BLOG
FRAME 4000 and 5000 Series LCD Mounting Kit: Everything You Need to Know
The CORSAIR FRAME 4000 and 5000 Series LCD Mounting Kits are small upgrades with a big visual payoff. It replaces the upper glass side panel of your FRAME case with a new panel and bracket combo designed to hold the CORSAIR XENEON EDGE 14.5" touchscreen display inside the chassis itself, instead of mounting it to the outside. For builders who already own (or are eyeing) a XENEON EDGE, this kit turns the top of your case into a built-in dashboard for sensor data, music controls, Discord, Twitch chat, animated wallpapers, or anything else you want to put on a 14.5" touchscreen.
Build your own custom FRAME 4000 Case with the FRAME Configurator.

Specs
| Compatible cases | CORSAIR FRAME 4000 series and FRAME 5000 series |
|---|---|
| Compatible display | CORSAIR XENEON EDGE 14.5" touchscreen (sold separately) |
| Material | Tempered glass upper side panel with integrated steel mounting bracket |
| Mounting hardware | 2x 1/4"-20 screws (included) |
| Display connection | DisplayPort + USB Type-C (or single USB-C with Alt-DP) |
| Installation time | Approximately 30 minutes |
| Warranty | 2-year limited warranty |
What's in the Box?
The kit includes:
- 1x Upper Glass Side Panel: A direct replacement for your FRAME case's existing upper glass side panel, with the bracket cutout pre-machined.
- 1x LCD Screen Mounting Bracket: A steel bracket sized specifically for the XENEON EDGE 14.5" display.
- 2x 1/4"-20 Screws: Standard tripod-mount-style screws used to secure the EDGE to the bracket.
The XENEON EDGE display itself is sold separately.
Compatibility and Cables
The kit is purpose-built for the CORSAIR FRAME 4000 and FRAME 5000 series cases. The replacement glass panel matches the original FRAME panel dimensions exactly, so there's no chassis cutting, drilling, or trimming required. If you already own a FRAME case and you've been on the fence about adding a XENEON EDGE, this is the cleanest path to getting one inside your build.
On the cable side, the XENEON EDGE typically wants two connections: a DisplayPort run from your GPU for video, and a USB Type-C run for power and touch input. There's a nice shortcut here, though. If your motherboard has a USB Type-C port that supports DisplayPort Alternate Mode (Alt-DP), you can drive the entire display over a single USB-C cable. That's a noticeably cleaner cable run, and worth checking your motherboard spec sheet for before you start routing.
Why Mount the XENEON EDGE Inside Your Case?
The XENEON EDGE ships with a magnetic mount, and plenty of people simply attach it to the outside of their case and call it done. That works fine, but moving the display inside the top panel changes the build in a few meaningful ways.
First, the display sits behind tempered glass, which protects it from bumps, dust, and the occasional cat tail. Second, your DisplayPort and USB-C runs disappear inside the chassis instead of trailing out the side, which keeps the front of your build clean. Third, and most importantly, the top of your case becomes an integrated dashboard rather than an accessory bolted to it. The XENEON EDGE stops feeling like an add-on and starts feeling like part of the case.
And because the EDGE is mounted in the top panel rather than buried somewhere awkward, it's still a touchscreen you can actually reach. If you use it for more than a sensor panel, like Twitch chat overlays, Discord controls, or media playback, that matters. Top-mounted keeps the touch experience intact.
Installation Process
The full step-by-step lives in the official Quick Start Guide, but the process is short enough to summarize in four steps. Plan on roughly 30 minutes if you're working carefully.
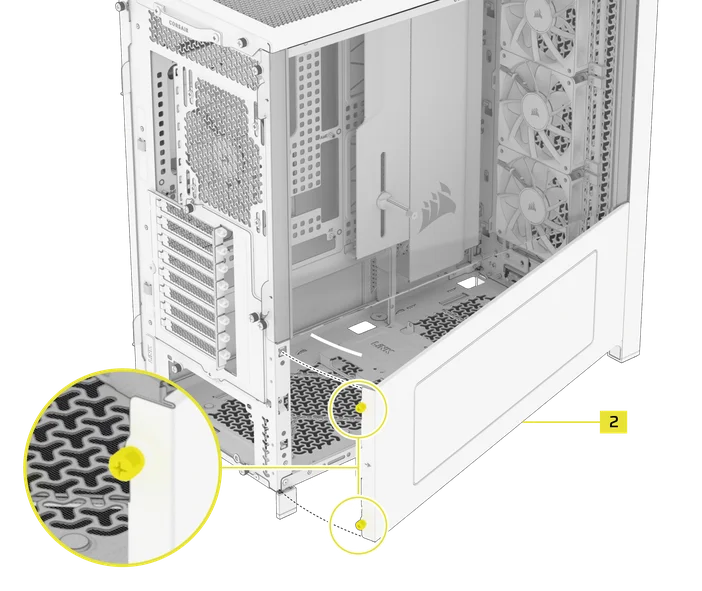
- Step 1, Strip the case down: Remove both side panels, the steel top panel, your GPU, and the PSU shroud so you have unobstructed access from above. On the FRAME 5000D the PSU shroud comes out with two screws and a lift, so it's quick.
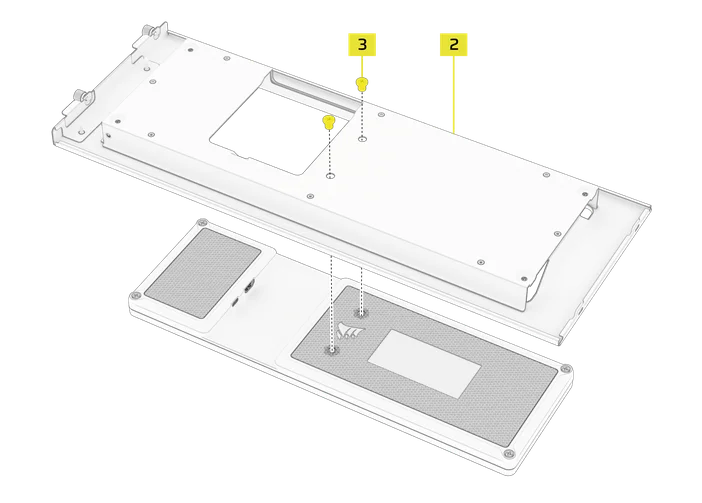
- Step 2, Mount the display: Attach the XENEON EDGE to the LCD Screen Mounting Bracket using the two 1/4"-20 screws included in the kit.
- Step 3, Route the cables: Run your DisplayPort and USB Type-C cables through the case's dedicated openings and connect them to the display. Do this before you drop the bracket into place, not after, it's much easier with the panel out.
- Step 4, Reinstall the panels: Set the new glass panel into position, secure it with the captive screws, and reattach the steel top panel.
Handle the new glass panel like glass, because it is glass. It's tempered, but tempered glass still chips and cracks if you set it on a hard surface or drop a screwdriver on it. Lay a towel on your work area before the panel comes out of the box, and clean the fingerprints off both sides right before you button everything back up.
Things to Know Before You Order
There are a few things to be aware of to be aware of so the kit doesn't catch you off guard once it arrives.
- The PSU shroud has to come out: To make room for the bracket, the included PSU shroud needs to be removed during installation. At the time of this writing it's a permanent removal, so if you have top-mounted fans or a cable layout that depends on the shroud, plan accordingly. CORSAIR has confirmed a smaller, compatible PSU shroud is on the way to address this exact concern.
- You may lose some RGB: The new glass panel doesn't have the same quarter-mesh channel as the stock FRAME panel, which means there's no longer a tidy place to route accessories like Aurora light strips. If you've got an RGB PSU cable running up that side of the case, the bracket will cover it, so it's not doing much for you anymore. Worth pulling before install to keep things clean.
The FRAME 4000 and 5000 Series LCD Mounting Kit isn't a flashy product on its own, but it's the kind of accessory that completely changes how a build looks. For around 30 minutes of work and three parts in the box, you turn the top of your FRAME case into an integrated 14.5" touchscreen dashboard that protects the display behind glass, hides your cable routing, and still lets you tap the screen during streams and games. If you already own a FRAME case and a XENEON EDGE, or you're planning to pick up both, this kit is the cleanest official way to bring them together.
ENREGISTREMENT DU PRODUIT
JOIN OUR OFFICIAL CORSAIR COMMUNITIES
Join our official CORSAIR Communities! Whether you're new or old to PC Building, have questions about our products, or want to chat about the latest PC, tech, and gaming trends, our community is the place for you.