This guide walks you through using CORSAIR’s firmware update utility on Linux and explains one Linux‑specific step you may need so your browser can talk to USB/HID devices. If the utility shows your device but the Current firmware field is “–”, or your browser console mentions NotAllowedError: Failed to open device, you’re in the right place. This exact symptom appears on Linux and stems from default HID permissions, not from your device.
Step 1: Open the Firmware Update Utility
- Launch your Chromium‑based browser.
- Open the CORSAIR Firmware Update Utility.
- Click Add Device → Authorize Access, then select the device(s) from the system dialog.
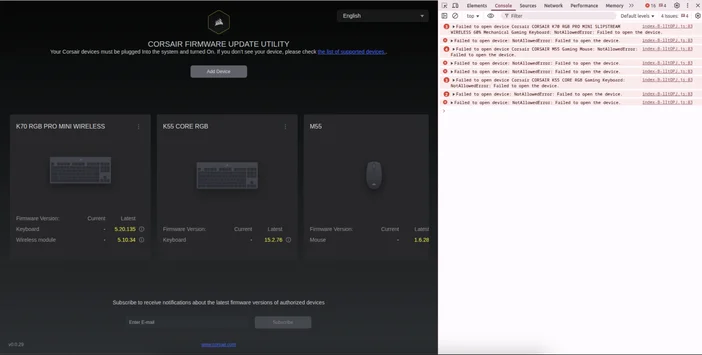
If you immediately see "Current: – "in the device tile (as in our screenshot) or the update button stays disabled, continue to Step 2.
Step 2: Fix Linux HID permissions (one‑time setup)
Find your device’s Vendor ID (VID) and Product ID (PID)
- Connect the device, then run:
lsusb
- Look for a line like ID 1234:5678 … — here 1234 is the VID and 5678 is the PID.
- Tip: If you have multiple CORSAIR devices or a receiver + device pair, note each VID:PID pair you’ll add one rule per pair.
Create a udev rule for WebHID access
- Create a new rules file:
sudo nano /etc/udev/rules.d/99-corsair-hid.rules
- Add one line per device (replace 1234 and 5678 with your actual IDs):
SUBSYSTEM=="hidraw", ATTRS{idVendor}=="1234", ATTRS{idProduct}=="5678", MODE="0666"
- Save and exit, then reload and apply the rule:
sudo udevadm control --reload-rules
sudo udevadm trigger
- Unplug and reconnect the device, then reload the updater page. Adding this rule made the utility detect the firmware version correctly.
SUBSYSTEM=="hidraw", ATTRS{idVendor}=="1234", ATTRS{idProduct}=="5678", MODE="0660", GROUP="plugdev"
- Then add yourself to plugdev :
sudo usermod -aG plugdev $USER
- Afterwards log out/in. Use the approach your organization’s security policy prefers.
Step 3: Authorize and connect in the updater
- Back in the updater, click Add Device → Authorize Access again and select the device.
- You should now see Current populated on the device tile (the “–” should be gone and should now show the firmware version of your device.)
Step 4: Update the firmware
- Select the device tile to view details.
- If Latest is higher than Current, click Update.
- Keep the device connected and powered until the progress completes.
- For wireless gear, update both parts when prompted:
- The receiver/dongle (USB)
- The device itself (often requires a USB cable or the device powered on and paired)
One‑shot copy/paste (replace VID/PID as needed)
# Replace the example VID/PID pairs with your actual IDs from lsusb
sudo tee /etc/udev/rules.d/99-corsair-hid.rules >/dev/null <<'EOF'
SUBSYSTEM=="hidraw", ATTRS{idVendor}=="1234", ATTRS{idProduct}=="5678", MODE="0666"
# Add more lines here if you have additional devices/receivers
EOF

sudo udevadm control --reload-rules
sudo udevadm trigger
echo "Unplug/replug your device(s), then authorize them in the updater."
Do I need this on Windows or macOS?
No this specific udev step is for Linux. The issue did not reproduce on Windows 11 or macOS.
Which Linux distros are known to work?
Most mainstream distros like Ubuntu should work
Why use per‑device rules instead of vendor‑wide rules?
Granting access per VID/PID is precise and minimizes exposure. If you understand the trade‑offs, vendor‑wide rules are possible but less restrictive.
JOIN OUR OFFICIAL CORSAIR COMMUNITIES
Join our official CORSAIR Communities! Whether you're new or old to PC Building, have questions about our products, or want to chat about the latest PC, tech, and gaming trends, our community is the place for you.