매뉴얼 | 빠른 시작 가이드
SABRE v2 PRO WIRELESS MG
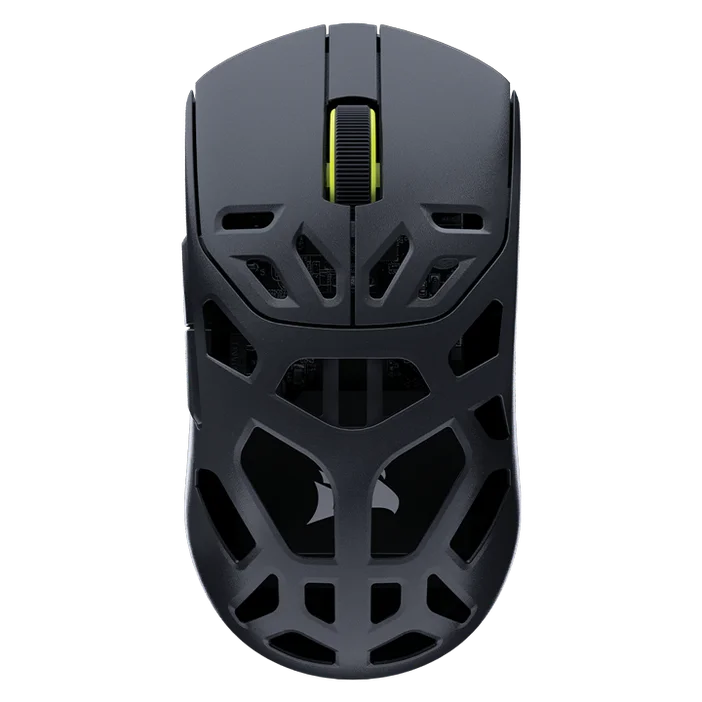
마그네슘 합금 게이밍 마우스
마우스 충전
중요: SABRE v2 PRO WIRELESS MG는 처음 사용하기 전에 완전히 충전해야 합니다. 최상의 환경을 위해 CORSAIR WEB HUB를 통해 펌웨어를 업데이트하세요.
USB 충전/데이터 케이블(L)을 사용하여 마우스를 PC의 사용 가능한 USB 2.0 또는 3.X 포트에 연결합니다.
마우스의 중간 클릭/스크롤 휠(C) 아래에 있는 표시등은 배터리 상태에 따라 켜지고, 충전이 완료되면 녹색으로 켜집니다.
마우스에 대해 알아보기
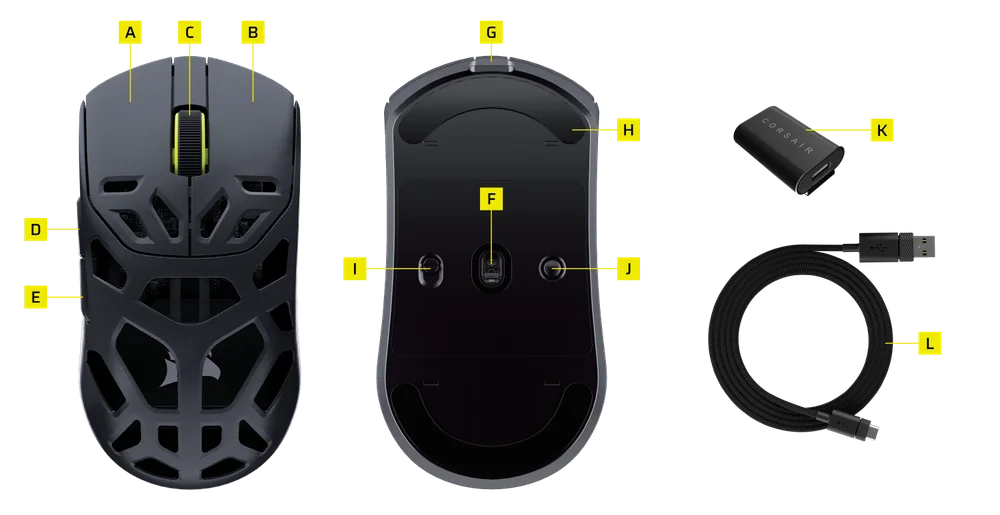
- 왼쪽 마우스 버튼
- 오른쪽 마우스 버튼
- 가운데 클릭 / 스크롤 휠
- 앞으로 버튼
- 뒤로 버튼
- MARKSMAN S 광 센서
- USB 충전 / 데이터 포트
- 100% 버진 등급 UPE 마우스 스케이트
- 전원 / 무선 모드 스위치
- DPI 버튼 & BLUETOOTH 페어링 버튼(3초)
- USB 무선 리시버
- USB 충전/데이터 케이블
2.4GHz 무선 설정
- USB 무선 리시버(K)를 USB 충전/데이터 케이블(L)에 연결한 후, 케이블의 다른 끝을 PC의 전면 패널에 있는 사용 가능한 USB 2.0 또는 3.x 포트나 근처의 USB 포트에 연결합니다.
- 전원/무선 모드 스위치(I)를 2.4GHz 무선으로 전환하여 마우스의 전원을 켭니다.
- 리시버에 연결되면 중간 클릭/스크롤 휠(C) 아래의 LED 표시등이 녹색으로 켜집니다.
BLUETOOTH 설정
Bluetooth 무선은 일상적인 컴퓨팅 작업, 생산성 및 사무실 애플리케이션에 가장 적합합니다.
- Bluetooth 4.0 이상을 지원하는 장치에서 Bluetooth 페어링을 시작합니다.
- 전원/무선 모드 스위치(I)를 Bluetooth로 전환하여 마우스의 전원을 켭니다.
- 연결되면 가운데 클릭/스크롤 휠(C) 아래의 LED 표시등이 파란색으로 깜박이고, 파란색으로 점등됩니다.
- BT 페어링 장치를 다시 페어링하거나 변경해야 하는 경우 우선 BT 모드를 전환합니다. DPI 버튼 & Bluetooth 페어링 버튼(J)을 3초 동안 길게 누르거나 LED 표시등이 파란색으로 깜박일 때까지 눌러 BT 페어링 모드로 들어갑니다.
*SABRE v2 PRO WIRELESS MG는 1개의 기기에만 페어링할 수 있습니다. 다른 장치와 페어링해야 하는 경우 재페어링 모드로 전환하여 페어링 프로세스를 초기화합니다.
DPI 프로필 순환
빠른 구성을 위해 DPI 순환을 사용할 수 있습니다.
- 다음 DPI 단계로 전환하려면 DPI 버튼(J)을 한 번 누릅니다.
- 해당 DPI 레벨로 전환하면 마우스 휠의 표시등이 해당 DPI 색상으로 3회 깜박인 후 꺼집니다.
- 다음 DPI 단계로 전환하려면 위 단계를 반복합니다. 5단계까지 DPI 단계를 순환한 후 1단계로 돌아갑니다.
고급 구성은 CORSAIR WEB HUB를 통해 수행할 수 있습니다.
마우스 상태 및 표시
무선 연결 및 배터리 상태는 가운데 클릭/스크롤 휠(C) 아래의 표시등을 통해 전달됩니다.
| DPI 상태 - 사전 정의됨 | LED 표시등 |
| 단계 1 ~ 400 | 빨간색 |
| 단계 2 ~ 800 | 파란색 |
| 단계 3 ~ 1200 | 녹색 |
| 단계 4 ~ 1600 | 노란색 |
| 단계 5 ~ 2000 | 자주색 |
| 배터리 상태 | LED 표시등 |
| 배터리 부족 시 충전 | 빨간색으로 깜빡임 |
| 배터리 중간 시 충전 | 녹색으로 깜빡임 |
| 배터리 가득 참 | 녹색 점등 |
| 배터리 최저, 충전 필요 | 빨간색으로 깜빡임 |
STEP-BY-STEP MOUSE SETUP GUIDE
Step 1 – Connect Your SABRE v2
A. Plug in the SABRE v2 PRO WIRELESS MG’s receiver via Type-C.
B. Make sure the power switch on the mouse is set to "2.4 GHz".
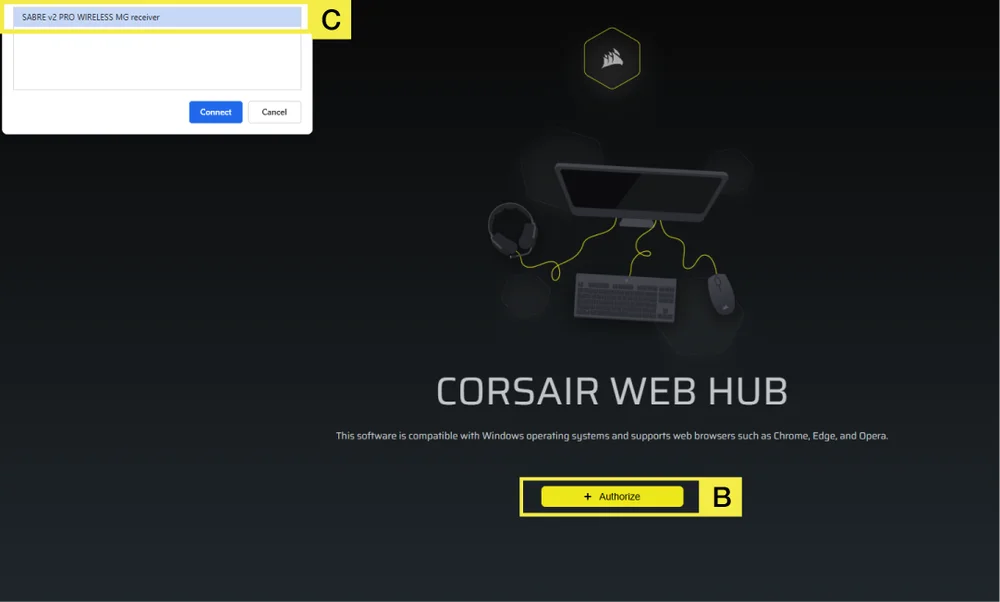
Step 2 – Open CORSAIR WEB HUB and Select the Mouse
A. Go to https://www.corsair.com/web-hub/index.html.
B. Click [Authorize].
C. Choose SABRE v2 PRO WIRELESS MG receiver.
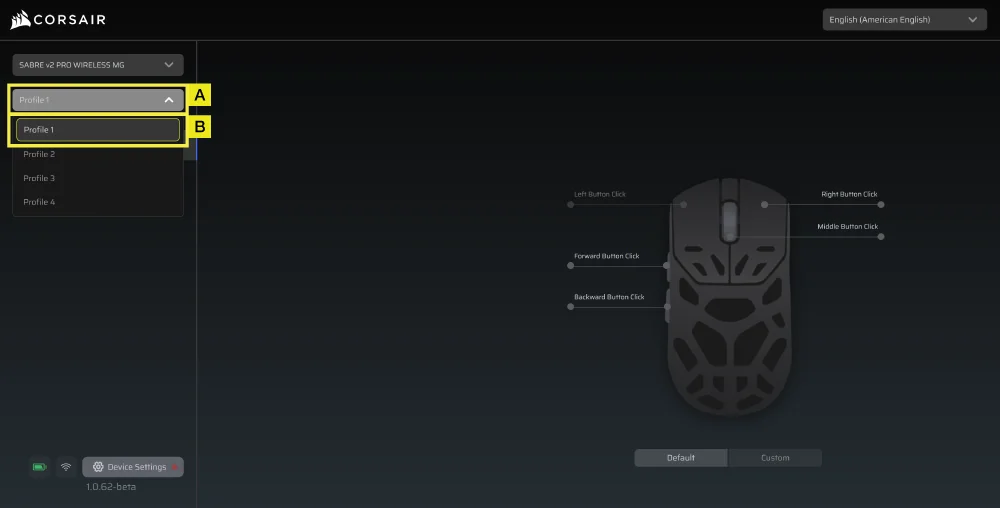
Step 3 – Create or Select a Profile
A. At the top-left, open the profile dropdown Menu.
B. Click the profile you want to edit (for example: “Profile 1”).
C. This profile will store your DPI, and button assignments.
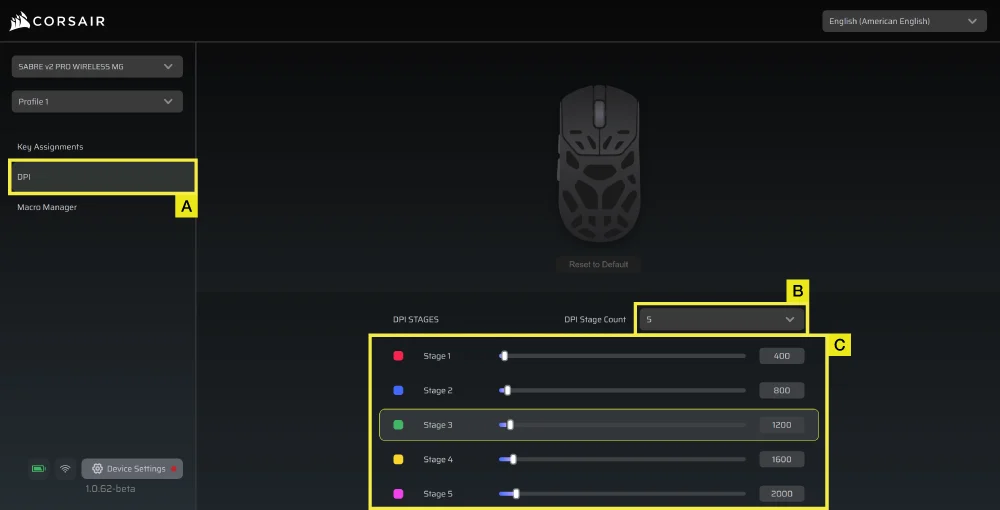
Step 4 – Set DPI Levels
A. Click [DPI] in the left sidebar.
B. Choose how many DPI stages you want (1~5).
C. Enable the DPI stages you want to use (for example, 800/1200/1600).
Recommended starting DPI:
- Desktop/general: 1200–1600 DPI
- FPS games: 800–1200 DPI
- MOBA/MMO: 1600–2400 DPI.
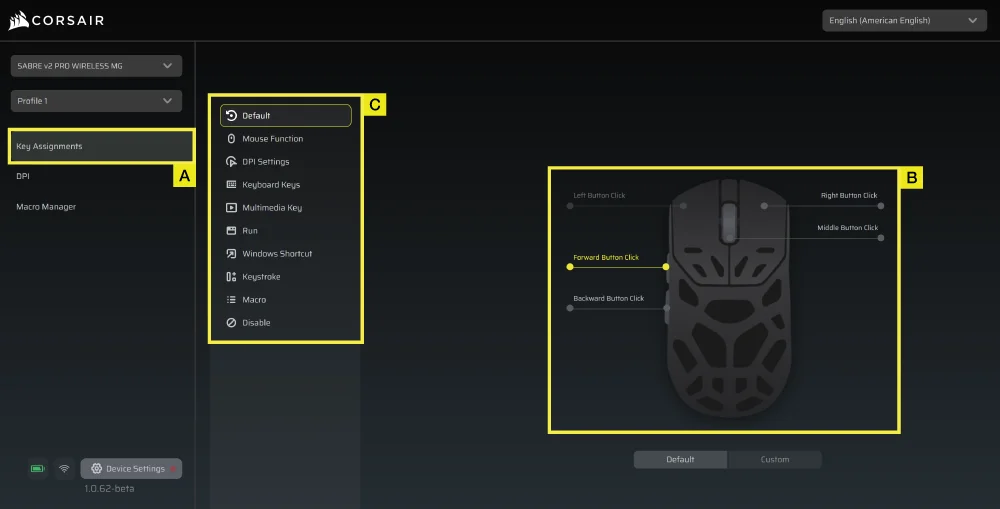
Step 5 – Remap Buttons (Actions / Key Assignments)
A. Click [Key Assignments] in the left sidebar.
B. Click the button on the mouse diagram you want to change.
C. Choose the Assignment Type:
- Keyboard (remap to a key like R, E, or P)
- Macro (record multiple keystrokes)
- etc.
D. Confirm the assignment and test it.
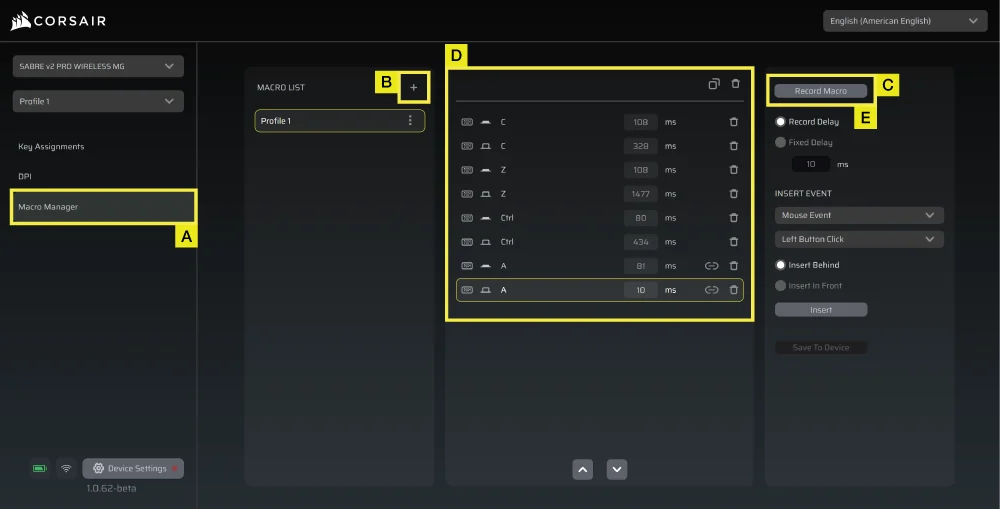
Step 6 – Set Macro Manager
A. Click [Macro Manager] in the left sidebar.
B. Click [ + ] to add a new Macro (For example: “Profile 1”).
C. Click [Record Macro] on the right.
D. Press the keyboard keys or mouse events you want to record.
E. Click [Record Macro] again to stop recording.
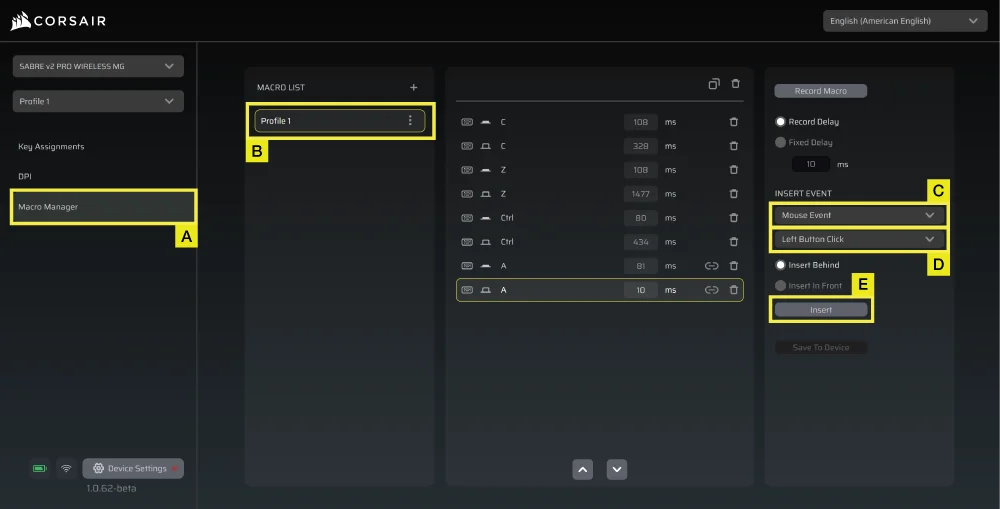
Step 7 – Insert Macro Events Manually
A. Click [Macro manager] in the left sidebar.
B. Choose the Macro you want to edit.
C. At the insert event bar, choose whether you want to insert keyboard or mouse events with the first dropdown menu.
D. Choose the event you want to insert with the second dropdown menu.
E. Click [Insert].
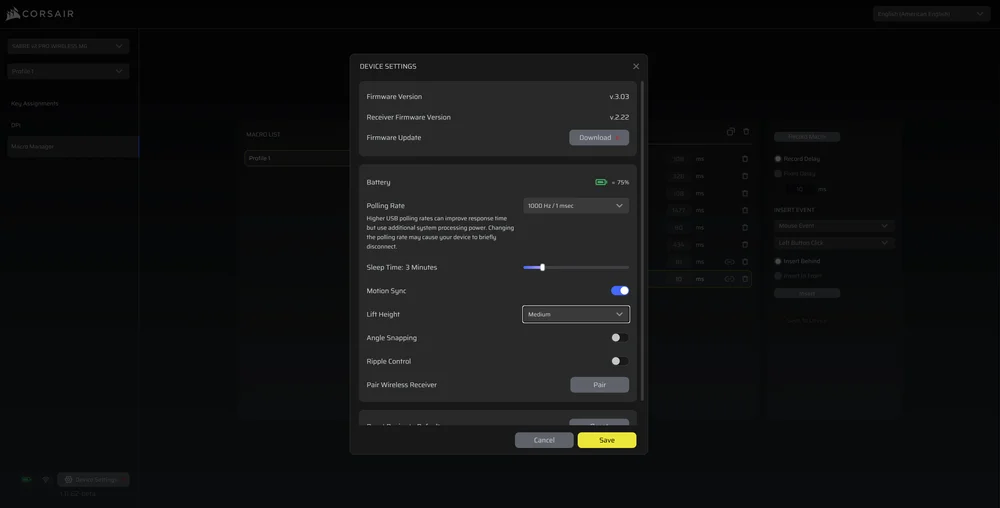
Step 8 – Device Setting
- Click Device Setting at bottom left.
- Device Settings.
- Battery – Wireless connectivity or battery status.

-
Polling Rate – Select [ 1000 Hz / 1 msec ] polling for 1000Hz polling.

- Sleep Time – Adjust time after mouse transitions to Sleep Mode.

-
Motion Sync – Aligns mouse movement data with USB polling intervals to deliver more consistent and stable cursor tracking.
- Lift Height – Sensor cut off height.

-
Angle Snapping – Smooths out mouse movement via sensor prediction when ON.
-
Ripple Control – Smooths mouse movement by filtering out small, unintended jitter at the cost of slightly reduced raw input precision.
-
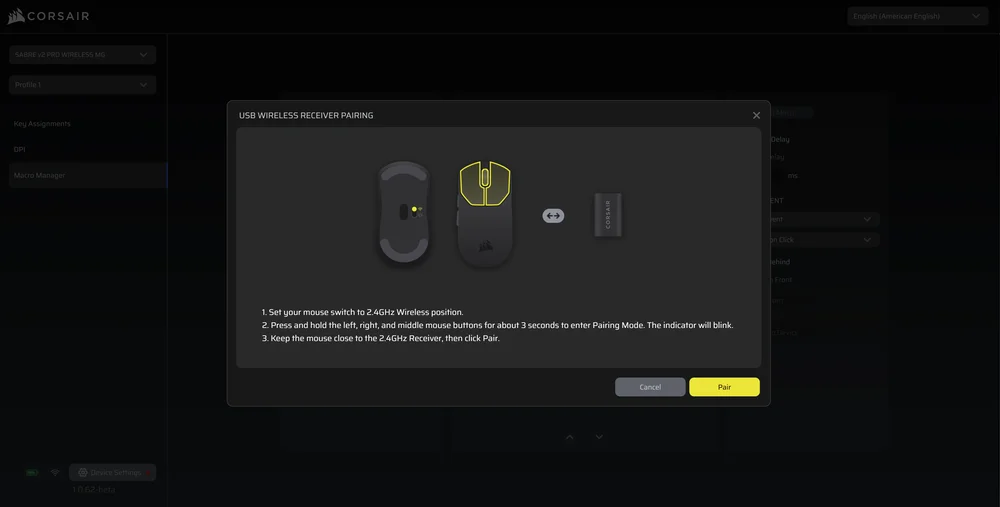
Pair Wireless receiver – Pair or reset the wireless receiver.
-
Reset Device Default – Reset your Saber v2 Pro Ultralight Wireless to default setting.
Step 9 – Update Firmware
A. Click [Device Setting] at bottom left.
B. Click [Check for Updates] to ensure you are running the latest device firmware.
C. Follow the steps to update the firmware if needed.
Step 10 – Pair Wireless Receiver
A. Click [Device Setting] at bottom left.
B. Click [Pair].
C. Follow the steps to pair the USB receiver.
배터리 제거 정보
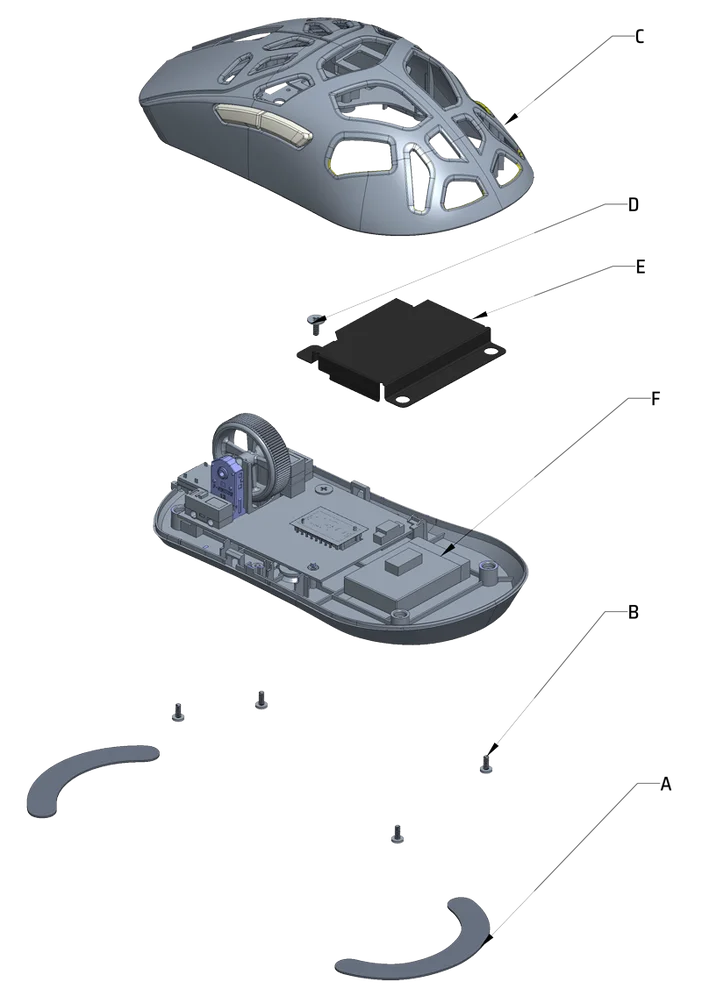
A: Remove feet x2
B: Remove screws x4
C: Disassemble top case sub assy
D: Remove screw x1
E: Remove battery cover
F: Remove battery
본 제품에서는 충전식 배터리가 사용되며 제품이 고장 난 경우 폐기 및 재활용 시 안전 지침을 반드시 준수해야 합니다. 폐기 및 재활용을 위해 배터리를 안전하게 제거하려면 아래 그림과 함께 번호로 표시된 단계를 따르십시오.
CORSAIR MEMORY, Inc.는 현지 법률 및 규정에 따라 중고 전자 하드웨어와 충전식 배터리의 재활용을 권장합니다.
배터리 정보
- M/N(型號): TW 602030
- 용량(전력량): 3.7V, 300mAh, 1.11Wh
- 배터리 세부 정보를 보려면 QR 코드를 스캔하세요

M/N(型號): RGP0184
등급(전압 및 전류): 5V
동글
M/N(모델): RGP0185
정격(電壓電流): 5V
FCC ID: 2AAFM-RGP0184(마우스)
FCC ID: 2AAFM-RGP0185(동글)
IC: 10954A-RGP0184(마우스)
IC: 10954A-RGP0185 (동글)

충전기가 공급하는 전력은 무선 장비에 필요한 최소 2.5와트 ~ 최대 10와트 사이여야 최대 충전 속도를 달성할 수 있습니다.
최상의 성능을 위해 5°C~40°C(41°F~104°F)의 온도에서 충전하는 것이 좋습니다.
저작권 / 법적 정보
© 2026 CORSAIR MEMORY, Inc. All rights reserved. CORSAIR and the sails logo are registered trademarks of CORSAIR in the United States and/or other countries. All other trademarks are the property of their respective owners. Product may vary slightly from those pictured.
