在组装电脑时,选择正确的 M.2 SSD 规格至关重要,因为这决定了 SSD 能否适配您的机箱和主板。不同主板对 M.2 SSD 规格的支持情况各不相同。要确认兼容性,请查阅主板的规格说明或用户手册。
“外形规格”指的是存储设备的尺寸和物理结构。多年来,2.5英寸和3.5英寸外形规格的SATA固态硬盘(SSD)和机械硬盘(HDD)一直是个人电脑组装的标准配置。但近年来,由于M.2外形规格在性价比、占用空间更小以及安装便捷等方面具有优势,它已成为存储设备的首选。
如果您刚刚购买了一块CORSAIR M.2固态硬盘来升级电脑,并且正在考虑如何安装它,本文将为您提供详细指南。
安装您的海盗船 M.2 固态硬盘
首先,您需要找出主板上的 M.2 插槽,请注意,根据主板型号的不同,这些插槽可能位于散热罩下方。如果您无法立即找到 M.2 插槽,请查阅主板说明书以确定其位置。
接下来,请确保将 M.2 垫片安装在 SSD 的正确位置。CORSAIR M.2 SSD 通常采用 2280 规格——请通过您的 M.2 SSD 产品页面再次确认其尺寸。您可以使用螺丝刀,或直接用手将垫片拧紧。
如果支架上已安装有 M.2 螺丝,请使用十字螺丝刀将其拧下——螺丝规格可能因主板型号而异。
如果您的 M.2 插槽位于盖板(即散热片或散热罩)下方,则会看到一块导热垫。如果导热垫上贴有塑料保护膜,请小心地将其撕下,以确保导热垫保持原位且完好无损。
如果您使用的是我们带散热片的 M.2 固态硬盘(例如MP600 PRO LPX),安装时可能需要将导热垫完全移除。
要安装 M.2 SSD,请以倾斜角度插入 M.2 SSD(如下图所示),然后将 M.2 SSD 轻轻平放于支架上。
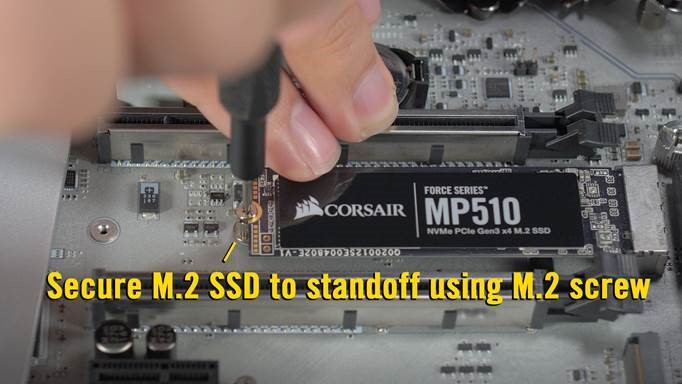
将 M.2 SSD 安装到位后,请使用之前拆下的 M.2 螺丝将其固定,或者通过主板上的机械卡扣(如有)进行固定。
注意:如果您安装的是未带散热片的 M.2 固态硬盘,且主板的 M.2 插槽位于挡板下方,请将挡板重新装回原位。
就这样,您的电脑现在已配备了一块 M.2 固态硬盘。
以下是旧文章
This article will teach you how to install your Corsair M.2 SSD.
NOTE: The instructions in this article only apply to the Corsair M.2 SSD, which has a form factor of 2280. If your M.2 has a different form factor, please refer to your motherboard manual for installation instructions.
Install your SSD
Before installing your SSD:
- If your M.2 SSD comes with a heatsink pre-installed and the M.2 slot on your motherboard already has a heatsink cover, remove the motherboard heat sink cover.
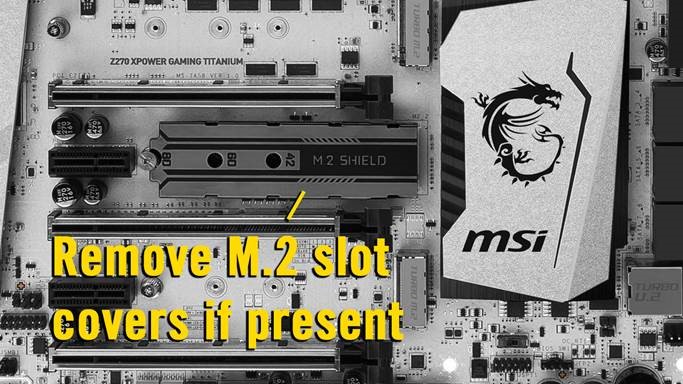
- If your motherboard has any standoffs pre-installed for short 2242 and 2260 M.2 SSDs, remove those standoffs to avoid damaging your 2280 M.2 SSD.
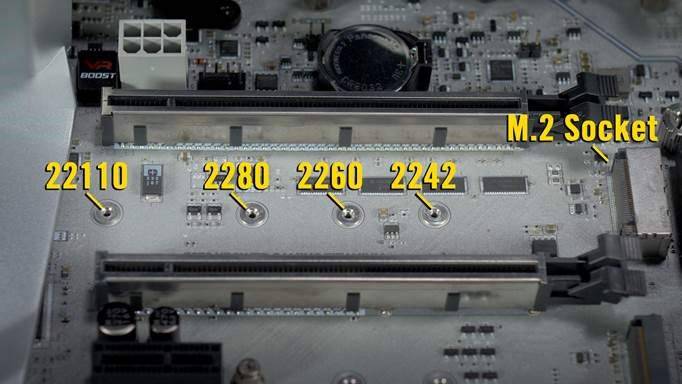
To install your SSD:
- If it isn't already installed, install the standoff in the 2280 socket.
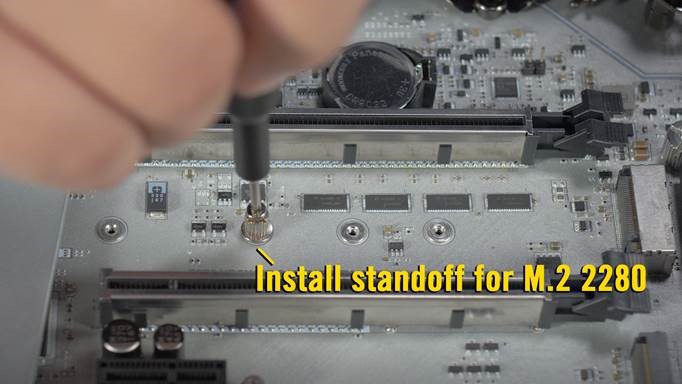
- Remove the mounting screw next to the M.2 slot.
- Gently insert the M.2 SSD into the M.2 slot.
- The M.2 slot is designed so that the M.2 SSD can only be inserted one way, according to the M key of the 2280 M.2 SSD. If the M.2 SSD doesn’t go in, do NOT force it in or you risk damaging your SSD and keyboard.
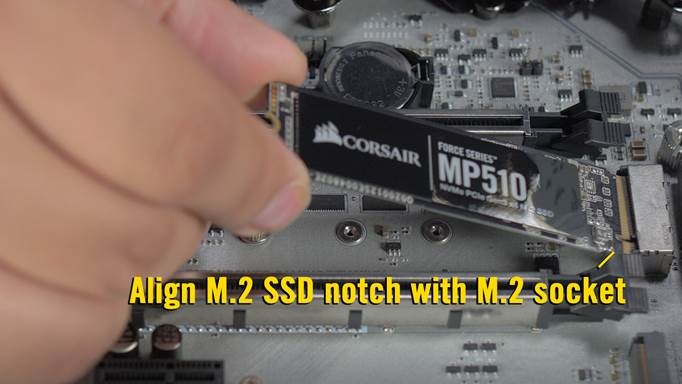
- The M.2 slot is designed so that the M.2 SSD can only be inserted one way, according to the M key of the 2280 M.2 SSD. If the M.2 SSD doesn’t go in, do NOT force it in or you risk damaging your SSD and keyboard.
- Press down on the M.2 SSD so the notch on the left of the drive lines up with the screw hole.
- Reinstall the screw to secure the M.2 SSD.
If you run into any issues or have further questions, contact our Customer Support.
Stay up to date with CORSAIR. Get our latest News, Guides, and Product Updates in your Google feeds.
Add CORSAIR as a preferred sourceWas this article helpful?
Feedback received
Thanks for helping us improve this article.
JOIN OUR OFFICIAL CORSAIR COMMUNITIES
Join our official CORSAIR Communities! Whether you're new or old to PC Building, have questions about our products, or want to chat about the latest PC, tech, and gaming trends, our community is the place for you.