KÄSIKIRJA | PIKAOPAS
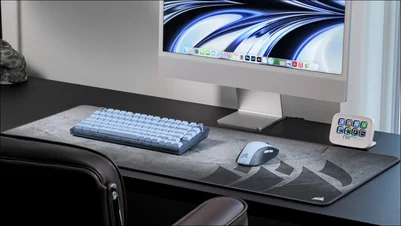
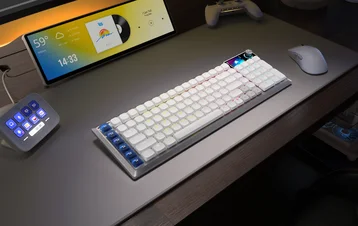
VANGUARD AIR 99 WIRELESS
OPTIS-MEKAANINEN PELINÄPPÄIMISTÖ
Englanninkielinen versio löytyy täältä - English
Jos sinulla on muita ongelmia, ota yhteyttä asiakastuki
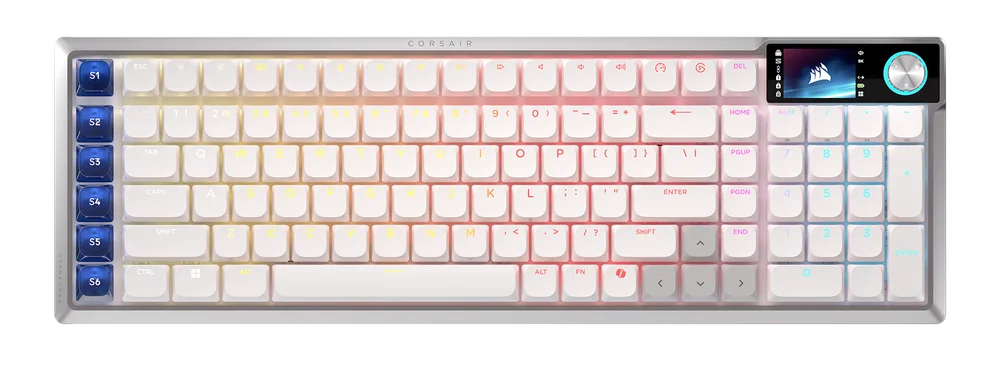
TUTUSTUMINEN NÄPPÄIMISTÖÖSI
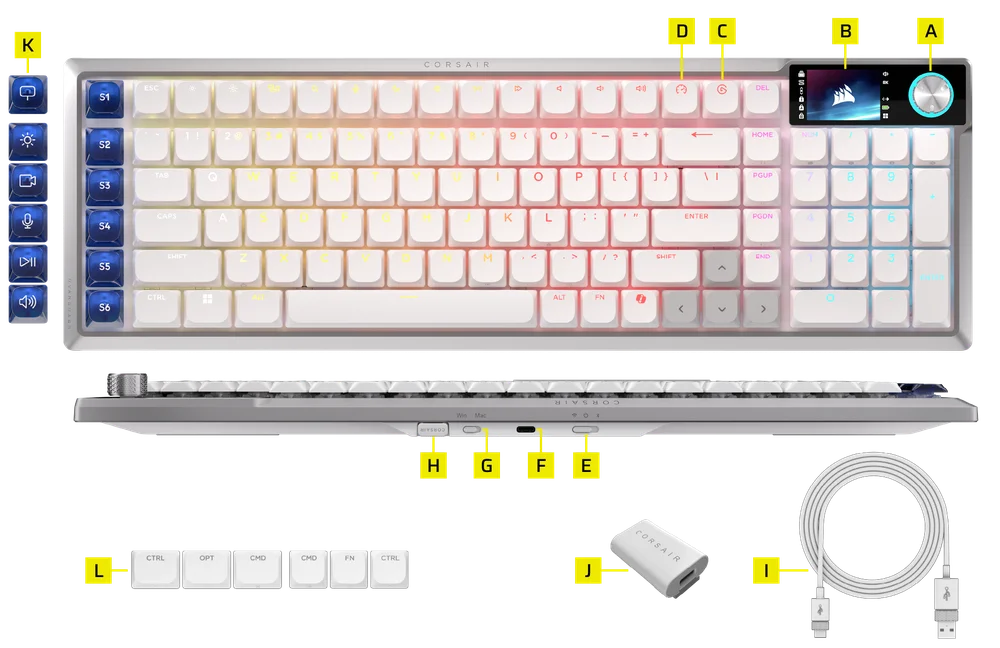
- KIERTONUPPI
- VÄRINÄYTTÖ
- ELGATO-AVAIN
- PELITILAPAINIKE
- 3-ASENTOINEN TILAKYTKIN
- USB Type-C -LIITÄNTÄ
- WIN MAC -TILAN VAIHTO
- LANGATON VASTAANOTIN
- USB-TYYPIN C – TYYPIN A -KAAPELI
- USB-TYYPPI-C–A-SOVITIN
- STREAM DECK STUDIO CONTROL -IKONIKUORISARJA
- MAC-NÄPPÄINKANNESARJA
TEKNISET TIEDOT
| ESITTELY | KUVAUS |
| Kotelomuoto | Kompakti täysikokoinen |
| Yläkansi | Alumiinilevy |
| Alareuna | Muovi |
| Asennustapa | Tiivistekiinnike |
| Äänenvaimennusvaahto (ylhäältä alas) |
5 kerrosta
|
| Värivaihtoehto | Musta / Valkoinen |
| Näyttö | 1,9 tuuman IPS-värinäyttö
Kuvan lataustiedot:
|
| Näppäinkannet (Pohjois-Amerikan ja Ison-Britannian näppäimistöasettelu) | PBT-kaksoisruiskutus |
| Näppäinkannet (muu asettelu) | ABS-yksittäislaukaus |
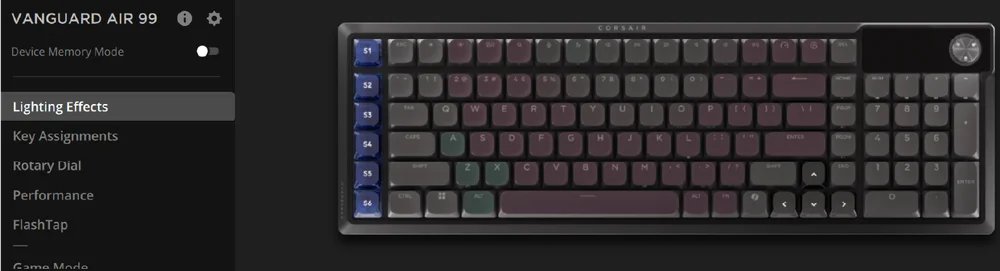
| Taustavalaistus | Yksittäiset LED-valot ja näppäinkohtaisesti ohjelmoitavat |
| LED-väri | RGB |
| Näppäinkytkimet | CORSAIR OPX Low Profile -näppäinkytkimet, 45 g:n painovoima, 1,5 mm:n painopiste, 2,5 mm:n kokonaisliike, 80 miljoonan painalluksen takuu |
| Yhteydet | 2,4 GHz:n Slipstream-langaton yhteys / Bluetooth / 1 x USB Type-A |
| Akun kesto |
|
| Akun tyyppi ja kemiallinen koostumus | Ladattava polymeerilitiumioniakku |
| Akun lataaminen |
|
| Akun kokoonpano | 1S1P |
| Paristojen lukumäärä | 1 |
| Soluja akkua kohti | 1 |
| Akun mallinumero | 2670155 |
| Akun kapasiteetti | 4170 mAh |
| Akun paino | 71 g |
| Akun jännite | 3,7 V |
| Akun wattitunnit | 15 429 Wh |
| Litiumpitoisuus | 3 % |
| Akun mitat | 159,0 (P) x 70,3 (L) x 3,5 (K) mm |
| Akun mitat (kaapeli mukaan lukien) | 309,0 (P) x 70,3 (L) x 3,5 (K) mm |
| Vaarallisten aineiden UN-numero | UN3480 |
| Matriisi | Täydellinen näppäinten ylikirjoitus (NKRO) ja 100-prosenttinen haamukirjoituksen esto |
| USB-tiedonsiirtonopeus |
Johdollinen: AXON 8 000 Hz Langaton: Todellinen 8 000 Hz |
| Laivalla olevat profiilit | 5 (1 laitteessa, 4 Web Hubissa) |
| Mediavalvonta | FN-pikanäppäimet / Valintakiekko |
| Pelitila | Pikanäppäin x1 |
| Stream Deckin lanseeraus | Pikanäppäin x1 |
| Monitoiminen ohjaus | Kiertonuppi x1 |
| SD-avaimet | 6 erillistä pikanäppäintä |
| Kirkkauden säätö | FN-pikanäppäimet / Valintakiekko |
| Säädettävä korkeus | Kyllä |
| Plug and Play -käyttö | Kyllä |
| Konsolien yhteensopivuus | Xbox One, Xbox Series X|S, PlayStation 4, 5 |
| Kaapeli | 1,8 m, USB Type-C – Type-A, irrotettava, sotkeutumaton kumijohto |
| Näppäinkappaleiden sarjojen paketti |
|
| Mitat | 425,63 (P) x 137,63 (L) x 26,27 (K) mm |
| Paino | 915 g |
| Takuu | Kaksi vuotta – sovelletaan paikallisia määräyksiä |

AXON-HYPERPROSESSOINTITEKNOLOGIA
CORSAIR AXON tarjoaa tehokkaan ja herkästi reagoivan näppäimistökokemuksen seuraavien ominaisuuksien ansiosta:
- Erittäin nopea näppäinpainallusten tunnistus ja käsittely
- Jopa 8 000 Hz:n hyper-polling (säädettävissä CORSAIR WEB HUB -laiteasetuksissa)
NÄPPÄIMISTÖN ASENNUS
Liitä näppäimistö USB-kaapelilla yhteensopivan laitteen vapaaseen USB Type-A -porttiin tai sitä parempaan porttiin, kuten:
| Windows-tietokone® | Apple Mac® |
Microsoft Xbox One* Microsoft Xbox Series X | S* |
Sony PlayStation 4** Sony PlayStation 5** |
*Näppäimistö on yhteensopiva heti käyttövalmiina; katso lisätietoja osoitteesta corsair.com/xbox-support.
**Katso kohta ”Yhteyden muodostaminen Sony PlayStationiin”.
YHTEYDEN MUODOSTAMINEN SONY PLAYSTATIONIIN
| PIKAKOMENTO | TOIMINTO | KÄYTTÖAIHE |
| FN+ |
Vaihda PlayStation-tilaan | |
| FN+ |
Palaa vakiotilaan |
YHTEYDEN MUODOSTAMINEN LANGATTOMASTI
- Kun USB-kaapeli kytketään, laite siirtyy automaattisesti USB-tilaan.
- Kun USB-kaapeli on irrotettu, vaihda kolmiasentoinen valitsin asentoon BT tai 2,4 GHz langattoman tilan ottamiseksi käyttöön.
- Kun kolmiasentoinen kytkin on asetettu BT-tilaan, laite voidaan lisätä suoraan Bluetoothin kautta.
| TILA | PIKAKOMENTO | TOIMINTO | SELITYS | LCD-näyttö |
| Langallinen | Ei saatavilla | Siirtyy automaattisesti USB-tilaan, kun kaapeli kytketään | Ei saatavilla | Kuvake |
| SLIPSTREAM Wireless | FN + Del | Pidä pikanäppäimiä painettuna 2 sekuntia, jotta 2,4 GHz:n pariliitostila otetaan käyttöön |
Del-näppäin:
|
Näkyvä kuvake: Pysyy aina näkyvissä, kun laite on 2,4 GHz:n tilassa, jos toiminto on käytössä |
| Bluetooth 1 | FN + Etusivu |
|
Koti-näppäin:
|
Näytettävä kuvake: Pysyy aina näkyvissä, kun laite on Bluetooth-tilassa, jos tämä asetus on käytössä |
| Bluetooth 2 | FN + PgUp | PgUp-näppäin:
|
||
| Bluetooth 3 | FN + PgDN | PgDN-avain:
|
LATAUS JA AKUN KESTÄVYYS

HUOMAUTUS: Laite sammuu automaattisesti, kun akun varaustaso laskee alle 5 %:n.
LCD-näytön akkunäytön väri ilmaisee akun nykyisen varaustason:
- Täysin vihreä (≥98 %): Täyteen ladattu
- Vihreä (51–97 %): Akku on lähes täynnä
- Keltainen (31–50 %): Akun varaustaso on keskitasoinen
- Punainen (0–30 %): Akun varaustaso on alhainen tai kriittinen
KÄYTTÖTILAT
Näppäimistössä on kaksi käyttötilaa:
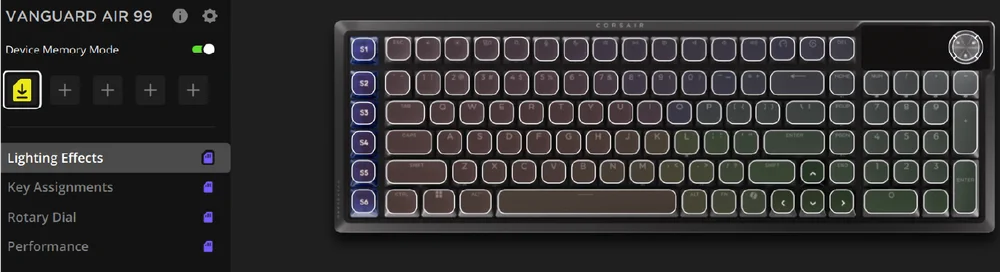
- Laitteistotila – Kun CORSAIR Web Hub -sovellusta ei ole käynnissä tai näppäimistö on kytketty laitteeseen, joka ei tue CORSAIR Web Hub -sovellusta, näppäimistö toimii laitteistotilassa, jossa käytetään laitteen sisäiseen muistiin tallennettuja profiileja ja asetuksia.
- Verkkopohjainen tila – Siirry CORSAIR Web Hub -sivustolle osoitte essa http://corsair.com/web-hub. Näppäimistö toimii verkkopohjaisessa tilassa käyttäen laitteen sisäiseen muistiin tallennettuja profiileja ja asetuksia.
- Elgato Stream Deck -tila – Siirry alla olevaan linkkiin ja lataa ohjelmisto, jolla hallitset kuuden SD-näppäimen Stream Deck -integraatiota: https://www.elgato.com/tw/zh/s/downloads
| TOIMINTO | LAITETILA | VERKKOPOHJAINEN TILA |
| Tallennus ja profiilit | 8 Mt enintään 5 profiilille | 5 profiilia |
| Luo uusia profiileja | Ei saatavilla | Luo CORSAIR Web Hubissa |
| Luo valoefektejä | Ei saatavilla | Luo CORSAIR Web Hubissa |
| Luo näppäinmääritykset | Ei saatavilla | Luo CORSAIR Web Hubissa |
| Valaistustasojen enimmäismäärä | 20 | 5 |
LAITTEISTON YLEISKATSAUS
FN-pikanäppäimet Valonilmaisin
Kun painat FN-näppäintä, kaikki valaistus sammuu hetkellisesti, paitsi niissä näppäimissä, joihin on määritetty lisätoimintoja tai makroja; niiden taustavalaistus syttyy.
- Oletusväri on VALKOINEN
- Käyttäjät voivat mukauttaa värimerkintöjä CORSAIR Web Hubissa
Käytössä olevan profiilin värimerkintä on etusijalla FN-pikanäppäinten valaistukseen nähden.
PELITILAN TOIMINTO
Ota kilpailukäyttöön optimoidut asetukset käyttöön hetkessä GAME MODE -painikkeella (D).
| TILA | TOIMINNOT | HUOMAUTUKSET | NÄYTTÖ |
| Oletustila (pelitila pois päältä) |
|
Tehdasasetukset | Kuvake |
| Pelitila päällä |
|
Voidaan mukauttaa CORSAIR Web Hub -palvelussa |
STREAM DECKIN KÄYNNISTYSTOIMINTO
Toimintopalkki (1)
Kun liität näppäimistön ensimmäisen kerran Stream Deck -sovelluksen ollessa käynnissä, toimintopalkki tulee näkyviin näytön vasemmalle puolelle.
- Toimintopalkissa näkyvät kuusi toimintoa, jotka on määritetty kuudelle SD-näppäimelle.
- Kuuden toiminnon alapuolella näkyvä kuvake osoittaa, mikä toiminto on määritetty Elgato-näppäimelle.
Huomaa: Tämän palkin seitsemän toimintoa ovat vain visuaalisia viitteitä – niitä ei voi klikata tai käynnistää hiirellä. Ne kaikki on aktivoitava näppäimistön fyysisillä SD-näppäimillä.
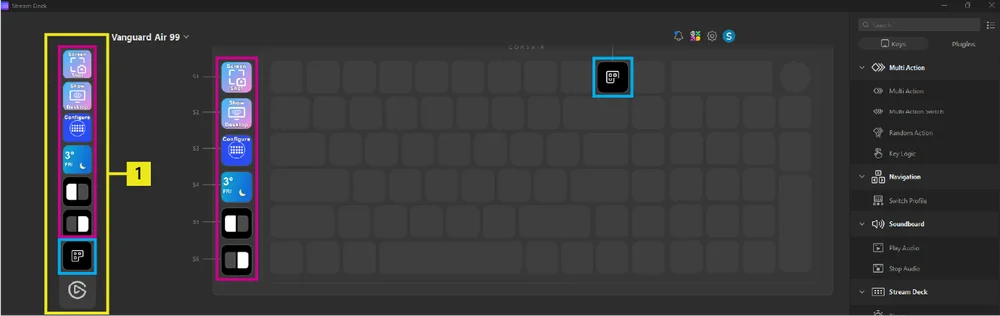
Alin toiminto on aina Stream Deck -sovelluksen avaaminen. Painamalla tätä painiketta avaat Stream Deck -sovelluksen.
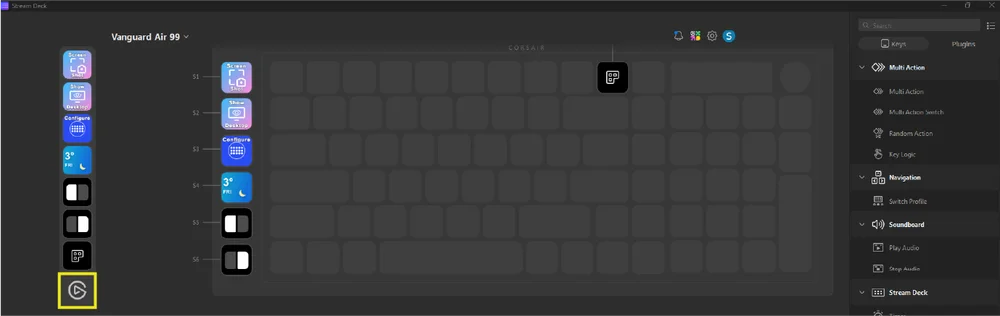
Toimintapalkin ottaminen käyttöön tai poistaminen käytöstä
- Etsi Stream Deck -sovelluksen kuvake Windowsin tehtäväpalkista
- Napsauta kuvaketta hiiren kakkospainikkeella, niin laitteen nimi (Vanguard Air 99) tulee näkyviin
- Vie hiiri laitteen nimen päälle
- Valitse:
- Näytä toimintapalkki (jos se on tällä hetkellä piilotettu), tai
- Piilota toimintapalkki (jos se on tällä hetkellä näkyvissä).

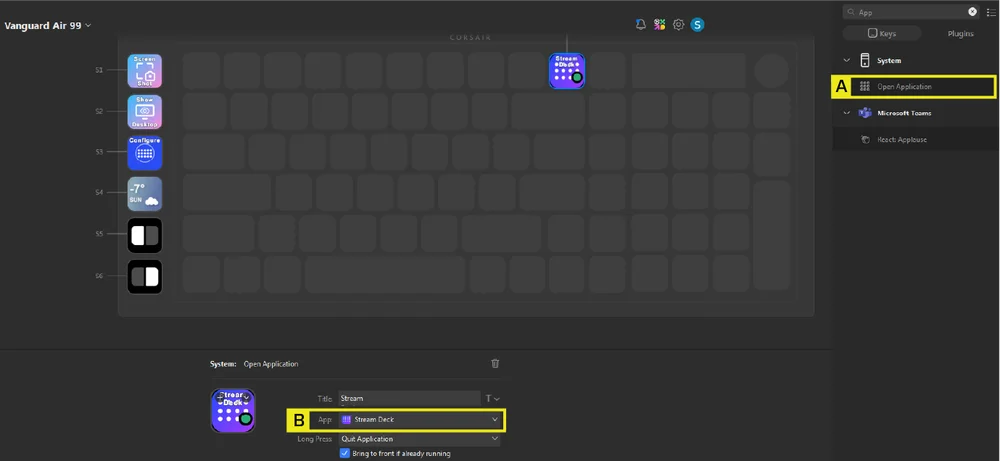
Elgato Key (C)
Nykyinen toiminta:
- Oletusasetus: Käynnistä Virtual Stream Deck

- Mukautettu asetus: Vedä ja pudota mikä tahansa näppäin oikeanpuoleisesta paneelista tämän näppäimen päälle. Esimerkki: Määritä tämä näppäin käynnistämään Stream Deck -sovellus
-
- Vedä ”Avaa sovellus” -painike ja pudota se tämän painikkeen päälle
- Valitse sovellusten avattavasta luettelosta ”Stream Deck”
Tulevat toimet (tavoitteena valmius toisella vuosineljänneksellä):
- Jos Stream Deck -sovellus on jo asennettu, mutta ei ole käynnissä: Painamalla näppäintä Stream Deck -sovellus käynnistyy automaattisesti.
- Jos Stream Deck -sovellus on jo asennettu ja käynnissä: Näppäimen painaminen käynnistää automaattisesti Virtual Stream Deck -sovelluksen.
- Jos Stream Deck -sovellusta ei ole asennettu: Näppäimen painaminen ohjaa käyttäjän Stream Deck -sovelluksen asennussivulle.
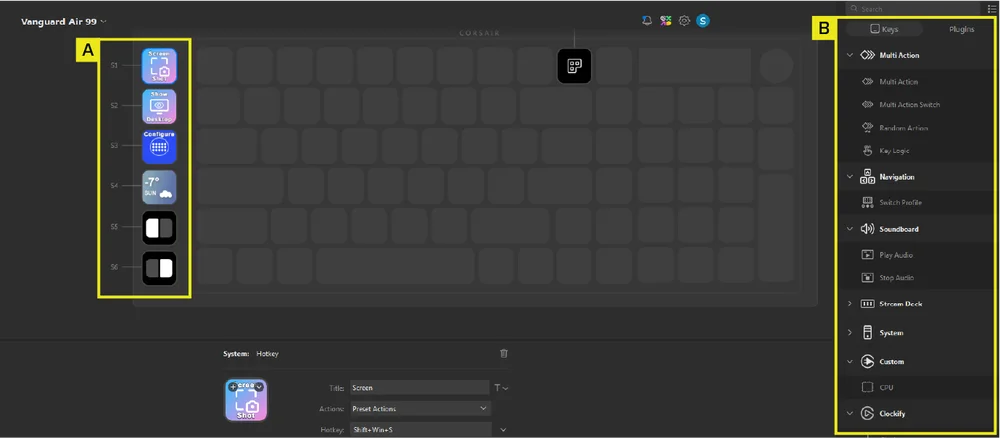
Stream Deck -integraatio 6 SD-näppäimelle
Kuudelle SD-näppäimelle (A) on määritetty kuusi oletustoimintoa. Voit muokata näitä milloin tahansa vetämällä ja pudottamalla näppäimiä oikeanpuoleisesta paneelista (B) haluamallesi SD-näppäimelle.
Kiertonuppitoiminto
| TILA | PIKAKOMENTO | TOIMINTO | SELITYS | NÄYTTÖ |
| Äänenvoimakkuuden säätö (oletusasetus) | FN+ NUM / |
|
NUM / Yhtenäinen valkoinen |
Kuvake |
| Vierityspalkki (pystysuora) | FN+ NUM * |
|
NUM* Yhtenäinen vihreä |
|
| Vierityspalkki (vaakasuora) | FN+ NUM * |
|
NUM* Yhtenäinen keltainen |
|
| Taustavalon säätö | FN+ NUM |
|
NUM Yhtenäinen punainen |
|
| Zoomin hallinta | FN+ NUM- |
|
NUM - Yhtenäinen sininen |
|
| Makrotallennus | Pidä FN- ja M-näppäimiä painettuna 2 sekuntia | Aloita makrotallennus ja käsittele valitsimen painallusta kuten mitä tahansa muuta tavallista kytkintä |
M Yhtenäinen keltainen |
3-ASENTOINEN TILAKYTKIN
| TOIMINTO | HUOMAUTUKSET |
|
Käytössä – 2,4 GHz |
|
|
Pois |
|
|
Päällä - BT |
Tavalliset pikanäppäimet
Pikanäppäintoiminnot aktivoidaan FN-näppäinyhdistelmillä.
F1–F12 (Mac-tilassa näillä näppäimillä on erityinen merkitys, kuten Mac-toimintojen määritelmäosiossa on kuvattu), FN+ /?, FN+ O, FN+ .> ja FN+ P toimivat vain Windows-tilassa, kun taas muut toimivat myös macOS:ssa
| PIKAKOMENTO | TOIMINTO | KUVAUS | KÄYTTÖAIHE | NÄYTTÖ | HUOMAUTUKSET |
| FN + F1 | Kirkkauden vähennys | Vähennä näytön kirkkautta | Ei saatavilla |
Kuvake: kuvitettu kuvake Teksti: Vähentää kirkkautta |
Vaihda kirkkaustasoja laskevassa järjestyksessä uusimman käyttöjärjestelmän määritelmän mukaisesti. |
| FN + F2 | Kirkkauden lisäys | Lisää näytön kirkkautta | Ei saatavilla |
Kuvake: kuvitettu kuvake Teksti: Lisää kirkkautta |
|
| FN + F3 | Tehtävänäkymä | Kytke tehtävänäkymä päälle Windowsissa | Ei saatavilla |
Kuvake: kuvitettu kuvake Teksti: Tehtävänäkymä |
|
| FN + F4 | Haku | Hae jotain PC-tilassa | Ei saatavilla |
Kuvake: kuvitettu kuvake Teksti: Haku |
|
| FN + F5 | Mikrofonin mykistys / mykistyksen poisto | Mykistä tai poista mikrofonin mykistys | Ei saatavilla |
Kuvake: kuvitettu kuvake Teksti: Mykistä / Poista mykistys |
|
| FN + F6 | Uni | Järjestelmä siirtyy lepotilaan | Ei saatavilla |
Kuvake: kuvitettu kuvake Teksti: Uni |
|
| FN + F7 | Viimeinen | Viimeinen raidan komento | Ei saatavilla |
Kuvake: kuvitettu kuvake Teksti: Viimeinen kappale |
|
| FN + F8 | Toista / Tauko | Toista / Tauko-komento | Ei saatavilla |
Kuvake: kuvitettu kuvake Teksti: Toista / Tauko |
|
| FN + F9 | Seuraava | Seuraava kappale -komento | Ei saatavilla |
Kuvake: kuvitettu kuvake Teksti: Seuraava kappale |
|
| FN + F10 | Mykistä | Mykistä / Poista mykistys | Ei saatavilla |
Kuvake: kuvitettu kuvake Teksti: Äänenvaimennus |
|
| FN + F11 | Äänenvoimakkuuden pienentäminen | Äänenvoimakkuuden pienentäminen | Ei saatavilla |
Kuvake: kuvitettu kuvake Teksti: Äänenvoimakkuuden pienentäminen |
Vähentää äänenvoimakkuutta 2 prosentin välein nollaan asti |
| FN + F12 | Äänenvoimakkuuden lisäys | Äänenvoimakkuuden lisäys | Ei saatavilla |
Kuvake: kuvitettu kuvake Teksti: Äänenvoimakkuuden lisääminen |
Nostaa äänenvoimakkuutta 2 %:n välein 100:aan asti |
| FN + I | INS | Lisää-näppäin | Ei saatavilla | Ei saatavilla | Ei toimi Macissa |
| FN + Z | Profiili | Pyöräily 5 profiilissa | Z-näppäin | Käyttöaihe | |
| FN + /? | PRTSC | Print Screen -näppäin | Ei saatavilla | Ei saatavilla | Ei toimi Macissa |
| FN + O | SCRLK | Kytkee Scroll Lock -toiminnon päälle ja pois päältä | Ei saatavilla |
Kuvake: kuvitettu kuvake Teksti: Scroll Lock [Päällä / Pois] |
Ei toimi Macissa |
| FN + .> | SOVELLUS | Avaa valikko | Ei saatavilla | Ei saatavilla | Ei toimi Macissa |
| FN + P | Tauko | Tauko | Ei saatavilla | Ei saatavilla | Ei toimi Macissa |
| FN + L | Voitonlukitus | Voitonlukitus | Ei saatavilla |
Kuvake: kuvitettu kuvake Teksti: Voiton lukitus [Päällä / Pois] |
Järjestelmälukitus Macissa |
| FN + oikea SHIFT | FlashTap (SOCD) | Ota FlashTap käyttöön | SOCD-yhteensopivat avaimet |
Kuvake: kuvitettu kuvake Teksti: FlashTap [Päällä / Pois] |
|
| FN + vasen/oikea | Näytön hallintalaitteet | Vaihda widgetien välillä | Ei saatavilla | Ei saatavilla | |
| FN + Enter | Valinta | Ei saatavilla | Ei saatavilla |
MAC-FUNKTION MÄÄRITELMÄ
Nämä ovat toiminnot, joita macOS tukee, kun Mac-tila on käytössä.
Jotta voit käyttää tavallisia F-näppäintoimintoja, kuten F5-näppäintä sivun päivittämiseen, sinun on käytettävä FN-näppäintä.
F1-näppäin on määritetty näppäinyhdistelmälle FN+F1, F2-näppäin näppäinyhdistelmälle FN+F2 ja niin edelleen koko F-näppäinriville. Painamalla F1–F12-näppäimiä yksinään suoritetaan alla luetellut toiminnot.
| AVAIN | TOIMINTO | NÄYTTÖ | HUOMAUTUKSET / ALT |
| F1 | Vähennä näytön kirkkautta |
Kuvake: kuvitettu kuvake Teksti: Vähentää kirkkautta |
Voit selata kirkkaustasoja laskevassa järjestyksessä uusimman käyttöjärjestelmän määritelmän mukaisesti. |
| F2 | Lisää näytön kirkkautta |
Kuvake: kuvitettu kuvake Teksti: Lisää kirkkautta |
|
| F3 | Lehdistö |
Kuvake: kuvitettu kuvake Teksti: Lentojohtokeskus |
|
| F4 | Lehdistö |
Kuvake: kuvitettu kuvake Teksti: Haku |
|
| F5 | Lehdistö |
Kuvake: kuvitettu kuvake Teksti: Sanelu |
|
| F6 | Lehdistö |
Kuvake: kuvitettu kuvake Teksti: Älä häiritse |
|
| F7 | Viimeinen raidan komento |
Kuvake: kuvitettu kuvake Teksti: Viimeinen kappale |
|
| F8 | Keskeytä / Toista -komento |
Kuvake: kuvitettu kuvake Teksti: Toista / Tauko |
|
| F9 | Seuraava kappale -komento |
Kuvake: kuvitettu kuvake Teksti: Seuraava kappale |
|
| F10 | Mykistä |
Kuvake: kuvitettu kuvake Teksti: Äänenvaimennus |
|
| F11 | Äänenvoimakkuuden pienentäminen |
Kuvake: kuvitettu kuvake Teksti: Äänenvoimakkuuden pienentäminen |
|
| F12 | Äänenvoimakkuuden lisäys |
Kuvake: kuvitettu kuvake Teksti: Äänenvoimakkuuden lisääminen |
|
| Voitto | Option-näppäin Mac OS:ssa |
Kuvake: kuvitettu kuvake Teksti: Vaihtoehto |
|
| ALT | Command-näppäin Mac OS:ssa | Ei saatavilla | Sekä vasen Alt-näppäin että oikea Alt-näppäin |
| Apukuljettaja | Oikea Ctrl-näppäin Mac OS:ssa | Ei saatavilla | Ctrl |
SISÄVALAISTUS
| PIKAKOMENTO | VALAISTUSTEHOSTE | HUOMAUTUKSET | NÄYTTÖ |
| FN + ` | Nykyinen laitteistoprofiilin valaistus | Voidaan mukauttaa Corsair Web Hubissa |
Kuvake: kuvitettu kuvake Teksti: [Valaistustehosteen nimi tai nopeustehoste] |
| FN + 1 | Horizon | ||
| FN + 2 | Vesiväri | ||
| FN + 3 | Kierteinen sateenkaari | ||
| FN + 4 | Rainbow Wave | ||
| FN + 5 | Valaisimen näppäin (satunnainen väri) | ||
| FN + 6 | Valaistustyyppi: Ripple (satunnainen väri) | ||
| FN + 7 | Värien vaihtelu (satunnainen värijärjestys) | ||
| FN + 8 | Väripulssi (satunnainen värijärjestys) | ||
| FN + 9 | Väriaalto (satunnainen värijärjestys) | ||
| FN + 0 | Kiinteä väri | Paina, niin värit vaihtuvat järjestyksessä: punainen, vihreä, sininen, keltainen, capri, violetti, keltainen, valkoinen | |
| FN + - | Vähennä vaikutuksen kestoa | ||
| FN + = | Nopeuta vaikutuksen alkamista | ||
| FN + [ | Kierrä vaikutusta vasemmalle | ||
| FN + ] | Kierrä vaikutusta oikealle |
MAKROKUVAUS
- Siirry makrotallennustilaan
- Pidä FN- ja M-näppäimiä painettuna 2 sekuntia tai paina valitsinta makrotallennustilassa (LED-valo palaa punaisena)
- M-näppäimen merkkivalo vilkkuu punaisena
- Näytöllä näkyvät makrotallennuksen ohjeet
- Paina mitä tahansa tavallisten näppäinten yhdistelmää aloittaaksesi tallennuksen
- Tähän sisältyy mahdollisuuksien mukaan (laiteohjelmiston tai ohjelmiston rajoitusten puitteissa) pikakomentoja, kuten FN + näppäinyhdistelmiä; esimerkiksi FN + O tallennetaan Scroll Lock -näppäimeksi
- Vain näppäimistön vakiotoiminnot voidaan tallentaa, ei erikois- tai laitteistokohtaisia toimintoja, kuten
- Hiiren osoitin
- Profiili
- Taustavalaistuksen vaikutukset
- Kirkkaus
- Media
- Tilavuus
- Voitonlukitus
- Vain näppäimistön vakiotoiminnot voidaan tallentaa, ei erikois- tai laitteistokohtaisia toimintoja, kuten
- Myös viivästykset kirjataan
- Ohje: Näytöllä näkyvät makrotallennuksen ohjeet
- Tähän sisältyy mahdollisuuksien mukaan (laiteohjelmiston tai ohjelmiston rajoitusten puitteissa) pikakomentoja, kuten FN + näppäinyhdistelmiä; esimerkiksi FN + O tallennetaan Scroll Lock -näppäimeksi
- Paina FN + M-näppäintä tai käännä valitsinta, jotta tallennus lopetetaan ja makro valmistellaan tallennettavaksi tai poistettavaksi
- Tämän painaminen useammin kuin kerran ei tuo mitään lisätoimintoa
- Ohje: Näytöllä näkyvät makrotallennuksen ohjeet
- Paina mitä tahansa näppäintä, FN + näppäin
- Jos näppäimet on tallennettu: kyseisen näppäimen tai näppäinyhdistelmän painaminen tallentaa makron
- Jos näppäimiä ei ole tallennettu: kyseisen näppäimen tai näppäinyhdistelmän painaminen poistaa kaikki tallennetut makrot tai toiminnot
- Jos kyseiseen näppäinyhdistelmään on normaalisti määritetty laiteohjelmiston pikakuvake, se palautetaan
- Seuraavia näppäimiä tai näppäinyhdistelmiä ei kuitenkaan voi tallentaa:
- FN
- FN + M
- FN + Windows
- Ilmoitus: Makrolle määritetty näppäinyhdistelmä vilkkuu nopeasti punaisena
- HUOMAUTUS: Punainen merkkiväri on oletusarvo, mutta käyttäjä voi muuttaa sen.
FLASHTAP (SOCD)
FlashTap on mullistava tekniikka, joka antaa pelaajalle täyden hallinnan liikkumisnäppäimistään, erityisesti vasemmalle ja oikealle, ja optimoi SOCD-toiminnon kaikissa peleissä ja pelityypeissä.
FlashTap on oletusarvoisesti pois käytöstä sekä HW-tilassa että Corsair Web Hubissa.
HW-tilan toiminta
- Ota käyttöön pikanäppäimillä: FN + oikea SHIFT
- Tukee näppäimiä A ja D, vain viimeisenä prioriteettina
- Toiminto: A- ja D-valot palavat tasaisesti keltaisina, kun FlashTap-toiminto on päällä (korvaa nykyisen valaistuksen)
Corsair Web Hubin toiminta (katso lisätietoja kohdasta Corsair Web Hub)
- Tukee edistyneitä ominaisuuksia, kuten tilan valintaa ja näppäinten uudelleenmäärittelyä
- Voidaan määrittää profiilin avulla
- Tilan valinnan yksityiskohdat
| VIIMEINEN ETUSIJA (oletusasetus, kun päällä) |
Tulosta aina viimeisin suunta ja ohita toinen |
| NEUTRAALI | Lähtösignaalia ei tule, kun molemmat suunnat laukeavat samanaikaisesti |
| ENSISIJINEN TÄRKEYS | Tulosta aina ensimmäinen suunta ja ohita toinen |
OHJELMISTON YLEISKATSAUS
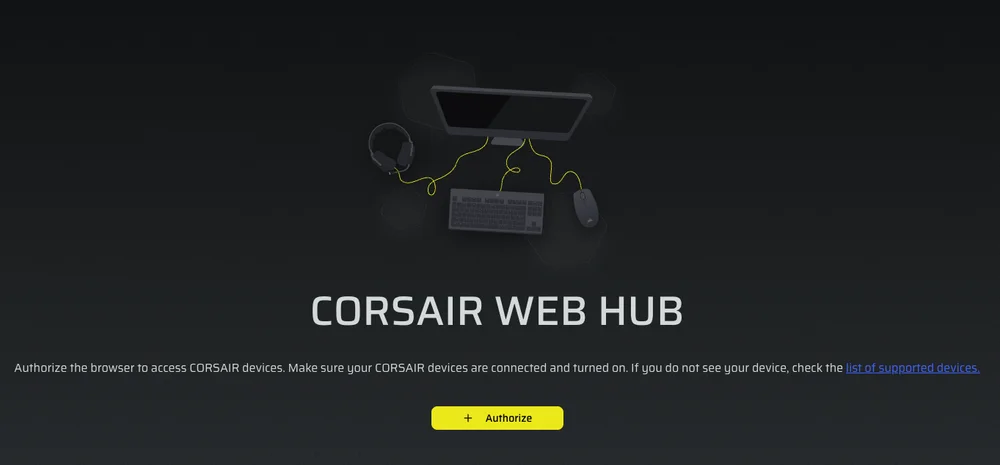
CORSAIR WEB HUB
CORSAIR Web Hub on kevyt, verkkopohjainen työkalu, jolla voit mukauttaa VANGUARD AIR 99 -näppäimistöäsi. Se on tehokas ja helppokäyttöinen, eikä vaadi erillisten ohjelmistojen asentamista. Kokeile sitä täällä: https://corsair.com/web-hub
-
Valaistustehosteet
-
Keskeiset tehtävät
-
Kiertonuppi
-
FlashTap
-
Näyttö
-
Pelitila
VALOTEHOSTEET
Tällä välilehdellä voit mukauttaa näppäimistön valoefektejä. Voit määrittää enintään viisi valokerroksia.
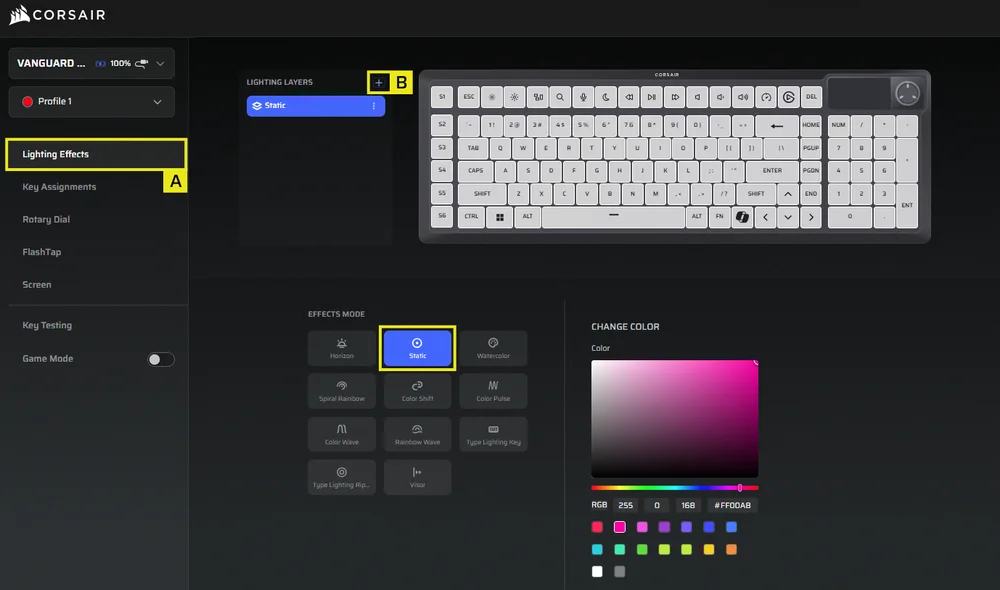
- Valitse Valaistustehosteet-välilehti
- Napsauta +-painiketta ja säädä valaistuskerrokset mieleiseksesi
TÄRKEIMMÄT TEHTÄVÄT
”Näppäinten määritykset” -välilehdessä voit helposti määrittää näppäinten toiminnot uudelleen tai määrittää niille uusia toimintoja.
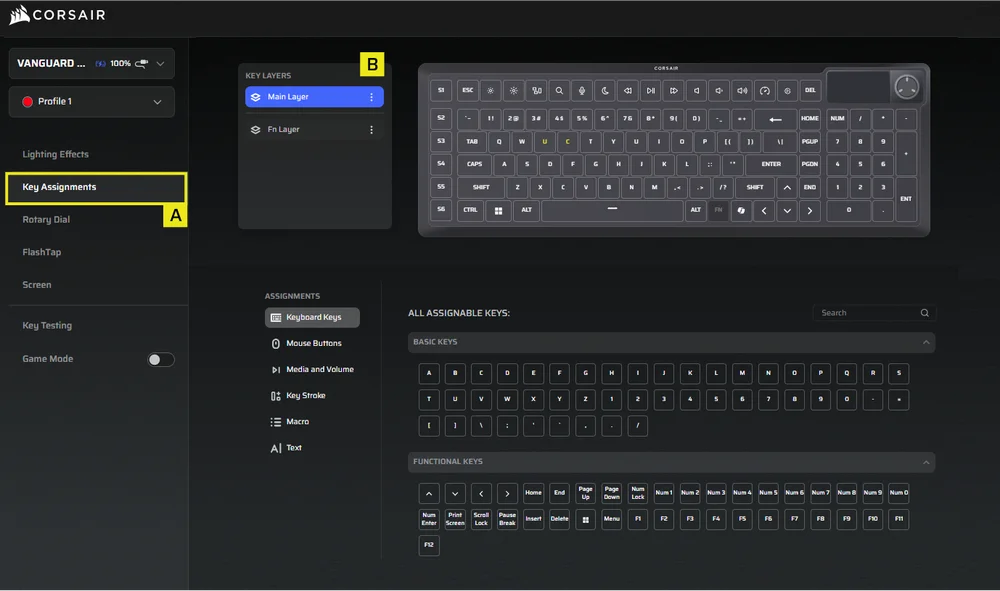
- Valitse ”Näppäinmääritykset”-välilehti
- Valitse näppäimet joko pääkerroksesta tai FN-kerroksesta ja määritä niille jokin valikossa luetelluista toiminnoista
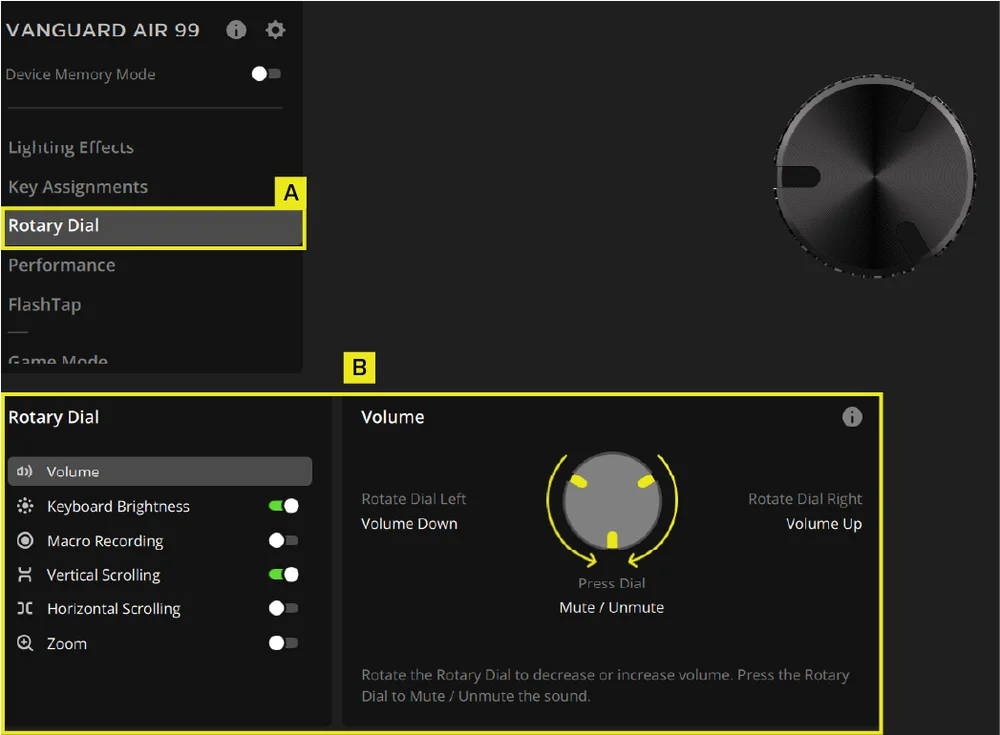
Kiertonuppi
”Kiertonuppi”-välilehdessä voit valita, mitkä toimintatilat haluat asettaa nopeasti käytettäviksi kiertonupista. Oletusasetuksena kaikki toimintatilat ovat käytössä.
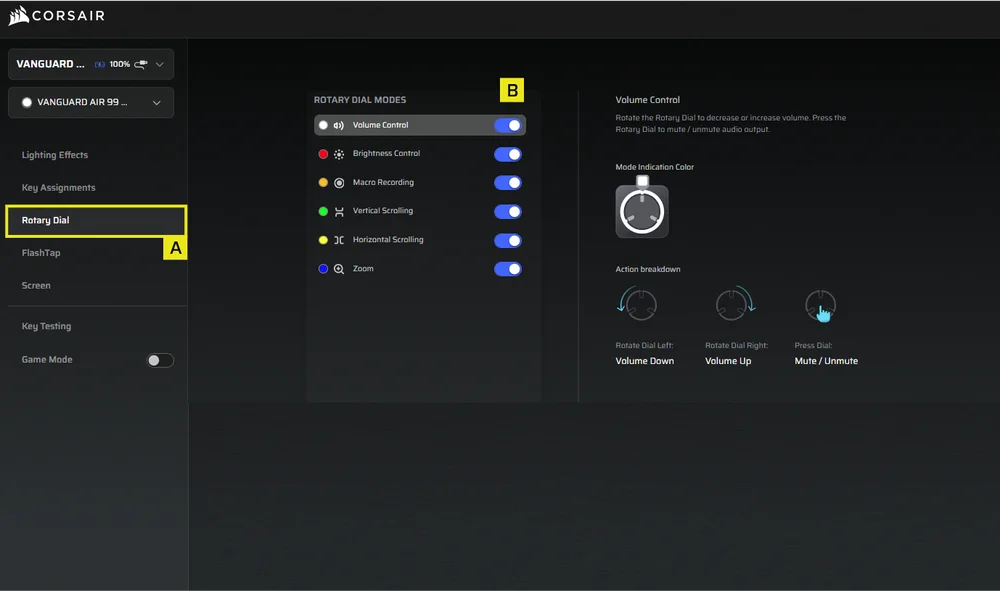
- Valitse ”Pyörivä valitsin” -välilehti
- Valitse valintatila
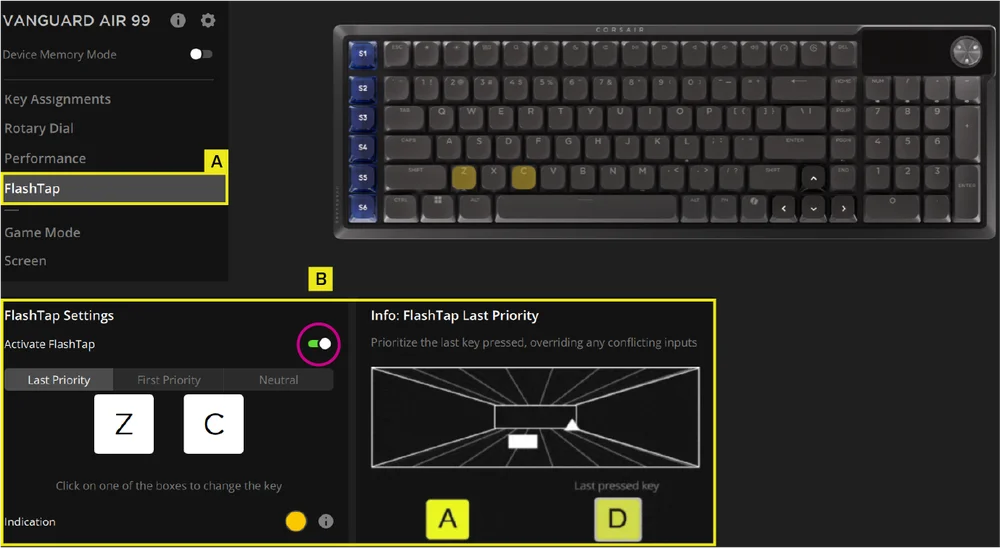
FLASHTAP
FlashTap (SOCD) -välilehdessä voit valita kolmesta eri asetuksesta ja määrittää tiettyjä näppäinyhdistelmiä FlashTap-toiminnon tukemiseksi.
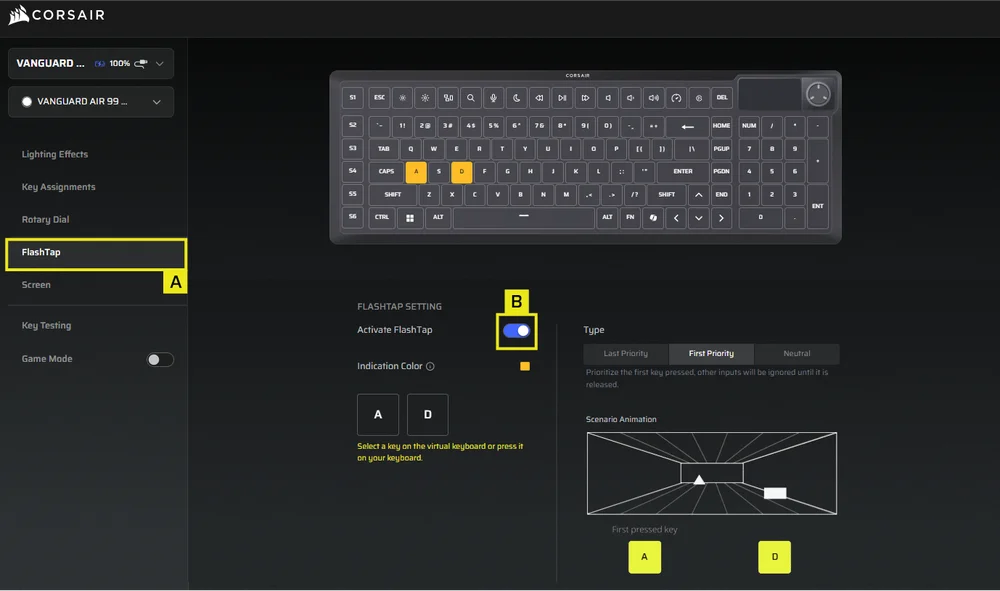
- Valitse FlashTap-välilehti
- Kytke FlashTap-toiminto päälle (oletusasetuksena pois päältä) ja valitse sitten haluamasi asetus sekä määritä näppäimille haluamasi toiminnot
NÄYTTÖ
Näytös-välilehdessä voit näyttää näytöllä haluamasi kuvan.

- Valitse Näyttö-välilehti
- Napsauta + ladataksesi omat kuvasi*
- Voit selata kuvia painamalla näppäinyhdistelmää ”FN + vasen nuolinäppäin” tai ”FN + oikea nuolinäppäin”
PELITILA
Pelitila-välilehdessä voit ottaa käyttöön kilpailukäyttöön optimoidut asetukset.
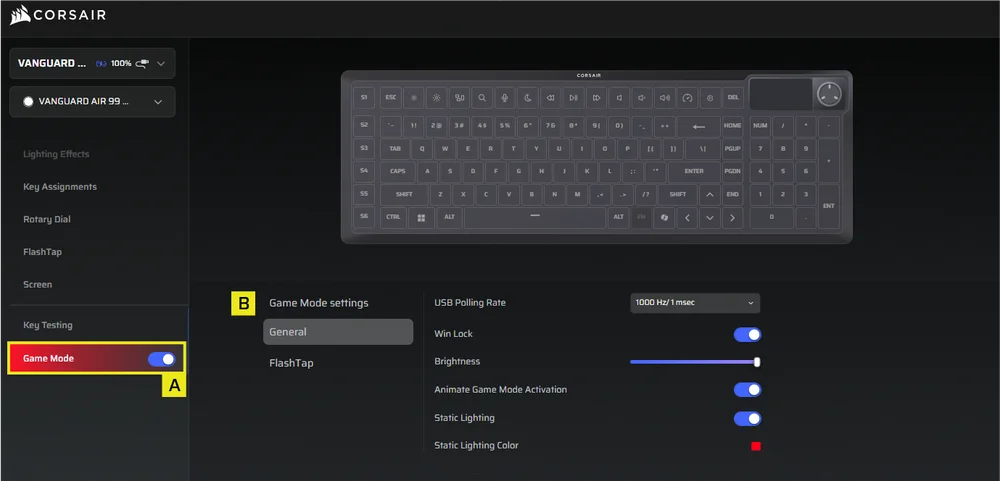
- Valitse Pelitila-välilehti ja kytke Pelitila päälle (oletusasetuksena se on pois päältä)
- Mukauta pelitilan asetuksia, kuten USB-kyselytaajuutta, näytön lukitusta, kirkkautta, valaistuksen vakioväriä sekä sitä, haluatko pelitilan aktivoinnin näkyvän animaationa
MAKROKUVAUS
Määritä käteviä makroja, joiden avulla voit tehostaa pelin sisäisiä toimintoja tai monimutkaisia tehtäviä.
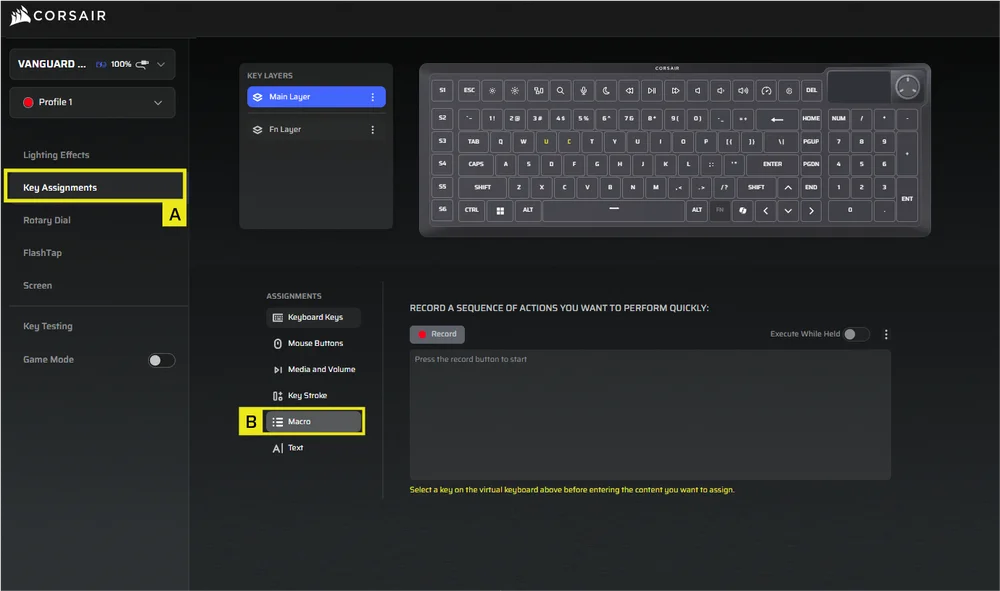
- Valitse ”Näppäinmääritykset”-välilehti
- Valitse tehtävätyypiksi ”Makro” ja aloita makron tallennus näppäinten uudelleenmäärittelyn jälkeen
LAITTEEN ASETUKSET
Tässä osiossa voit päivittää laiteohjelmiston, säätää langallisen USB-yhteyden kyselytaajuutta, näppäimistöasettelua, Windows-lukitusta ja kirkkautta sekä palauttaa laitteen tehdasasetukset ja paljon muuta.
HUOMAUTUS: Kyselytaajuuden säätö: oletusarvoinen kyselytaajuus on 1000 Hz. Kyselytaajuuden muuttaminen käynnistää laitteen uudelleenkäynnistyksen (kuten näytöllä näkyy). Odota, että uudelleenkäynnistys on päättynyt, ennen kuin alat käyttää laitetta.
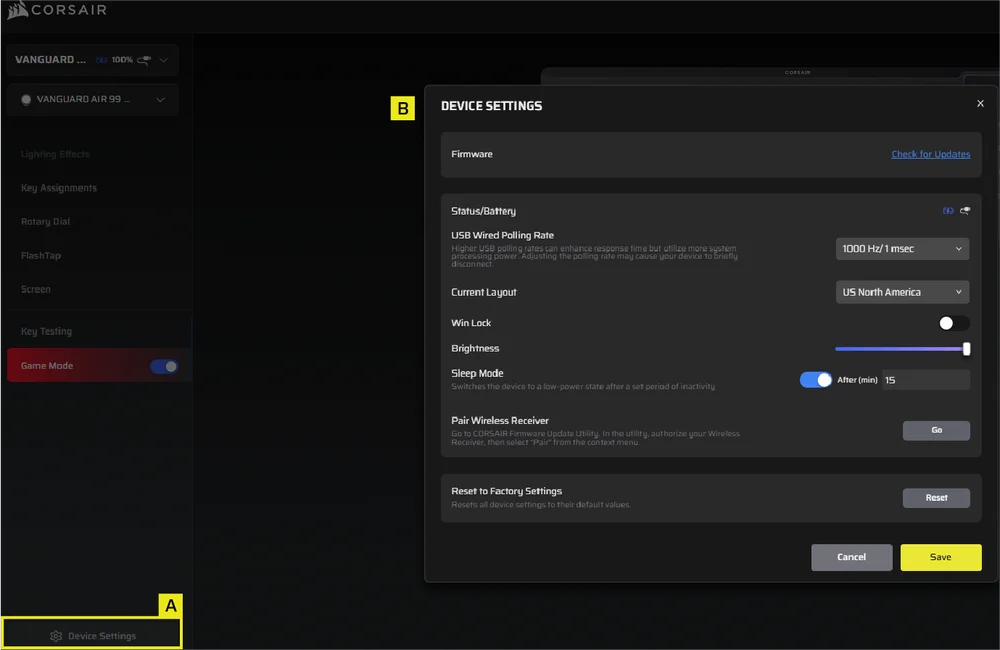
- Napsauta Laiteasetukset-välilehteä
- Muuta lisäasetuksia (kyselytaajuus, kirkkaus jne.)
iCUE-ALOITUSNÄYTTÖ JA LAITENÄYTTÖ*
* iCUE-yhteensopiva vuoden 2026 toisen neljänneksen alkupuolella
Kun avaat iCUE-sovelluksen ensimmäisen kerran, näet uuden laiteruudun nimeltä VANGUARD AIR 99. Kun napsautat laiteruutua, näkyviin tulee vaihtoehtoja, joiden avulla voit aloittaa ohjelmoinnin seuraaville laitteille:
- Valaistustehosteet
- Keskeiset tehtävät
- Kiertonuppi
- Suorituskyky
- FlashTap
- Pelitila
- Näyttö
Jos iCUE-ikkunassa näkyy päivitysilmoitus, päivitä laiteohjelmisto uusimpaan versioon napsauttamalla ilmoitusta.
LAITTEEN MUISTITILA
Ennen kuin aloitat ohjelmoinnin, ota huomioon, että jokaisessa iCUE-järjestelmäprofiilissa on kaksi asetusjoukkoa: Ohjelmisto ja Laitteen muistitila
Laitteen muistitilan valikosta voit määrittää toimintoja, jotka tallennetaan näppäimistön sisäiseen muistiin ja jotka suoritetaan laitteistotilassa.
| TOIMINTO | LAITTEEN MUISTITILA |
OHJELMISTOTILA |
| Tallennus ja profiilit | 1 Mt enintään 5 profiilille | Rajoittamaton |
| Ominaisuudet |
|
|
| Kuinka säästää | Manuaalinen tallennus |
Automaattisesti |
| Valaistustasojen enimmäismäärä | 20 | Rajoittamaton |
VALOTEHOSTEET
Tällä välilehdellä voit mukauttaa näppäimistön valoefektejä. Voit määrittää enintään viisi valokerroksia.
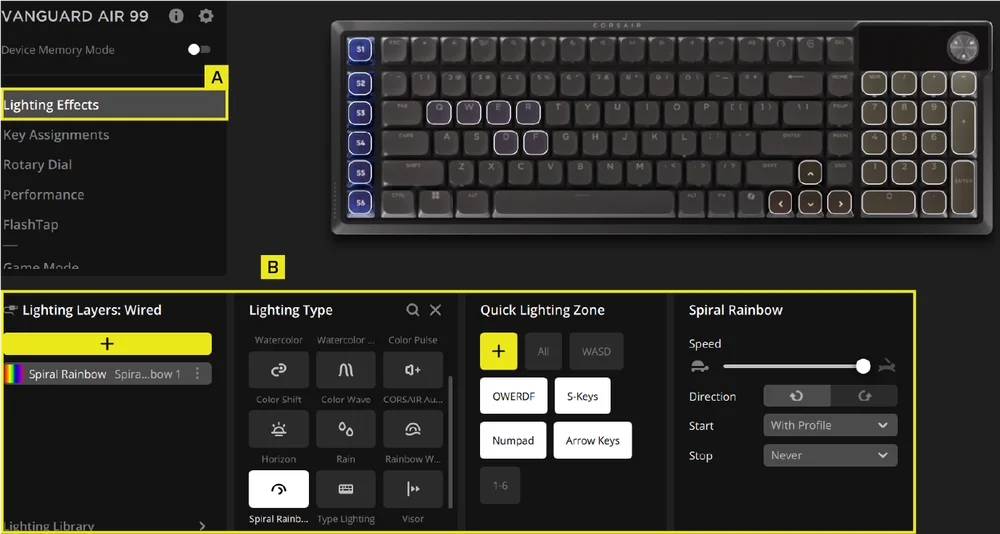
- Valitse Valaistustehosteet-välilehti
- Valitse Valaistuskerrokset-kohdasta [ + ] ja säädä valaistus mieleiseksesi
TÄRKEIMMÄT TEHTÄVÄT
”Näppäinten määritykset” -välilehdessä voit helposti määrittää näppäinten toiminnot uudelleen tai määrittää niille uusia toimintoja.
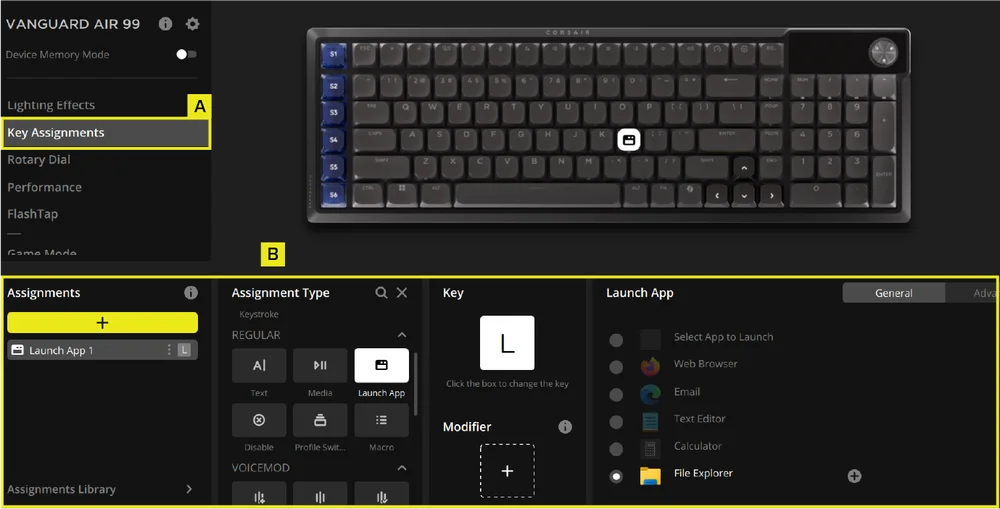
- Valitse ”Näppäinmääritykset”-välilehti
- Napsauta Tehtävät-kohdassa [ + ] -painiketta, jos haluat määrittää näppäimet uudelleen tai määrittää niille uusia toimintoja
Kiertonuppi
”Kiertonuppi”-välilehdessä voit valita, mitkä toimintotilat haluat asettaa nopeasti käytettäviksi kiertonupista.
- Valitse ”Pyörivä valitsin” -välilehti
- Valitse valintatila
SUORITUSKYKY
Suorituskyky-välilehdessä voit ottaa pikakuvakkeet käyttöön tai poistaa ne käytöstä sekä mukauttaa ilmaisimien värejä.
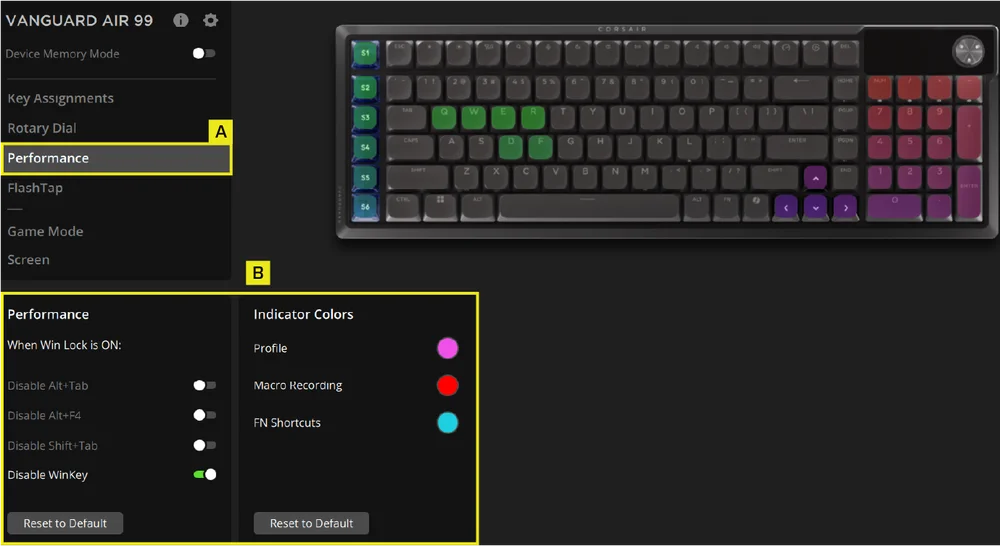
- Valitse Suorituskyky-välilehti
- Ota pikakuvakkeet käyttöön tai poista ne käytöstä tai muokkaa merkkien värejä mieleiseksesi
FLASHTAP
FlashTap (SOCD) -välilehdessä voit valita kolmesta eri asetuksesta ja määrittää tiettyjä näppäinyhdistelmiä FlashTap-toiminnon tukemiseksi.
- Valitse FlashTap-välilehti
- Kytke FlashTap päälle (oletusasetuksena pois päältä) ja valitse sitten haluamasi asetus sekä määritä näppäimille haluamasi toiminnot.
PELITILA
Pelitila-välilehdessä voit ottaa käyttöön kilpailukäyttöön optimoidut asetukset.

- Valitse Pelitila-välilehti ja kytke Pelitila päälle (oletusasetuksena se on pois päältä).
- Mukauta pelitilan asetuksia, kuten USB-kyselytaajuutta, Win Lock -toimintoa, FlashTap-toimintoa, kirkkautta, valaistuksen vakioväriä sekä sitä, haluatko pelitilan aktivoinnin tapahtuvan animaation kera.
NÄYTTÖ
Näytös-välilehdessä voit näyttää näytöllä haluamasi kuvan.
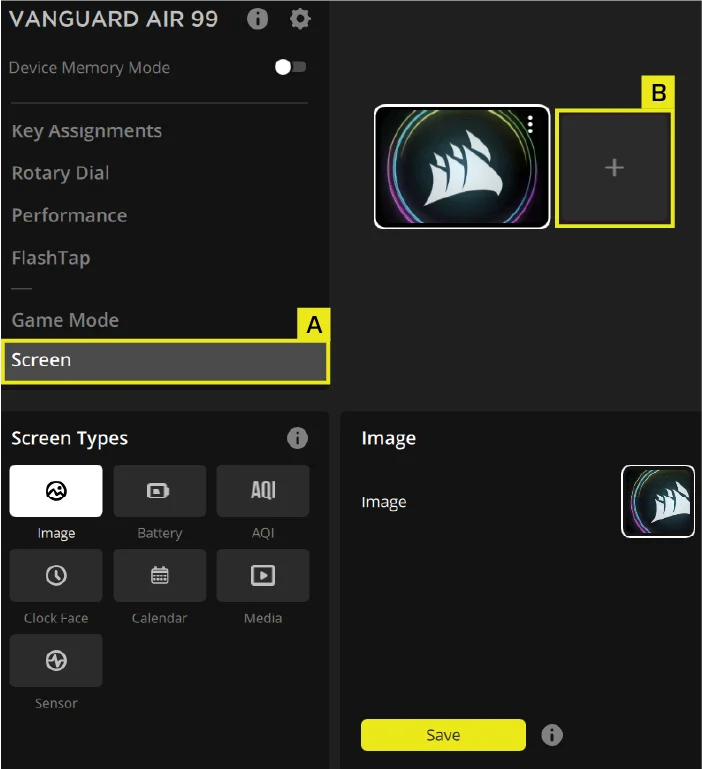
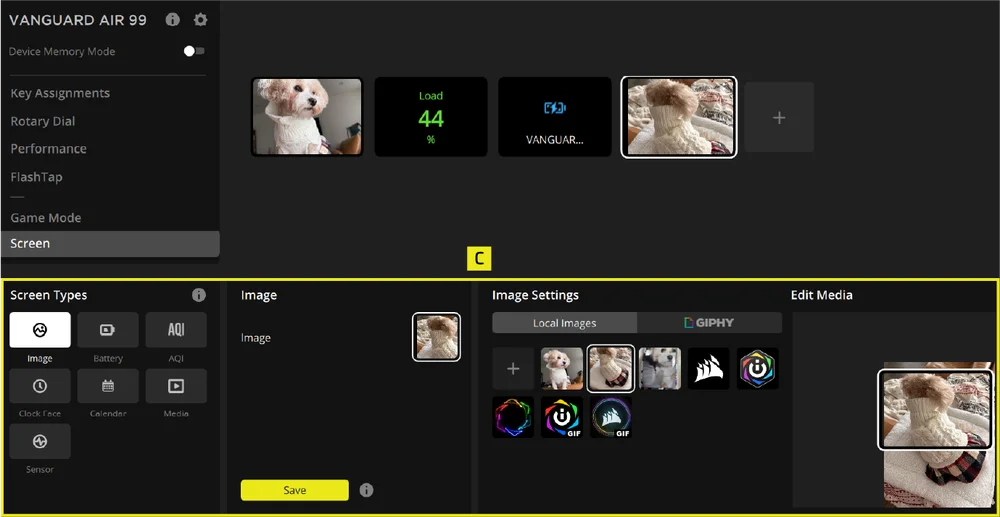
- Valitse Näyttö-välilehti
- Napsauta + avataksesi näytön tyyppivalikon
- Lataa ja tuo haluamasi kuvat ruudulle ja napsauta Tallenna-painiketta
Näytö-välilehdessä voit myös valita anturiasetuksen ja ladata sen LCD-näyttöön.
LAITTEEN ASETUKSET
Tässä osiossa voit päivittää laiteohjelmiston, säätää langallisen USB-yhteyden kyselytaajuutta, näppäimistöasettelua ja kirkkautta, palauttaa laitteen tehdasasetukset ja paljon muuta.
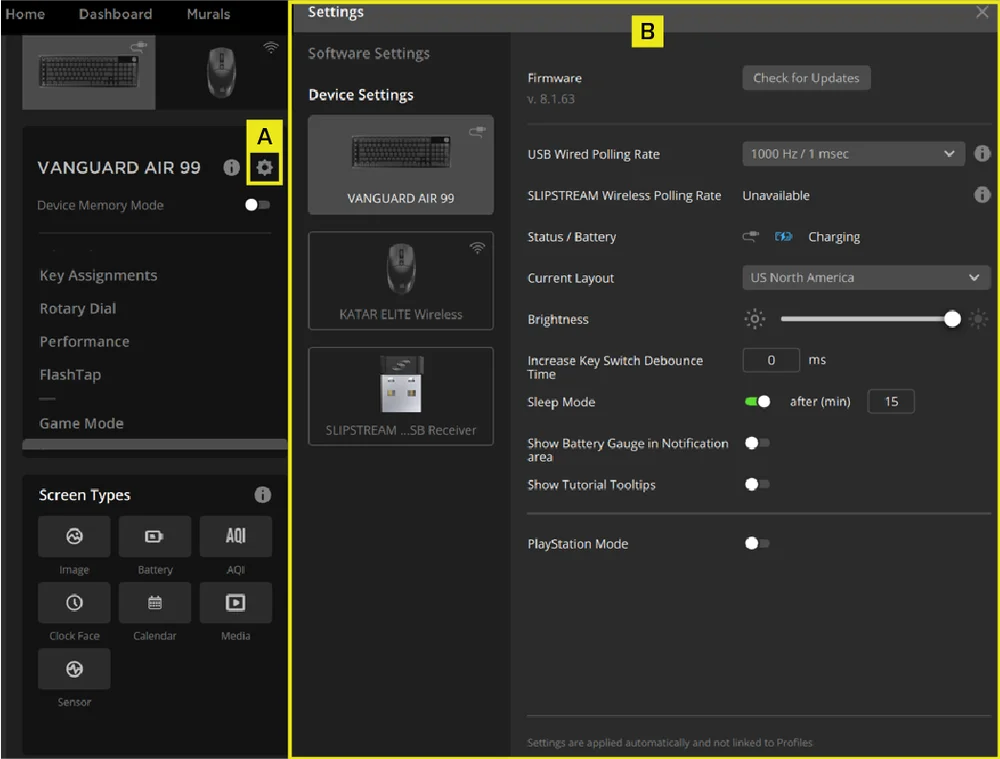
- Napsauta asetuskuvaketta
- Muuta lisäasetuksia (kyselytaajuus, kirkkaus jne.)
TEHDASASETUKSET
Pidä ESC-näppäintä painettuna, kun liität laitteen. Irrota USB-kaapeli ja liitä se uudelleen, kunnes näet käynnistysanimaation, joka osoittaa, että nollaus on valmis.
AKUN POISTAMISTA KOSKEVAT OHJEET
Tämä tuote toimii ladattavalla akulla, ja turvallisuusohjeita on noudatettava, kun tuote poistetaan käytöstä hävittämistä ja kierrätystä varten. Poista akku turvallisesti hävittämistä ja kierrätystä varten noudattamalla numeroituja ohjeita ja alla olevia kuvia.
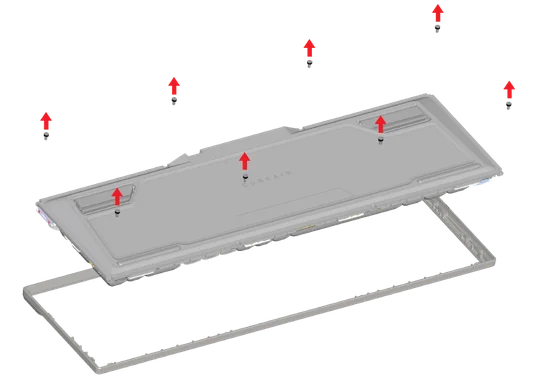
1. Irrota kahdeksan ruuvia ja irrota yläkansi.
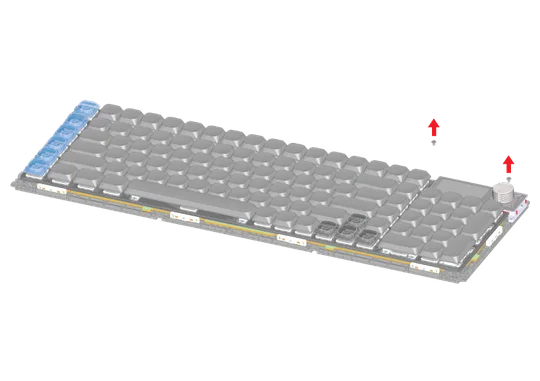
2. Irrota LCD-moduulin kiinnityksessä olevat kaksi ruuvia.
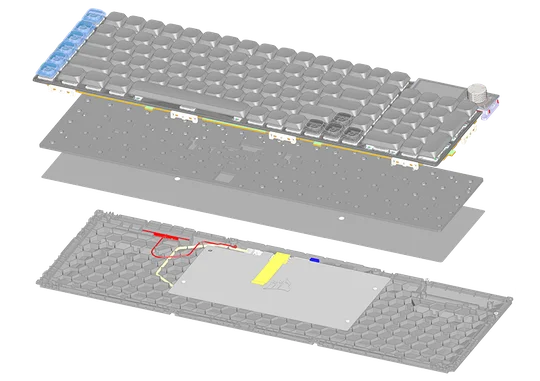
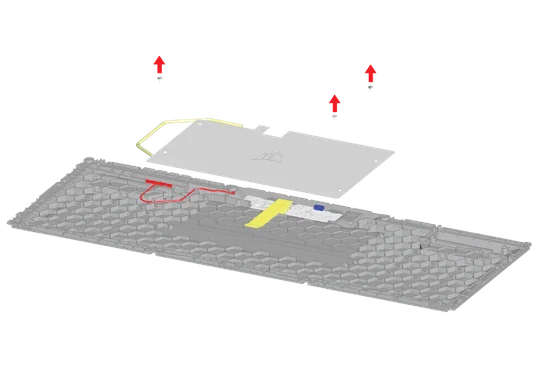
3. Irrota PCBA-moduuli. Irrota FPC-kaapeli ja antenni PCBA-moduulista ja poista vaahtomuovi sekä pohjalevy.
4. Irrota kolme ruuvia ja poista sitten metallinen tukilevy sekä akku.
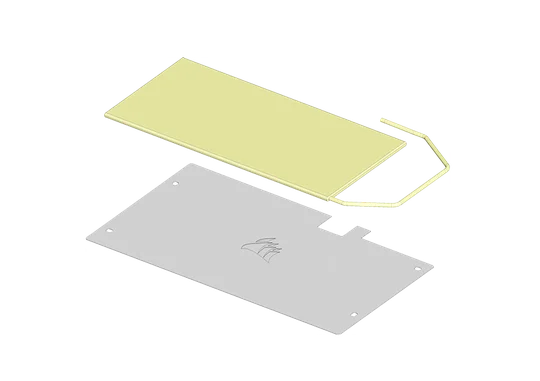

5. Irrota akku metallilevystä (akku on kiinnitetty metallilevyyn kaksipuolisella teipillä) ja hävitä akku asianmukaisesti kierrätystä varten.
CORSAIR MEMORY, Inc. kehottaa asiakkaita kierrättämään käytetyt elektroniikkalaitteet ja ladattavat akut paikallisten lakien ja määräysten mukaisesti.
AKUTIEDOT
- M/N (tuotenumero): 2670155
- Kapasiteetti (akun kapasiteetti): 3,7 V, 4170 mAh, 15,43 Wh
- Skannaa QR-koodi saadaksesi lisätietoja akusta:

Näppäimistö
M/N (型號): RGP0181
Nimellisarvot (jännite/virta): 5 V ![]() 1,5 A
1,5 A
Dongle
M/N (型號): RGP0177
Nimellisarvot (jännite ja virta): 5 V ![]() 0,1 A
0,1 A
FCC-tunnus (näppäimistö): 2AAFM-RGP0181
FCC-tunnus (vastaanotin): 2AAFMRGP0177
IC-tunnus (näppäimistö): 10954A-RGP0181
IC-tunnus (vastaanotin): 10954A-RGP0177

Laturin tuottaman tehon on oltava radiolaitteen vaatiman vähintään 2,5 watin ja enintään 10 watin välillä, jotta saavutetaan suurin mahdollinen latausnopeus.
TEKSTI- JA TEKIJÄNOIKEUDET / OIKEUDELLISET TIEDOT
©2026 CORSAIR MEMORY, Inc. Kaikki oikeudet pidätetään. CORSAIR ja purje-logo ovat CORSAIRin rekisteröityjä tavaramerkkejä Yhdysvalloissa ja/tai muissa maissa. Kaikki muut tavaramerkit ovat niiden omistajien omaisuutta. Tuote voi poiketa hieman kuvassa esitetystä.


VASTAAVA SISÄLTÖ