在組裝電腦時,選擇合適的 M.2 SSD 規格至關重要,因為這決定了 SSD 能否安裝到您的電腦機殼和主機板上。不同主機板對 M.2 SSD 規格的支援程度各不相同。若要確認相容性,請查閱主機板的規格說明或使用手冊。
「外型規格」指的是儲存裝置的尺寸與物理配置。多年來,2.5 吋和 3.5 吋外型規格的 SATA SSD/HDD 一直是個人電腦組裝的標準選擇。但近年來,由於 M.2 外型規格具備高性價比、佔用空間較小且安裝簡便等優勢,已成為儲存裝置的首選。
如果您剛購入了一顆CORSAIR M.2 SSD來升級您的電腦,並想知道該如何安裝,我們將在此為您提供詳細說明。
安裝您的 CORSAIR M.2 SSD
首先,您需要找出主機板上的 M.2 插槽,請注意,根據主機板型號的不同,這些插槽可能位於散熱罩下方。若您無法立即找到 M.2 插槽,請參閱主機板說明書以確認其位置。
接著,請確認 M.2 支撐座已安裝在 SSD 的正確位置。CORSAIR M.2 SSD 通常採用 2280 規格——請透過您的 M.2 SSD 產品頁面再次確認其尺寸。您可以使用螺絲起子,或直接用手將支撐座擰緊。
如果距離柱上已安裝有 M.2 螺絲,請使用十字螺絲起子將該 M.2 螺絲拆下——螺絲尺寸可能因主機板型號而異。
如果您的 M.2 插槽位於蓋板(亦即散熱片或散熱罩)下方,則會看到一塊導熱墊。若導熱墊上附有塑膠保護膜,請小心撕除該保護膜,以確保導熱墊保持原位且完整無損。
如果您使用的是我們其中一款附帶散熱片的 M.2 SSD(例如MP600 PRO LPX),安裝時可能需要將導熱墊完全移除。
要安裝 M.2 SSD,請將 M.2 SSD 以傾斜角度插入(如下圖所示),然後將 M.2 SSD 輕輕平放於支撐柱上。
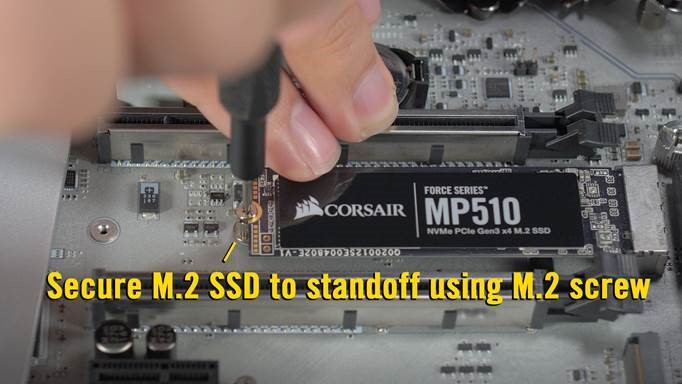
將 M.2 SSD 安裝到位後,請使用先前拆下的 M.2 螺絲將其固定,或透過主機板的機械撥桿(若主機板具備此功能)進行固定。
注意:若您安裝的是未附散熱片的 M.2 SSD,且主機板的 M.2 插槽原本有蓋板遮蓋,請將蓋板重新裝回。
就這樣,您的電腦現在已配備了一顆 M.2 SSD。
以下為舊文章
This article will teach you how to install your Corsair M.2 SSD.
NOTE: The instructions in this article only apply to the Corsair M.2 SSD, which has a form factor of 2280. If your M.2 has a different form factor, please refer to your motherboard manual for installation instructions.
Install your SSD
Before installing your SSD:
- If your M.2 SSD comes with a heatsink pre-installed and the M.2 slot on your motherboard already has a heatsink cover, remove the motherboard heat sink cover.
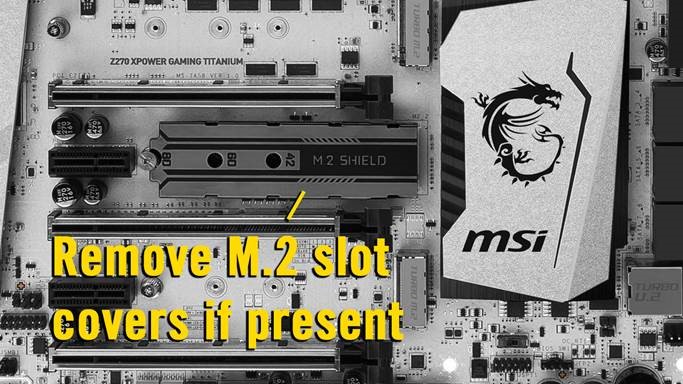
- If your motherboard has any standoffs pre-installed for short 2242 and 2260 M.2 SSDs, remove those standoffs to avoid damaging your 2280 M.2 SSD.
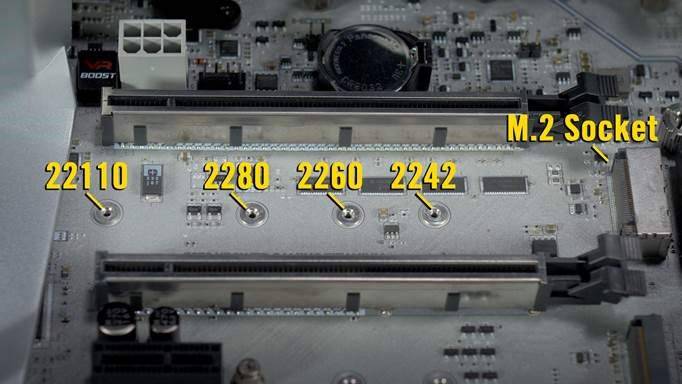
To install your SSD:
- If it isn't already installed, install the standoff in the 2280 socket.
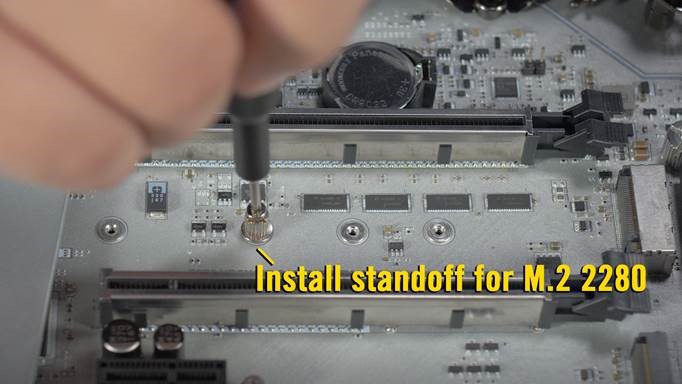
- Remove the mounting screw next to the M.2 slot.
- Gently insert the M.2 SSD into the M.2 slot.
- The M.2 slot is designed so that the M.2 SSD can only be inserted one way, according to the M key of the 2280 M.2 SSD. If the M.2 SSD doesn’t go in, do NOT force it in or you risk damaging your SSD and keyboard.
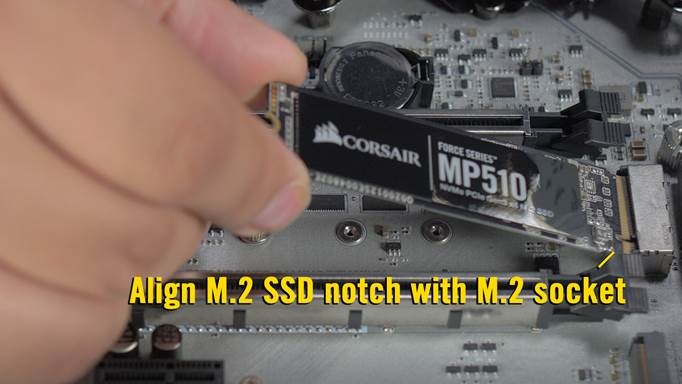
- The M.2 slot is designed so that the M.2 SSD can only be inserted one way, according to the M key of the 2280 M.2 SSD. If the M.2 SSD doesn’t go in, do NOT force it in or you risk damaging your SSD and keyboard.
- Press down on the M.2 SSD so the notch on the left of the drive lines up with the screw hole.
- Reinstall the screw to secure the M.2 SSD.
If you run into any issues or have further questions, contact our Customer Support.
Stay up to date with CORSAIR. Get our latest News, Guides, and Product Updates in your Google feeds.
Add CORSAIR as a preferred sourceWas this article helpful?
Feedback received
Thanks for helping us improve this article.
JOIN OUR OFFICIAL CORSAIR COMMUNITIES
Join our official CORSAIR Communities! Whether you're new or old to PC Building, have questions about our products, or want to chat about the latest PC, tech, and gaming trends, our community is the place for you.