-
AI WORKSTATION INTRODUCTION
-
CORSAIR AI WORKSTATION CONTENTS
-
CORSAIR AI WORKSTATION CONNECTIVITY
-
SETTING UP YOUR CORSAIR AI WORKSTATION
-
PERFORMANCE LEVEL SELECTOR
-
UNIFIED MEMORY
-
CORSAIR AI SOFTWARE STACK
-
AI SOFTWARE RECOMMENDATIONS
-
UPGRADING STORAGE
-
ACCESSING THE LATEST SETUP AND DOCUMENTATION
-
COMPLIANCE STATEMENT
-
LIMITED PRODUCT WARRANTY
-
REMEDIES
-
OBSOLETE OR DISCONTINUED PRODUCTS
-
EXCLUSIONS
-
COPYRIGHT/LEGAL INFORMATION
-
LIMITATION OF LIABILITY
MANUAL | QUICK START GUIDE
CORSAIR WORKSTATION PC
AI WORKSTATION INTRODUCTION
Thank you for purchasing the CORSAIR AI WORKSTATION!
CORSAIR AI WORKSTATION CONTENTS

TOP SHEET
POWER CABLE
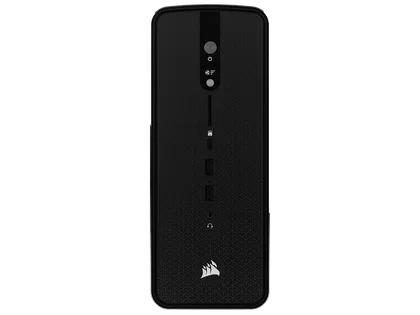
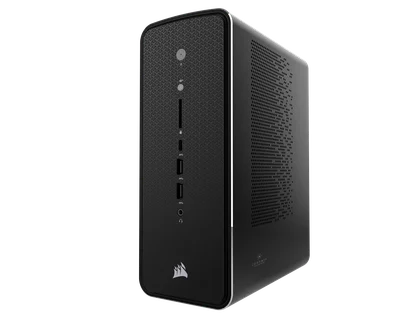
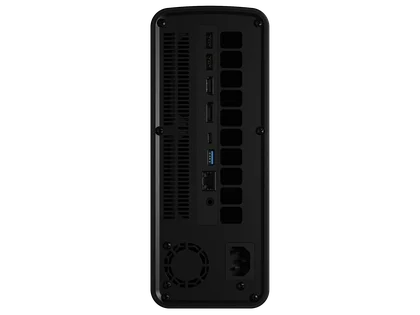
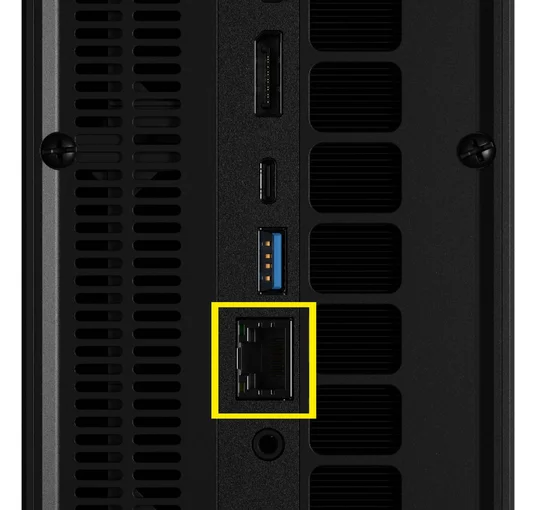
CORSAIR AI WORKSTATION CONNECTIVITY
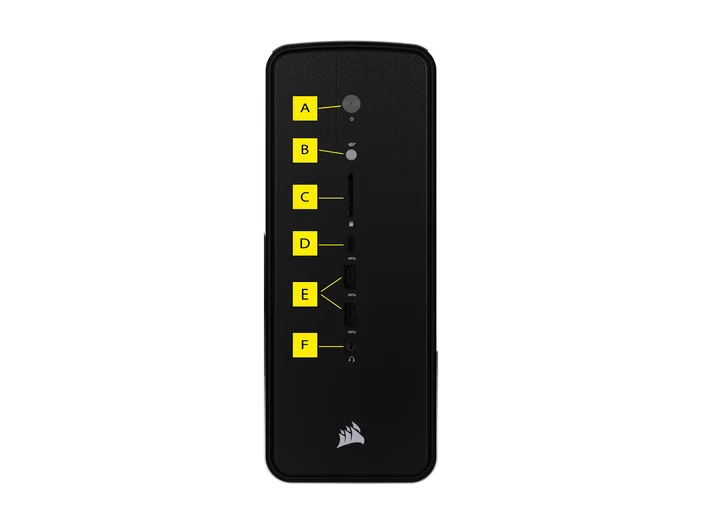
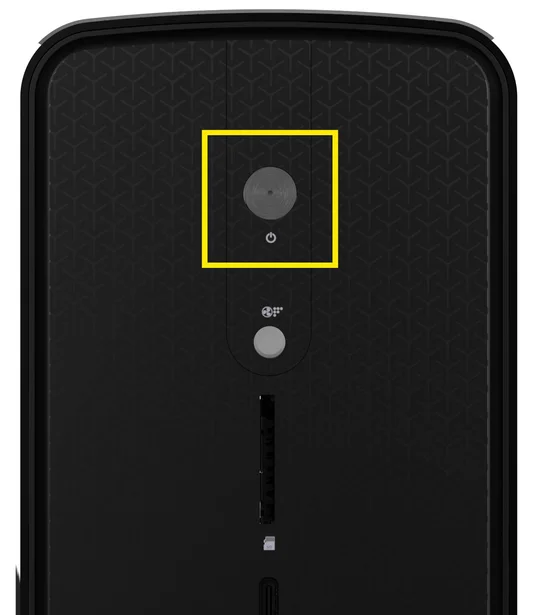
- Power
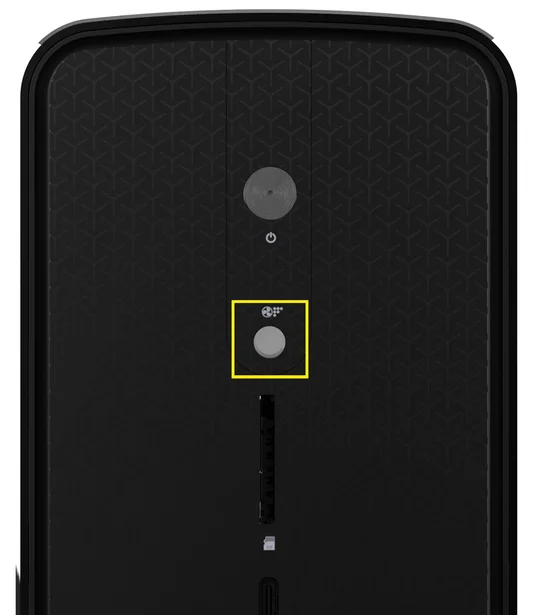
- Performance Level Selector
- SD 4.0 Card Reader
- 1x USB 4.0 Type-C Port
- 2x USB 3.2 Gen 2 Type-A Ports
- Headphone / Mic Combo Jack
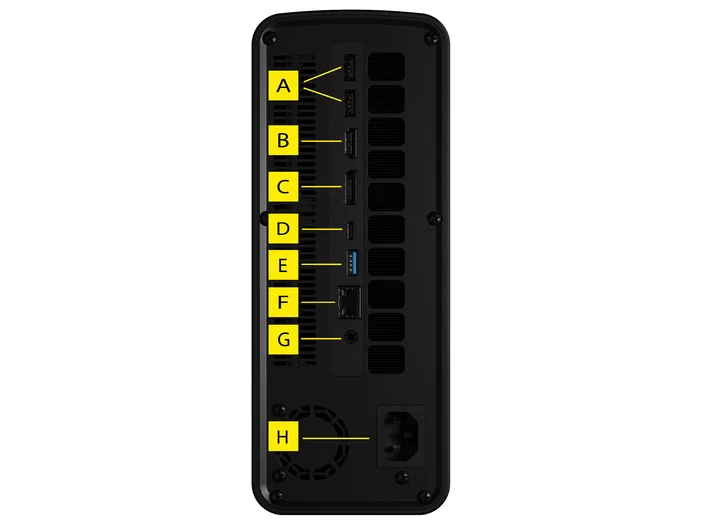
- 2x USB 2.0 Type-A Ports
- 1x HDMI 2.1 (FRL 8Gbps) – 4K60 HDR / 1440p120
- 1x DP 1.4 (HBR3) – 4K120 / 5K60 w/ DSC
- 1x USB 4.0 Type-C Port
- 1x USB 3.2 Gen 2 Type-A Port
- 1x 2.5GbE Ethernet Port (RTL8125BG)
- Headphone / Mic Combo Jack
- Power Supply Connector
SETTING UP YOUR CORSAIR AI WORKSTATION
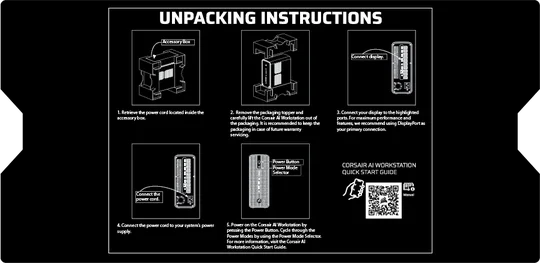
UNBOXING THE CORSAIR AI WORKSTATION
The CORSAIR AI WORKSTATION is bundled with a power supply power cord that will be installed on the rear side of the desktop. Before powering on, make sure to connect all your devices so they are readily available when the system is powered on.
- Safely remove the CORSAIR AI WORKSTATION from its packaging.
- Remove the top and bottom protective shipping inserts from the CORSAIR AI WORKSTATION.
- Place your CORSAIR AI WORKSTATION on your desk to continue the set-up process. If you prefer to place the CORSAIR AI WORKSTATION on the floor, avoid placing it on shaggy carpets as this can cause heating issues. For the best results, make sure the CORSAIR AI WORKSTATION is elevated off the floor.
CONNECTING THE CORSAIR AI WORKSTATION
- Connect your mouse and keyboard, as well as any other devices, to the desktop via the USB ports on the motherboard located on the rear side of the case.
2. Connect your monitor to the DisplayPort or HDMI port using an HDMI or Display cable.
3. The CORSAIR AI WORKSTATION has built-in WI-FI and does not require WI-FI antennas. If you prefer to use an Ethernet cable for Internet access, plug in an ethernet cable instead (Use the unshielded RJ45 cable for operation).
4. Connect the power cable into the power supply and then connect the other end of the power cable to the nearest power outlet. If you are using a surge protector, connect the power cable to the surge protector instead.

5. To power on the CORSAIR AI WORKSTATION, press the power button located on the front panel.
6. Once the system goes through the initial boot process, it will load the pre-installed Windows operating system.
7. Follow along the Windows prompts to complete the user account creation.
PERFORMANCE LEVEL SELECTOR
FRONT PANEL CONTROLS
The CORSAIR AI WORKSTATION includes three performance modes—Quiet, Balanced, and Max. Use the Power Level Selector on the front of the system to cycle through modes to best suit your current task. A status notification will appear on-screen to confirm your selection.
UNIFIED MEMORY
The CORSAIR AI WORKSTATION features Unified Memory, allowing the CPU and GPU to share the same high-speed memory for faster data access and improved performance in AI, creative, and professional workloads. This improves efficiency, reduces latency, and accelerates demanding AI, rendering, and creative workloads. You can follow the instructions below to change the graphics card memory allocation.
BIOS Instructions
1. Power on the system. When the CORSAIR logo appears, immediately press the DEL key on your keyboard to enter the BIOS setup.
2. In the BIOS Home Screen, locate and select the Advanced screen tab.
3. Select the GFX Configuration option.

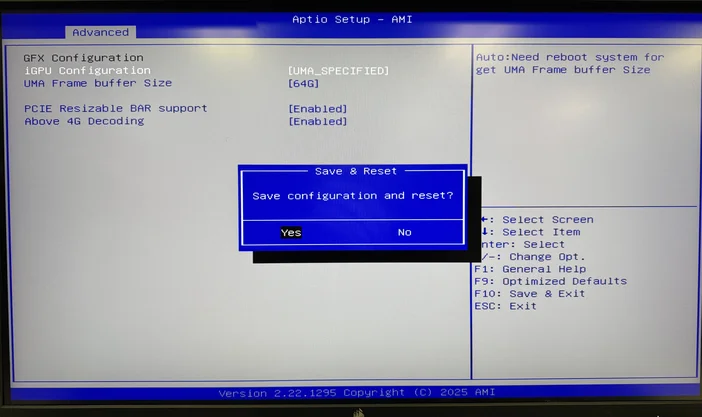
4. Locate and Select the UMA Frame buffer Size option. Note: The iGPU Configuration, PCIE Resizable BAR support, and Above 4G Decoding settings should be preconfigured as shown in the image below.
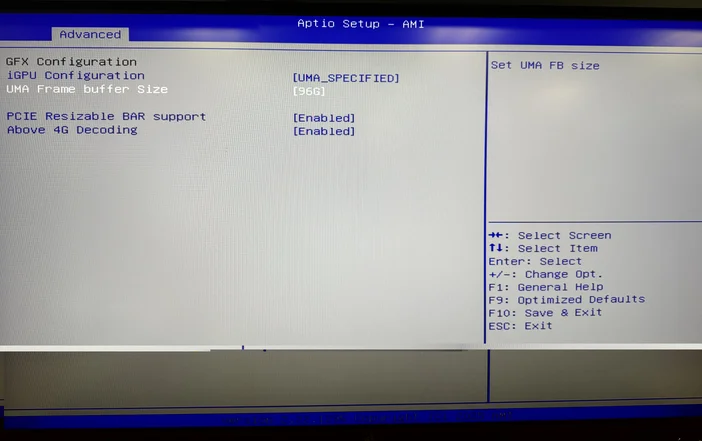
5. A pop-up menu will appear showing available UMA Frame Buffer sizes. Select the size that best fits your current workload.
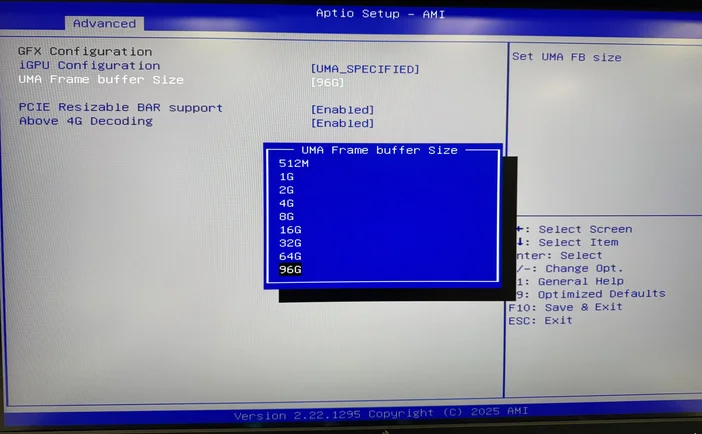
6. After completing your selection, press F10 on your keyboard, then choose Save to confirm and restart your PC.
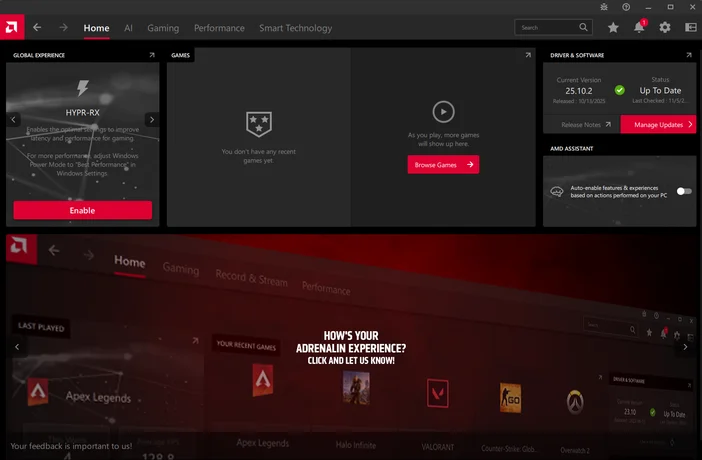
AMD SOFTWARE Instructions
1. Open the AMD SOFTWARE: Adrenaline Edition.
2. Select the Performance tab at the top of the software window, then choose Tuning from the options below.
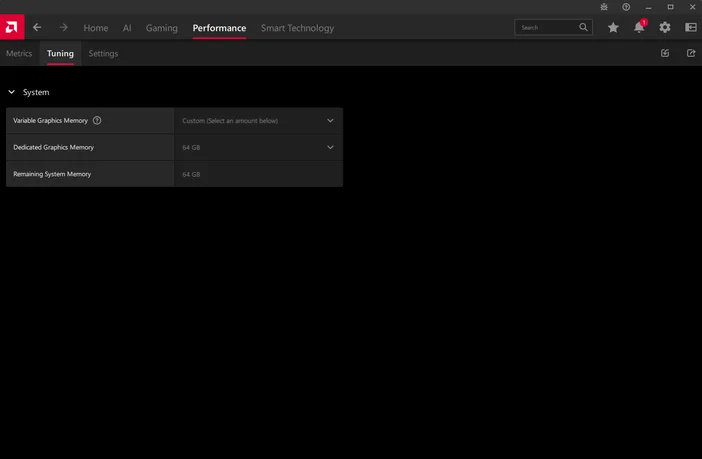
3. You can choose from the three preset options — Minimum, Medium, or High — or select Custom to set a variable memory value of your choice.
- Minimum: 0.5GB Dedicated Graphics Memory
- Medium: 32GB Dedicated Graphics Memory
- High: 64GB Dedicated Graphics Memory
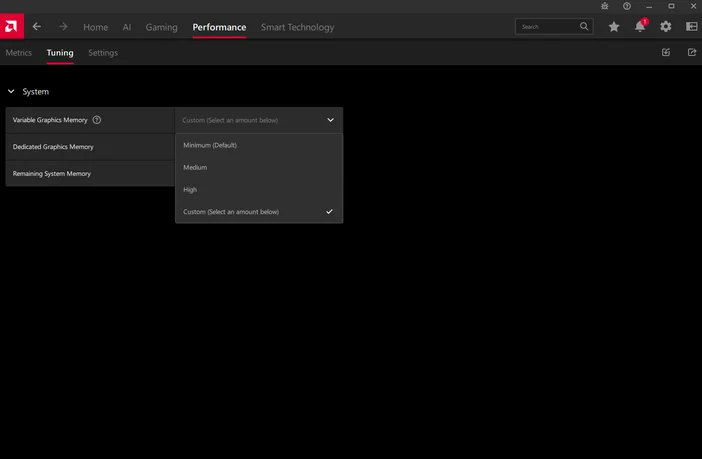
4. If the Custom option is chosen, you can select the desired dedicated graphics memory allocation from the drop down menu.
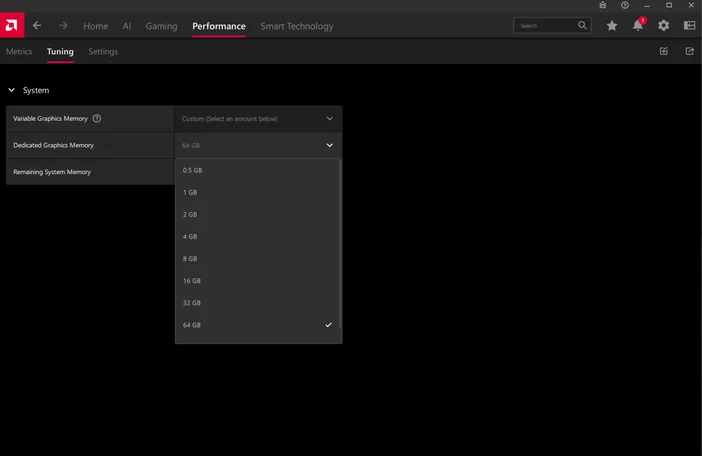
5. After selecting your preferred dedicated graphics memory allocation, a restart prompt will appear at the bottom of the AMD software. Follow the prompt to restart your PC.
CORSAIR AI SOFTWARE STACK
The Corsair AI Software Stack is a curated, web-based configuration and setup assistant designed to simplify the experience of configuring AI-first workstations like the AI Workstation 300. Its mission is to remove the guesswork for less technical users, while preserving flexibility for power users.
Workstation configuration is inherently personal — optimized for your tools, models, and workflow. But for many, especially those new to local AI, LLMs, or open-source inference tools, the initial setup can feel overwhelming. Installing toolchains like Python, Git, PyTorch, Ollama, Anaconda, LangChain, Transformers, and others often requires command-line knowledge, proper dependency handling, understanding technical jargon, and system tuning.
https://www.corsair.com/ai-software-stack/index.html
The Corsair AI Software Stack addresses this challenge with:
- Pre-validated toolkits that users can install with minimal interaction.
- Auto-configured presets for common workflows: LLM inference, Whisper transcription, ComfyUI image generation, and more.
- Web-based interface for setup and customization — no command line required.
- Fast onboarding for new users who want to start running models (GPT-OSS, DeepSeek, LLaMA, Mistral, Gemma, etc) through open-source frameworks like Jan.ai.
- Optional activation — advanced users can opt out of installation entirely or selectively install only the components they need.
CORSAIR AI SOFTWARE STACK FAQ
Q: What is the CORSAIR AI Software Stack?
A: The CORSAIR AI Software Stack is a web-based platform that helps you set up and manage AI-ready & developer tools on your workstation. It works in two parts:
- A lightweight installer that runs on your system to gather basic hardware and software details.
- A web portal where you can browse and install compatible AI tools and integrate workflows.
Q: How do I start using it?
A: Follow Steps listed below.
- Select GET STARTED from the Home Page of the AI SOFTWARE STACK.
- Select the USE CASES that fit your needs. You can find additional information in the LEARN MORE sections of each USE CASE.
- Once you have selected all of the USE CASES you want to start with, click NEXT.
- Select the ANALYZE MY SYSTEM button. This will download a small application that gathers basic system information: (CPU Brand, Operating System, CPU Type, GPU Type, System Memory amount, available storage). This application will also handle the installation of the tools that you select. It can be removed after installation if desired.
- Select SUBMIT to continue to the recommended tools
- Browse the Toolkit section and choose the tools you want to install (e.g., Ollama, Python, ComfyUI, Pytorch).
- Select INSTALL.
- Download the System Analyzer Application.
- Run the Application.
- Select CONFIRM to continue the installation process.
- Monitor the installation progress. Most of the applications will install in the background. Any necessary installation windows will guide you through any manual configurations.
How the Installer Works
Q: What does the local installer do?
A: The local installer:
- Detects your system’s hardware (CPU, GPU, RAM, storage) and OS version
- Verifies compatibility with available AI tools
- Installs chosen tools from the web portal
Q: Does the installer run AI models?
A: No. It does not process data or run models itself. It only prepares your workstation for the AI tools you choose to install.
Using the Toolkit
Q: What is the Toolkit?
A: The Toolkit is the curated list of AI applications and utilities available through the web portal. Each listing includes:
- A description of what the tool does
- Minimum and recommended system requirements
- Step-by-step installation and configuration guides
Q: Can I add tools not listed in the Toolkit?
A: Yes, you can install any compatible software manually, but the AI Software Stack’s automated setup and update features will only work with tools in the Toolkit. The developer and AI landscape is changing in what seems like a daily basis. We provide an assortment of baseline tools that are utilized by many developers to get you started.
Privacy & Data Handling
Q: What information does the local agent collect?
A: Only basic system specifications (hardware configuration, OS version, installed drivers) and the list of installed Stack-managed tools. It does not collect personal files, browsing history, or usage data from other applications.
Q: Is my information sent to the cloud?
A: No, the basic system info required to recommend and configure compatible tools is only used locally. No personal or project data is transmitted.
Q: Is my data shared with third parties?
A: No. There is no information collected that is shared with Corsair, any of our subsidiaries, or any third party.
Updates & Support
Q: How often is the AI Software Stack updated?
A: Updates to the local agent and the web portal will be released regularly to add new tools, improve compatibility detection, and enhance installation processes. Since this is meant as a baseline setup tool, most users will find that they only need it to get their system up and running the first time. As they explore and refine their use case and customize their system to their needs, there is a wide assortment of repositories to access the tools directly such as GitHub, Hugging Face, etc.
Q: Where can I get help?
A: You can access documentation and support articles directly in the web portal in the FAQ and Support section.
AI SOFTWARE RECOMMENDATIONS
JAN.AI
The CORSAIR AI WORKSTATION includes Jan.ai which is an open-source, local-first AI platform designed to give users full control over their AI interactions. Rather than relying on cloud-based services, Jan lets you run powerful language models directly on your own hardware—offering privacy, flexibility, and customization.
Key aspects include:
- Local Operation or Cloud Flexibility: Run models locally or connect to cloud APIs like OpenAI, Groq, Cohere when higher compute is needed.
- Model Hub Accessibility: Comes with its own model hub that simplifies access to open-source models like Mistral, LLaMA, Gemma, and more via the GGUF format for efficient local deployment.
- Local API Server: Includes an OpenAI-compatible API listening on localhost:1337, enabling integration with existing tools or workflows that expect standard OpenAI endpoints.
- Extensible Ecosystem: Supports extensions and the Model Context Protocol (MCP), enabling AI to interact with tools like Jupyter, Canva, web browsers, and more.
Jan.Ai is particularly suited for:
- Privacy-Conscious Users: Ideal for managing sensitive or regulated data since all processing and storage happen locally.
- Developers & Researchers: Allows experimenting with various large language models, building custom assistants, or setting up private AI servers.
- Enthusiasts & Hobbyists: Great for anyone wanting to explore local AI workflows, run models offline, or avoid recurring cloud costs.
AMUSE.AI
AMUSE.AI (commonly referred to as Amuse) is a free, locally-run AI art and video generation tool for Windows PCs, developed by TensorStack in collaboration with AMD. It harnesses Stable Diffusion and other advanced AI models to let you generate and manipulate creative visuals directly on your hardware, without needing an internet connection, account, or subscription.
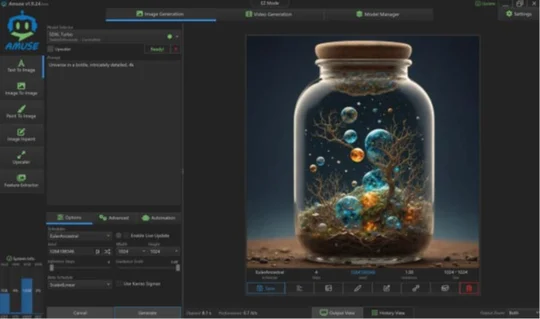
Key Features:
- EZ Mode for Instant Creativity: Start generating stunning artwork from text prompts or sketches right away—no setup required.
- Expert Mode with Advanced Controls: Unlock over 100 AI models for fine-tuned, technical control—including image generation, filtering, and automation.
- Custom AI Filters & Design Tools: Apply generative filters to existing images or transform your sketches into polished artwork.
- Text‑to‑Video and Video Capabilities: Amuse now supports experimental video generation—convert text to video, transform images into video, and restyle clips.
- AMD‑Powered Super‑Resolution: On compatible hardware, the AMD XDNA™ Super Resolution feature upscales images with improved clarity and speed.
- Private, Local, and Free: All processes run on your PC—no cloud involvement means full privacy. And best of all, it’s free for personal use, with no login or subscription needed.
Amuse.AI is particularly suited for:
- Quick Art Creation: Use EZ Mode for instantaneous image generation from text or sketches.
- Image Editing & Filtering: Apply AI filters to change styles, tone, or mood of your photos.
- Sketch Expansion: Turn simple outlines into detailed polished artwork via Design Mode.
- Video Content Creation: Experiment with text-to-video, image-to-video, and restyling effects.
- High-Resolution Output: Upscale images using AMD XDNA™ for sharper visual output.
- Privacy-Conscious Workflow: Generate content entirely on your device—no data leaves your PC.
- AMD Hardware Showcase: Demonstrates full use of powerful AMD AI-enabled CPUs, GPUs, and NPUs.
META LLAMA 4 SCOUT
Llama 4 Scout is part of Meta’s next-generation Llama 4 series, launched in April 2025. It’s a 17 billion active-parameter model built on a Mixture-of-Experts (MoE) architecture, employing 16 experts out of a total of 109 billion parameters. The model supports native multimodal input, meaning it can process text and images and produce multilingual text or code output.
Distinguishing Features & Advantages:
- Efficient yet powerful: Despite its scale, Llama 4 Scout is compact enough to run on a single NVIDIA H100 GPU in optimized setups.
- High benchmark performance: It surpasses models like Google’s Gemma 3, Gemini 2.0 Flash‑Lite, and Mistral 3.1 across a variety of benchmarks.
- Open-weight with some licensing limits: While technically accessible, Llama 4 models are subject to licensing restrictions for very large commercial users.
- Better at sensitive topics: Compared to Llama 3.3, Llama 4—including Scout—handles contentious topics more openly, refusing fewer prompts and showing reduced bias.
Use Cases & Applications:
In practical terms, here’s where Llama 4 Scout shines:
- Long-document tasks: Ideal for analyzing or summarizing massive data structures like technical documentation, legal text archives, codebases, or transcripts—all while maintaining context over millions of tokens.
- Multimodal analysis: Its ability to process text and images makes it well-suited for visual reasoning, document understanding, and use cases like image captioning or content generation.
- Multilingual & multimodal outputs: Great for chatbots, coding assistance, or cross-language content generation and translation.
- Efficient deployment: Excellent option for research labs or enterprises aiming to deploy powerful AI without requiring massive GPU clusters.
How to run Meta Llama 4 Scout on Strix Halo 128GB:
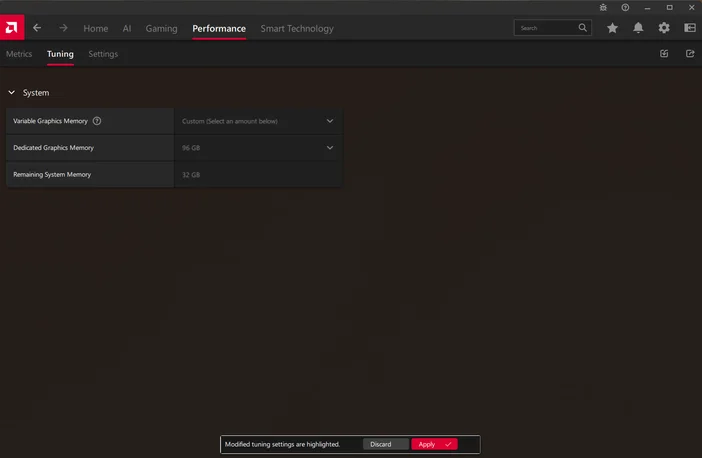
Note: The following steps apply only when operating in Developer Mode or Power User Mode. Meta Llama 4 requires a minimum of 96 GB memory for stable operation.
- Install the Adrenalin Preview Press Driver provided.
- Open AMD Adrenalin Software, Click on the Performance Tab, Click on the Tuning Tab, In front of Variable Graphics Memory, change the drop down to 96GB and click apply (this will result in a restart).
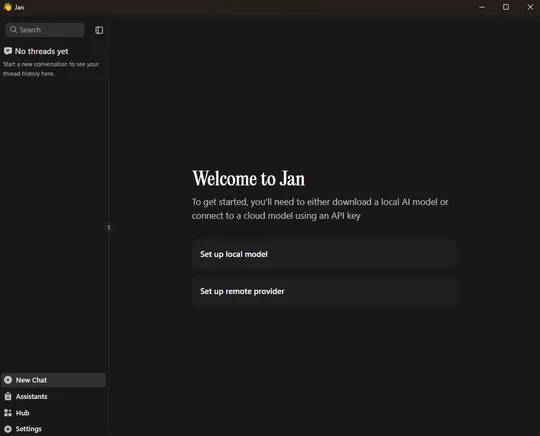
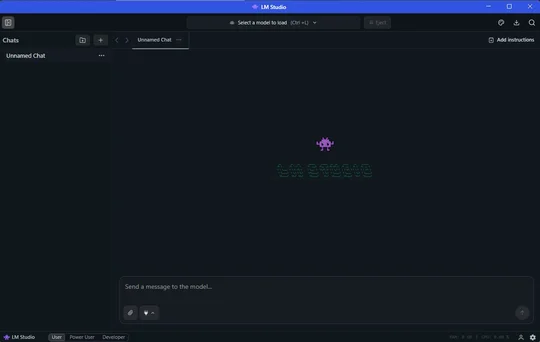
- Install LM Studio. LM Studio - Discover, download, and run local LLMs
- Run it and click on “skip onboarding”
- Go to the discover tab (magnifying glass).
- Click on “Runtime” on the left hand side and click update if any updates are pending.
- Make sure (Vulkan) llama.cpp is selected as the default runtime on the right hand side.
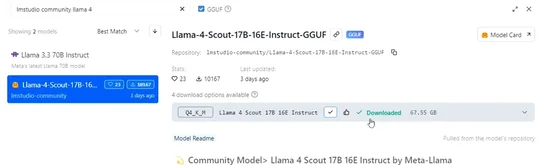
- Click on the “Model Search” drawer now and search for “lmstudio community llama 4 scout”
- On the right hand side from the drop down box, select the Q4 K M version and download. It will be 67 GB in size.
10. Once the model finishes downloading, go back to the “Chat” tab and click the center drop down menu. Make sure “manually select parameters” is checked and then click on the model name : Llama 4 Scout.
11. Maximize the GPU offload layers to 100% (48/48).
a. Use the --gpu-layers flag: Specify the number of layers to offload with the GPU Layers (or -ngl) argument.
b. Set the value: Set the value to 48 to offload all layers to the GPU.
Example Prompt: ./llama-cli --model llama4-scout-model.gguf --n-gpu-layers -48
12. Click load model.
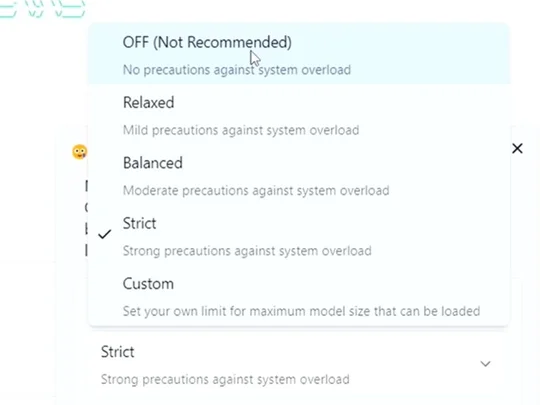
13. On first load, you may get the following guardrails message. If you do, please turn it OFF:
14. Load the model (making sure manual load param is selected and GPU offload layers is 100%
15. Chat!
16. Note: You can click on the “image” icon in the chat area to give the LLM an image to test its vision capability.
17. Note: These steps only work on Developer & Power user mode.
UPGRADING STORAGE
Storage Installation
If you would like to add more storage, a second NVMe SSD can be installed.
Note: To ensure proper fitment, it is best to install a low-profile heatsink NVMe SSD or an NVMe SSD that does not have a heatsink.
To change or install more storage, follow the instructions listed below.
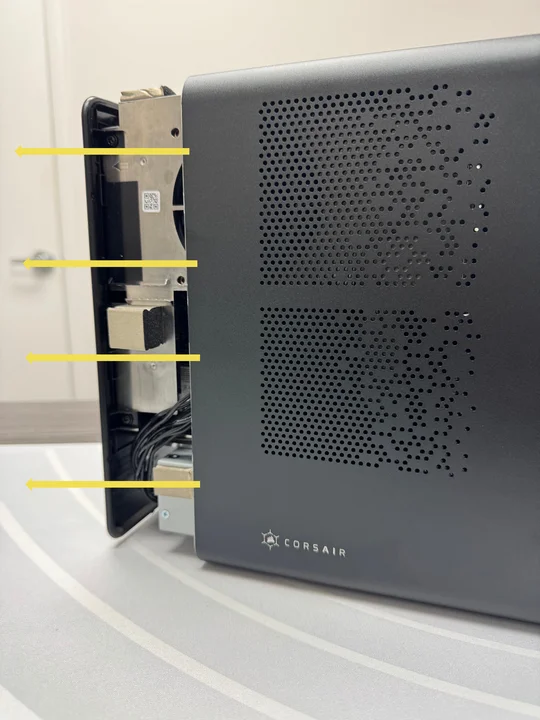
- Remove the Rear Panel by unscrewing the 9x screws indicated below.

2. Carefully remove the Rear Panel.
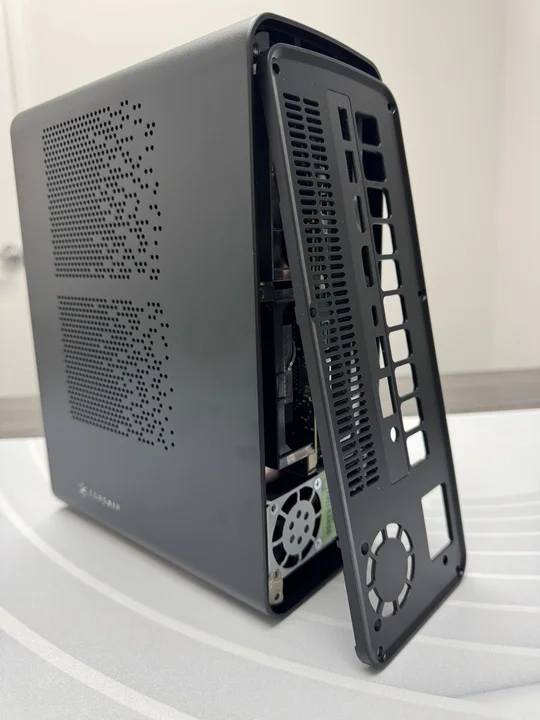
3. Carefully apply some force to push the internal tray so it slides out through the front side of the case. Once enough of the tray is available to grab, carefully pull the tray out of the case.
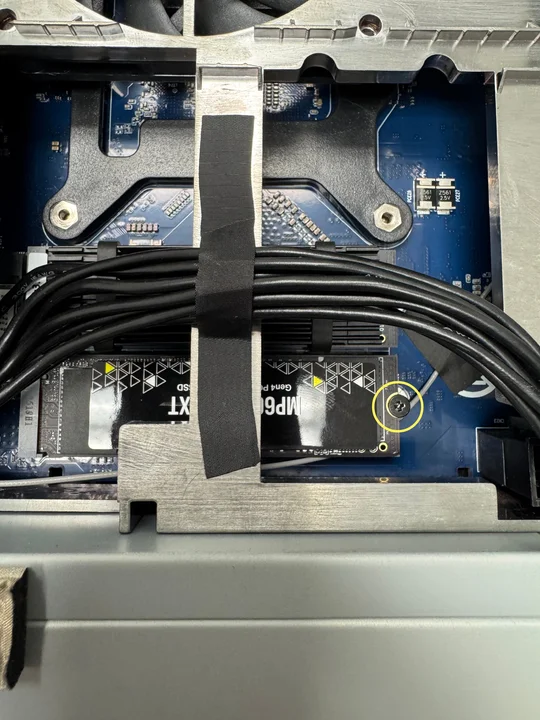
4. Locate the second m.2 slot on the motherboard and proceed to install your NVMe SSD storage drive.
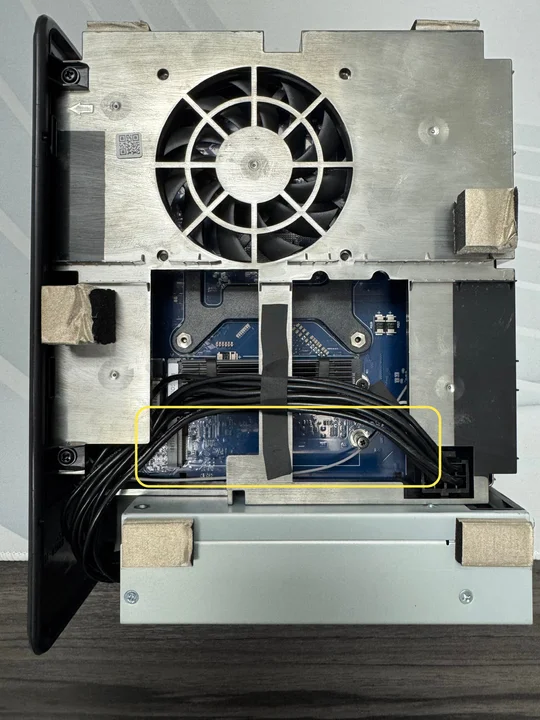
5. Make sure to secure the NVMe SSD storage drive with the pre-installed screw.
6. After completing installation, insert the motherboard tray back into the case.
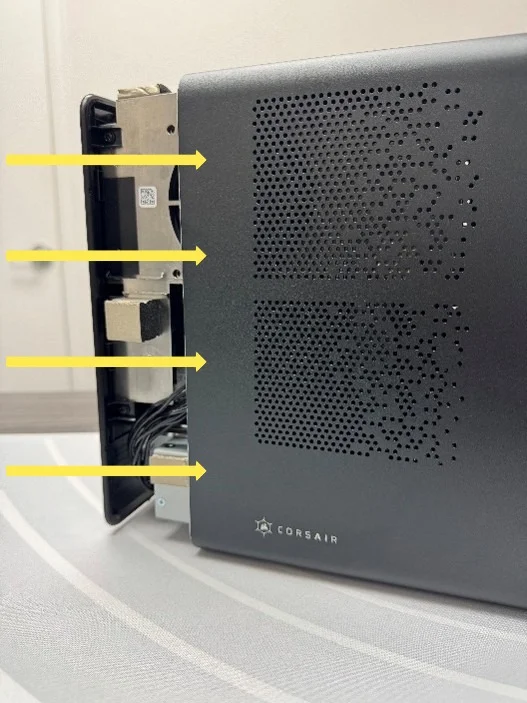
7. Install the Rear Panel back in its place.
8. Secure the Rear Panel with the 9x Screws.
ACCESSING THE LATEST SETUP AND DOCUMENTATION
ACCESSING DRIVERS AND SOFTWARE
CORSAIR AI WORKSTATION comes with all the necessary drivers and software pre-installed for operation. New versions of drivers and software are available on Corsair.com product support page, under the "Downloads" section.
COMPLIANCE STATEMENT
CORSAIR is committed to compliance with the laws and regulations in each country in which the company ships our products. CORSAIR products are designed and tested to meet the appropriate worldwide standards for Product Safety, Electromagnetic Compatibility, and other compulsory regulatory requirements when used for their intended purpose.
LIMITED PRODUCT WARRANTY
CORSAIR provides a non-transferable 2-year warranty to the purchaser of the CORSAIR AI WORKSTATION product purchased from an authorized CORSAIR reseller. CORSAIR warrants that the product will be free from defects in material and workmanship for a specified period commencing on the date the product is received by the purchaser The warranty period will vary by specific product, as identified in your user documentation, on the product package, or as listed in the attached listing of CORSAIR Warranty Periods. In the event any of these warranty periods differ, the longest specified warranty period will apply.
Except where prohibited by applicable local law, this warranty is limited to the original purchaser and is non-transferable. To exercise your warranty rights, you must present a sales receipt and provide product serial number information. This warranty provides you with specific legal rights, and you may have additional rights that vary under local laws.
In general, this warranty means your CORSAIR hardware product will operate in accordance with published technical specifications, as specified by its data sheet, and in the operating environment for which it was intended for the length of the warranty period.
REMEDIES
CORSAIR’s entire liability and your exclusive remedy for any CORSAIR product that is not operating in accordance with its published technical specifications is at CORSAIR’s discretion: replace the product at CORSAIR’s expense. This warranty obligation is conditioned upon the hardware being returned to the original place of purchase, or another place as directed by CORSAIR, with the original sales receipt attached. You may be required to pay shipping and handling charges, as well as any applicable tariffs, duties, taxes, or other fees. CORSAIR may, at its discretion, provide new or refurbished products.
Any replacement product will be warranted for the remainder of the original warranty period or thirty (30) days, whichever is greater, or for the period of time required by local statute.
OBSOLETE OR DISCONTINUED PRODUCTS
An obsolete or discontinued product will be replaced with the same product if available. If CORSAIR is unable to replace your obsolete or discontinued product with the same product, CORSAIR will replace the obsolete or discontinued product, in its sole discretion, with a product having similar function and capacity.
EXCLUSIONS
This warranty does not cover problems or damage resulting from, but not limited to, any of the following:
- Wear and tear associated with normal use.
- Any modification, abuse, accident, disassembly, misapplication, or unauthorized repair.
- Missing, altered, or otherwise unreadable serial number label, manufacturer model or part number label.
- Any improper operation, including any use not in accordance with any supplied product instructions.
- Connection to any improper voltage supply.
- Any other cause which does not relate to a product defect in materials or workmanship.
Also excluded from this warranty are counterfeit products; that is, products that CORSAIR, at its sole discretion, determines were not manufactured by CORSAIR or any of its authorized manufacturing partners.
COPYRIGHT/LEGAL INFORMATION
COPYRIGHT/LEGAL INFORMATION
© 2025 CORSAIR MEMORY, Inc. All rights reserved. CORSAIR and the sails logo are registered trademarks of CORSAIR in the United States and/or other countries. All other trademarks are the property of their respective owners. Products may vary slightly from those pictured.
LIMITATION OF LIABILITY
CORSAIR SHALL NOT BE LIABLE FOR ANY SPECIAL, INCIDENTAL, INDIRECT, OR CONSEQUENTIAL DAMAGES WHATSOEVER, INCLUDING BUT NOT LIMITED TO LOSS OF PROFITS, REVENUE, OR DATA (WHETHER DIRECT OR INDIRECT) OR COMMERCIAL LOSS FOR BREACH OF ANY EXPRESS OR IMPLIED WARRANTY ON YOUR PRODUCT EVEN IF CORSAIR HAS BEEN ADVISED PREVIOUSLY OF THE POSSIBILITY OF SUCH DAMAGES. Some local laws do not allow the exclusion or limitation of special, indirect, incidental or consequential damages, so this limitation or exclusion may not apply in your jurisdiction.
Contains FCC ID: RAS-MT7925B22M
Contains IC: 7542A-MT7925B22M