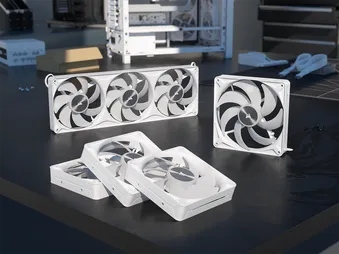
MANUAL | QUICK START GUIDE
CORSAIR RS II Series
PWM Fans
In this Guide
CONTENTS
120mm Single Fan
- One (1) RS II Fan
- Four (4) Mounting Screws
- One (1) PWM Extension Cable
140mm Single Fan
- One (1) RS II Fan
- Four (4) Mounting Screws
- One (1) PWM Extension Cable
360mm Triple Fans
- One (1) RS360 II Unified Frame Fan
- Four (4) Mounting Screws
| a. Female PWM Connector | b. Male PWM Connector |
FAN INSTALLATION
BEFORE YOU START
IMPORTANT: Turn the computer off prior to the installation of the RS II fans.
IMPORTANT: Before connecting multiple fans to a single PWM header, check your motherboard manual for its maximum current limit. Ensure the total current requirement of your fans does not exceed this limit. Please refer to the "POWER RATING" section at the bottom of this Quick Start Guide.
1. INSTALL THE RS II FAN(S) INSIDE THE CASE
- Mount the RS II fans in your case with the supplied (B) mounting screws.
2. CREATE A FAN GROUP - SINGLE FANS
- Daisy-chain each fan’s PWM connector from one fan to the next until the chain is complete.
- The final PWM connector will be used later to connect the fan group to your motherboard.
* Skip this step if you plan to use the RS II fan individually.
3. CREATE A FAN GROUP - 360 UNIFIED FRAME FANS
- Each 360 Unified Frame Fan Includes a 600mm PWM cable and a 50mm PWM daisy-chain cable.
- Daisy-chain each fan group by connecting the 50mm PWM cable from the RS360 II Unified Frame Fans to the PWM connector on the next RS II fan.
- The remaining 600mm PWM cable will be used later to connect the fan group to your motherboard.
* Skip this step if you plan to use the RS II fan individually.
4. CONNECT FAN(S) TO 4-PIN FAN HEADER
- Single Fans: Connect the PWM group to the PWM extension cable (C), then into an available 3-pin or 4-pin fan header on your motherboard or fan controller.
- A 4-pin header is necessary for PWM control. Ensure that the fan connector guides line up with the guide on the fan header.
- 360 Unified Frame Fans: Connect the 600mm PWM cable directly into an available 3-pin or 4-pin fan header on your motherboard or fan controller.
- A 4-pin header is necessary for PWM control. Ensure that the fan connector guides line up with the guide on the fan header.
FAN SETUP
Fan speeds are configured and managed by the devices to which the 4-pin cable is connected. In most situations this is typically the motherboard via a fan header, which would require entering the BIOS to configure fan speeds. Please refer to your motherboard manual for additional details.
Motherboard manufacturers typically offer software to control fan speeds, so find out which software is offered for your motherboard to control the fans using that method.
FREQUENTLY ASKED QUESTIONS
Can I connect the 4-pin cable connector into a 3-pin fan header on the motherboard or fan controller?
Yes, you can, but keep in mind, installing a 4-pin connector on a 3-pin header will no longer benefit from PWM control.
In which direction does the air flow?
CORSAIR fans have little arrows on the side of the fan frame that indicate the direction the fan blades spin as well as the direction in which the air flows.
How many fans can I chain together?
Most motherboard fan headers can typically provide up to 1A, which would be about 3 fans.
POWER RATING
RS120 II Input Rating: 12V max 0.4A / typical 0.17A
RS140 II Input rating: 12V max 0.45A / typical 0.18A
RS360 II Input Rating: 12V max 1.2A / typical 0.51A
WARRANTY

CORSAIR RS II Series fans have a 5-year warranty.
LEGAL
© 2026 CORSAIR MEMORY, Inc. All rights reserved. CORSAIR and the sails logo are registered trademarks of CORSAIR in the United States and/or other countries. All other trademarks are the property of their respective owners. Product may vary slightly from those pictured.
RELATED CONTENT