The Basic Input/Output System, also known as BIOS, is a vital element of your motherboard. Think of it as firmware stored on the motherboard’s memory chip that kicks in when you turn on your PC, initializing and testing all your hardware components. It acts as a bridge between the operating system and the hardware, making sure everything, like the CPU, RAM, and storage devices, is working properly before your computer fully starts up - a process called POST, or Power-on Self-Test.
If your PC is having stability or compatibility troubles with newer hardware, updating the BIOS to the latest version can really help. As you know, the PC hardware world is always changing, with components improving and applications and games demanding more to deliver a better experience. Flashing the motherboard’s BIOS is a key step in keeping your PC running well and avoiding potential issues. For example, sometimes a new graphics card or processor needs a BIOS update to work perfectly with your current motherboard.

By flashing the BIOS, you can take advantage of these updates, ensuring your PC runs smoothly and efficiently and ultimately extending the lifespan of your hardware.
How to Flash the BIOS
Before we get into the process of flashing the BIOS, let’s quickly touch on what UEFI is, since modern motherboards use UEFI instead of BIOS to prevent any confusion. BIOS and UEFI, also known as Unified Extensible Firmware Interface, are technically the same. Like other PC components, BIOS has evolved into a more advanced version called UEFI over the years. It performs the same basic functions as a BIOS but offers improved features, including faster boot times, support for larger hard drives, mouse support, and enhanced security measures. In the steps below, we will use an MSI motherboard with UEFI.
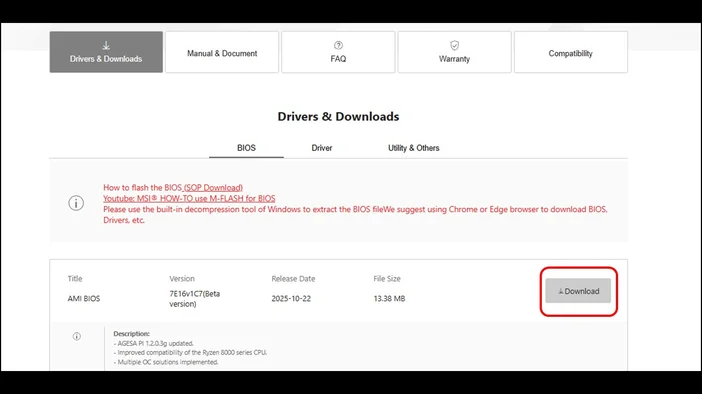
- First, download the latest BIOS version for your motherboard from the manufacturer's official website.
- Once you have the latest BIOS, save it to a USB drive formatted as FAT32, then extract the BIOS update to the root directory of the USB drive.
- Insert it into a USB port on your PC, then power on the PC with the USB drive connected.
- To access your system’s BIOS, watch for the prompt on your screen during startup and be ready to press the designated key to access BIOS.
Most motherboards, if not all, use the “DELETE” key. But some motherboard manufacturers may use the “Esc” key, so it’s best to check the motherboard manual for specific instructions on accessing the BIOS.
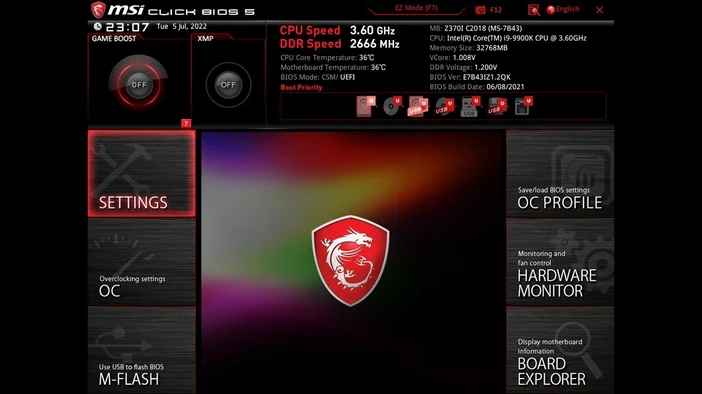
- Once you are in the system BIOS, go to the flashing tool to update the BIOS. In this BIOS UI, it’s called “M-FLASH”.
- You will then be asked if you want to enter flash mode – select “Yes”.
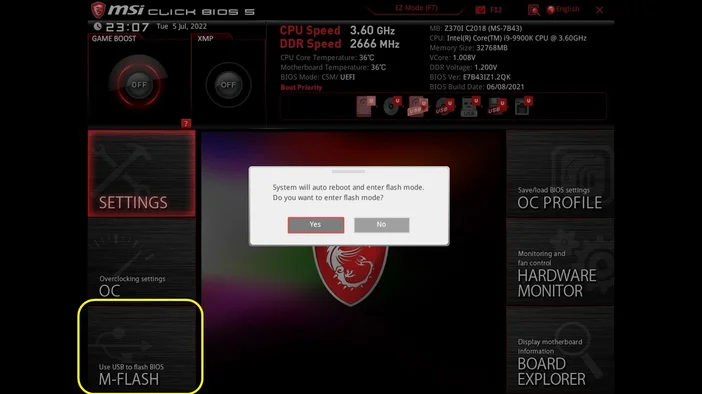
The PC will auto reboot, and once it boots back up, it will go straight to “flash mode”.
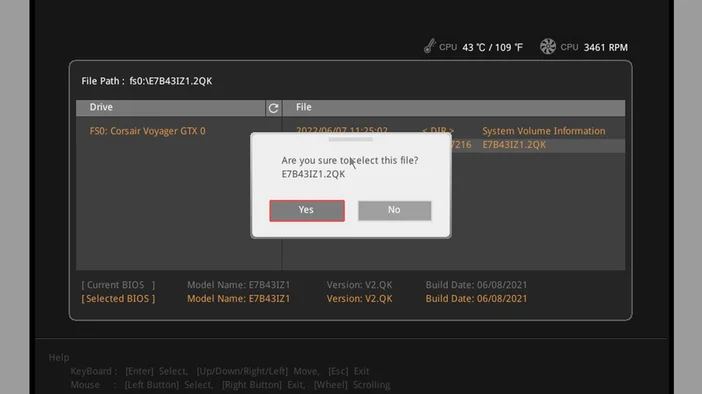
Select the USB thumb drive where you saved the latest BIOS version file, then select “Yes” when asked to choose the file.
- The PC will go through the entire update process. Once the BIOS has been flashed, the PC will restart.
NOTE: Do NOT interrupt the BIOS update process to ensure the update is applied correctly.
When the PC restarts, it will display the main BIOS screen. Press "F6" to load the BIOS default settings optimized for performance. The update process is now finished, and your motherboard’s BIOS is up to date. To exit and save your changes, press “F10".
Flashing the BIOS on your motherboard is not only a responsibility that all PC users should know, but it should also be part of your regular system maintenance to keep your PC in top condition, especially when your build is constantly in use. Knowing how to update the BIOS empowers you to troubleshoot and resolve hardware-related issues effectively. Many problems, such as system crashes or failure to recognize new peripherals, can often be traced back to outdated BIOS versions.
JOIN OUR OFFICIAL CORSAIR COMMUNITIES
Join our official CORSAIR Communities! Whether you're new or old to PC Building, have questions about our products, or want to chat about the latest PC, tech, and gaming trends, our community is the place for you.