So you've installed your new NVMe drive and turned your PC on but you can't see your new drive. Why is that?
Unfortunately, getting a new SSD to show up in windows isn't quite as seamless as you'd expect it to be, even in Windows 11. To make a new SSD show up, you must initialize it first. Here's how to do that.
How to Initialize a New Drive in Windows
Once the SSD is physically installed, turn the PC on and follow these steps to initialize the new drive:
- Open the start menu and type in "Create and format hard disk partitions" and hit enter (you may be prompted for permission as an administrator).
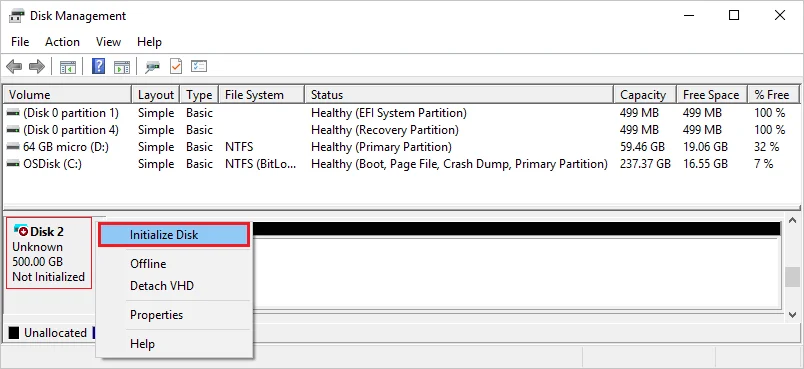
- Find where your new SSD is listed as "Unknown" and "Not initialized".
- Right click it and select "Initialize Disk".
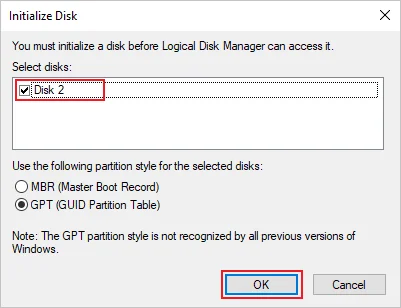
- In this menu, select GPT (GUID Partition Table) and click OK.
The other option is not recommended as it's less compatible with drives over 2TB in capacity.
Do I Need to Format the Drive After Initializing it?
Not technically, but it's still a best practice.
Here you should use the NTFS format. Avoid using FAT32 on Windows 10/11. We compared FAT 32 vs exFAT vs NTFS in a separate article so read that for more information.
You can also change the drive name and assigned letter by right clicking the main portion of the drive and clicking "Change Drive Letter and Paths..."
PRODUCTS IN ARTICLE
JOIN OUR OFFICIAL CORSAIR COMMUNITIES
Join our official CORSAIR Communities! Whether you're new or old to PC Building, have questions about our products, or want to chat about the latest PC, tech, and gaming trends, our community is the place for you.