매뉴얼 | 빠른 시작 가이드
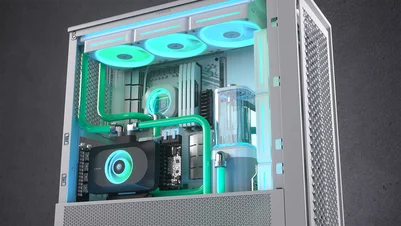
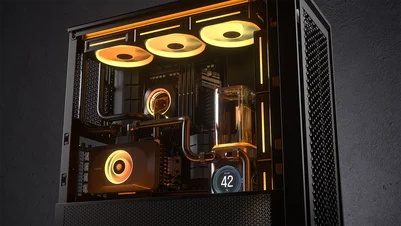
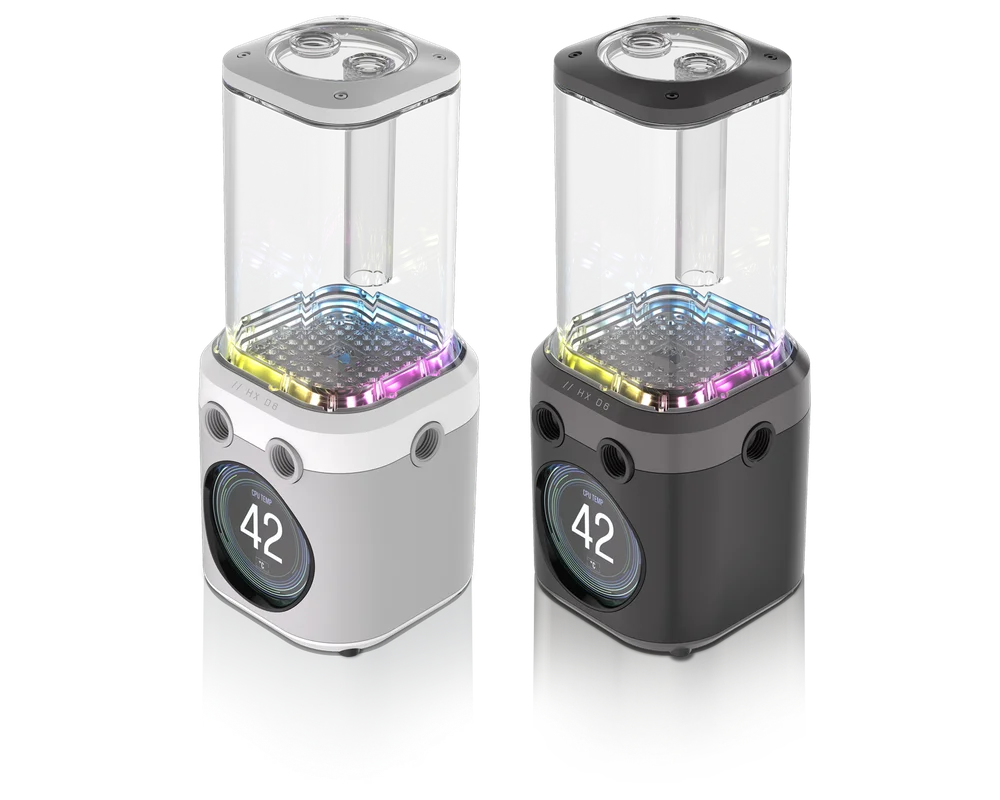
CORSAIR iCUE LINK XD6 RGB ELITE LCD
PUMP / RESERVOIR COMBO
BEFORE YOU START
PACKAGE CONTENTS
iCUE LINK XD6 RGB ELITE LCD Pump / Reservoir (1x)

Pump / Reservoir Mounting Bracket (1x)

120mm & 140mm Fan Mounting Adapter Plates (1x each)

ATX 24-pin PSU Jumper Bridge (1x)

CORSAIR G 1/4" Plugs (3x)

Self-tapping Fan Screws (4x)

M4 Hex Nuts (4x)

M4 Washers (4x)

M4 6mm Screws (4x)

M3 6mm Screws (4x)

M3 Thumb Screws (4x)

Plug Tool (1x)
iCUE LINK 600mm Cable with Straight/90° Connectors (1x)
USB Type-C 90° 600mm Cable (1x)
PREREQUISITES (NOT INCLUDED)

Phillips Head Screwdriver

iCUE LINK System Hub
Latest Version of iCUE Software

Microsoft Windows 10 or newer

Filling Bottle and CORSAIR Coolant
Internal USB 2.0 Header
(Motherboard or USB Internal Hub)
INITIAL ASSEMBLY OF THE UNIT
1. INSTALLING THE MOUNTING BRACKET
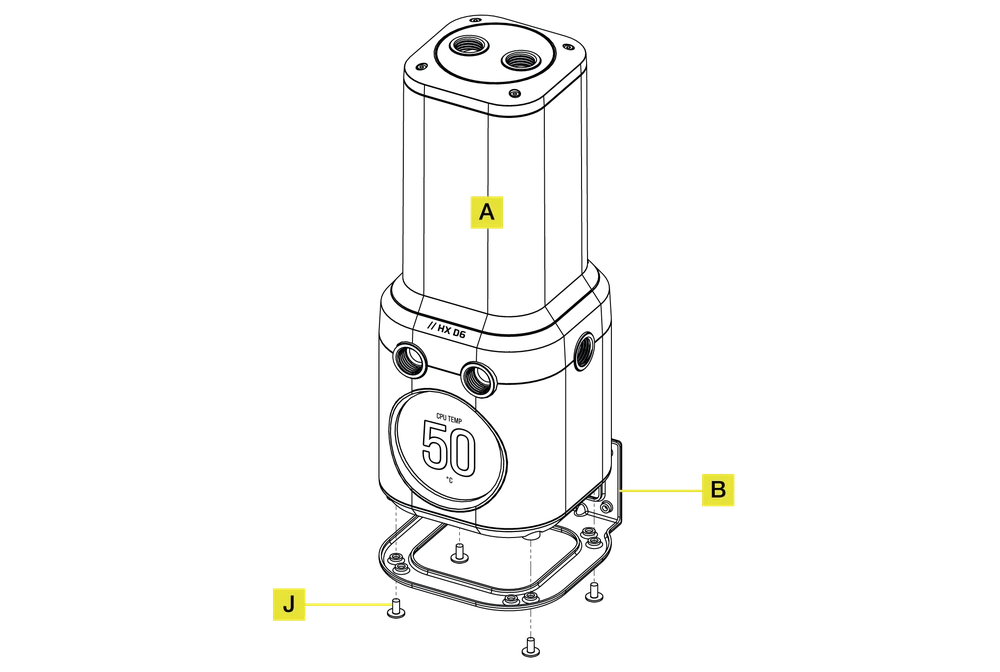
- Place the Pump / Reservoir (A) on the Pump / Reservoir Mounting Bracket (B) with un-threaded holes facing up.
- Secure the Pump / Reservoir (A) to the bracket (B) using four M3 6mm Screws (J) from the bottom.
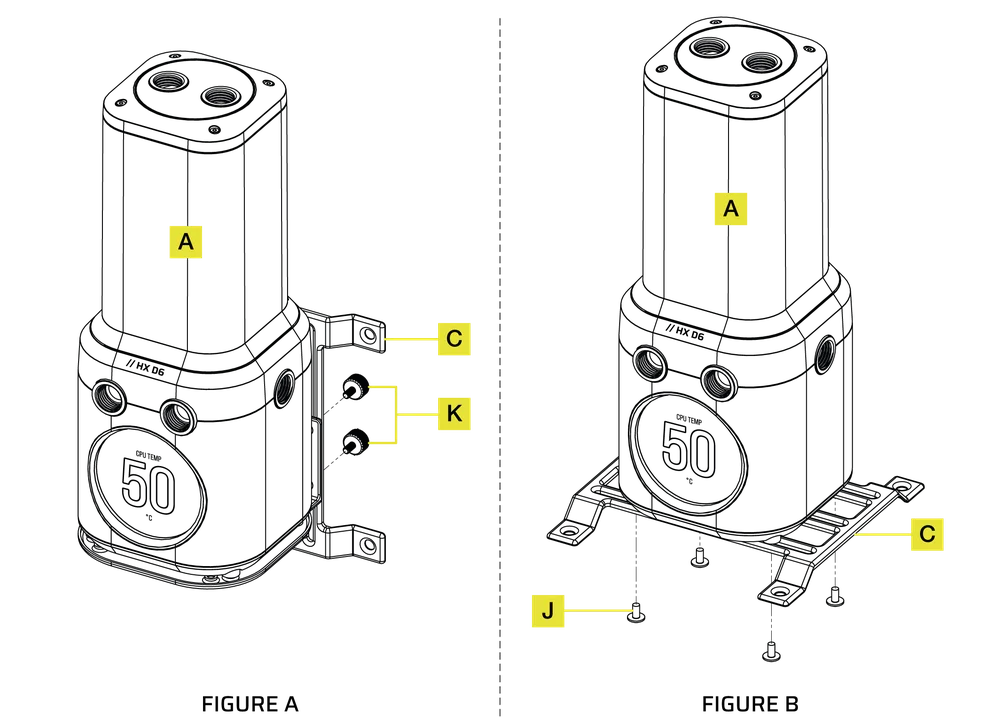
2. INSTALLING THE FAN MOUNTING ADAPTER PLATE
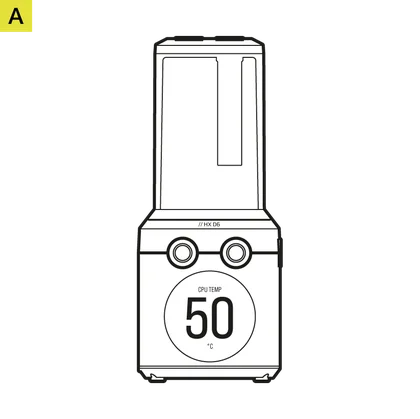
VERTICAL MOUNTING (FIGURE A)
- Secure the Pump / Reservoir (A) with the installed mounting bracket to a 120mm or 140mm Fan Mounting Adapter Plate (C) using four M3 Thumb Screws (K).
HORIZONTAL MOUNTING (FIGURE B)
- Secure the Pump / Reservoir (A) to a 120mm or 140mm Fan Mounting Adapter Plate (C) using four M3 6mm screws (J).
MOUNTING THE ASSEMBLY
1. MOUNTING THE ASSEMBLY TO A RADIATOR
- Secure the Pump / Reservoir (A) with the fan mounting adapter bracket to the radiator using short 6mm (0.25") M4 P0.7 screws supplied with the CORSAIR XR radiator itself.

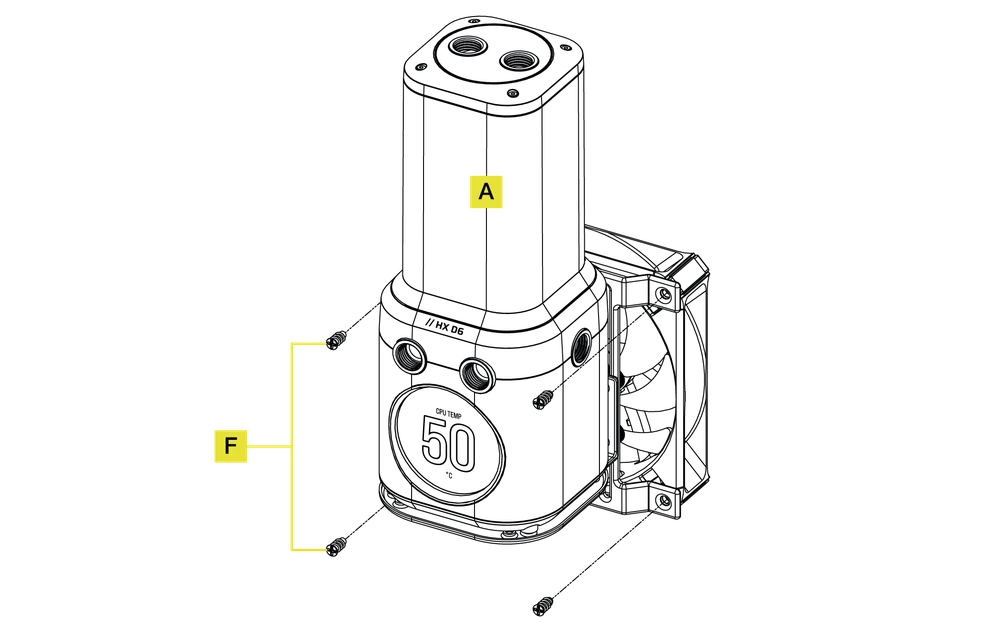
2. MOUNTING THE ASSEMBLY TO A FAN
- Secure the Pump / Reservoir (A) with the fan mounting adapter bracket to the fan using four Self-tapping Fan Screws (F).
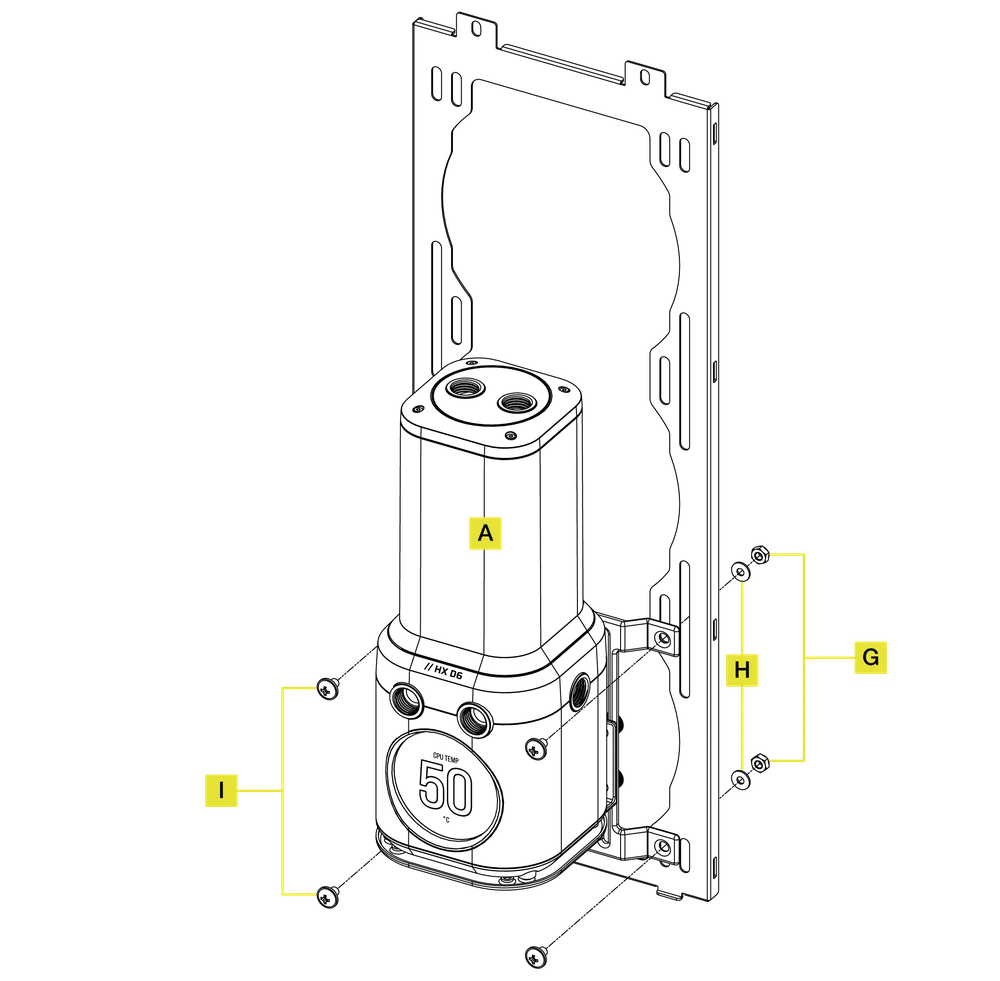
3. MOUNTING THE ASSEMBLY TO A CASE FAN SLOT
- Secure the Pump / Reservoir (A) with the fan mounting adapter bracket to a case fan opening using four M4 6mm screws (I) along with four M4 Washers (H) and four M4 Hex Nuts (G).
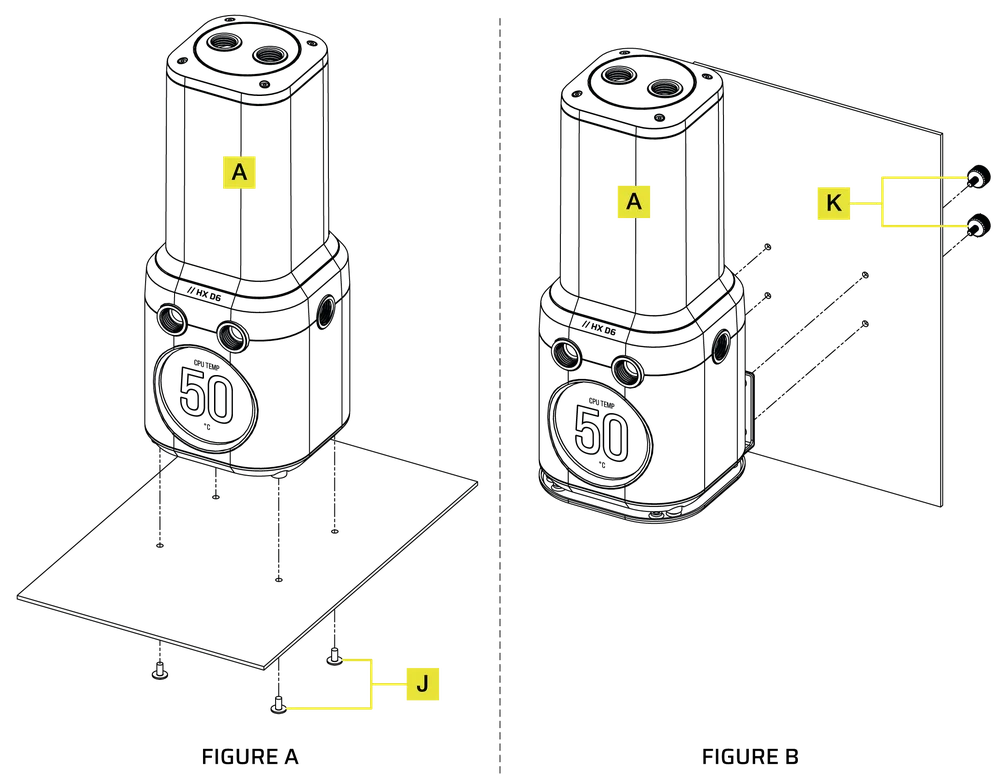
4. MOUNTING THE ASSEMBLY TO A CASE'S SHEET METAL
- Locate the suitable cut-out hole pattern in the chassis that fits the 55mm x 27.5mm (for vertical installation) or 55mm x 67mm (for horizontal installation) hole pattern.
HORIZONTAL MOUNTING (FIGURE A)
- Secure the Pump / Reservoir (A) to a case's sheet metal using four M3 6mm screws (J).
VERTICAL MOUNTING (FIGURE B)
- Secure the Pump / Reservoir (A) with the installed Mounting Bracket to a case's sheet metal using four M3 Thumb Screws (K).
MOUNTING ORIENTATION
- The iCUE LINK XD6 RGB ELITE LCD must be installed vertically with the pump below the reservoir tube.

FINALIZING THE SETUP
- Install the two (2) appropriate CORSAIR XF G 1/4" BSPP threaded-type fittings (not included) into the front reservoir ports and tighten them by hand. Do not use any tools (i.e. pliers).
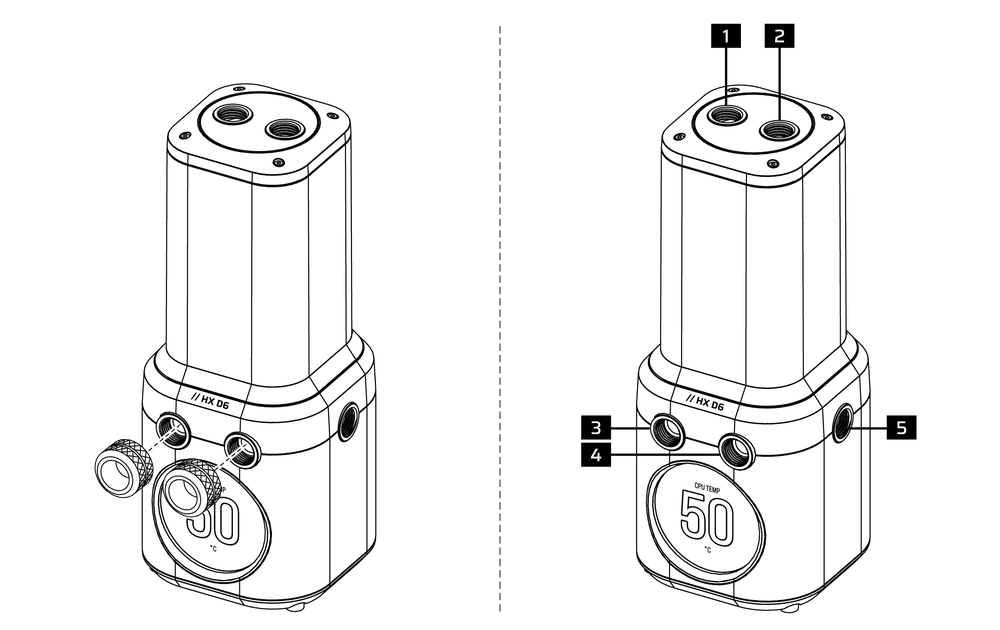
- FILL port
- Optional INLET port
- OUTLET port
- Recommended INLET port
- Optional INLET port
iCUE LINK CONNECTION
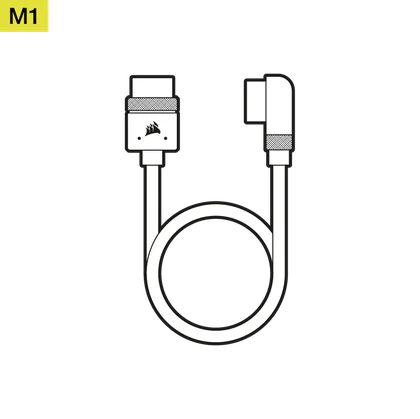
- Connect the iCUE LINK header on the pump housing to an iCUE LINK System Hub (O) using the included iCUE LINK 600mm Cable with Straight/90° Connectors (M1).
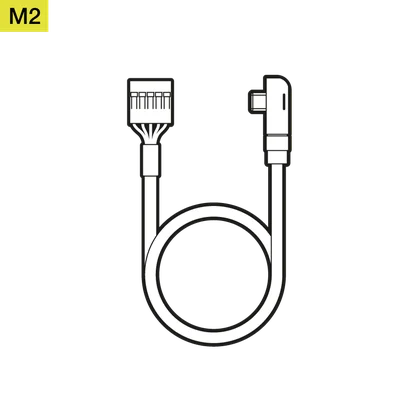
- Insert the angled USB Type-C plug of the included USB Type-C 90° 600mm Cable (M2) to the USB Type-C port on the pump housing.
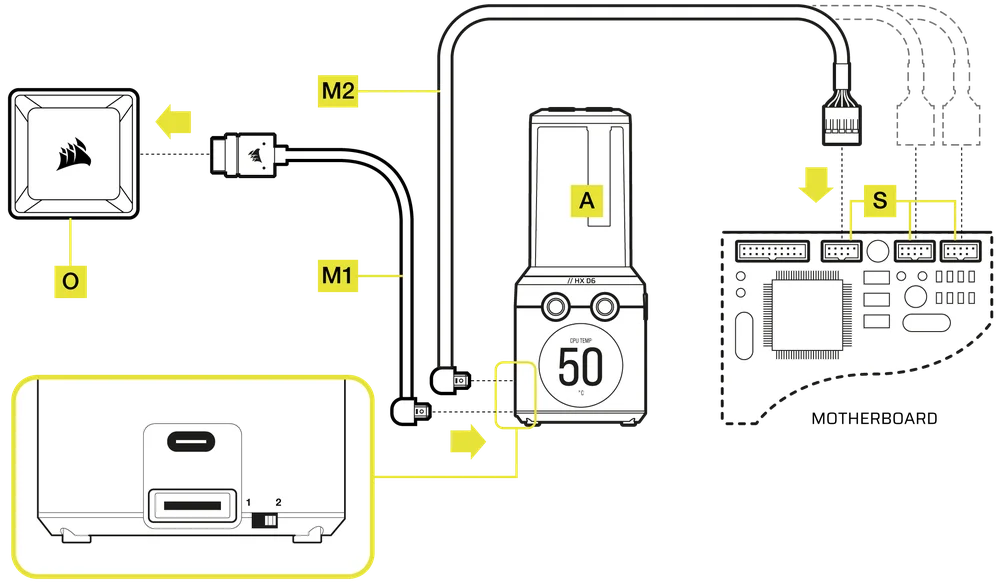
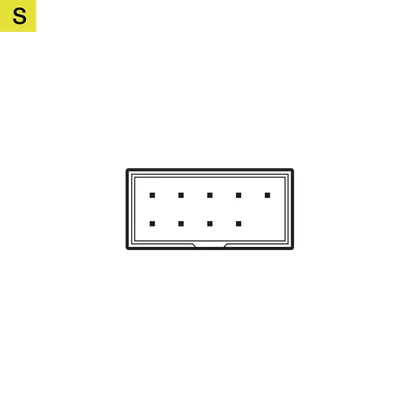
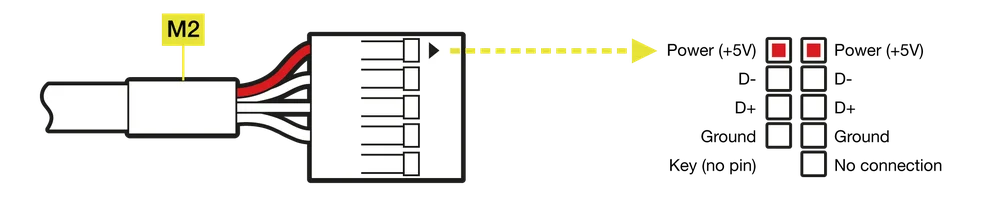
- Connect the other side of the USB Type-C 90° 600mm Cable (M2) to a USB 2.0 motherboard internal header (S) so that the red wire on the connector aligns with the power pin of the header.
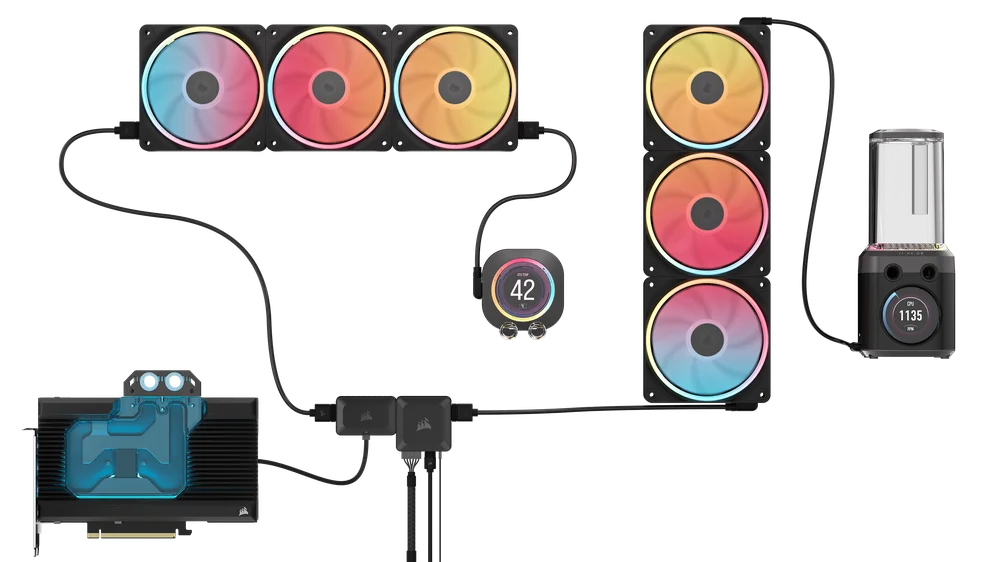
The iCUE LINK XD6 RGB ELITE LCD can be used with other iCUE LINK hardware by placing it anywhere on the channel string using a direct connection, Y-Cable accessory, or 4-Way Splitter.
Learn more about how CORSAIR iCUE LINK System Hub connections work.
FILLING AND PRIMING
1. PREPARING THE POWER SUPPLY UNIT
- Make sure the PSU is turned OFF, either at the plug socket, or via the toggle switch on the rear of the PSU (Figure 1).
- Disconnect PSU power cables from all computer components except the iCUE LINK System Hub 6-pin PCIe power connector.
- Connect the enclosed ATX 24-pin PSU Jumper Bridge starter (D) to your PSU 24-pin ATX cable. This will allow you to power on your iCUE LINK System Hub and all devices connected to the System Hub without powering on the PC (Figure 2).

2. PREPARING THE PUMP
- Move the manual pump speed override switch on the side of the Pump / Reservoir to position 1. This will allow the pump to run at full power, allowing for easier priming and bleeding of air.

3. FILLING AND PRIMING THE RESERVOIR
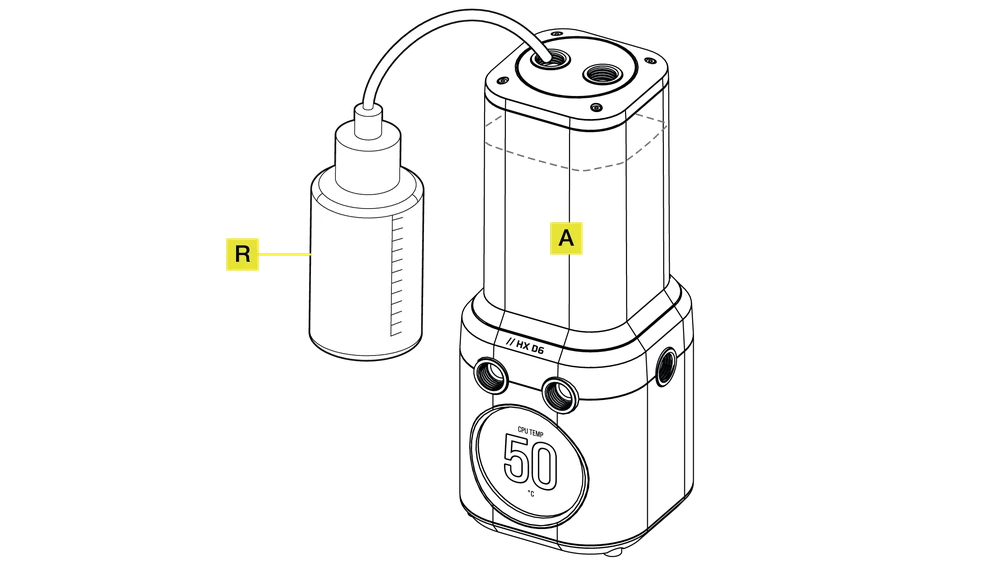
- Fill the reservoir through the top left G 1/4" opening with CORSAIR coolant using the Filling Bottle (R) to about 2cm (4/5 below the top).
- Turn on the power by flipping the ON switch on the PSU. The pump motor will be primed with coolant from the reservoir and will start flowing through the system. Turn the power OFF before the reservoir is emptied. Do not let the pump run without coolant in the reservoir as this will damage the pump.
- Repeat steps 1 and 2 until your custom cooling system is full. CORSAIR recommends not filling the reservoir more than about 2cm from the top.
- Move the manual override pump speed switch back to position 2 on the pump housing once priming the loop is complete. You will not be able to control pump speed and it will run at priming speed if not set back to its original position.

- Once the system is filled with coolant, CORSAIR recommends running it for 24 hours to remove any air trapped in the components and to make sure there are no leaks in the system.
- Once you have thoroughly leak-tested the system, turn OFF the PSU (Figure 1) and disconnect the ATX 24-pin PSU Jumper Bridge (D)(Figure 2).
- Reconnect the power cables to other computer peripherals and start the computer.

SOFTWARE SETUP
1. INSTALL iCUE
- Download and install the latest version of iCUE from www.corsair.com/downloads
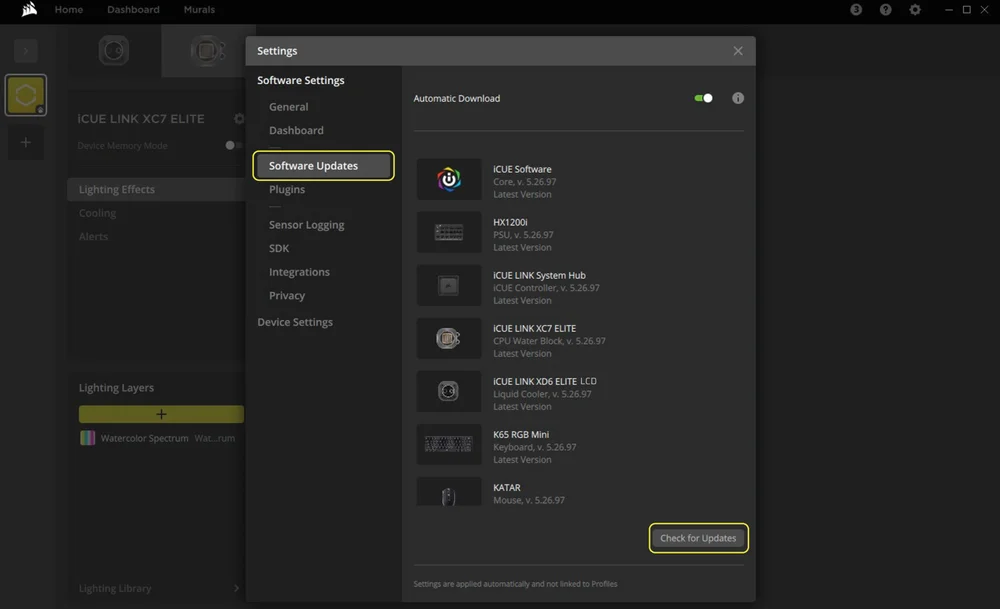
2. SOFTWARE UPDATE
- Once iCUE is installed, run the software. If any of the connected devices need a firmware update, you will be prompted to perform an update via a notification in the top right corner. You can also click the settings (cog wheel icon in the top right corner) and check for the software and firmware updates manually.
3. LIGHTING SETUP
Quick Lighting Setup
- Select the predefined Murals effects from the iCUE Home screen to quickly change the lighting effects.

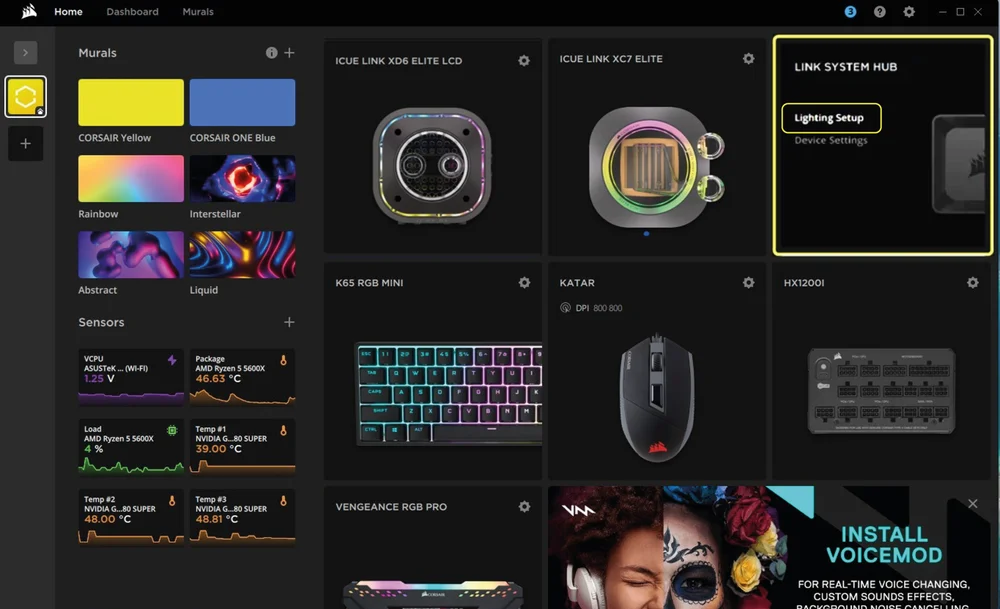
Re-order iCUE LINK connected devices
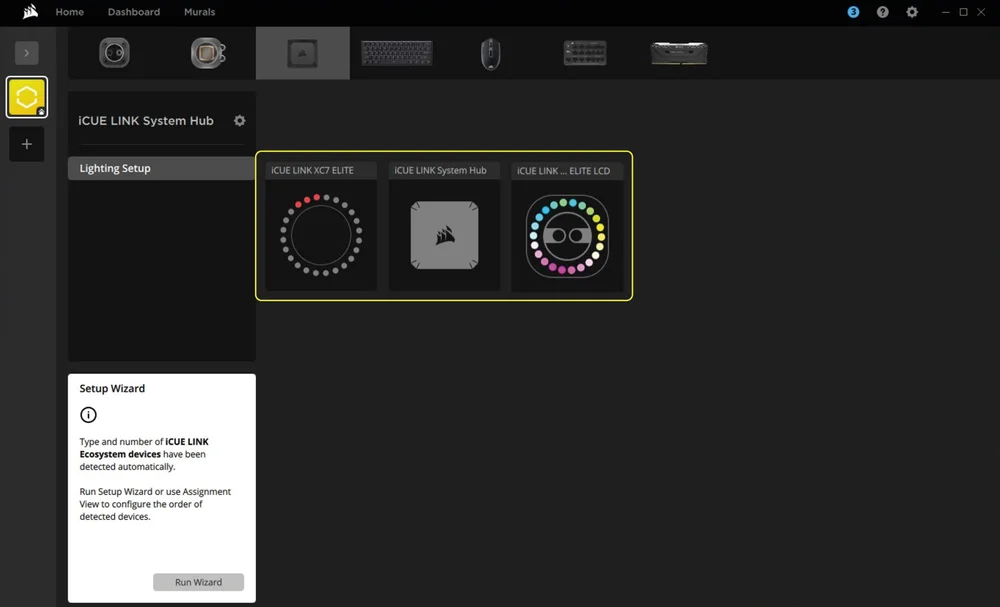
The Lighting Setup page will display all iCUE LINK devices connected to the System Hub and allow you to re-order them to better match the physical placement inside your system.
- Mouseover the System Hub tile and select "Lighting setup".
- Re-arrange your iCUE LINK devices to match your setup.
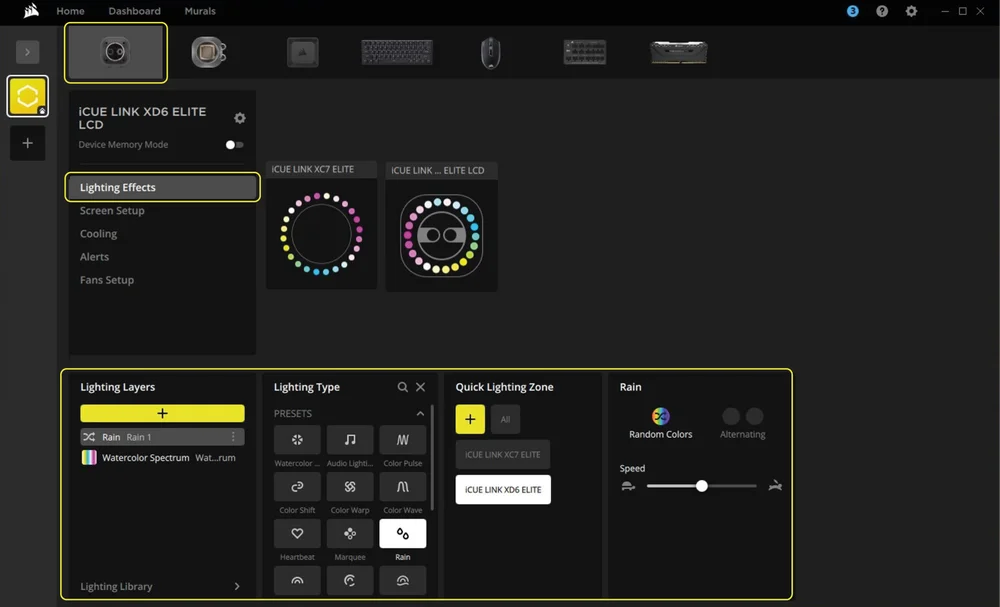
Lighting Effects
Choose what lighting effect will be displayed when the iCUE software is running:
- Select iCUE LINK XD6 RGB ELITE LCD from the navigation bar.
- Select "Lighting Effects".
- Select the desired lighting effect by clicking on one of the available options in the "Lighting Type" panel.
- In the "Quick Lighting Zone" panel, select the product you want to apply the selected effect to. Choose "All" to apply the effect to all listed products.
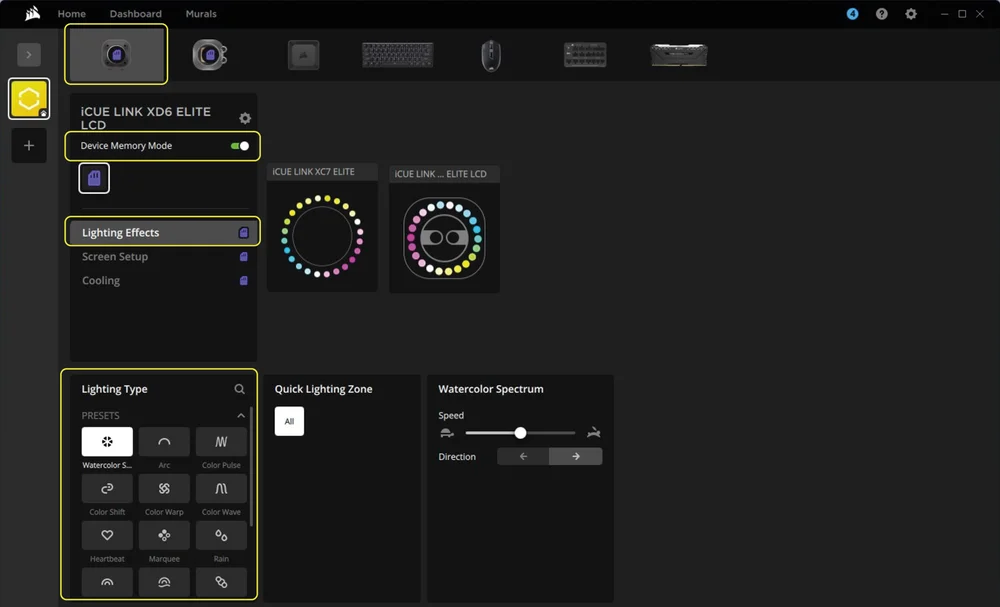
Device Memory Mode
Choose what lighting effect will be displayed when iCUE software is not running, usually during computer the startup phase:
- Select iCUE LINK XD6 RGB ELITE LCD from the navigation bar.
- Select "Lighting Effects".
- Toggle the Device Memory Mode by clicking on the button.
- Select the desired lighting effect by clicking on one of the available options in the "Lighting Type" panel and click on the save icon.
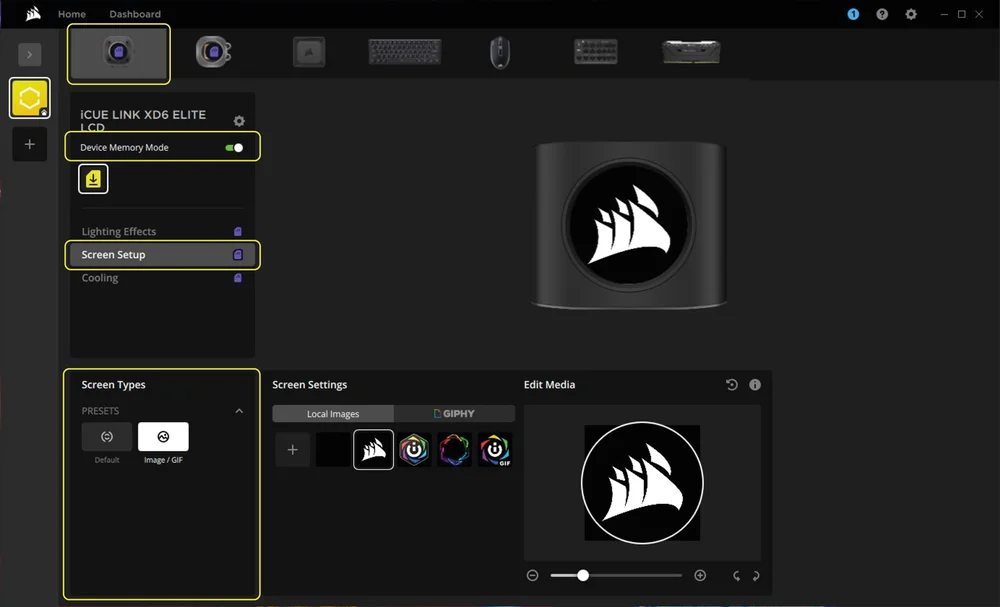
4. LCD SCREEN SETUP
Screen Setup
- Select iCUE LINK XD6 RGB ELITE LCD from the navigation bar.
- Select "Screen Setup".
- Choose one of the available presets in the "Screen Types" panel by clicking them.

Device Memory Mode
Choose what will be displayed on the LCD screen of your iCUE LINK XD6 RGB ELITE LCD when iCUE software is not running, usually during computer the startup phase:
- Select iCUE LINK XD6 RGB ELITE LCD from the navigation bar.
- Select "Screen Setup".
- Toggle the Device Memory Mode by clicking on the button.
- Choose one of the available presets in the "Screen Types" panel and click on the save icon.
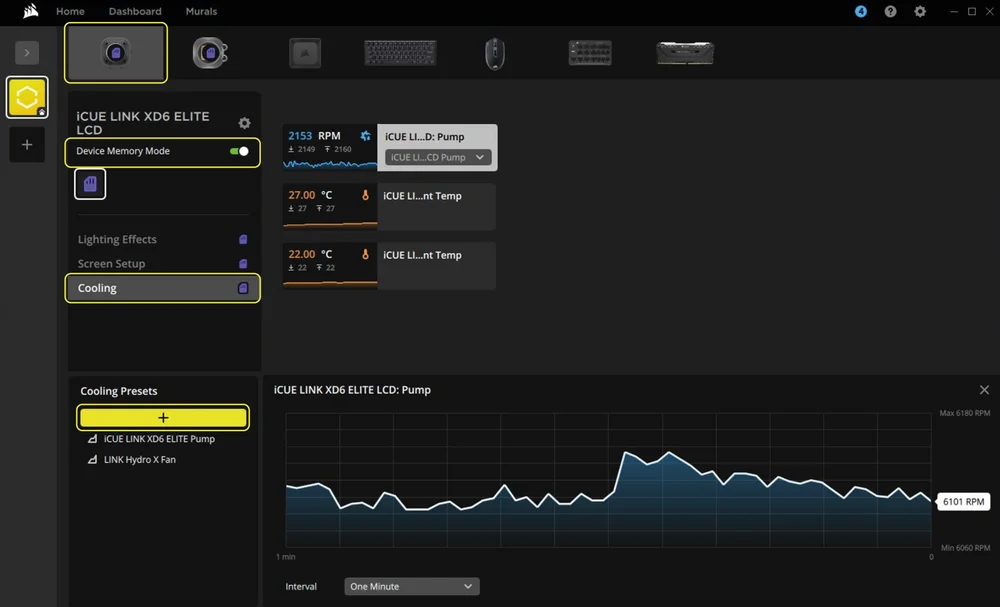
5. COOLING AND PUMP SPEED SETUP
Cooling Performance
- Select iCUE LINK XD6 RGB ELITE LCD from the navigation bar.
- Select "Cooling".
- Add a custom cooling preset by clicking the "+" button in the "Cooling Presets" panel.
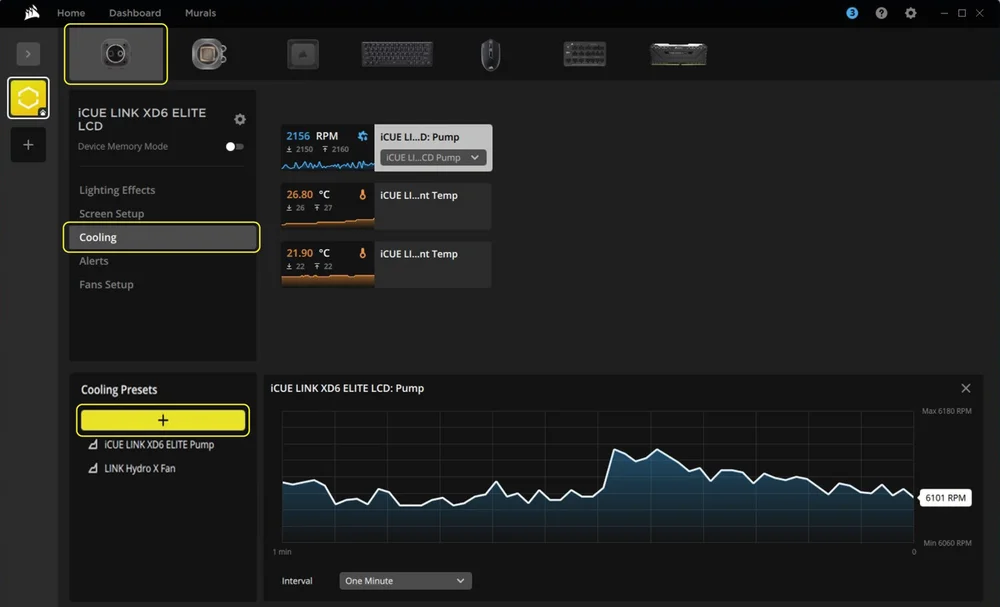
- Choose one of the available options in the middle panel and customize the curve.

Device Memory Mode
Choose how your pump will perform when the iCUE software is not running, usually during computer startup phase:
- Select iCUE LINK XD6 RGB ELITE LCD from the navigation bar.
- Select "Cooling".
- Toggle the Device Memory Mode by clicking on the button.
- Add a custom cooling preset by clicking the "+" button in the "Cooling Presets" panel.
- Choose one of the available options in the middle panel, customize the curve and click on the save icon.
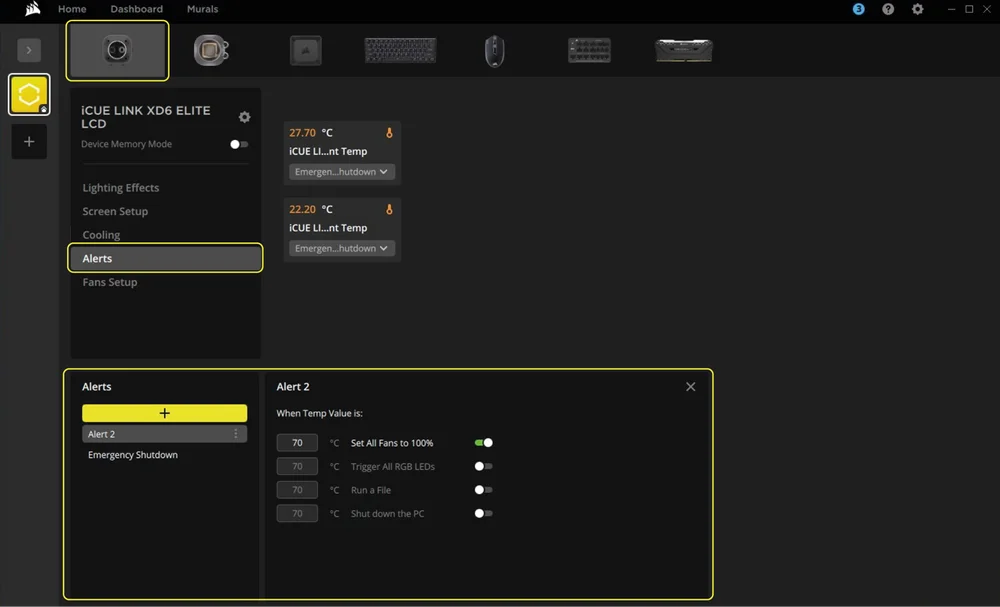
6. ALERT SETUP
The "Alerts" feature allows you to set custom alerts or trigger specific actions when your device reaches a certain temperature:
- Select iCUE LINK XD6 RGB ELITE LCD from the navigation bar.
- Select "Alerts".
- Set the the temperature values for triggering a specific alert action.
FREQUENTLY ASKED QUESTIONS
Can I use the iCUE LINK XD6 RGB ELITE LCD Pump / Reservoir as a standalone part?
No, this is a water-cooling pump with an integrated reservoir which requires a complete custom water-cooling system, including cold plates (water blocks) and a radiator. For more information, please visit the Hydro X Series page.
Can I use the iCUE LINK XD6 RGB ELITE LCD Pump / Reservoir with aluminium water-cooling equipment?
Certain parts are made from copper and brass and should not be mixed with aluminium.
Can I install two iCUE LINK XD6 RGB ELITE LCD Pumps / Reservoirs?
In order to use two iCUE LINK XD6 RGB ELITE LCD Pumps / Reservoirs, each must be connected to a separate System Hub port.
Can I use a different brand of coolant with iCUE LINK XD6 RGB ELITE Pump / Reservoir?
During internal testing, some liquid coolants proved incompatible with Hydro X Series products. Check the coolant compatibility list to make sure you are using the right coolant. If a coolant is not listed, it should be considered incompatible.
What should I do if I’m experiencing LCD flickering issues?
To fix the issue, follow the steps in the guide linked below:
How To: Fix LCD Flickering issues on your AIO or Custom Cooling Device – Corsair
WARRANTY

HYDRO X Series Core products (CPU and GPU Blocks, Pumps/Reservoirs, and Radiators) have a 3-year warranty.
LEGAL
© 2025 CORSAIR MEMORY, Inc. All rights reserved. CORSAIR, Hydro X Series, and the sails logo are registered trademarks of CORSAIR in the United States and/or other countries. All other trademarks are the property of their respective owners. Product may vary slightly from those pictured.
관련 콘텐츠