-
SPECIFICATIES BEHUIZING
-
INHOUD ACCESSOIRESET
-
CASE EXPANDED VIEWS
-
PANEELINSTALLATIE / VERWIJDERING
-
INSTALLATIE VAN HET MOEDERBORD
-
INSTALLATIE VAN FRONT I/O-KABELS
-
MAGNETISCHE STRIP INSTALLATIE
-
VENTILATORINSTALLATIE
-
HYDRO X AANGEPASTE KOELINGSUPPORT
-
RADIATORINSTALLATIE
-
INSTALLATIE VAN OPSLAGAPPARATUUR EN CONTROLLERS
-
INSTALLATIE VAN STROOMVOORZIENING
-
INSTALLATIE VAN DE GRAFISCHE KAART
-
UW FANS VERBINDEN
-
ONDERHOUD
-
GARANTIEVERKLARING
-
PRODUCT CHANGES
-
AVAILABLE ACCESORIES
-
SPARE PARTS LISTING
-
LEGAL
- GERELATEERDE INHOUD
HANDLEIDING | SNELSTARTGIDS
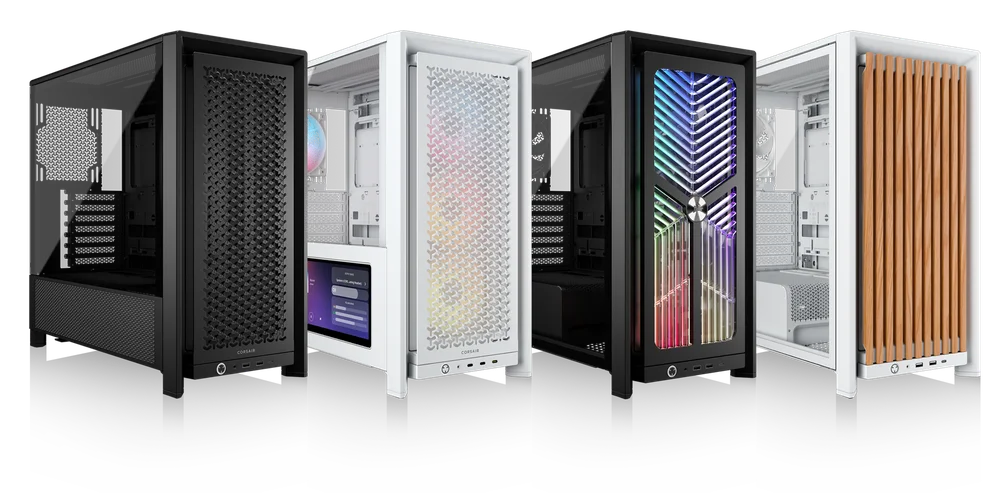
CORSAIR FRAME 4000-serie
MODULAR MID-TOWER CASE
De Engelse versie is hier beschikbaar - English
Als u nog andere problemen heeft, neem dan contact op klantenondersteuning
SPECIFICATIES BEHUIZING
|
PCI-sleufconfiguratie |
7 Horizontaal / 3 Verticaal |
|
Compatibiliteit moederborden |
Mini-ITX, Micro-ATX, ATX, E-ATX (305 mm x 277 mm) |
|
HDD's |
|
|
SSD's |
|
|
Beschikbare kleuren |
|
|
Materiaal linkerzijpaneel |
Gehard glas |
|
Materiaal voorpaneel |
|
|
Kabelruimte achteraan |
37 mm |
|
Stoffilters |
Front, Side, Bottom |
|
I/O vooraan |
Standard FPIO (FRAME 4000D, FRAME 4000D WOOD, FRAME 4000X):
ELITE FPIO (FRAME 4000D LCD, FRAME 4000D Vault SERIES):
|
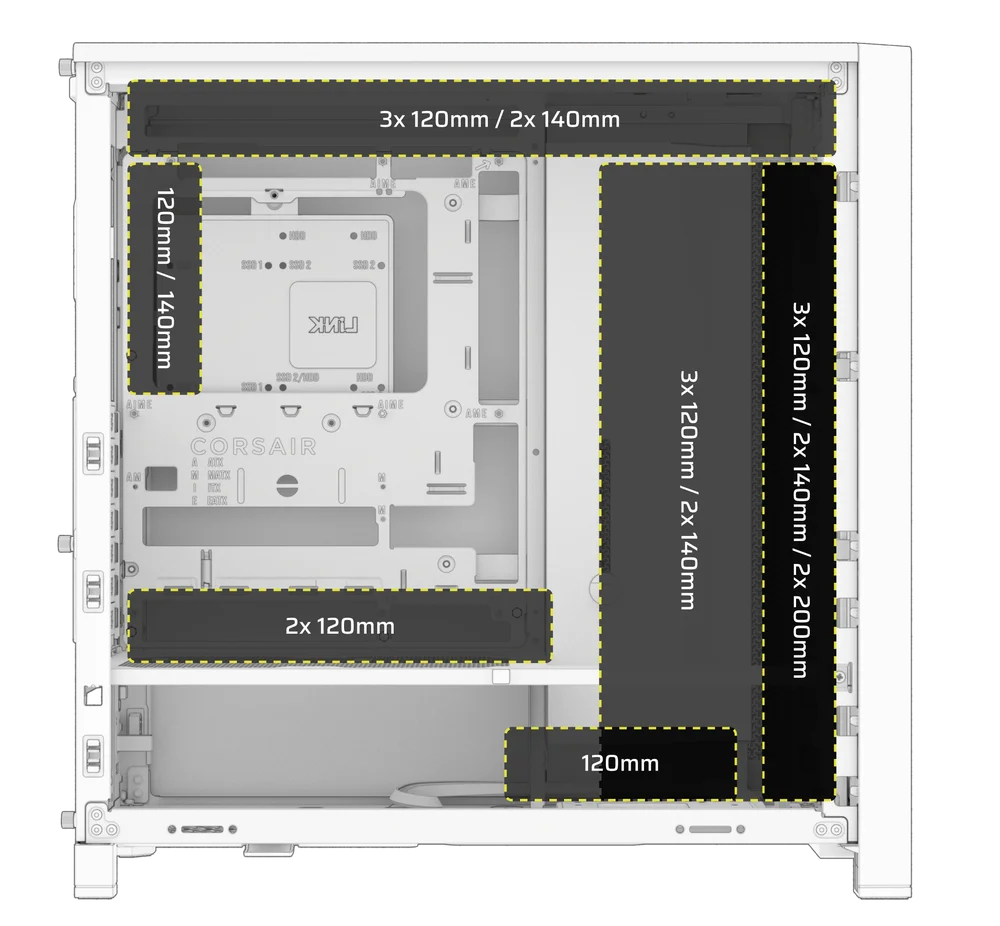
1. LOCATIES VAN DE VENTILATOREN
NOTE: No fans are included with the FRAME 4000D or FRAME 4000D Vault Series.
| FRAME 4000D RS/RS ARGB | ||||||
|
Voorkant |
Top |
Achterzijde |
Zijde |
PSU-afscherming | Bottom | |
|
3x 120 mm 2x 140 mm 2x 200 mm |
3x 120 mm 2x 140 mm
|
1x 120 mm 1x 140 mm
|
3x 120 mm 2x 140 mm
|
2x 120 mm |
None |
|
|
FRAME 4000D LCD, FRAME 4000D WOOD, FRAME 4000X |
||||||
|
Front |
Top |
Rear |
Side |
PSU Shroud | Bottom | |
|
3x 120mm 2x 140mm 2x 200mm |
3x 120mm 2x 140mm
|
1x 120mm 1x 140mm
|
3x 120mm 2x 140mm
|
2x 120mm |
1x 120mm |
|
2. INBEGREPEN VENTILATOREN EN REGELAARS
|
FRAME 4000D |
FRAME 4000D RS | FRAME 4000D RS ARGB |
FRAME 4000D WOOD, FRAME 4000X |
FRAME 4000 LCD
|
|
|
Geen |
3x RS120 (Pre-installed) |
3x RS120 ARGB (Pre-installed) |
4x RS120 (Pre-installed) |
4x RS120 ARGB (Pre-installed) |
|
NOTE: Fans and lighting controllers are not included. ARGB lighting can be controlled through your motherboard or with a separate fan controller.
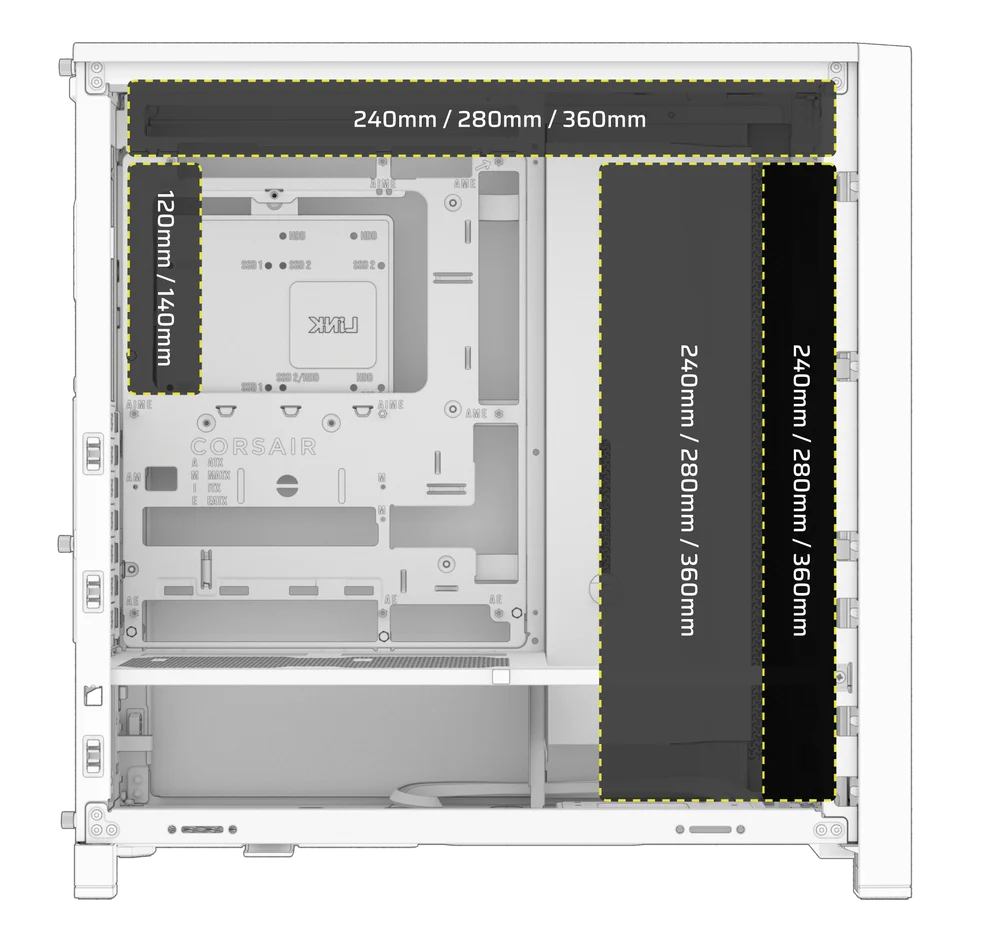
3. COMPATIBILITEIT MET RADIATOREN
|
Voorkant |
Top |
Achterzijde |
Zijde |
PSU-afscherming |
|
240 mm 280 mm 360 mm |
240 mm 280 mm 360 mm |
120 mm 140 mm |
240 mm 280 mm 360 mm |
Geen |
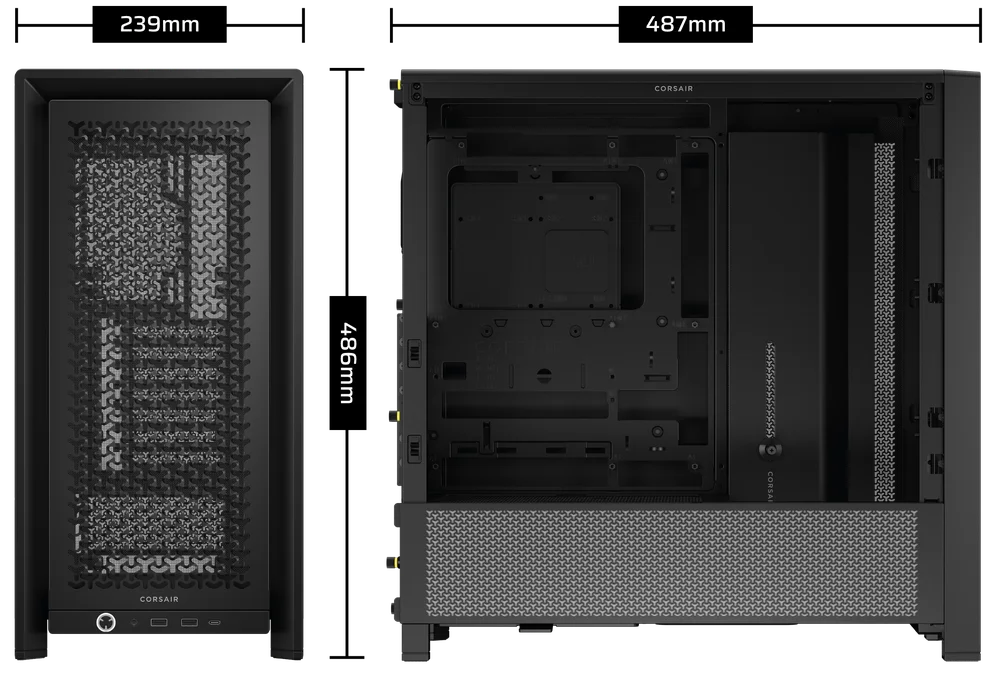
4. AFMETINGEN VAN DE KAST
| Afmetingen |
487mm x 239mm x 486mm |
|
Max GPU-lengte |
430 mm |
|
Max CPU-koelerhoogte |
170 mm |
|
Max. lengte voeding |
220 mm |
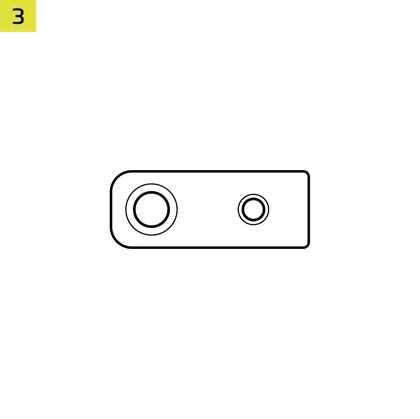
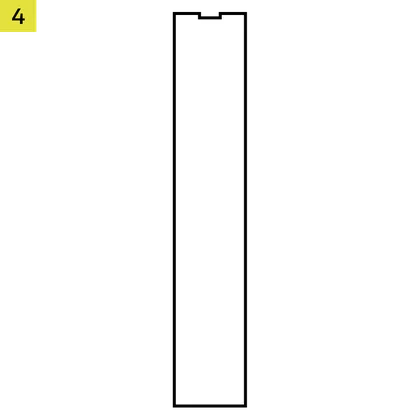
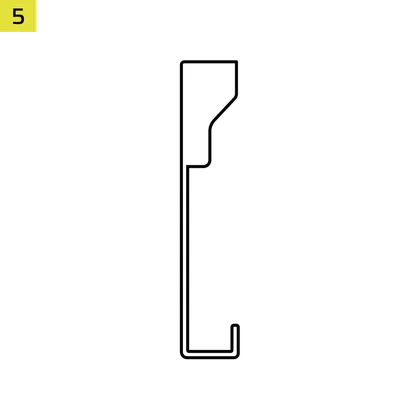
INHOUD ACCESSOIRESET
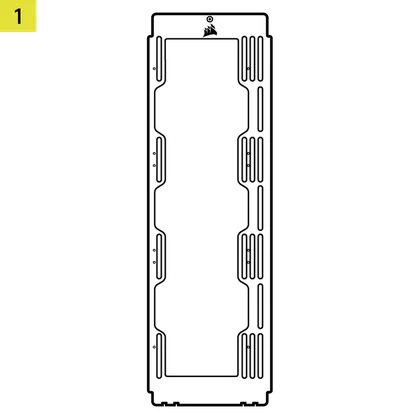
1x Zijventilator-montagebeugel
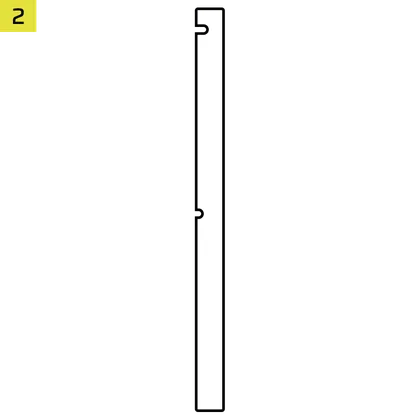
1x omgekeerde connector magnetische strip
12x InfiniRail Fan Mounts
(Pre-Installed on Select Cases)
1x Solid Side Insert
(Select Models)
1x GPU Anti-sag Stabilization Arm Mini Mount
1x GPU Anti-sag Stabilization Arm Rubber Spacer
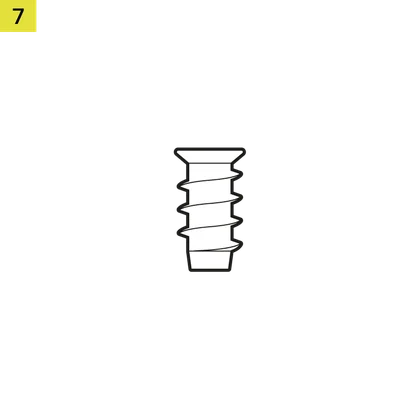
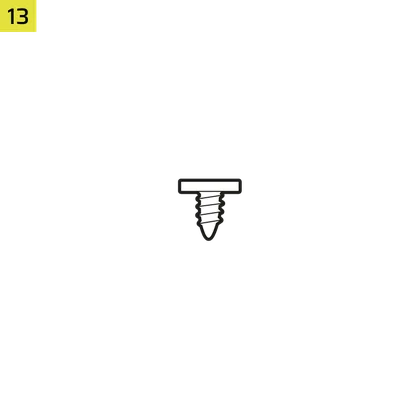
12-28x Self-Tapping Fan Screws
(Qty varies by model)
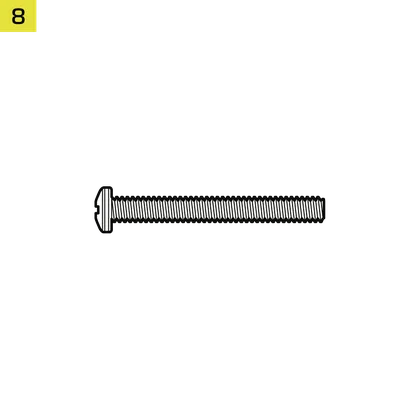
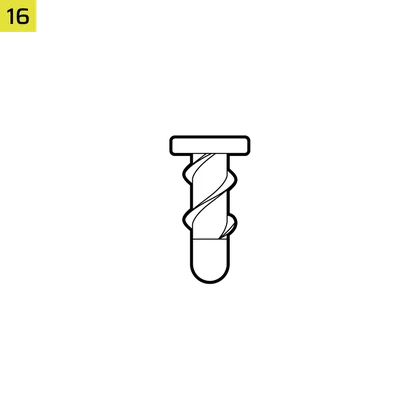
8-12x Long Fan Screws (6-32 UNC; 30mm)
(Qty varies by model)
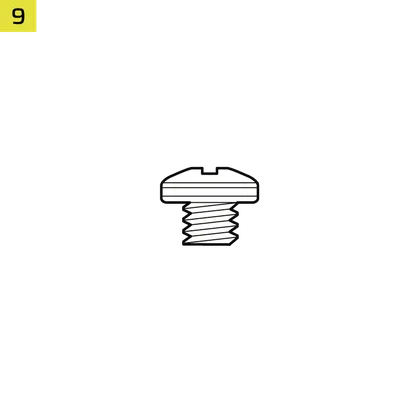
18x moederbord-/HDD-schroeven (6-32 UNC; 6 mm)

8-16x SSD Screws (M3 x 0.5; 5mm)
(Qty varies by model)
1x reserve moederbord afstandhouder

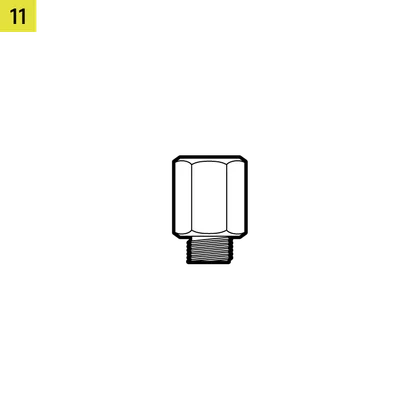
2x verticale afstandhouders
InfiniRail Fan Mount Lock Screws
(Pre-Installed on Select Models)
1x Front I/O-adapterkabel
3x or 4x RS120 / RS 120 ARGB Fans
(Pre-Installed on Select Models)
12x QuikTurn® Fan Screws
(Select Models)

CASE EXPANDED VIEWS
FRAME 4000D RS/RS ARGB

| A. Driekwart zijruitpaneel | H. Zijventilatorfilter |
| B. PCI-plaat | I. Voorpaneel |
| C. Standaard stalen moederbordlade | J. Ventilatorfilter vooraan |
| D. Bovenpaneel | K. PSU ventilatorfilter |
| E. Plaat aandrijving/regelaar | L. PSU-kap |
| F. Cable Shroud with GPU Anti-sag Stabilization Arm | M. Doorschijnend zijelement |
| G. Stalen zijpaneel | N. Zijpaneel met kwartgaas |
FRAME 4000D LCD

| B. PCI Plate | J. Front Fan Filter |
| C. Standard Steel Motherboard Tray | K. PSU Fan Filter |
| D. Top Panel | O. Front Panel I/O |
| E. Drive / Controller Plate | P. Compact PSU Shroud |
| F. Cable Shroud with GPU Anti-sag Stabilization Arm | Q. Two-Thirds Side Glass Panel |
| G. Steel Side Panel | R. LCD Screen Mounting Bracket |
| H. Side Fan Filter | S. XENEON EDGE LCD Touchscreen |
| I. Front Panel |
FRAME 4000X
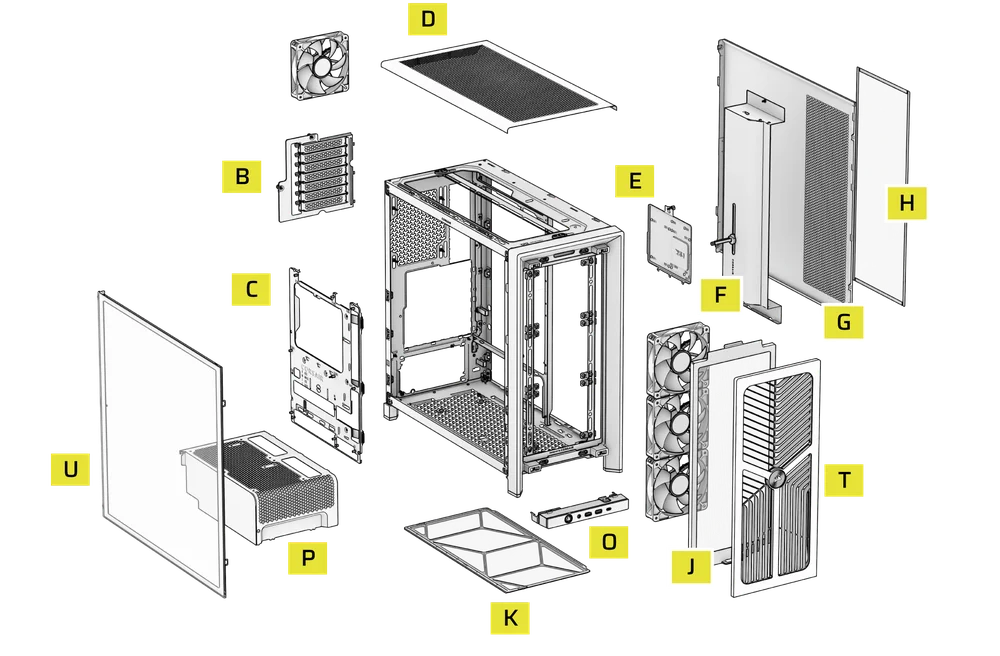
| B. PCI Plate | J. Front Fan Filter |
| C. Standard Steel Motherboard Tray | K. PSU Fan Filter |
| D. Top Panel | O. Front Panel I/O |
| E. Drive / Controller Plate | P. Compact PSU Shroud |
| F. Cable Shroud with GPU Anti-sag Stabilization Arm | T. RGB FLOW Front Panel |
| G. Steel Side Panel | U. Full Tempeed Side Glass Panel |
| H. Side Fan Filter |
FRAME 4000D WOOD

| B. PCI Plate | J. Front Fan Filter |
| C. Standard Steel Motherboard Tray | K. PSU Fan Filter |
| D. Top Panel | O. Front Panel I/O |
| E. Drive / Controller Plate | P. Compact PSU Shroud |
| F. Cable Shroud with GPU Anti-sag Stabilization Arm | U. Full Tempered Glass Side Panel |
| G. Steel Side Panel | V. Wood Front Panel |
| H. Side Fan Filter |
FRAME 4000D Vault Series
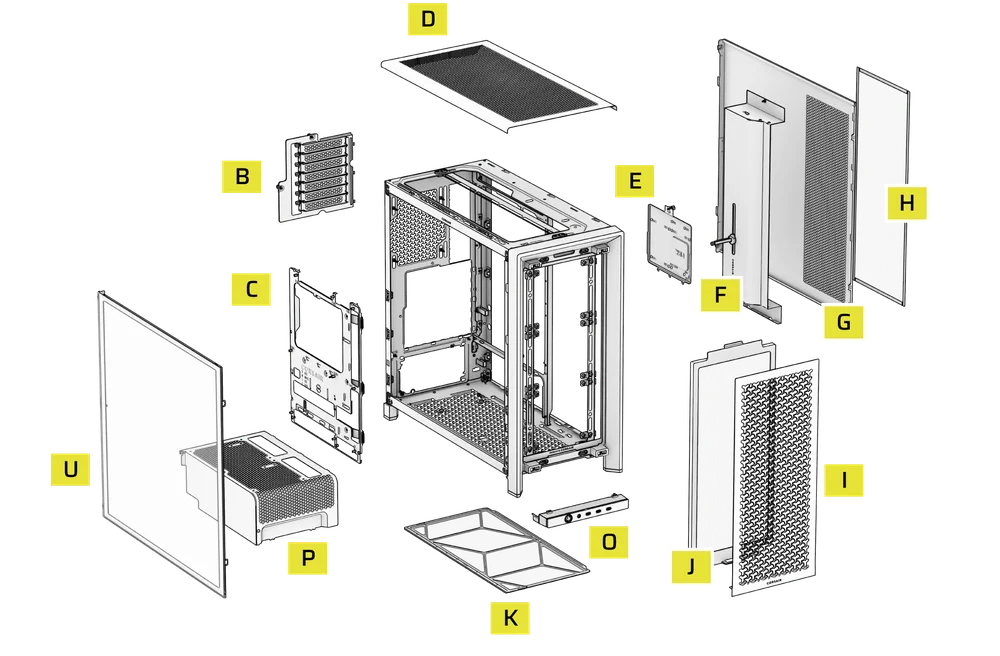
| B. PCI Plate | I. Front Panel |
| C. Standard Steel Motherboard Tray | J. Front Fan Filter |
| D. Top Panel | K. PSU Fan Filter |
| E. Drive / Controller Plate | O. Front Panel I/O |
| F. Cable Shroud with GPU Anti-sag Stabilization Arm | P. Compact PSU Shroud |
| G. Steel Side Panel | U. Full Tempered Side Glass Panel |
| H. Side Fan Filter |
PANEELINSTALLATIE / VERWIJDERING
WAARSCHUWING: Dit product bevat gehard glas. Ga er voorzichtig mee om.
- Om schade of letsel te voorkomen, moet u de koffer niet op harde oppervlakken zoals keramische of porseleinen tegels, steen, metselwerk of beton plaatsen of bewaren.
- CORSAIR raadt ten zeerste aan om alle zijpanelen van gehard glas te verwijderen voordat u de behuizing plaatst of begint met de montage op een hard oppervlak.
- Als u het voltooide bouwwerk op een harde ondergrond moet plaatsen, til de behuizing dan op of isoleer deze om het risico op onbedoeld contact, schade of persoonlijk letsel te minimaliseren.
Vervangende panelen zijn verkrijgbaar op www.corsair.com. Neem contact op met help.corsair.com voor hulp.
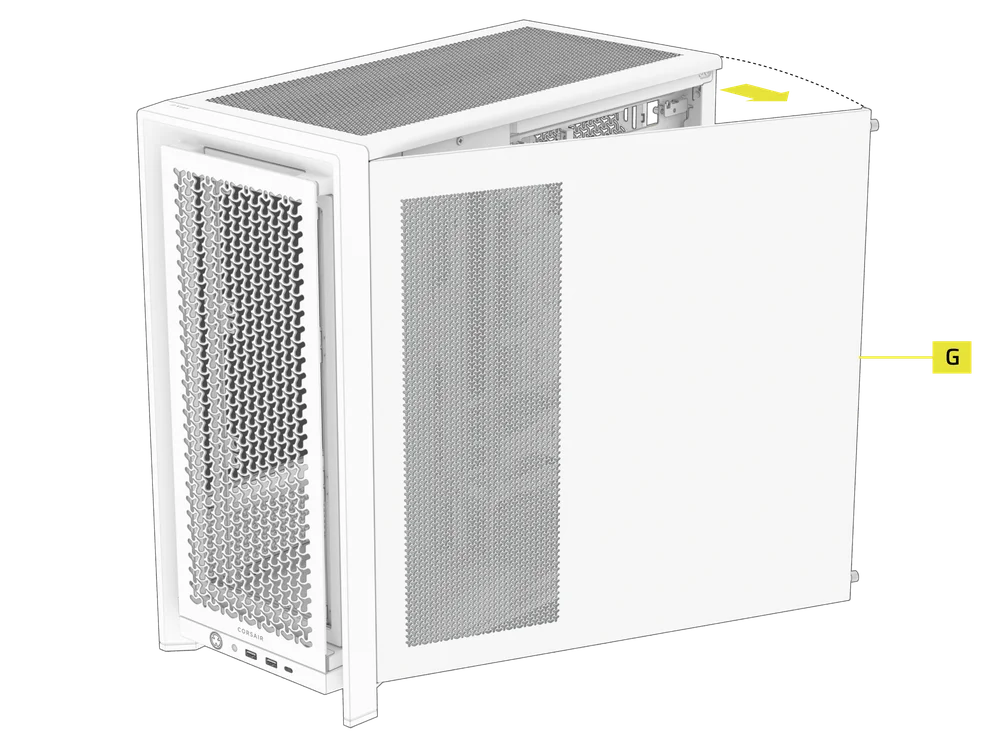
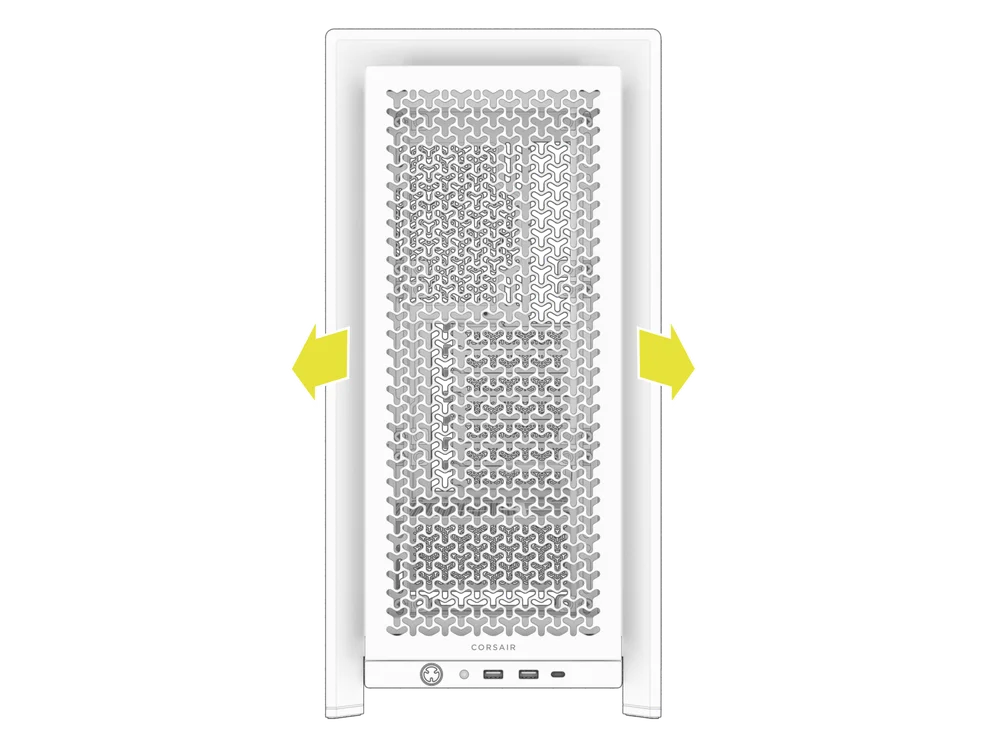
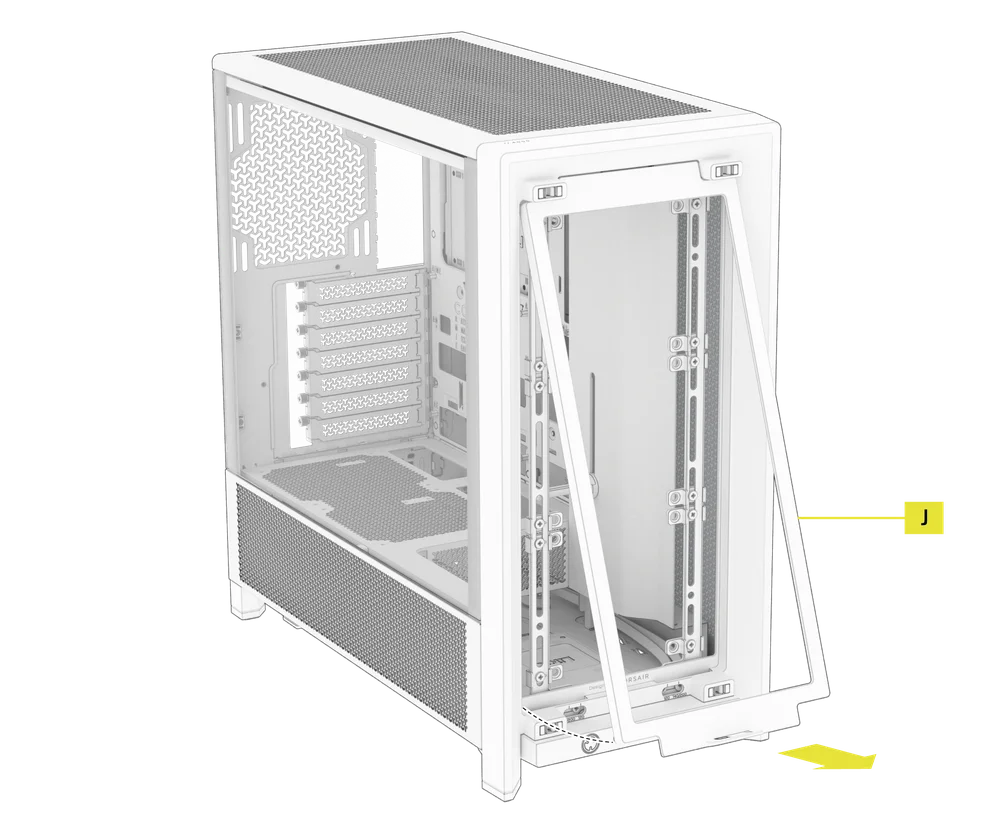
1. VERWIJDEREN VAN DE ZIJPANELEN
NOTE: This case is available with different left side panel designs (full glass or split glass/steel). Depending on your model, you may have one or multiple panels to remove. The removal method is the same for all variants.
- To remove the left side panel(s), loosen the thumbscrews at the rear of the case, then swing the panel(s) outward from the back and lift them off the front mounting tabs.
NOTE: On models equipped with the Quarter Mesh Side Panel (N), two optional inserts are included to customize the look and function of your build. A Translucent Side Insert (M) comes pre-installed, allowing RGB lighting to shine through while partially concealing cables. Alternatively, you can install the Solid Side Insert (4) for full coverage, or leave the panel open for maximum airflow. Inserts slide under the long edges of the panel for quick installation and removal.

- Om het stalen zijpaneel (G) te verwijderen, schroeft u het paneel aan de achterkant van de behuizing los en draait u het paneel vanaf de lipjes naar de voorkant van de behuizing.
TIP: For removal or use of accessory side panels, please reference these Quick Start Guides for more in-depth information:
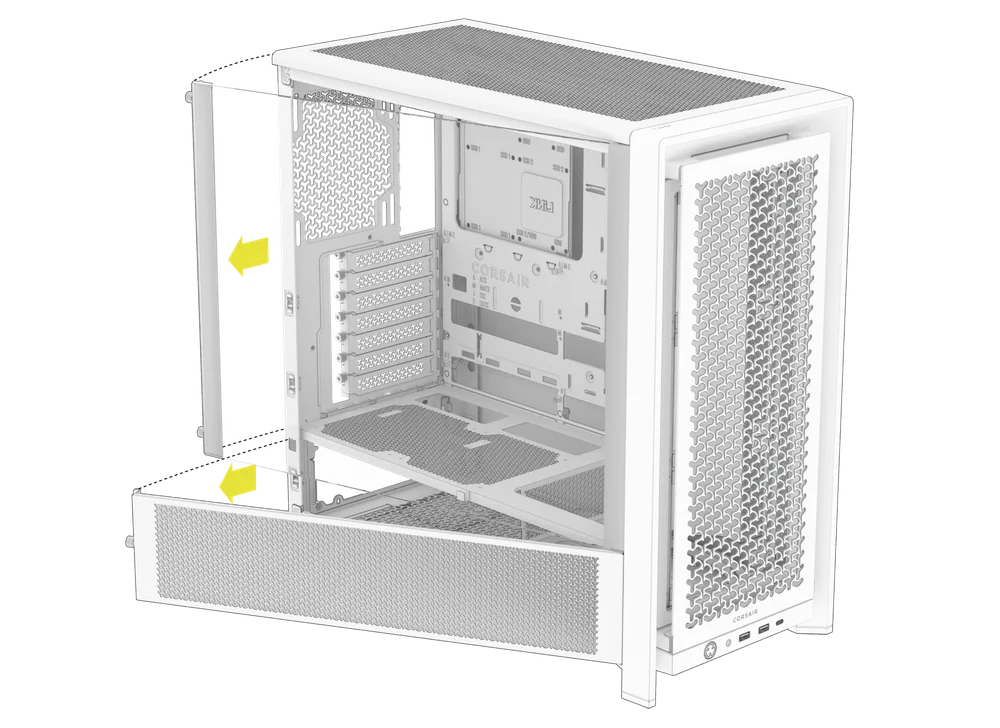
2. VERWIJDEREN VAN HET VOORPANEEL
- Pull the Front Panel outward. It's secured by two ball snaps at the top and bottom.
3. VERWIJDEREN VAN HET BOVENPANEEL
- Draai de twee vastzittende duimschroeven aan de achterkant los en trek aan de rubberen band om het bovenpaneel (D) te verwijderen.
WARNING: The rubber pull-grip on the Top Panel (D) is designed to assist in removing the top panel from the case.
Dit is geen handvat om de behuizing of uw systeem op te tillen. Als u uw behuizing aan dit handvat optilt, loopt u het risico ernstige schade aan uw pc, behuizing en uzelf toe te brengen.

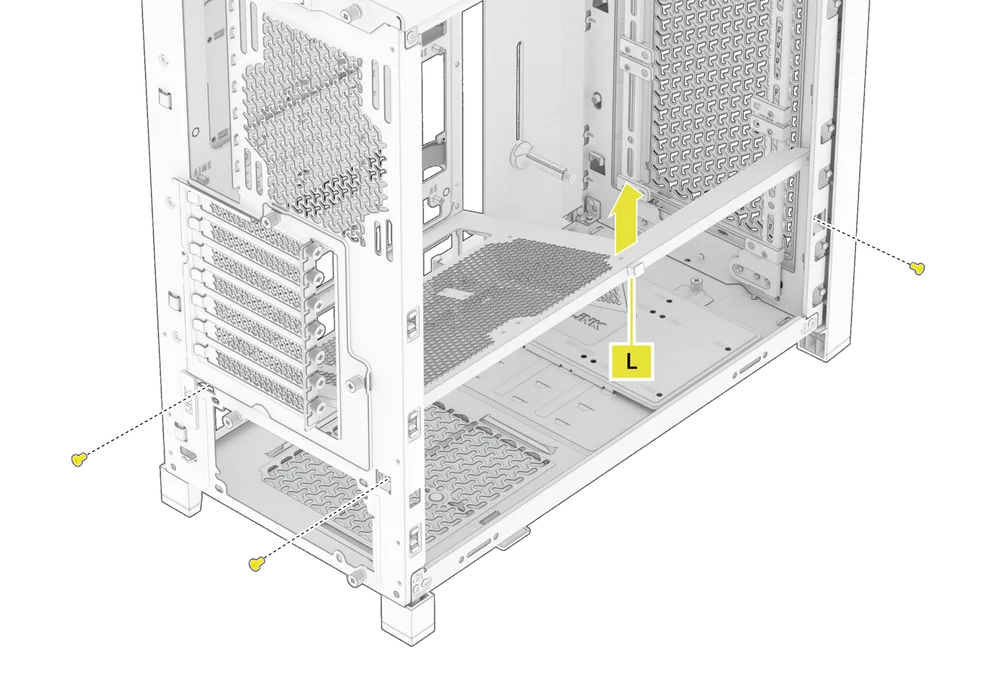
4.1 STANDARD PSU SHROUD REMOVAL (FRAME 4000D, FRAME 4000D RS / RS ARGB)
- FRAME 4000D
- FRAME 4000D RS
- FRAME 4000D RS ARGB
The PSU Shroud (L) is held in with a screw in the front of the case along the side and two screws in the rear panel of the case.
- Remove these three screws and the shroud will lift out.
4.2 COMPACT PSU SHROUD REMOVAL
- FRAME 4000D LCD
- FRAME 4000X
- FRAME 4000D WOOD
- FRAME 4000D Vault Series
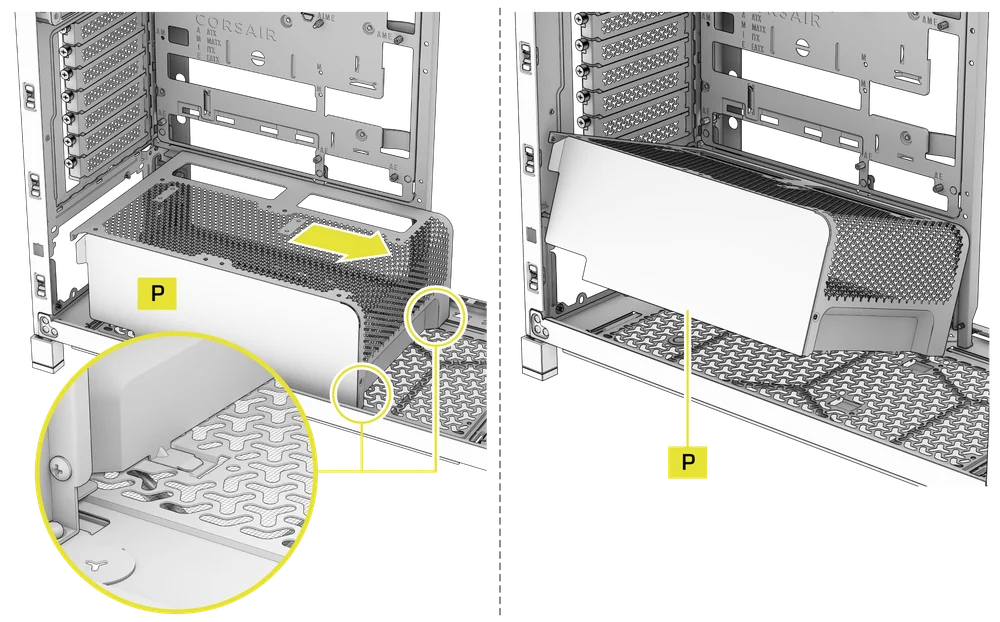
The Compact PSU Shroud (P) is held in with a screw in the front of the case along the side and two screws in the rear panel of the case.
- Remove the three screws.
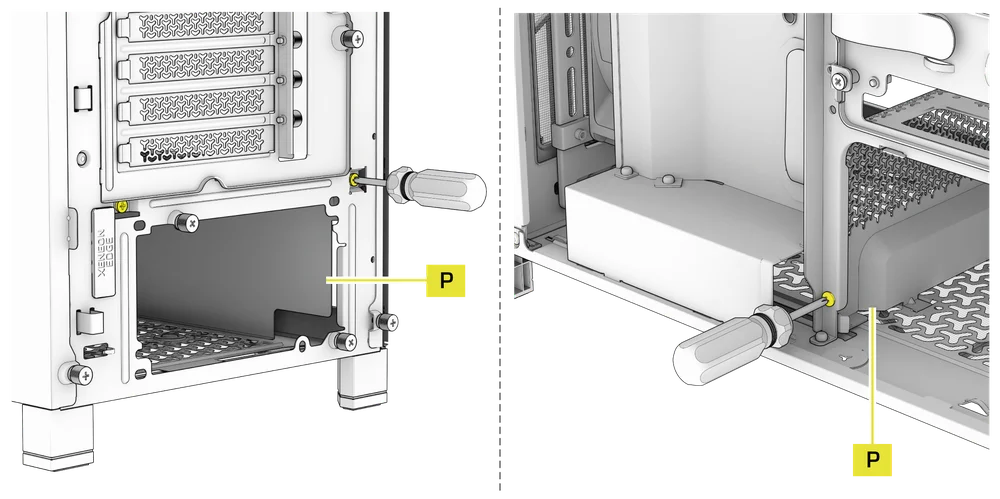
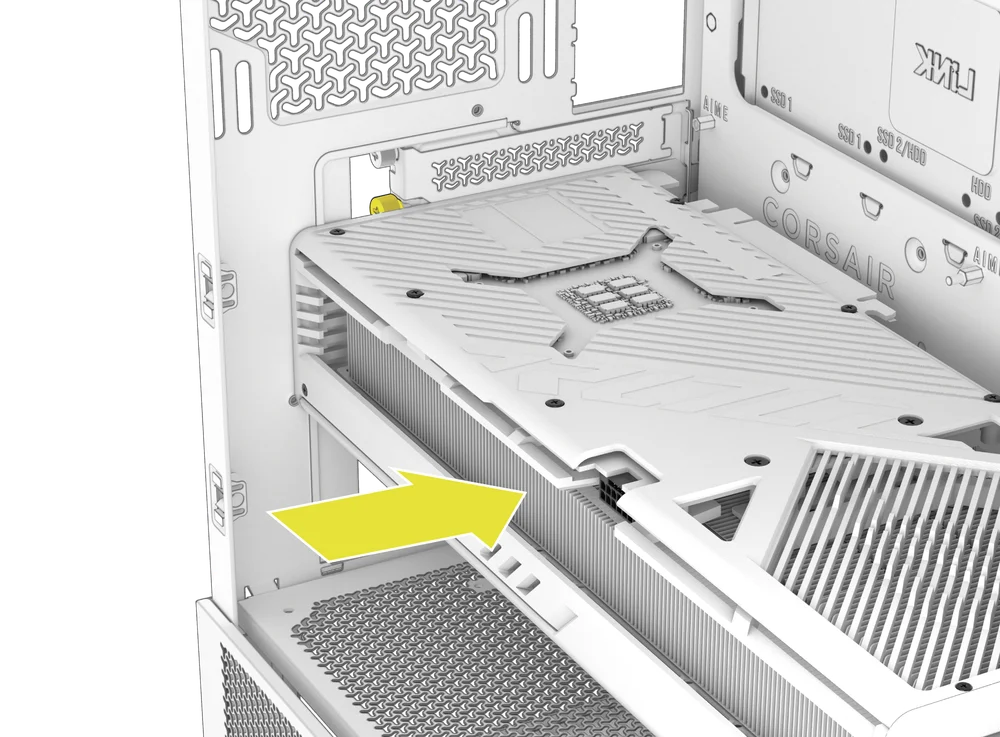
- Slide the Compact PSU Shroud (P) forward to release the clips located at its bottom front and the shroud will lift out.
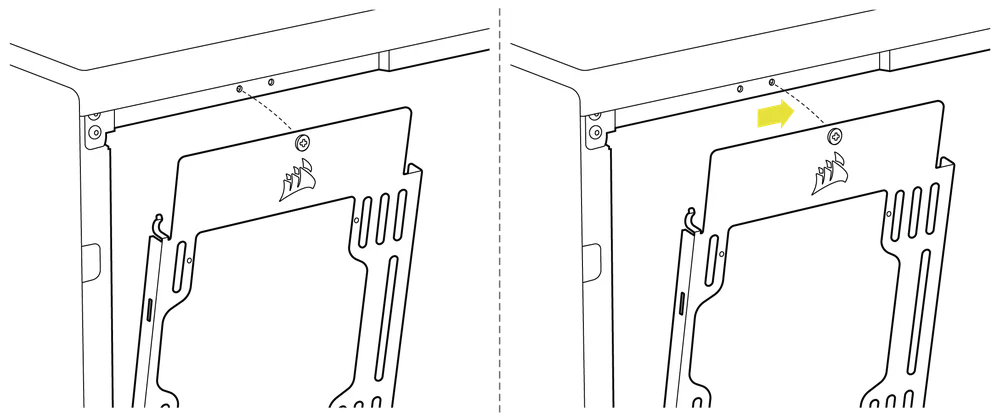
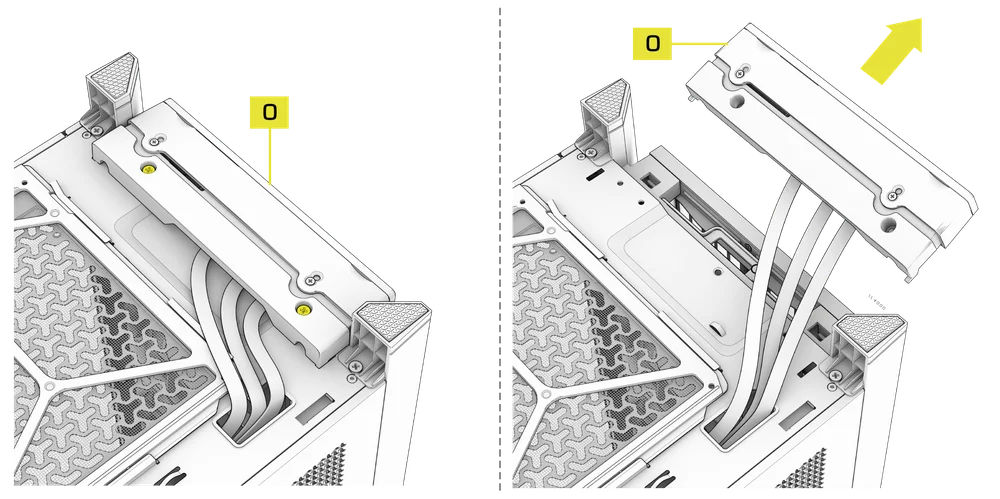
5. KABELAFDEKKING OF ZIJDELINGSE VENTILATORBEVESTIGING VERWIJDEREN
- Unscrew the screw at the top and tip the Side Fan Mounting Bracket (1) or Cable Shroud (F) out of the side. Repeat this in reverse to reinstall the part of your choice.
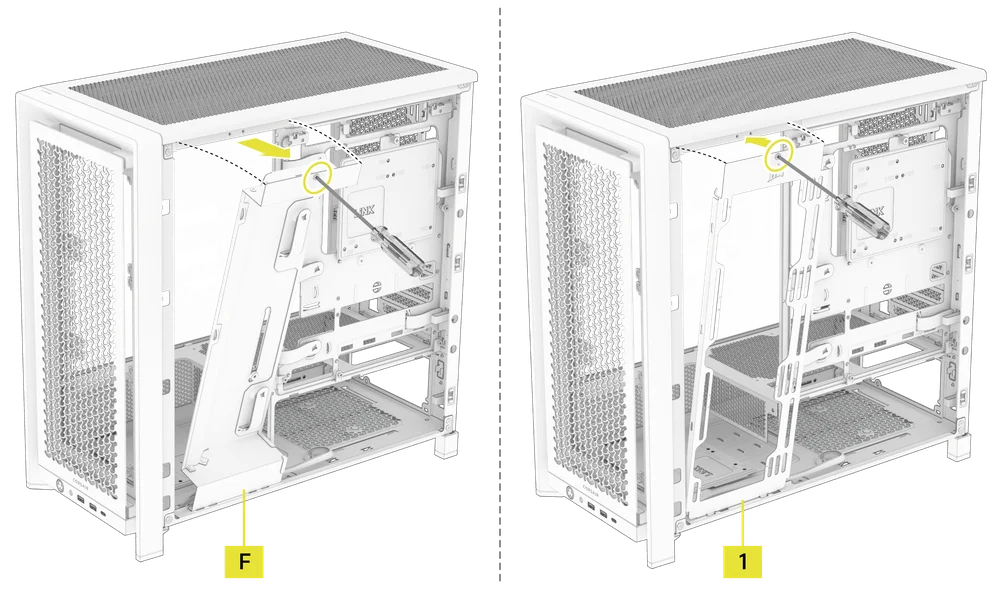
NOTE: The side mount has two positions for mounting. If using a radiator or 200mm fans, we recommend using the position closest to the motherboard.
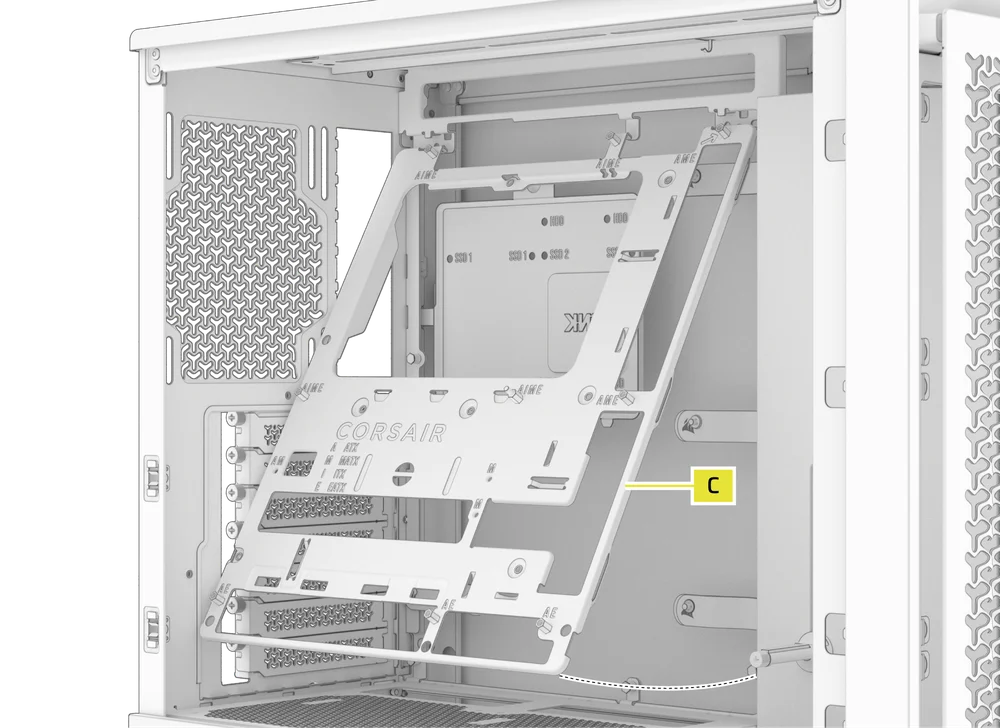
6. VERWIJDEREN VAN DE MOEDERBORDBAK
De standaard stalen moederbordlade (C) wordt op zijn plaats gehouden door 4 schroeven aan de achterkant van de lade.
- Unscrew these four screws.
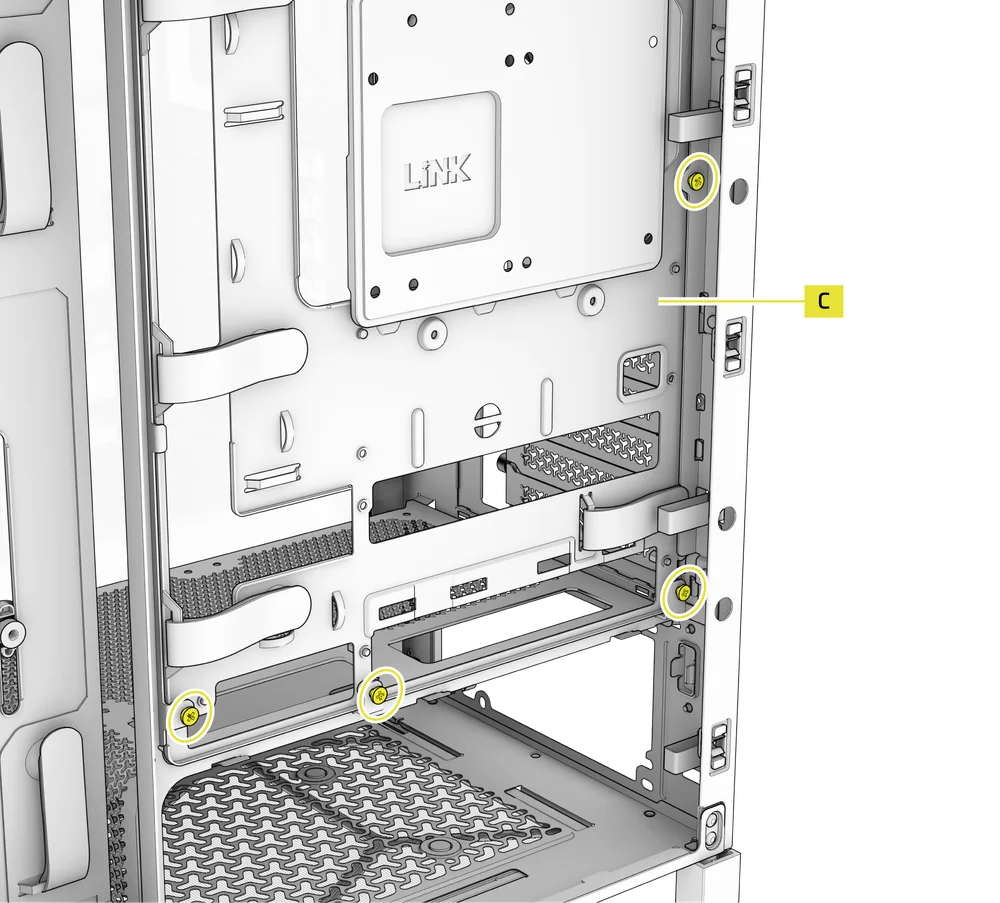
- Tilt the tray outward and lift it out.
7. VERWIJDEREN VAN DE I/O-AANSLUITINGEN OP HET VOORPANEEL
The Front Panel I/O (O) is held in with two screws on the bottom of the case.
- To remove it, simply unscrew these two screws, and the entire Front Panel I/O (O) assembly can be lifted out.
- To reinstall the Front Panel I/O (O) or to install a new one, place the assembly back in position and secure it with the same two screws.
INSTALLATIE VAN HET MOEDERBORD
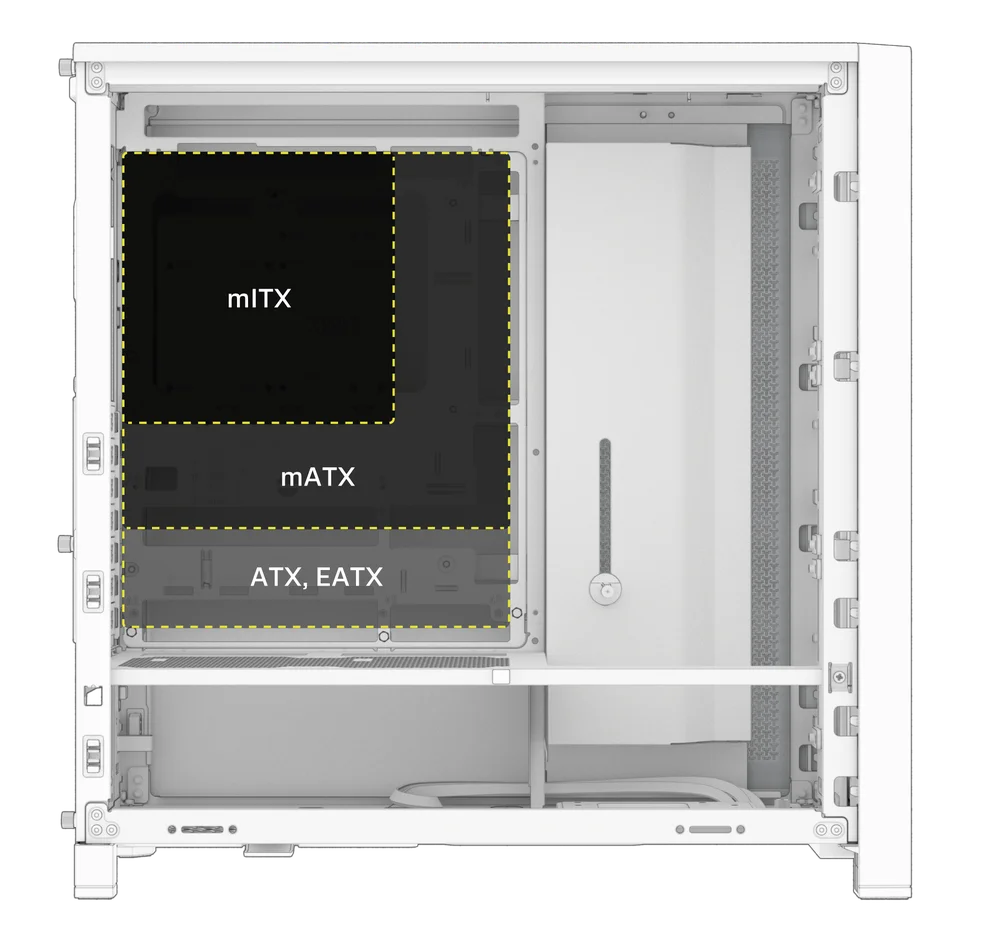
EEN MOEDERBORD INSTALLEREN
The FRAME 4000 supports mITX, mATX, ATX, and E-ATX motherboards, including ASUS BTF, MSI Project Zero, and GIGABYTE Project Stealth with reversed connections.
- Lijn het moederbord uit met de afstandhouders en zet het vast met de meegeleverde moederbordschroeven (9).
OPMERKING: Controleer voor de installatie of het I/O-schild van uw moederbord op zijn plaats zit, indien nodig.
TIP: Als de vooraf geïnstalleerde afstandhouders niet overeenkomen met de gaten op uw moederbord, verwijder dan de ongebruikte afstandhouders en plaats ze opnieuw zodat ze overeenkomen met de open bevestigingspunten op uw moederbord.
OPTIONAL MOTHERBOARD TRAY CONFIGURATIONS
The FRAME 4000 Series includes a standard motherboard tray, with additional tray options available (sold separately) to customize your build:

| a. FRAME Standard Steel Motherboard Tray | c. FRAME ELITE Motherboard Tray |
| b. FRAME RapidRoute 2.0 Motherboard Tray |
NOTE: FRAME ELITE motherboard tray (CNC Aluminum) is designed for use with NVMe SSDs. You will lose the HDD/SSD tray that installs on the back of the steel motherboard tray that is included with FRAME 4000 Series cases. Text for SPY & GPU on the ELITE MB Tray is to assist in assembling as a standalone test bench. Ignore text during use with FRAME 4000 Series.
INSTALLATIE VAN FRONT I/O-KABELS
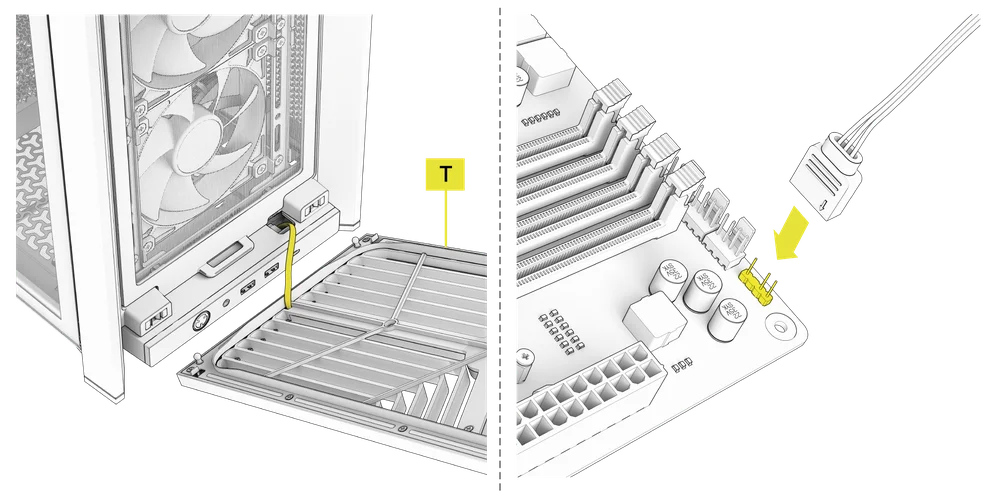
1. STANDAARD INTEL-MOEDERBORDEN
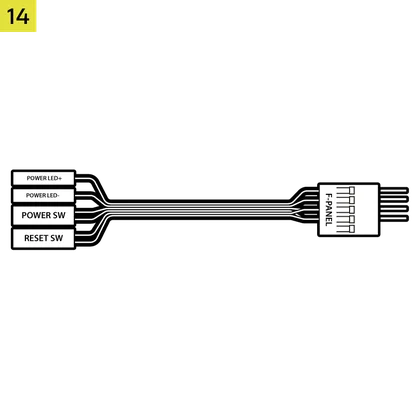
- Sluit de FPANEL-stekker aan op de I/O-header op het voorpaneel van uw moederbord, waarbij u deze uitlijnt met de sleutelindeling. Deze header wordt op sommige moederborden vaak aangeduid met JFP1.

TIP: Als uw pc niet opstart of problemen vertoont bij het gebruik van de FPANEL-stekker, probeer dan de meegeleverde Front I/O-adapterkabel (14) te gebruiken om een goede verbinding met de moederbordconnector te garanderen.
OPMERKING: Deze behuizing bevat geen HDD-LED of resetknop, dus hoewel deze connectoren op de Front I/O-adapterkabel (14) aanwezig zijn, zijn ze niet functioneel en zijn ze opzettelijk niet bezet gelaten.
2. AMD- OF NIET-STANDAARD INTEL-MOEDERBORDEN
- Gebruik de meegeleverde boven gemonteerde front-I/O-adapter (14) om de FPANEL-stekker aan te sluiten op de afzonderlijke frontpaneel-I/O-headerpinnen.

3. FRONT PANEL 5V ARGB CONNECTION (FRAME 4000X only)
- Run the +5V ARGB cable through the passthrough filter and into your case.
- Plug the +5V ARGB cable into your motherboard for easy ARGB control or use a COMMANDER DUO for full iCUE synchronization.
NOTE: For standard FRAME 4000D configurations without the passthrough hole in the front panel I/O, you must use the front fan filter included with the front panel and route the ARGB cable through the bottom right edge to pass it into the chassis. This wire is able to be split in half for easier routing during installation.
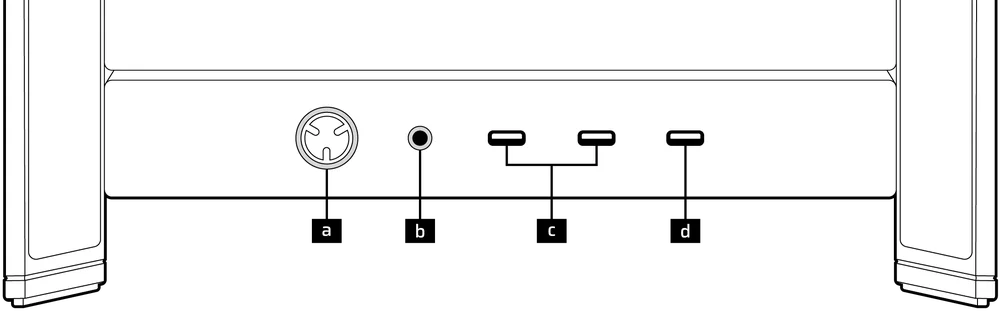
4. FRONT I/O EXPLANATION
- FRAME 4000D
- FRAME 4000D RS
- FRAME 4000D RS ARGB
- FRAME 4000X
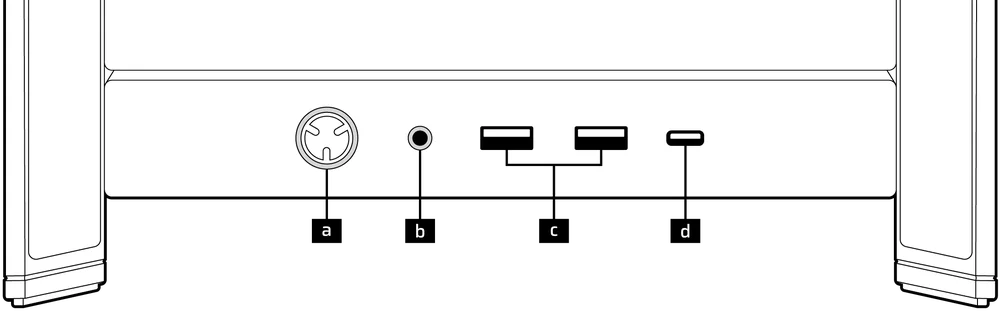
| a.Aan/uit-knop + LED | c.2x USB 3.2 Gen 1 Type-A (5 Gbps) |
| b.Combinatieaansluiting voor hoofdtelefoon/microfoon | d.1x USB 3.2 Gen 2x2 Type-C (20 Gbps) |
- FRAME 4000D LCD RS ARGB
- FRAME 4000D VAULT-SERIE
| a.Aan/uit-knop + LED | c. 2x USB 3.2 Gen 1 Type-C (5 Gbps) |
| b.Combinatieaansluiting voor hoofdtelefoon/microfoon | d.1x USB 3.2 Gen 2x2 Type-C (20 Gbps) |
5. FRONT I/O CONNECTIONS
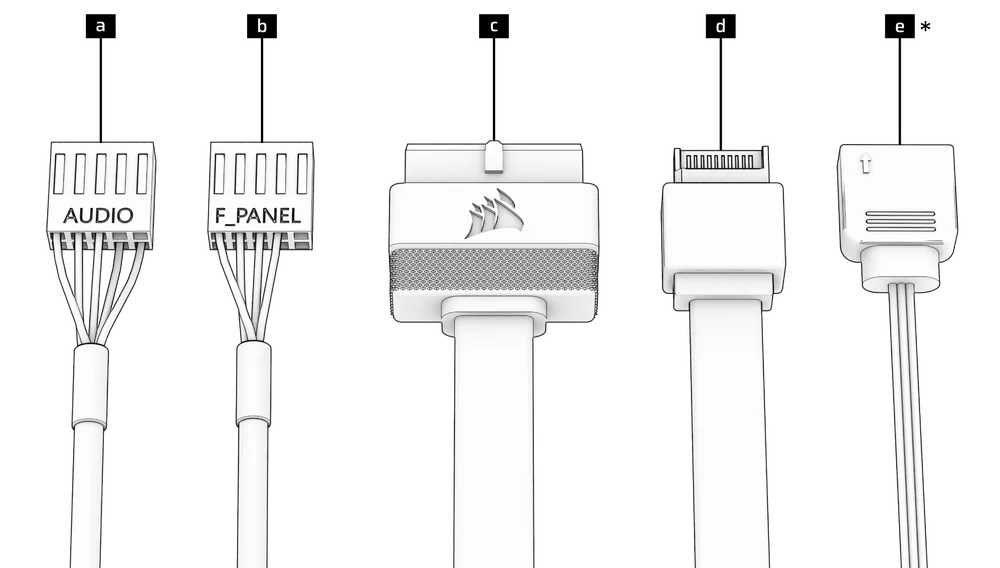
| a. HD Audio (Headphone, Microphone) | d. USB 3.2 Type-E (20 Gbps) |
| b. FPANEL (Power LED, Power Button) | e. +5V ARGB (FRAME 4000X only)* |
| c. USB 3.0 |
6. SWAPPING FRONT PANEL BUTTON POWER KEY SWITCH
The power button of the ELITE Front Panel I/O used in the FRAME 4000D LCD case utilizes a standard MX-Style key switch. This key switch is removable and replaceable to customize the look and feel of your power button.
- Simply pop off the plastic bezel on the front panel I/O and extract the key switch. Replace with a switch of your choice.
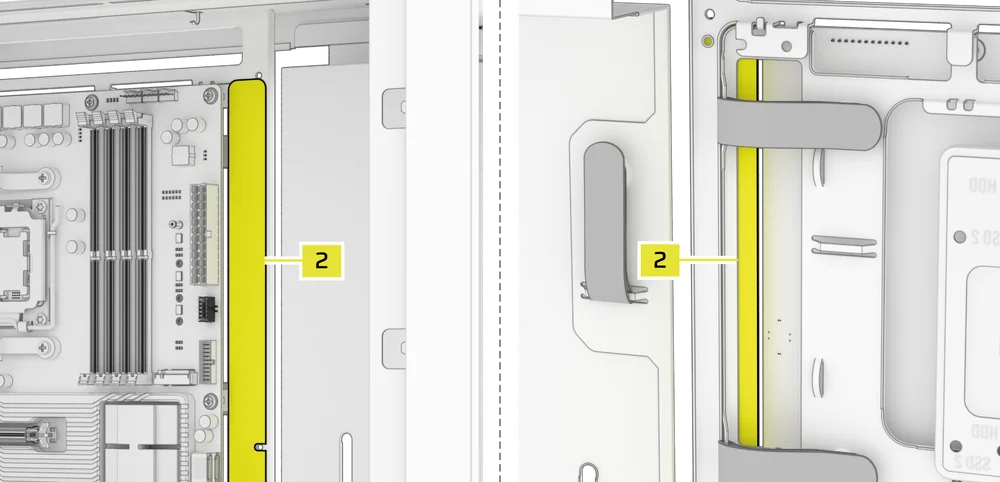
MAGNETISCHE STRIP INSTALLATIE
De FRAME 4000 bevat een magnetische strip voor de omgekeerde connector (2) die is ontworpen om de zichtbare rand van de gaten voor de omgekeerde connector in de moederbordlade te bedekken.
- Lijn de magnetische strip van de omgekeerde connector (2) uit met uw afstandhouders en verstel deze zijdelings om de opening op uw moederbord te dichten.

1. MOEDERBORD MET OMKEERBARE CONNECTOREN
Als u een moederbord met omgekeerde connectoren installeert, kunt u de magnetische strip voor omgekeerde connectoren (2) gebruiken om de opening rond de 24-pins ATX-poort op te vullen, voor een netter en strakker uiterlijk.
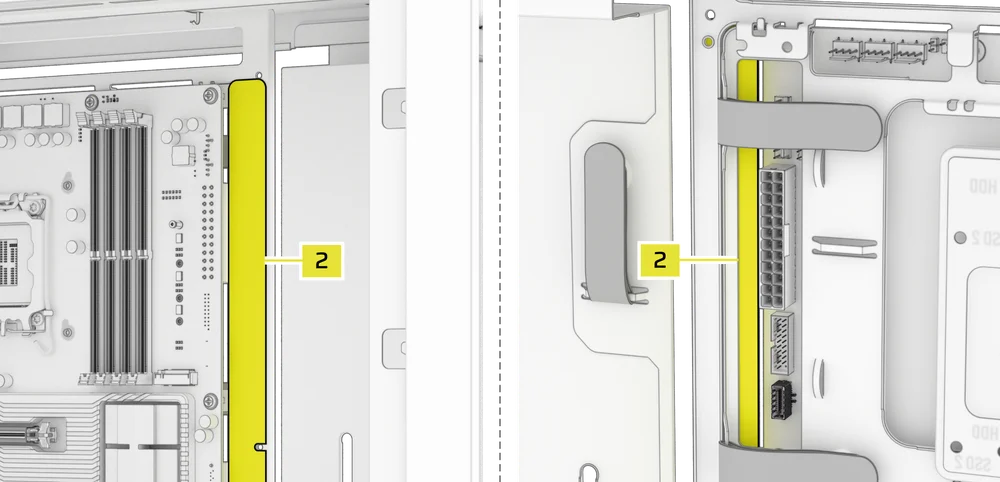
2. MOEDERBORDEN MET STANDAARD CONNECTOREN
Bij het installeren van een standaard moederbord kunt u de magnetische strip voor de omgekeerde connector (2) achter het bord schuiven, waarbij u deze uitlijnt met de schroefgaten langs de moederbordlade, om de sleuf voor de omgekeerde connector af te dekken en eventuele draden langs de moederbordlade te verbergen voor een netter uiterlijk.
TIP: The magnetic strip features cut-out slots, allowing you to install it simultaneously with a GPU anti-sag stabilization arm mini mount.
VENTILATORINSTALLATIE
| FRAME 4000D RS/RS ARGB | ||||||
|
Front |
Top |
Rear |
Side |
PSU Shroud | Bottom | |
|
3x 120mm 2x 140mm 2x 200mm |
3x 120mm 2x 140mm
|
1x 120mm 1x 140mm
|
3x 120mm 2x 140mm
|
2x 120mm |
None |
|
|
FRAME 4000D LCD, FRAME 4000D WOOD, FRAME 4000X |
||||||
|
Front |
Top |
Rear |
Side |
PSU Shroud | Bottom | |
|
3x 120mm 2x 140mm 2x 200mm |
3x 120mm 2x 140mm
|
1x 120mm 1x 140mm
|
3x 120mm 2x 140mm
|
2x 120mm |
1x 120mm |
|
USING THE INFINIRAIL™ FAN MOUNTING SYSTEM
CORSAIR's InfiniRail™ is an innovative fan and radiator mounting system designed to offer exceptional flexibility and ease of use in PC case builds. Unlike traditional cases with fixed mounting points, InfiniRail utilizes adjustable steel rails that allow users to slide and position fans and radiators precisely where needed.
De FRAME 4000 is voorzien van twee van deze InfiniRail-systemen: één aan de bovenkant en één aan de voorkant.
NOTE: Determine the size and placement of your fans before configuring the rails. You do not have to fully remove the InfiniRail Phillips head screws.
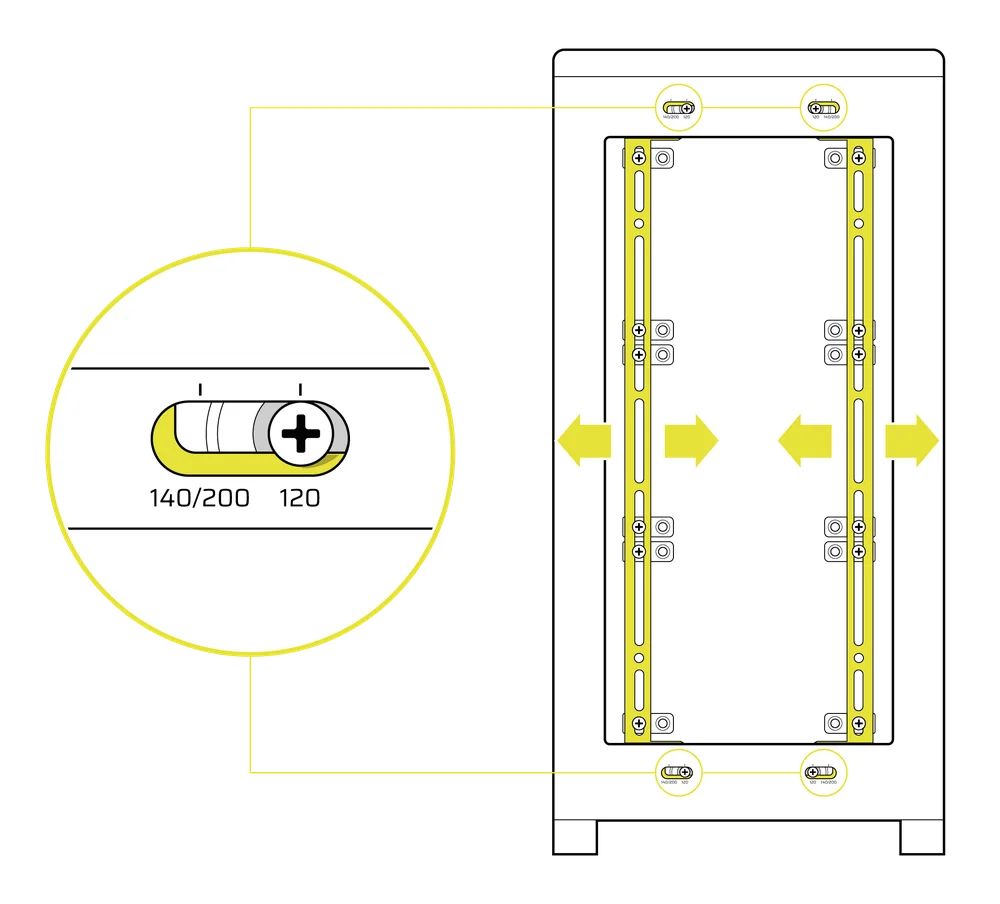
De rails aan de voorkant van de behuizing aanpassen
- Loosen the Phillips head screw on both ends of the InfiniRails.
- Stel beide voorste rails voor uw ventilatoren af volgens de markeringen op de behuizing.
NOTE: If using 200mm fans in front, you may need to remove the PSU shroud depending on your version of FRAME 4000 Series.
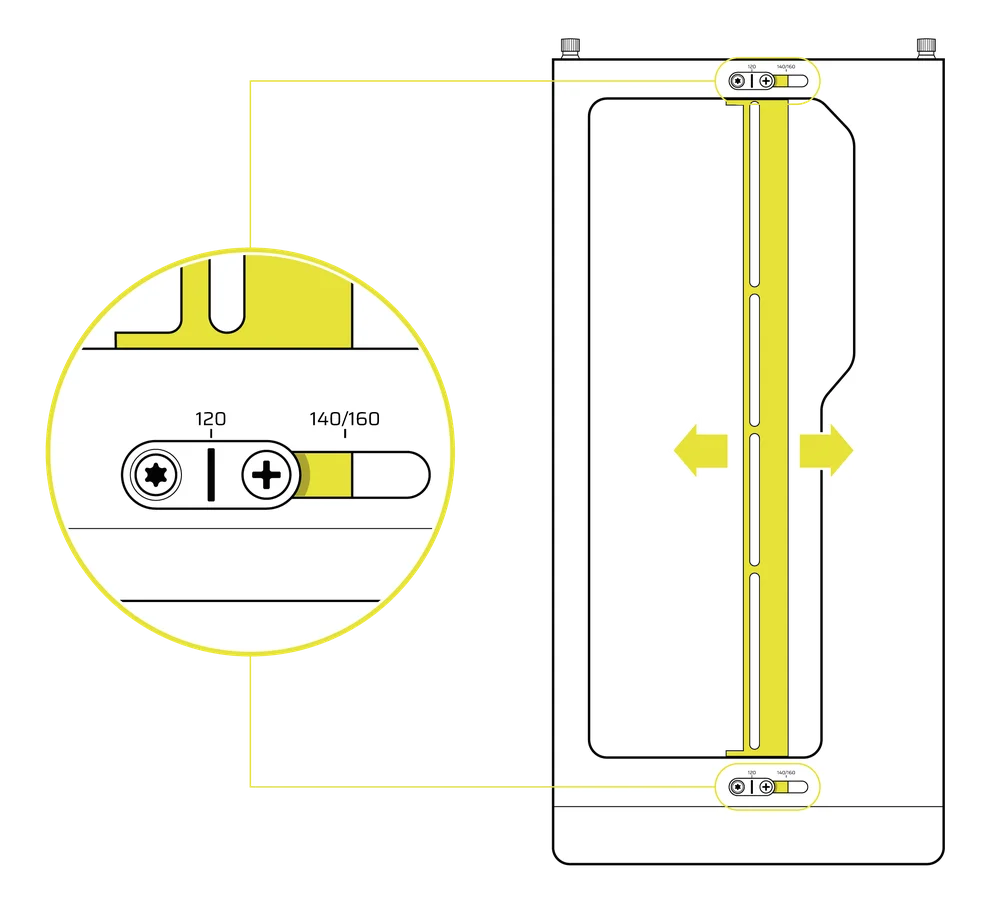
De rail aan de bovenkant van de behuizing afstellen
- Loosen the Phillips head screw on both ends of the InfiniRail.
- Stel de bovenste rail voor uw ventilatoren af volgens de markeringen op de behuizing.
BELANGRIJK: Schroeven met niet-standaard kopvormen mogen niet worden verwijderd.
2. INSTALLATIE VAN VENTILATOREN AAN DE VOORZIJDE
120 mm of 140 mm ventilatoren installeren
Om 120 mm of 140 mm ventilatoren te installeren met behulp van het InfiniRail-ventilatormontagesysteem aan de voorzijde, moet u de InfiniRail-ventilatormontages (3) installeren. Gebruik vier montages per ventilator, twee aan elke kant van de rails.
OPMERKING: Sommige behuizingen kunnen worden geleverd met vooraf geïnstalleerde InfiniRail-ventilatormontages.
- Klem de InfiniRail-ventilatormontages (3) op de rails door eerst de binnenrand van elke montage te verankeren en vervolgens de buitenrand op zijn plaats te klikken.
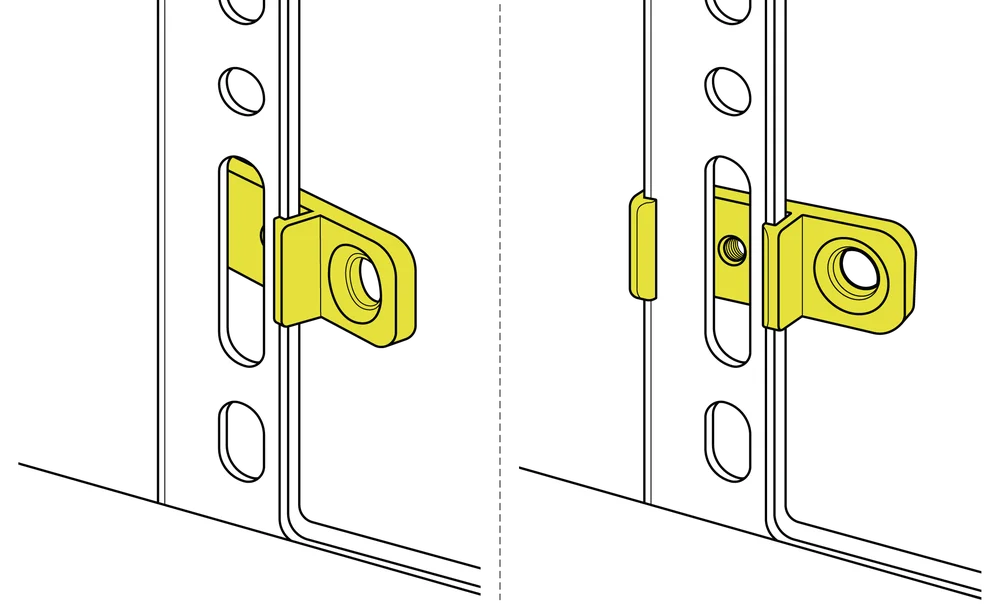
- Schuif de bevestigingen langs de rails om ze uit te lijnen met de bevestigingspunten van uw ventilator.
- Lijn uw ventilatoren uit met de bevestigingslipjes op de steunen en zet ze vast door zelfborende ventilatorschroeven (7) in te draaien.
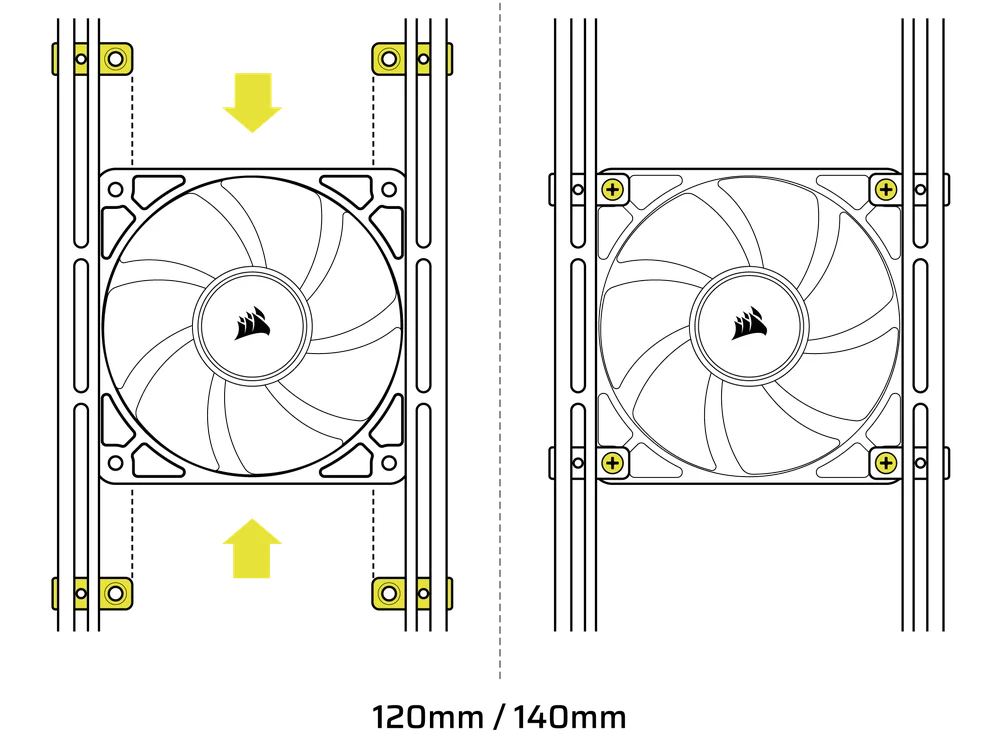
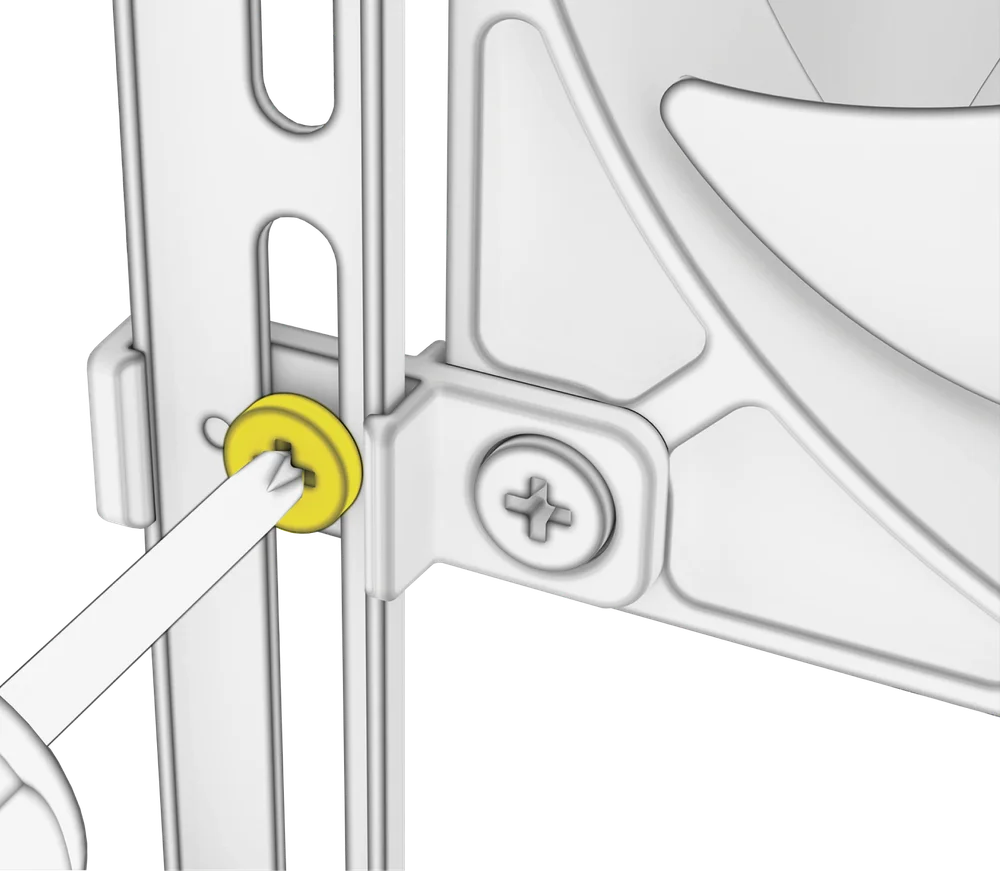
- Zodra alles is uitgelijnd, kunt u de opstelling op zijn plaats vergrendelen met de InfiniRail-ventilatormontageschroeven (13).
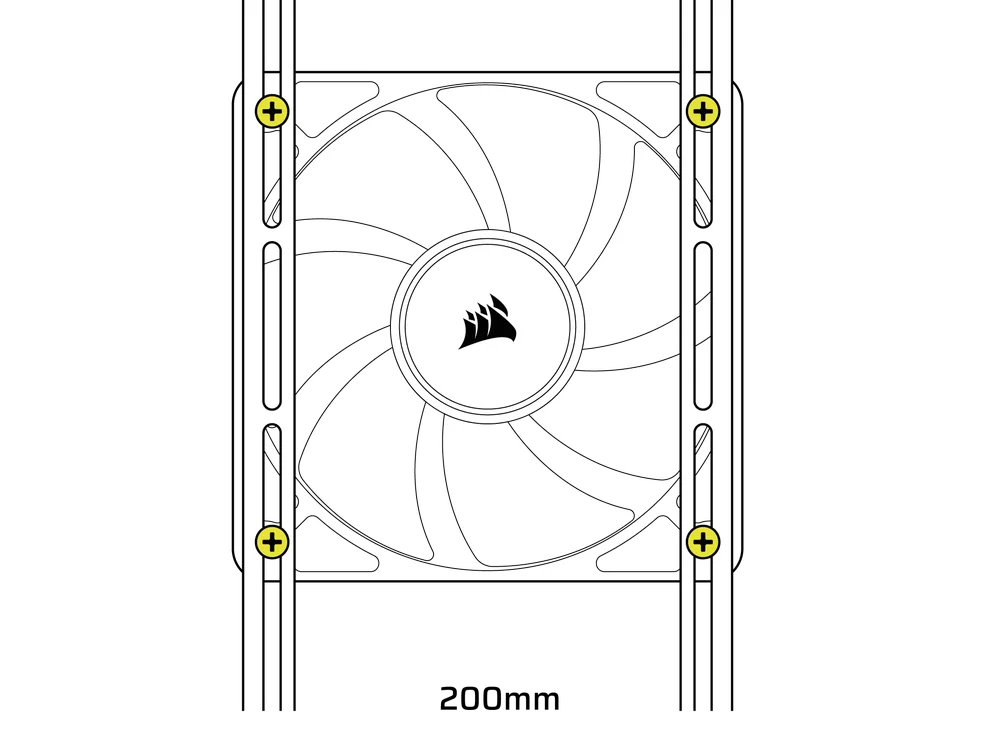
Installatie van ventilatoren van 200 mm
200 mm-ventilatoren kunnen rechtstreeks op de InfiniRail-bevestigingen worden geschroefd zonder de plastic ventilatorbevestigingen. Verwijder de bevestigingen als deze vooraf op uw behuizing zijn geïnstalleerd.
- Lijn uw ventilatoren uit met de montagesleuven op de InfiniRails en zet ze vast door zelfborende ventilatorschroeven (7) in het ventilatorframe te schroeven.
OPMERKING: Voor bepaalde 200 mm-ventilatoren moet u mogelijk de PSU-afdekking verwijderen om ze te kunnen plaatsen.
NOTE: When installing 200 mm front fans, the side fan bracket or cable cover must be mounted in the secondary position (towards the motherboard tray) to provide sufficient clearance.
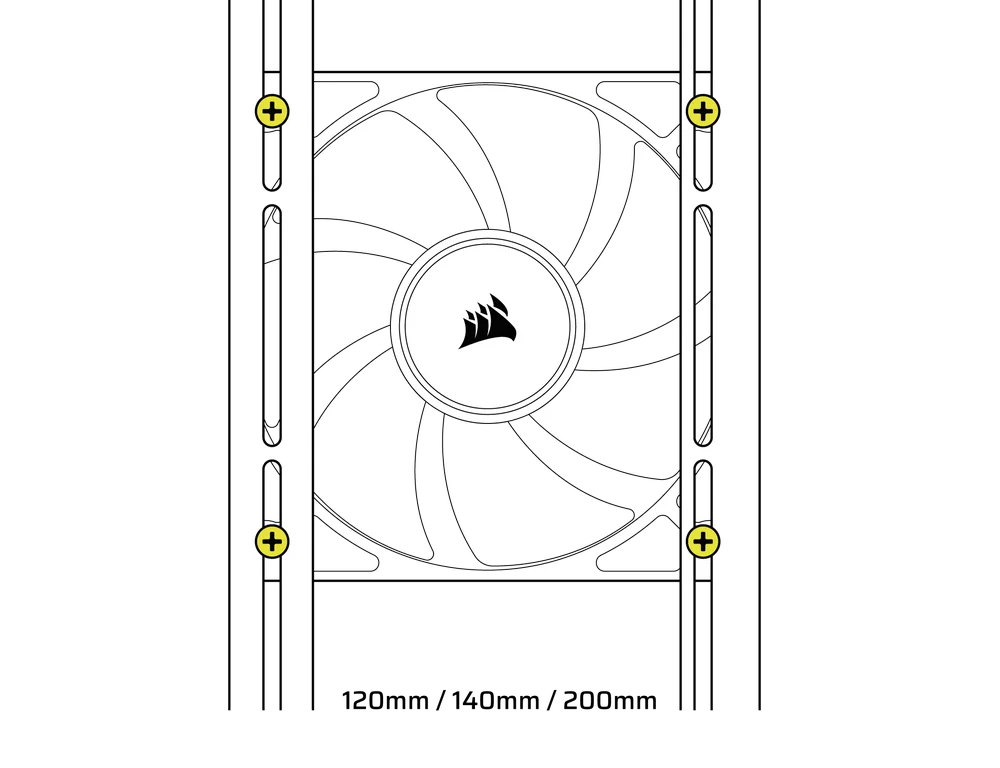
3. VENTILATOREN OP DE BOVENKANT INSTALLEREN
- Lijn uw ventilatoren uit met de InfiniRail-ventilatormontagesleuven en zet ze vast door zelfborende ventilatorschroeven (7) in het ventilatorframe te schroeven.
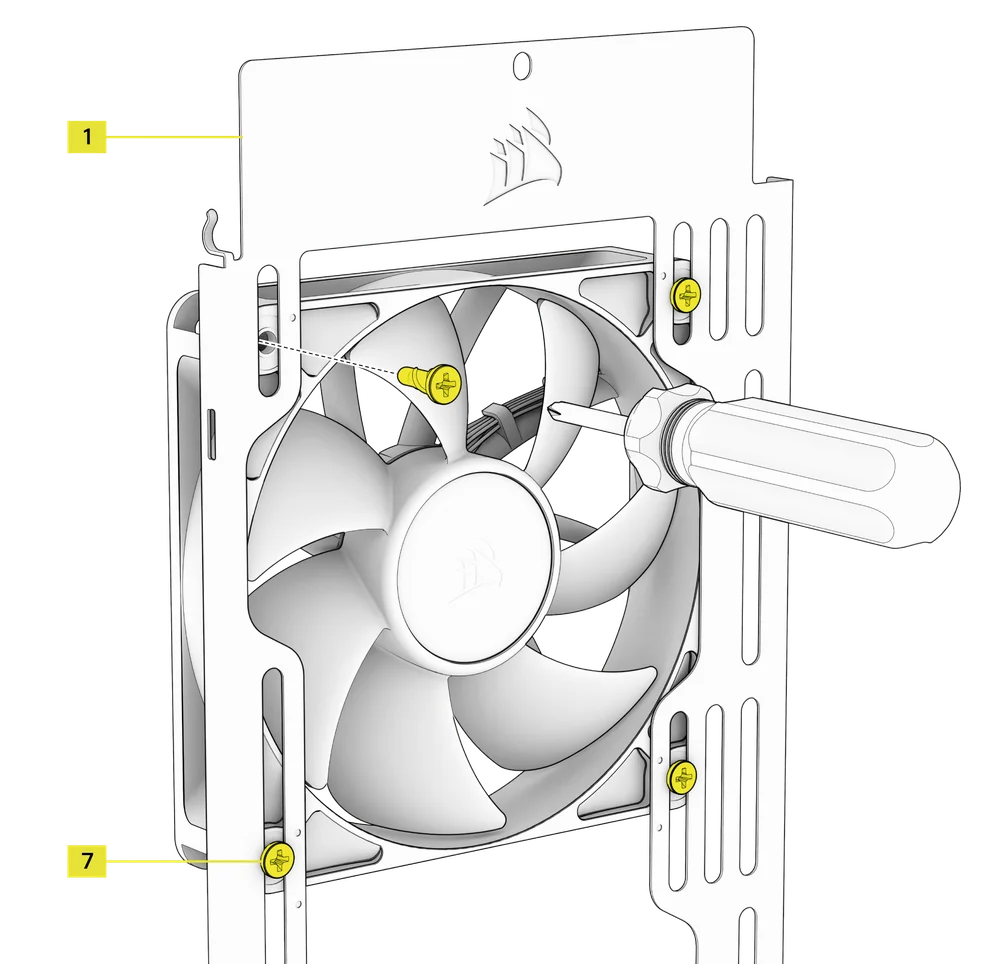
4. VENTILATOREN AAN DE ZIJKANT INSTALLEREN
Om ventilatoren aan de zijkant te installeren, moet u ervoor zorgen dat u de zijventilatorbevestigingsbeugel (1) hebt geïnstalleerd.
- Lijn uw ventilatoren uit met de ventilatorbevestigingssleuven en zet ze vast door zelftappende ventilatorschroeven (7) in het ventilatorframe te schroeven.
TIP: Gebruik de stippen op de zijventilatorbevestigingsbeugel (1) als centreergeleiders.
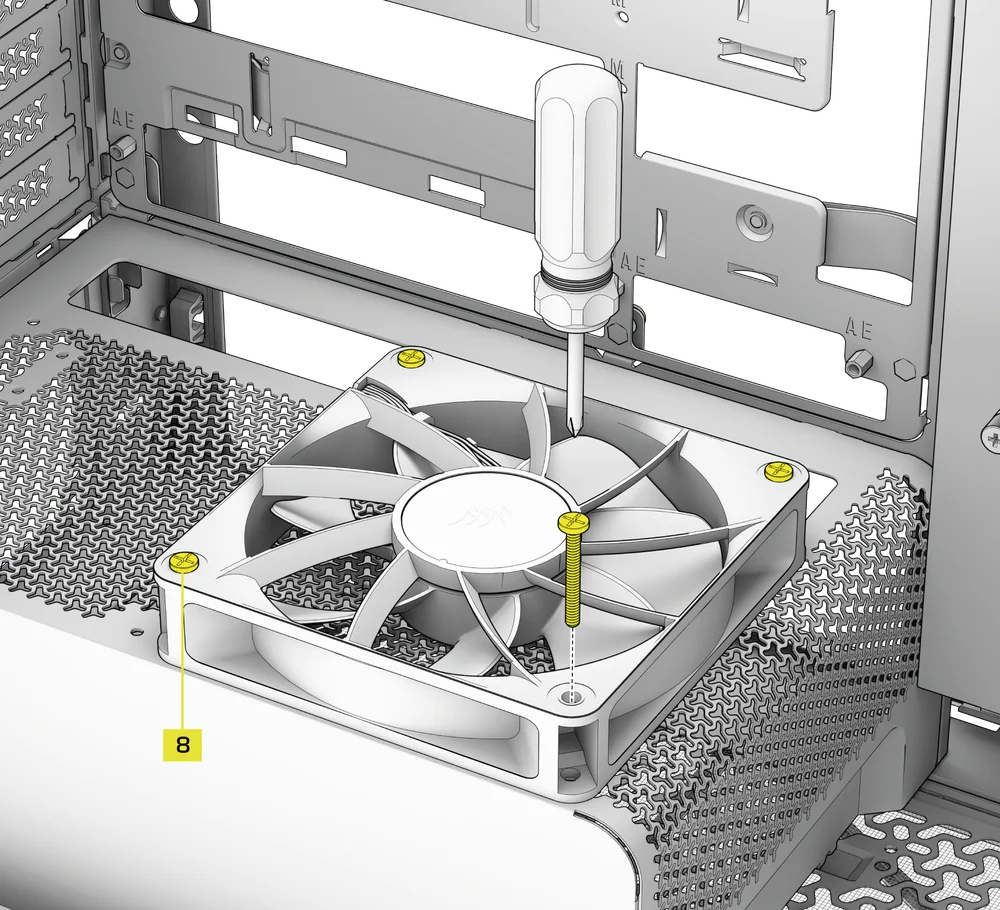
5. VENTILATOREN OP DE PSU-AFDEKKING INSTALLEREN
- Align your fans to the fan mounting holes on the PSU Shroud.
- Bevestig de ventilatoren met lange ventilatorschroeven (8).
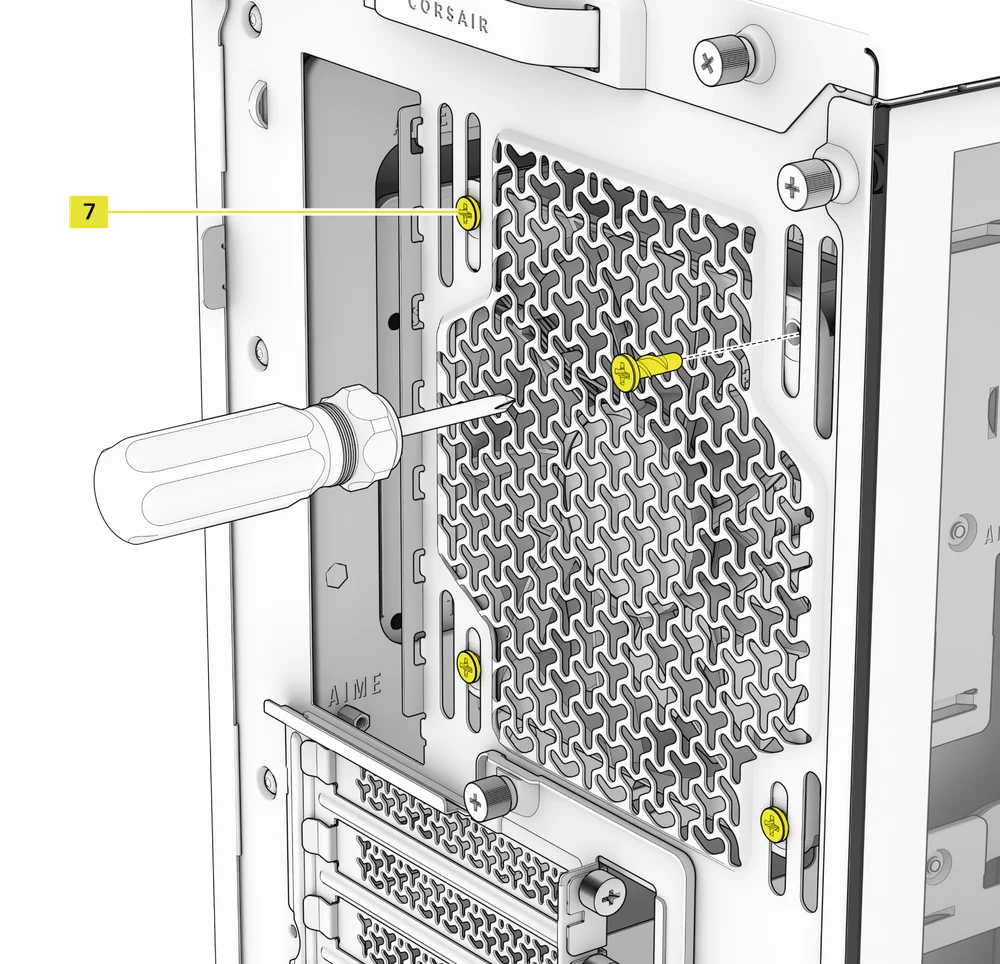
6. VENTILATOREN AAN DE ACHTERKANT INSTALLEREN
- Lijn uw ventilator uit met de bevestigingsgaten voor de ventilator.
- Bevestig de ventilator door zelfborende ventilatorschroeven (7) vast te draaien.
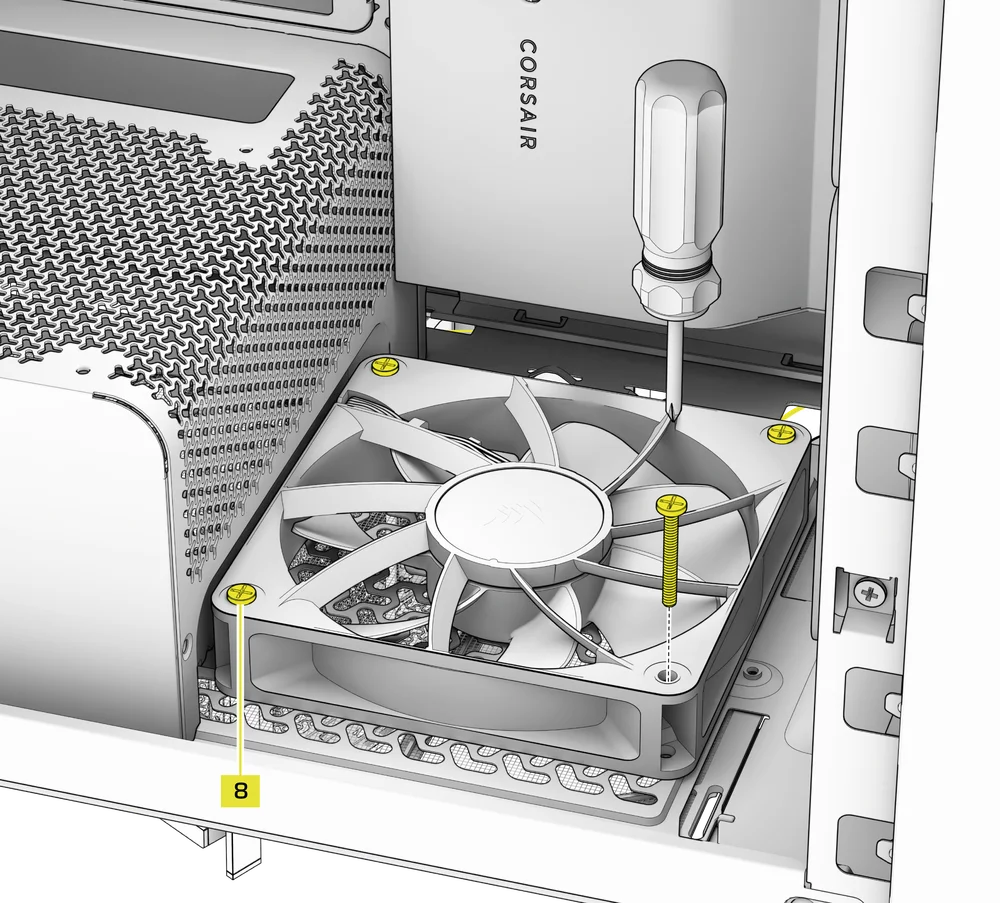
7. INSTALLING FANS IN THE BOTTOM
- Align your fans to the fan mounting holes.
- Secure the fans with Long Fan Screws (8).
NOTE: Not all FRAME 4000 Series variants can install a bottom fan. Refer to the fan location table for your particular case.
HYDRO X AANGEPASTE KOELINGSUPPORT
The FRAME 4000 has fill / drain ports pre-punched in the top and bottom panels for a Hydro X open loop liquid cooling setup.
- Verwijder de poortafdekkingen door ze voorzichtig los te wrikken met een platte schroevendraaier.
RADIATORINSTALLATIE
De FRAME 4000 biedt verschillende locaties om een radiator voor vloeistofkoeling te monteren, waarbij de voor- en bovenlocaties zijn voorzien van een verstelbare InfiniRail-ventilatormontage. Raadpleeg het gedeelte Ventilatorinstallatie voor meer informatie over het gebruik van het InfiniRail-ventilatormontagesysteem.
TIP: Voor optimale geluids- en thermische prestaties en betrouwbaarheid moet u ervoor zorgen dat de radiator hoger is gemonteerd dan de pomp wanneer u een AIO gebruikt.
|
Voorkant |
Top |
Achterzijde |
Zijde |
PSU-afscherming |
|
240 mm 280 mm 360 mm |
240 mm 280 mm 360 mm |
120 mm 140 mm |
240 mm 280 mm 360 mm |
Geen |
Bovenmontage zorgt voor optimale geluidsprestaties, maar andere bevestigingen kunnen worden gebruikt op basis van uw bouwvoorkeuren. Raadpleeg de producthandleiding van uw koeler voor meer tips over het gebruik en de beste werkwijzen.
1. OPTIMAL RADIATOR MOUNTING CONFIGURATION

OPMERKING: Om de radiator te centreren, moet u mogelijk één bevestigingsschroef van de radiator verwijderen. Met elf schroeven zijn er nog steeds voldoende bevestigingspunten om de radiator en ventilatoren stevig te installeren.
INSTALLATIE VAN OPSLAGAPPARATUUR EN CONTROLLERS
FRAME 4000 Series cases include up to two Combination Drive Plates - with each capable of mounting one HDD or two SSDs.

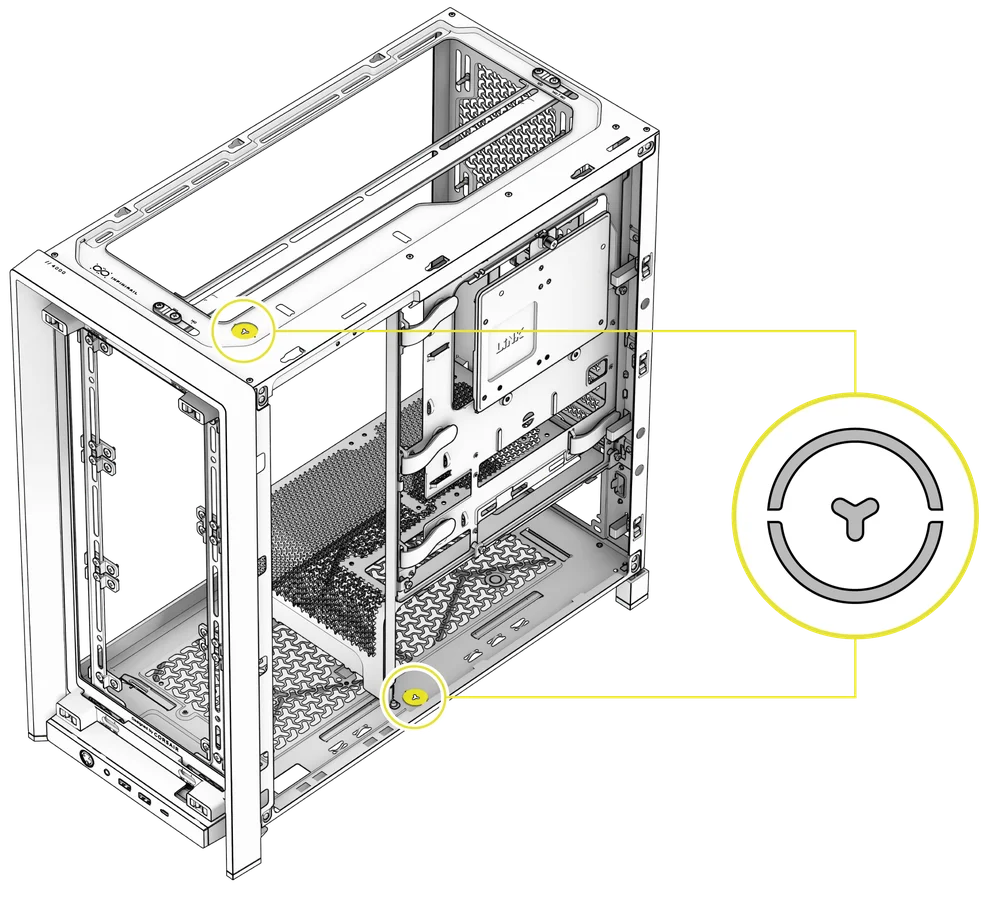
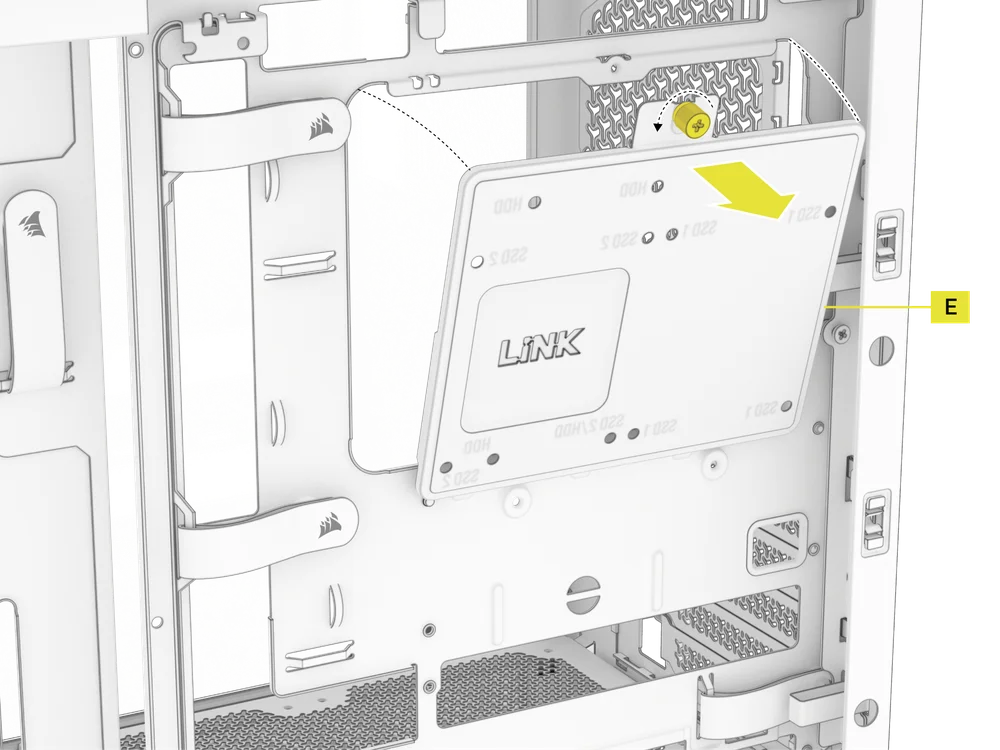
1. VERWIJDEREN VAN DE COMBINATIE-AANDRIJFPLATEAU
- Draai de duimschroef los waarmee de combinatie-aandrijfplaat (E) vastzit en verwijder vervolgens de plaat.
2. SSD-INSTALLATIE OP DE COMBINATIEAANDRIJVINGSPLAAT
- Installeer de SSD(s) op de combinatieplaat (E) door deze met de meegeleverde SSD-schroeven (10) aan de onderkant van de plaat vast te zetten.
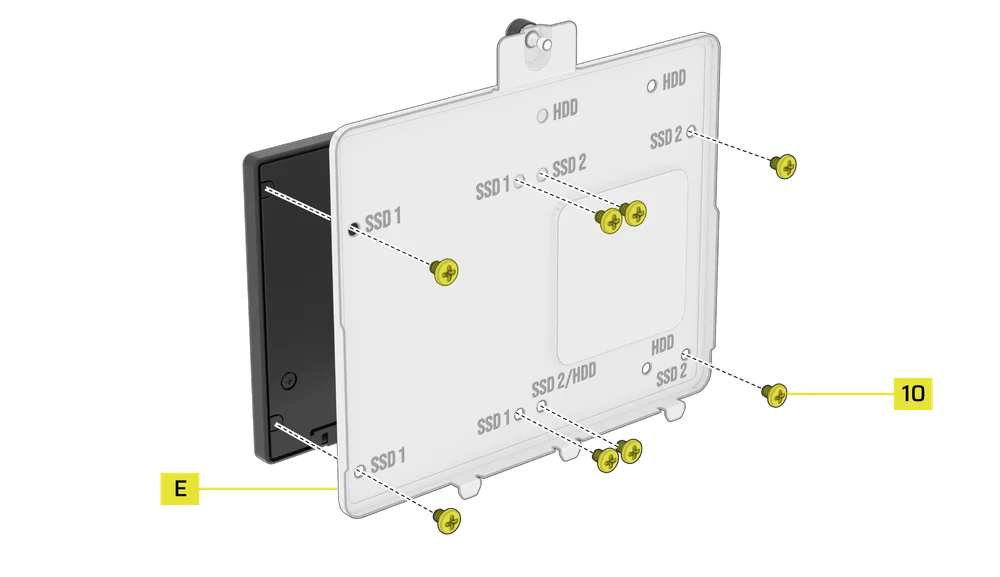
3. HDD-INSTALLATIE OP DE COMBINATIEAANDRIJFPLATEAU
- Installeer de HDD op de combinatieplaat (E) door deze aan de onderkant van de plaat vast te zetten met de meegeleverde HDD-schroeven (9).
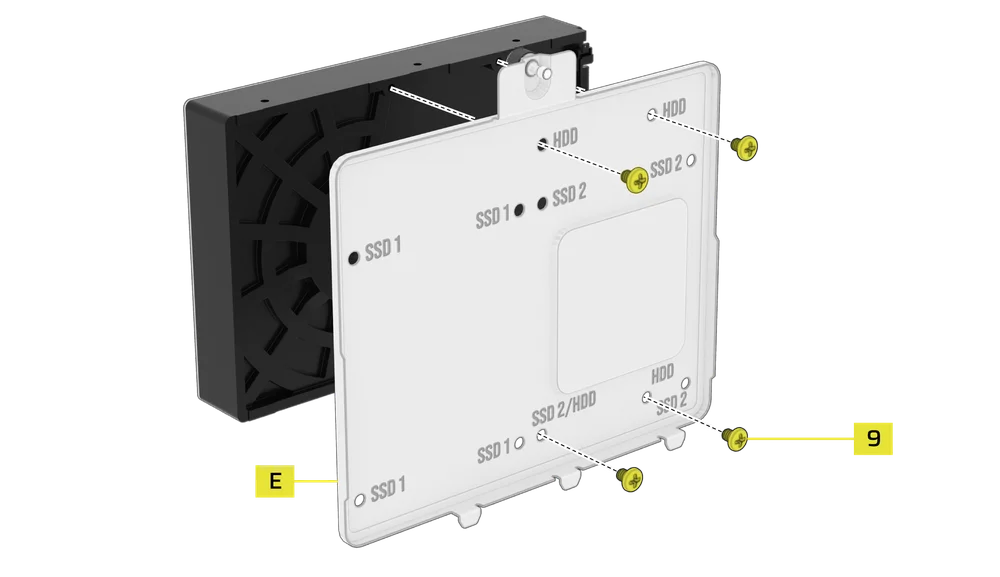
De combinatie-aandrijfplaat (E) dient ook als montageplaats voor een iCUE LINK System Hub-controller, indien deze wordt gebruikt.
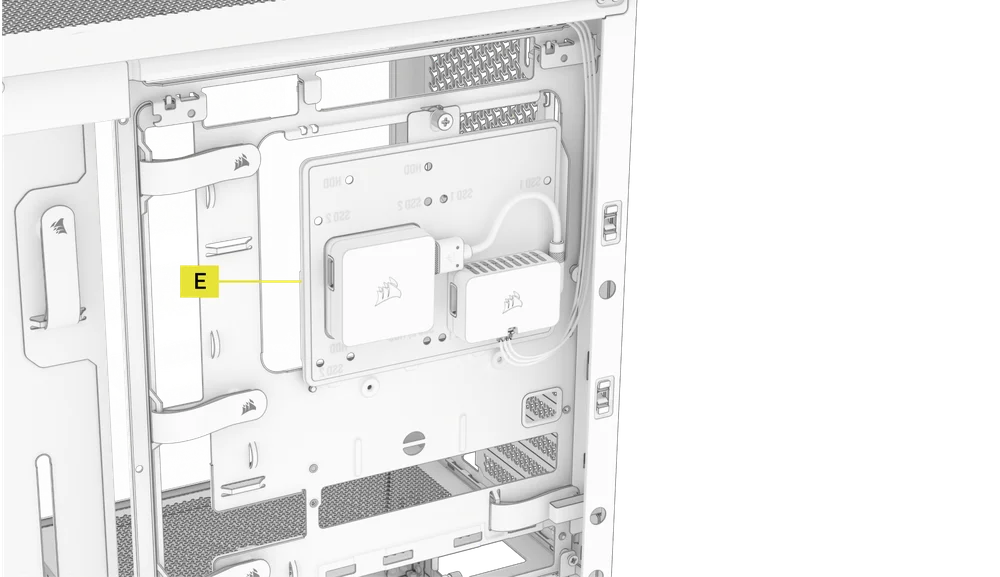
4. DE COMBINATIE-AANDRIJFPLATEAU BEVESTIGEN
Plaats de combinatieaandrijfplaat (E) terug in de daarvoor bestemde sleuf in de behuizing en zet deze vast door de duimschroef met de klok mee vast te draaien.
INSTALLATIE VAN STROOMVOORZIENING
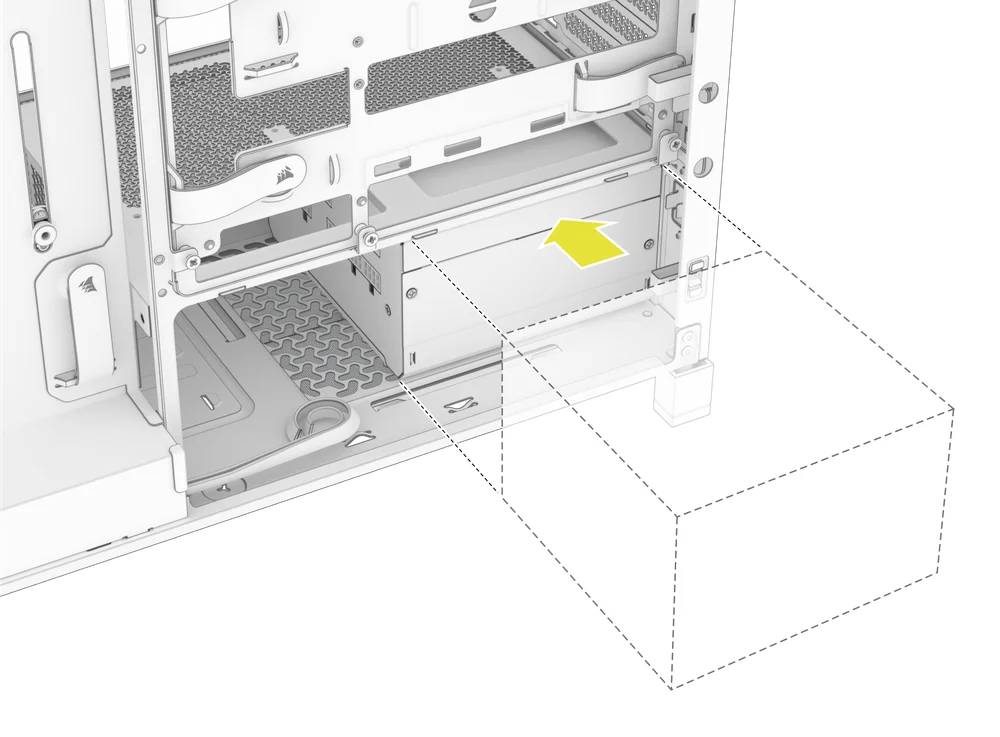
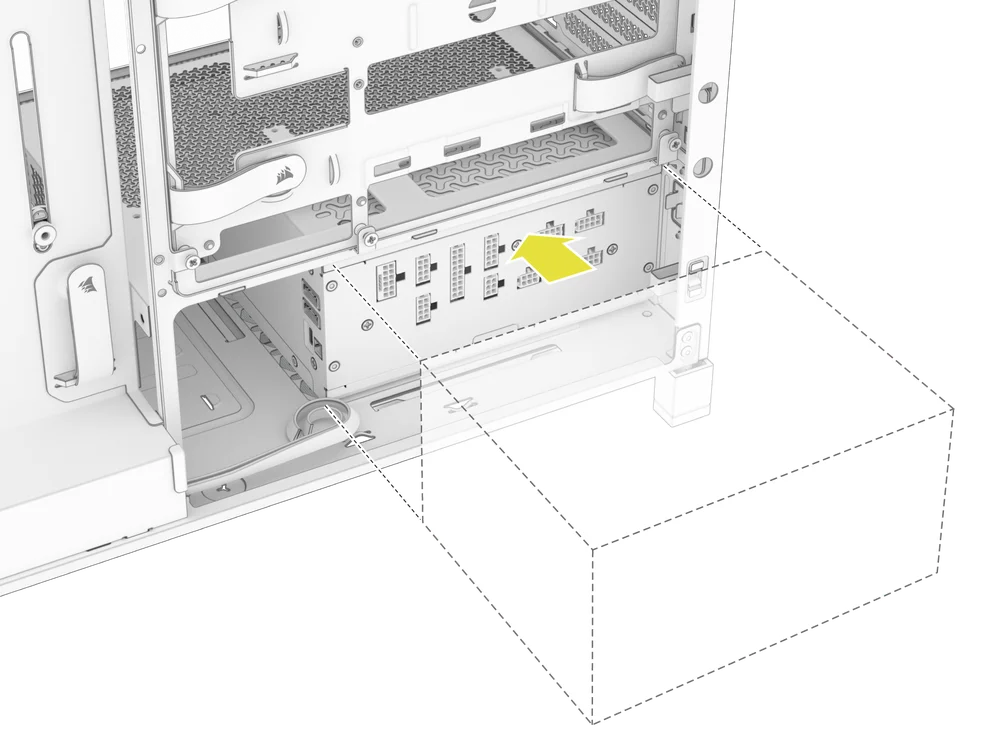
1. STANDAARD PSU-INSTALLATIE
- Installeer de PSU met de ventilator naar beneden gericht.
- Bevestig de stroomvoorziening aan het chassis met de twee onverliesbare schroeven aan de achterkant van de behuizing.
- Voor extra veiligheid zet je de PSU vast met twee moederbordschroeven (9) in de hoeken van het achterpaneel.
2. INSTALLATIE VAN DE CORSAIR SHIFT-VOEDING
De FRAME 4000 is volledig compatibel met alle SHIFT-voedingen en wordt op dezelfde manier geïnstalleerd als een standaard ATX-voeding.
INSTALLATIE VAN DE GRAFISCHE KAART
Dankzij de meegeleverde PCI-beugel kan de FRAME 4000 zowel horizontale als verticale GPU-montageconfiguraties ondersteunen.
TIP: Voor een eenvoudigere montage installeert u de GPU als laatste stap.
1. EEN GPU IN EEN STANDAARDORIËNTATIE INSTALLEREN
- Schroef de PCIe-sleufafdekkingen los en verwijder ze.
- Steek de kaart in de PCIe-sleuf totdat deze vastklikt in het bevestigingsmechanisme van de PCIe-sleuf.
- Lijn de beugel uit met de PCIe-sleuven en bevestig de kaart aan de behuizing.
2. GEBRUIK VAN DE GPU ANTI-SAG STABILISATIEARM
De GPU Anti-sag Stabilization Arm ondersteunt uw grafische kaart en voorkomt dat deze buigt of doorhangt onder het gewicht van het koellichaam. Dit helpt niet alleen uw grafische kaart en PCIe-sleuf te beschermen, maar draagt ook bij aan een nettere, professionelere uitstraling.
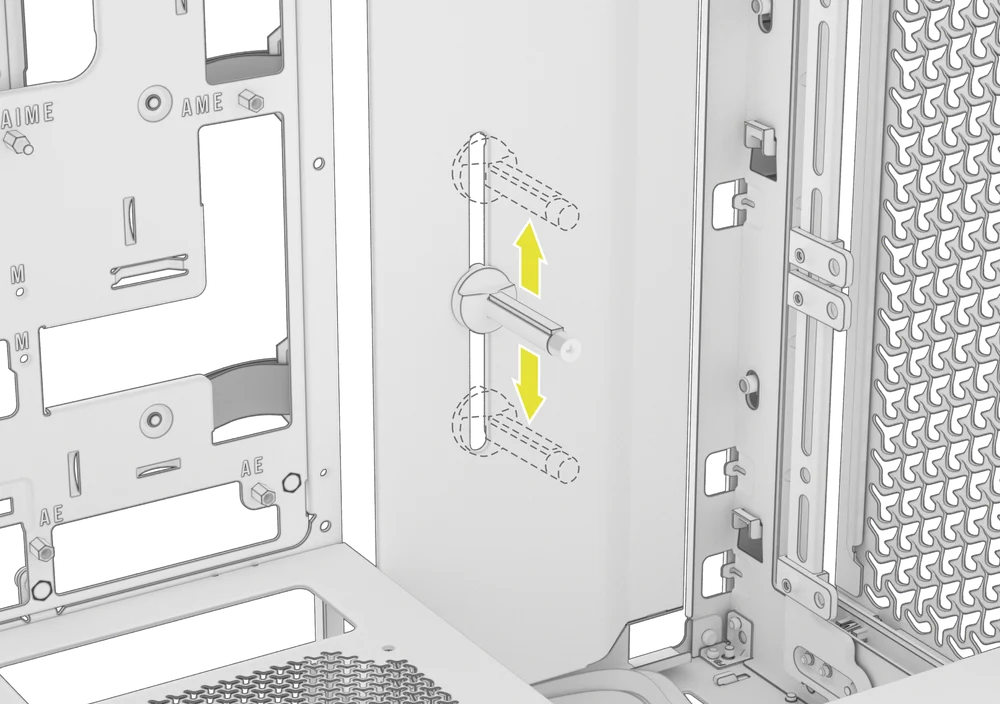
- Stel de GPU Anti-Sag Arm af door de schroef aan de voorkant los te draaien en deze omhoog of omlaag te schuiven.
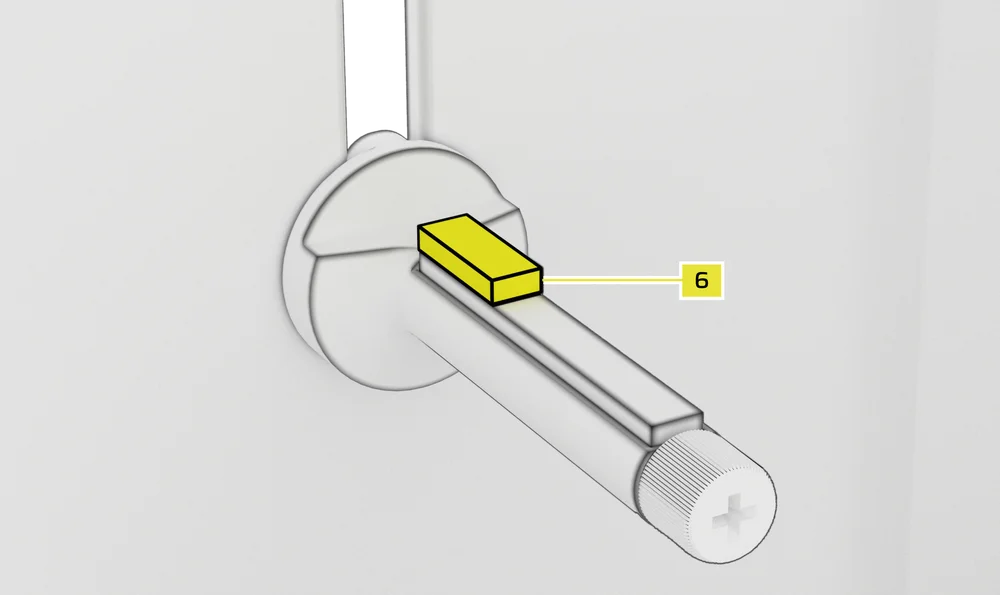
OPMERKING: Als uw GPU-ventilator of andere onderdelen in contact komen met de rubberen arm, gebruik dan de meegeleverde Anti-sag Stabilization Arm Rubber Spacer (6) uit de accessoirebox om ervoor te zorgen dat er voldoende ruimte is tussen bewegende onderdelen.
- Bevestig de zelfklevende rubberen afstandhouder (6) voor de stabilisatiearm tegen doorhangen aan de GPU-arm tegen doorhangen.
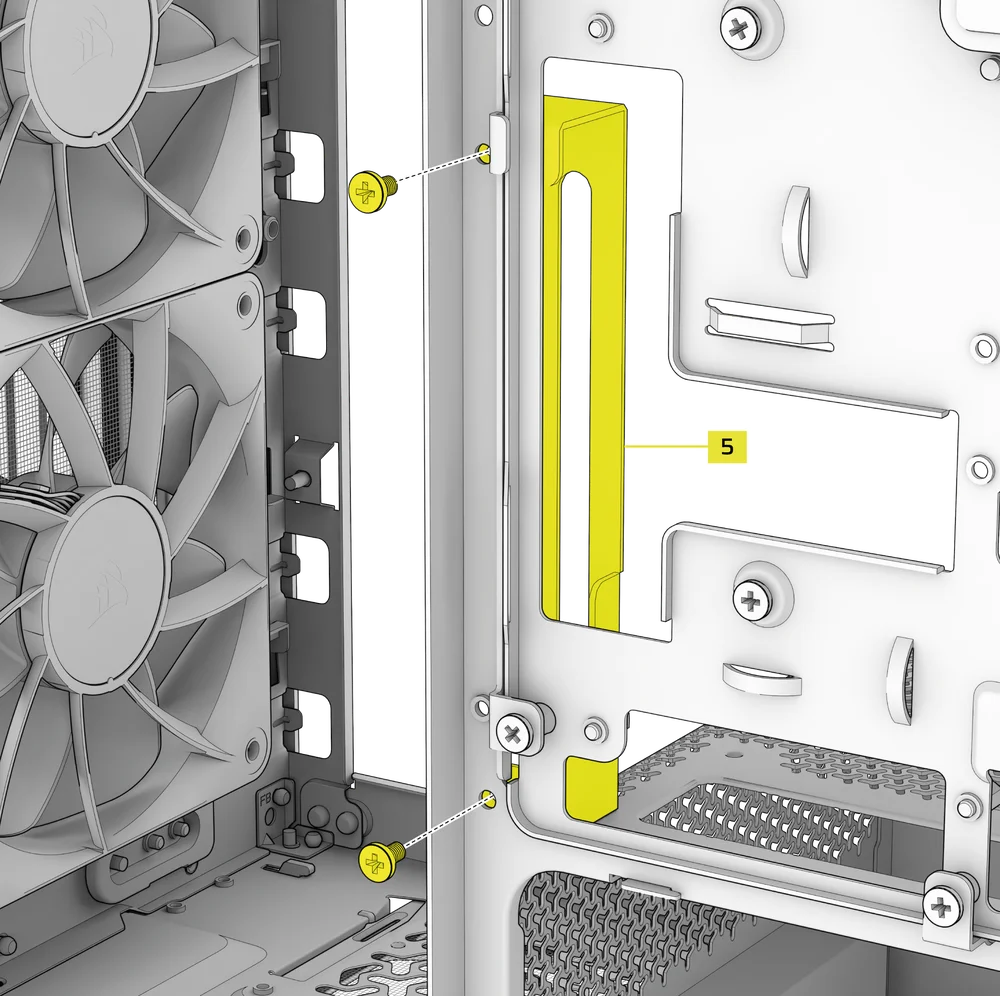
TIP: Als u besluit om de kabelbeschermkap (F) te vervangen door de zijventilatorbevestigingsbeugel (1), kunt u uw GPU-anti-doorhangstabilisatiearm verplaatsen naar de mini-bevestiging voor de anti-doorhangstabilisatiearm (5) en zo de anti-doorhangfunctionaliteit behouden.
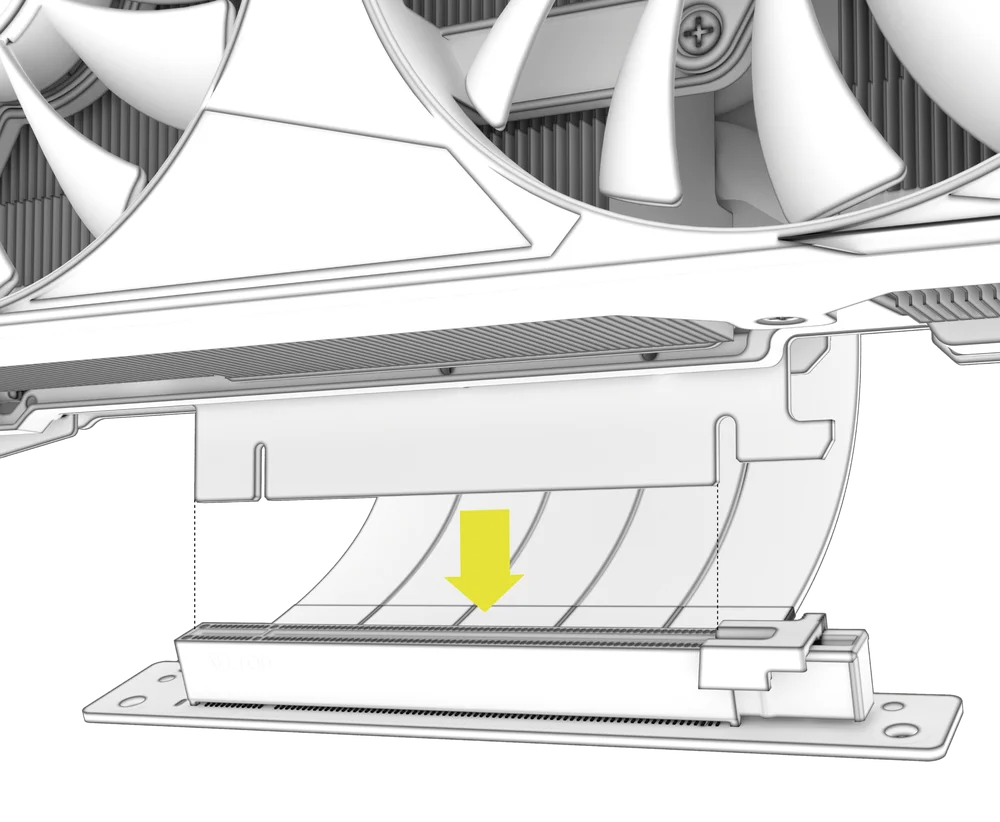
3. EEN GPU IN VERTICALE POSITIE INSTALLEREN
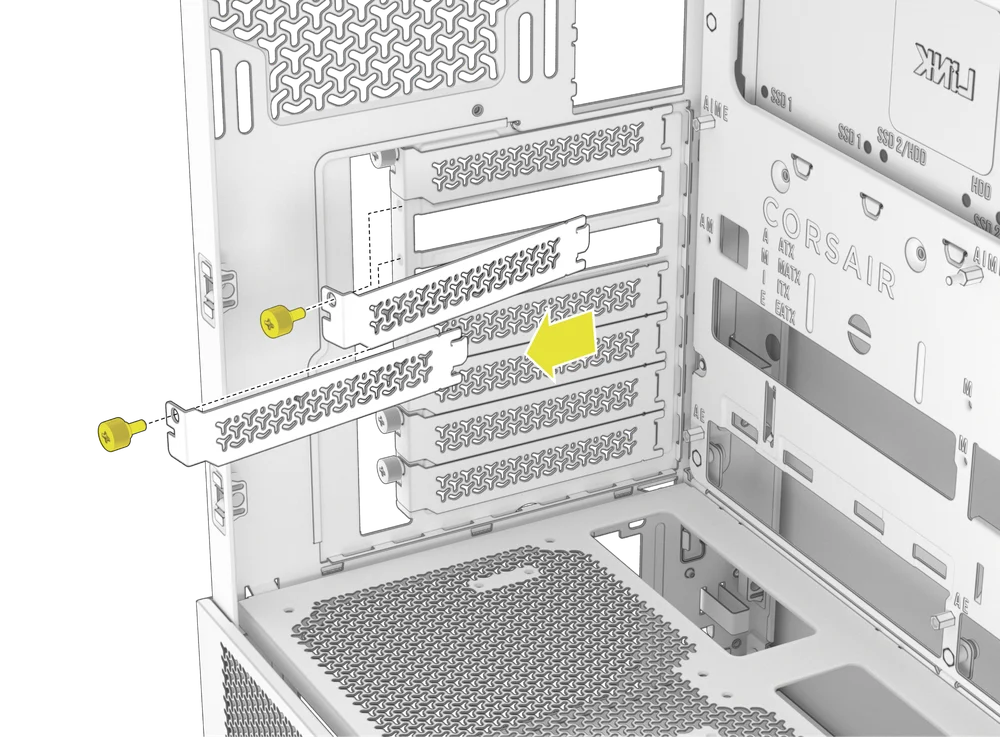
De FRAME 4000 ondersteunt verticale GPU-montage met de meegeleverde PCI-plaat (B) en een PCIe-riserkaart (apart verkrijgbaar).
- Verwijder de PCI-plaat (B) door de drie schroeven aan de achterkant van de behuizing los te draaien.
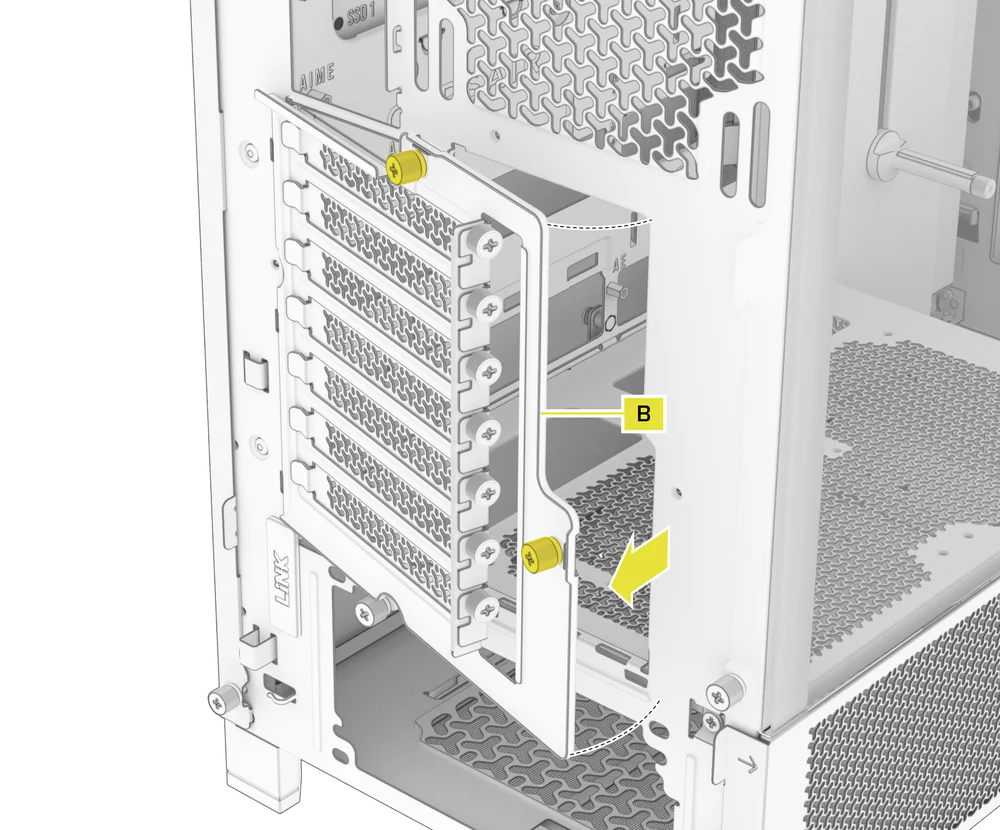
OPMERKING: De PCI-plaatschroeven zijn vastgezet en hoeven niet volledig te worden verwijderd.
- Draai de PCI-plaat (B) 90 graden tegen de klok in, zodat de duimschroeven van de PCIe-sleufafdekking naar boven wijzen.
- Bevestig de PCI-plaat (B) opnieuw en draai de duimschroeven vast.

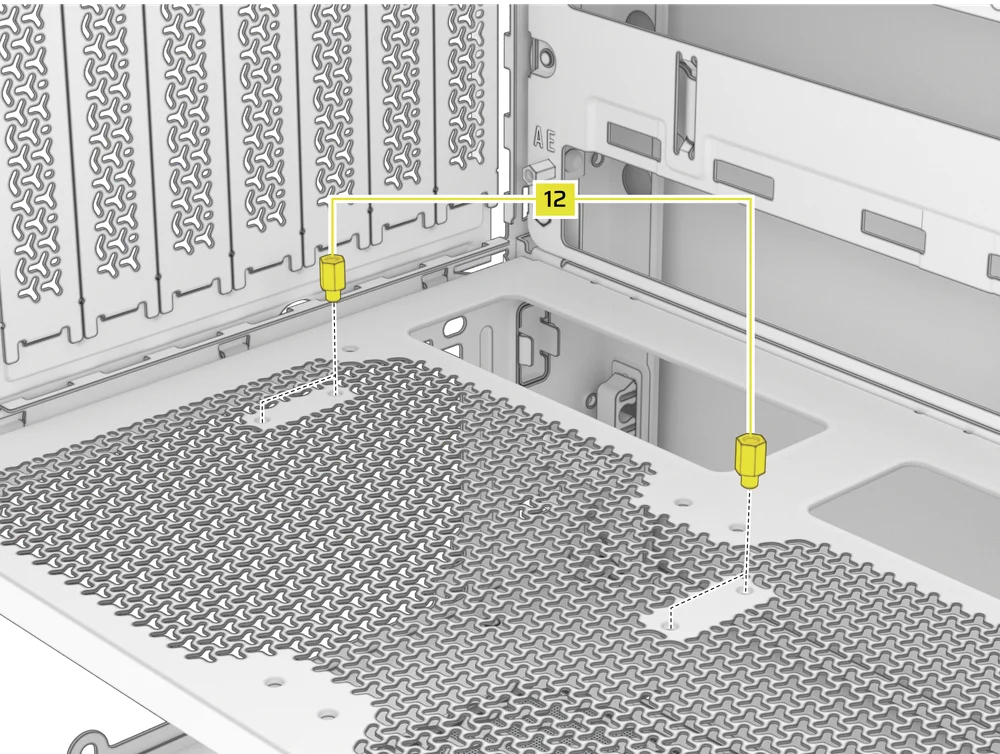
- Install the Vertical Mount Standoffs (12) from the accessory box to the top of the PSU shroud. There are two locations for standoffs, so choose the location that best suits the size of your GPU in relation to how far it is from the side panel.
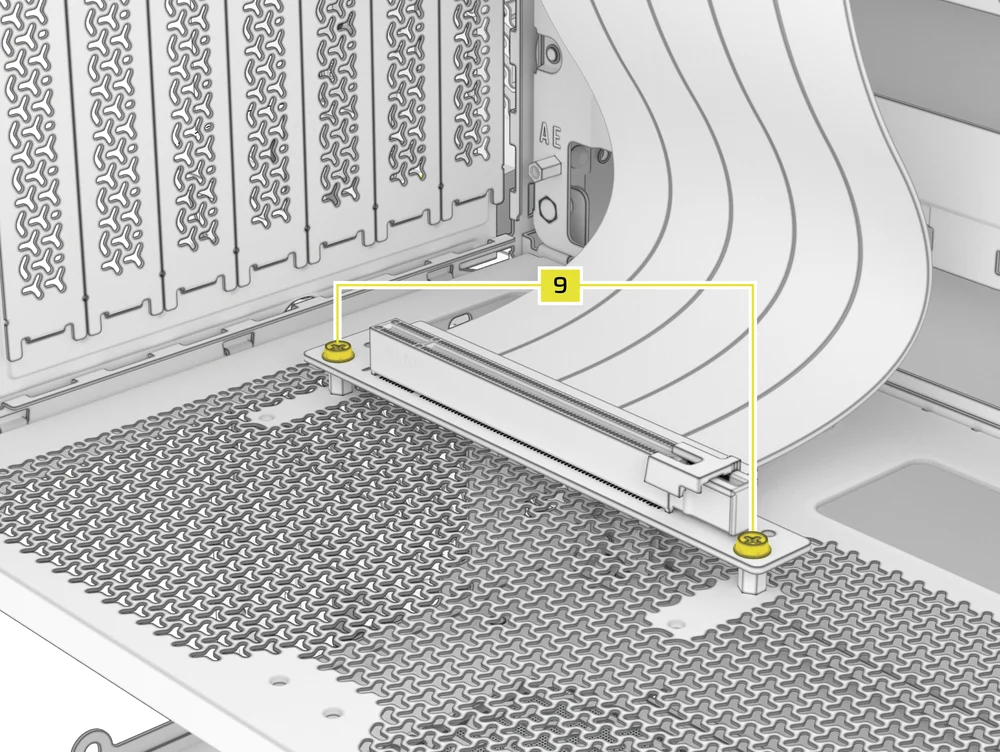
- Mount the PCIe Riser Card (sold separately) to the Vertical Mount Standoffs (12) using two of the included Motherboard Screws (9).
- Bevestig de GPU in de PCI-beugel door deze stevig in de riserkaart te plaatsen totdat deze vastklikt, en zet hem vervolgens vast met duimschroeven.
UW FANS VERBINDEN
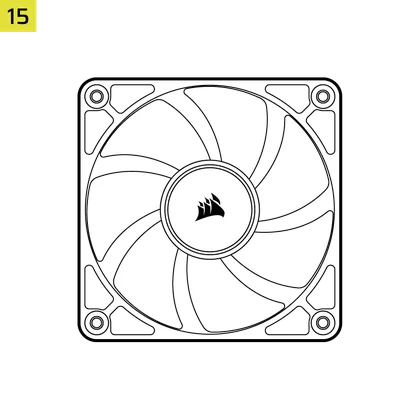
1. CONNECTING AND CONTROLLING RS FANS
- FRAME 4000D RS
- FRAME 4000D WOOD RS
- FRAME 4000X
Raadpleeg de snelstartgids voor de CORSAIR RS-serie voor instructies over de installatie van ventilatoren.
2. CONNECTING AND CONTROLLING RS ARGB FANS
- FRAME 4000D RS ARGB
- FRAME 4000D LCD RS ARGB
Raadpleeg de snelstartgids voor de CORSAIR RS ARGB-serie voor instructies over de installatie van ventilatoren.
ONDERHOUD
1. UW KASTFILTERS REINIGEN
De FRAME 4000 heeft drie verwijderbare stoffilters. Een voedingsfilter aan de onderkant, een magnetisch filter aan de zijkant en een plastic/nylon filter aan de voorkant.
- Om het filter van de voorste ventilator (J) te verwijderen, kantelt u het plastic filterframe naar de bovenkant van de behuizing en trekt u het vanaf de onderkant naar buiten.
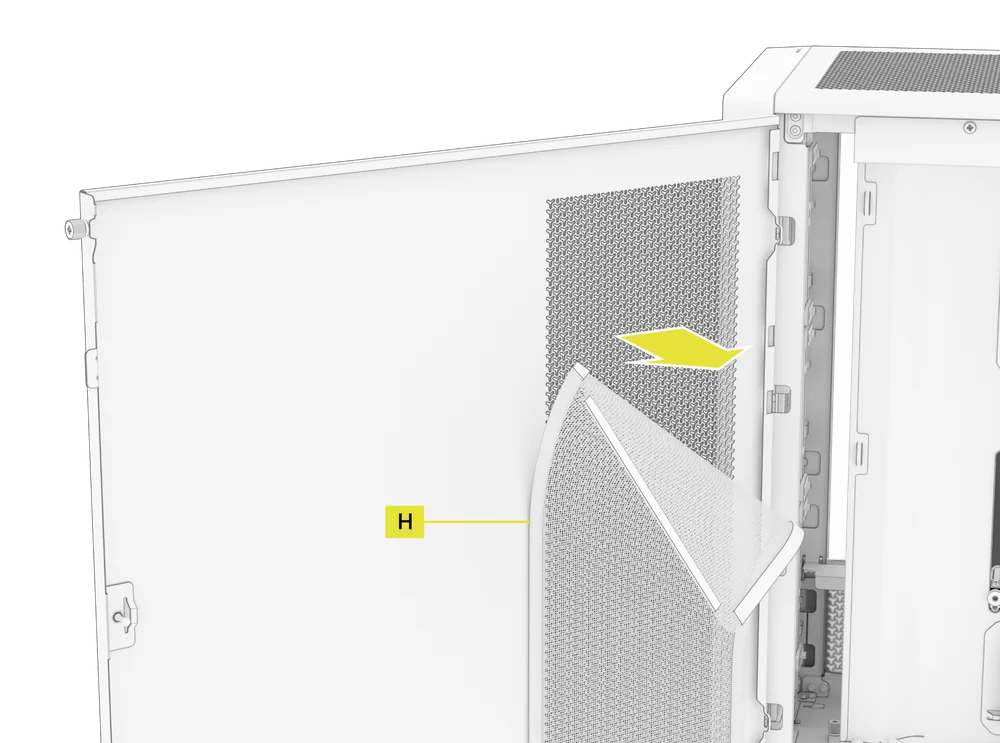
- Om het magnetische zijventilatorfilter (H) te verwijderen, trekt u in het midden om het frame te buigen, maakt u vervolgens de uiteinden los van de vergrendelingspunten en tilt u het filter weg.
- Om het PSU-ventilatorfilter (K) te verwijderen, trekt u het uit de behuizing.
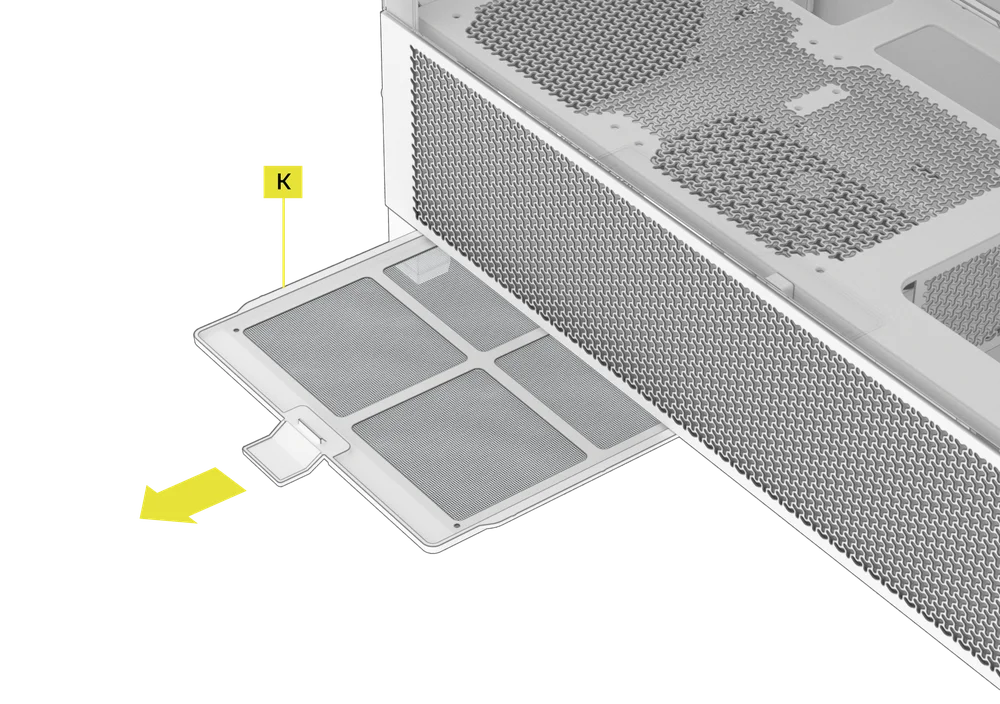
OPMERKING: Filters kunnen worden gereinigd met perslucht of water. Als u uw filter spoelt, zorg er dan voor dat de filters volledig droog zijn voordat u ze opnieuw installeert.
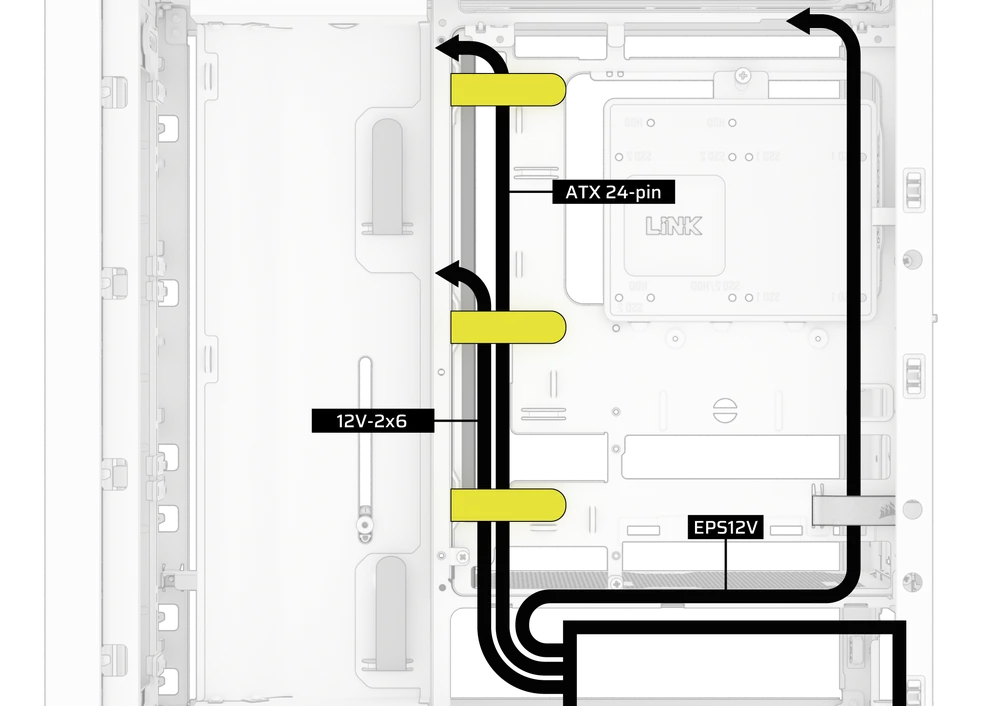
2. TIPS VOOR KABELBEHEER
De FRAME 4000 bevat diverse andere functies voor kabelbeheer, zoals:
- Verstelbare interne/externe klittenbandriemen voor de achterkant van de koffer.
- Meerdere posities voor klittenbandriemen voor standaard of omgekeerde connector-moederborden.
- Kabelbinders zijn strategisch geplaatst om stroomkabels naar specifieke apparaten te leiden.
- iCUE LINK-kabelhaken in het bovenpaneel om LINK-kabels stevig vast te houden zonder permanente bevestiging.
- Supports most reverse connector motherboards (MSI, ASUS, GIGABYTE) that feature connectors on the rear of the board for a build with no visible motherboard cables.
- Een speciale locatie voor uw iCUE LINK-systeemhub.
- Als u niet veel tijd wilt besteden aan kabelbeheer en niet wilt dat uw kabels zichtbaar zijn door het onderste gaas paneel, vervang dan het doorschijnende inzetstuk door het bijpassende blinde inzetstuk dat in de accessoirebox zit.
GARANTIEVERKLARING

Cases uit de CORSAIR FRAME 4000-serie worden geleverd met 2 jaar garantie.
PRODUCT CHANGES
|
January 2025 |
Initial Release |
|
March 2026 |
Thicker steel side panels 200mm fan compatibility PSU shroud cut Various case rigidity improvements |
AVAILABLE ACCESORIES
CC-8900917 FRAME 4000 3D-Y Airflow Front Panel - Black
CC-8900918 FRAME 4000 3D-Y Airflow Front Panel - White
CC-8901149 FRAME 4000 RGB FLOW Front Panel - Black
CC-8901150 FRAME 4000 RGB FLOW Front Panel - White
CC-8901151 FRAME 4000 Series WOOD Front Panel - Black/Walnut
CC-8901152 FRAME 4000 Series WOOD Front Panel - White/Oak
CC-8901153-WW FRAME 4000 Series ELITE WOOD Front Panel - Black/Walnut
CC-8901154-WW FRAME 4000 Series ELITE WOOD Front Panel - White/Oak
CC-8901155 FRAME 4000 Series Flat Glass Front Panel - Black
CC-8901156 FRAME 4000 Series Flat Glass Front Panel - White
CC-8901157 FRAME 4000 Series Pixel Glass Front Panel - Black
CC-8901158 FRAME 4000 Series Pixel Glass Front Panel - White
CC-8901208 FRAME 4000 Glass + Mesh Side Panels - Black
CC-8901209 FRAME 4000 Glass + Mesh Side Panels - White
CC-8901147 FRAME 4000 Full Tempered Glass Side Panel - Black
CC-8901148 FRAME 4000 Full Tempered Glass Side Panel - White
CC-8901048-WW FRAME 4000 Series LCD Mounting Kit - Black
CC-8901049-WW FRAME 4000 Series LCD Mounting Kit - White
CC-8901142-WW FRAME 4000 Series Cold Air Intake Kit - Black
CC-8901143-WW FRAME 4000 Series Cold Air Intake Kit - White
CC-8901171 FRAME 4000 Series - Flat Steel Panel - Black
CC-8901172 FRAME 4000 Series - Flat Steel Panel - White
CC-8900966 FRAME Standard Steel Motherboard Tray - Black
CC-8900967 FRAME Standard Steel Motherboard Tray - White
CC-8901022 FRAME RapidRoute 2.0 Motherboard Tray - Black
CC-8901023 FRAME RapidRoute 2.0 Motherboard Tray - White
CC-8901146-WW FRAME ELITE Motherboard Tray - Meteorite Aluminum
CC-8900937 FRAME 4000 Full Length PSU Shroud - Black
CC-8900938 FRAME 4000 Full Length PSU Shroud - White
CC-8901161 FRAME 4000/4500 Compact PSU Shroud - Black
CC-8901162 FRAME 4000/4500 Compact PSU Shroud - White
CC-8900919 FRAME 4000 Standard FPIO - Black (2xA; 1xC)
CC-8900920 FRAME 4000 Standard FPIO - White (2xA; 1xC)
CC-8901159-WW FRAME 4000 Series ELITE Front Panel I/O - Black (3xC + ARGB Cherry MX Style PWR Button)
CC-8901160-WW FRAME 4000 Series ELITE Front Panel I/O - White (3xC + ARGB Cherry MX Style PWR Button)
SPARE PARTS LISTING
|
CC-8900917 |
FRAME 4000D 3D-Y Airflow Front Panel, Black |
|
CC-8900918 |
FRAME 4000D 3D-Y Airflow Front Panel, White |
|
CC-8900919 |
FRAME 4000D Replacement Front I/O, Black |
|
CC-8900920 |
FRAME 4000D Replacement Front I/O, White |
|
CC-8900921 |
FRAME 4000D Replacement Front Bezel Assembly, Black |
|
CC-8900922 |
FRAME 4000D Replacement Front Bezel Assembly, White |
|
CC-8900923 |
FRAME 4000D Replacement Top Panel, Black |
|
CC-8900924 |
FRAME 4000D Replacement Top Panel, White |
|
CC-8900925 |
FRAME 4000D Replacement Three-Quarter Side Glass, Black |
|
CC-8900926 |
FRAME 4000D Replacement Three-Quarter Side Glass, Black |
|
CC-8900927 |
FRAME 4000D Replacement Y-Mesh Quarter Panel, Black |
|
CC-8900928 |
FRAME 4000D Replacement Y-Mesh Quarter Panel, White |
|
CC-8900929 |
FRAME 4000D Accessory Box, Black |
|
CC-8900930 |
FRAME 4000D Accessory Box, White |
|
CC-8900931 |
FRAME 4000D Replacement PCI Bracket, Black |
|
CC-8900932 |
FRAME 4000D Replacement PCI Bracket, White |
|
CC-8900933 |
FRAME 4000D Replacement Top InfiniRail, Black |
|
CC-8900934 |
FRAME 4000D Replacement Top InfiniRail, White |
|
CC-8900935 |
FRAME 4000D Replacement Front InfiniRail (Single), Black |
|
CC-8900936 |
FRAME 4000D Replacement Front InfiniRail (Single), White |
|
CC-8900937 |
FRAME 4000D Replacement PSU Shroud, Black |
|
CC-8900938 |
FRAME 4000D Replacement PSU Shroud, White |
|
CC-8900939 |
FRAME 4000D Replacement Drive/Controller Plate, Black |
|
CC-8900940 |
FRAME 4000D Replacement Drive/Controller Plate, White |
|
CC-8900941 |
FRAME 4000D Replacement Cable Cover, Black |
|
CC-8900942 |
FRAME 4000D Replacement Cable Cover, White |
|
CC-8900943 |
FRAME 4000D Replacement InfiniRail Fan Mounts (12pcs), Black |
|
CC-8900944 |
FRAME 4000D Replacement InfiniRail Fan Mounts (12pcs), White |
|
CC-8900945 |
FRAME 4000D Replacement Strap Kit, Black |
|
CC-8900946 |
FRAME 4000D Replacement Strap Kit, White |
|
CC-8900947 |
FRAME 4000D Replacement PSU Filter, Black |
|
CC-8900948 |
FRAME 4000D Replacement PSU Filter, White |
|
CC-8900949 |
FRAME 4000D Replacement Front Filter, Black |
|
CC-8900950 |
FRAME 4000D Replacement Front Filter, White |
|
CC-8900951 |
FRAME 4000D Replacement Side Filter, Black |
|
CC-8900952 |
FRAME 4000D Replacement Side Filter, White |
|
CC-8900953 |
FRAME Series GPU Anti-Sag Assembly, Black |
|
CC-8900954 |
FRAME Series GPU Anti-Sag Assembly, White |
LEGAL
©2026 CORSAIR MEMORY, Inc. All rights reserved. CORSAIR and the sails logo are registered trademarks of CORSAIR in the United States and/or other countries. All other trademarks are the property of their respective owners. Product may vary slightly from those pictured.
GERELATEERDE INHOUD


