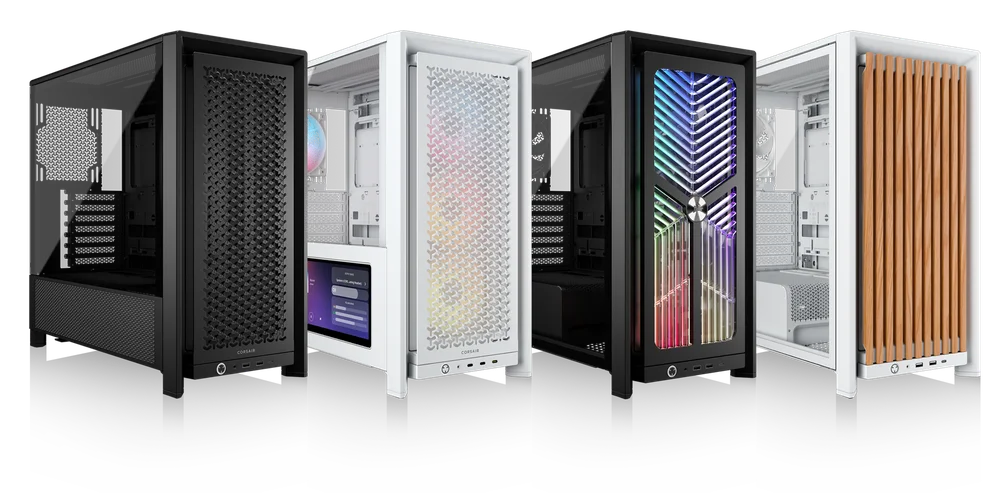
快速入門指南
CORSAIR FRAME 4000 系列
MODULAR MID-TOWER CASE
機箱規格
|
PCI 插槽配置 |
7 個水平插槽 / 3 個垂直插槽 |
|
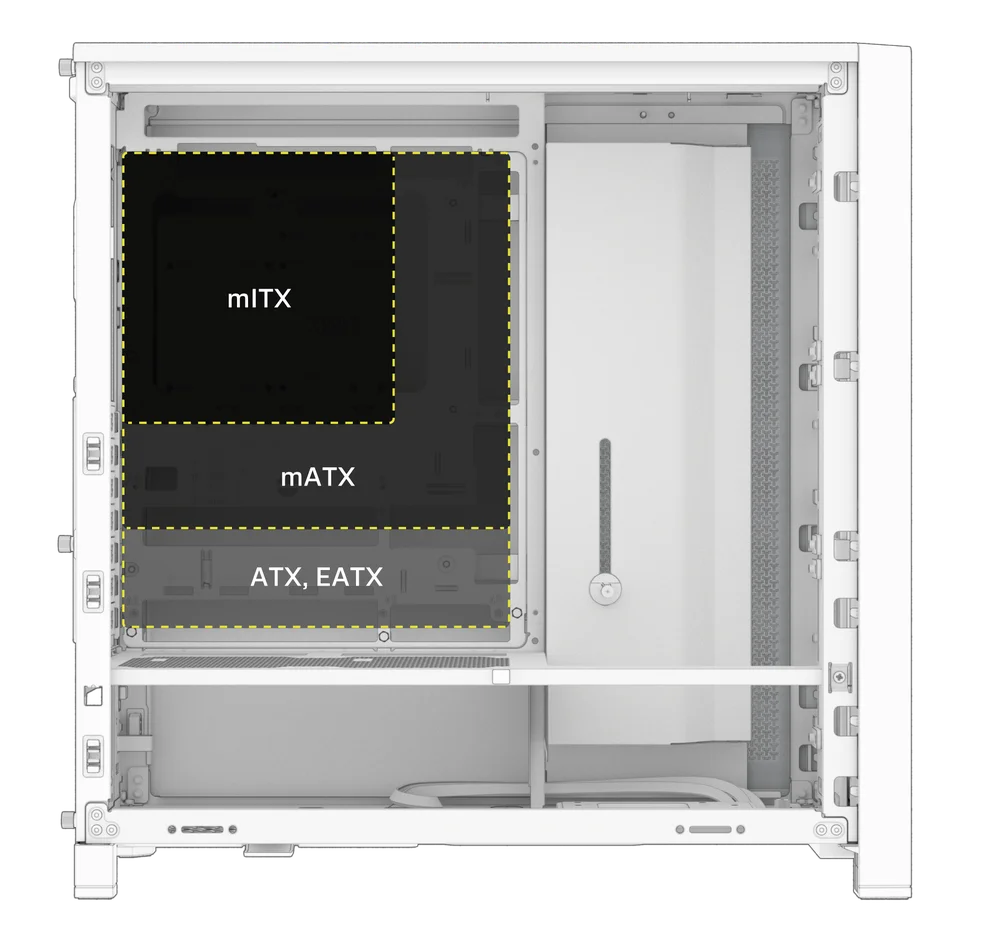
主板兼容性 |
Mini-ITX、Micro-ATX、ATX、E-ATX ( 305 毫米 x 277 毫米) |
|
硬盤驅動器 |
|
|
固態硬盤 |
|
|
顏色可選 |
|
|
左側板材料 |
鋼化玻璃 |
|
前面板材料 |
|
|
後部電纜空間 |
37毫米 |
|
灰塵過濾網 |
Front, Side, Bottom |
|
前端 I/O |
Standard FPIO (FRAME 4000D, FRAME 4000D WOOD, FRAME 4000X):
ELITE FPIO (FRAME 4000D LCD, FRAME 4000D Vault SERIES):
|
1. 風扇位置
NOTE: No fans are included with the FRAME 4000D or FRAME 4000D Vault Series.
| FRAME 4000D RS/RS ARGB | ||||||
|
正面 |
頂部 |
後方 |
側邊 |
PSU 護罩 | Bottom | |
|
3x 120毫米 2x 140毫米 2x 200毫米 |
3x 120毫米 2x 140毫米
|
1x 120毫米 1x 140毫米
|
3x 120毫米 2x 140毫米
|
2x 120毫米 |
None |
|
|
FRAME 4000D LCD, FRAME 4000D WOOD, FRAME 4000X |
||||||
|
Front |
Top |
Rear |
Side |
PSU Shroud | Bottom | |
|
3x 120mm 2x 140mm 2x 200mm |
3x 120mm 2x 140mm
|
1x 120mm 1x 140mm
|
3x 120mm 2x 140mm
|
2x 120mm |
1x 120mm |
|
2. 隨附風扇與控制器
|
FRAME 4000D |
FRAME 4000D RS | FRAME 4000D RS ARGB |
FRAME 4000D WOOD, FRAME 4000X |
FRAME 4000 LCD
|
|
|
無 |
3x RS120 (Pre-installed) |
3x RS120 ARGB (Pre-installed) |
4x RS120 (Pre-installed) |
4x RS120 ARGB (Pre-installed) |
|
NOTE: Fans and lighting controllers are not included. ARGB lighting can be controlled through your motherboard or with a separate fan controller.
3. 散熱器相容性
|
正面 |
頂部 |
後方 |
側邊 |
PSU 護罩 |
|
240毫米 280毫米 360毫米 |
240毫米 280毫米 360毫米 |
120毫米 140毫米 |
240毫米 280毫米 360毫米 |
無 |
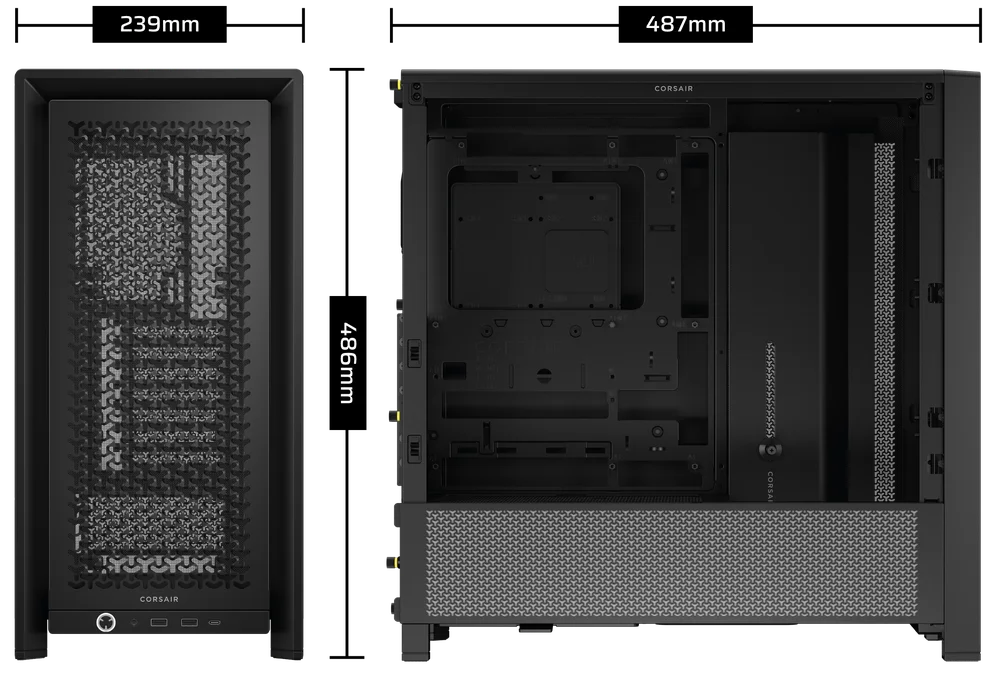
4. 箱體尺寸
| 尺寸 |
487 毫米 x 239 毫米 x 486 毫米 |
|
GPU 長度上限值 |
430毫米 |
|
CPU 冷卻器高度上限值 |
170 毫米 |
|
PSU 長度上限值 |
220 毫米 |
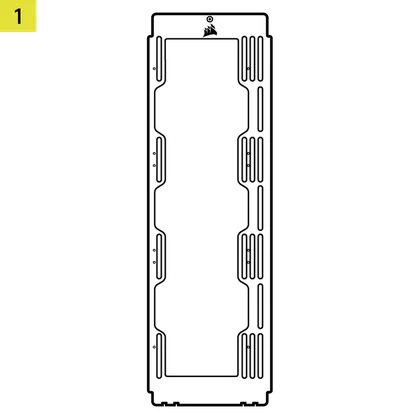
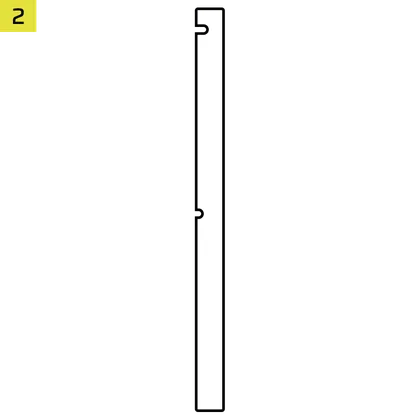
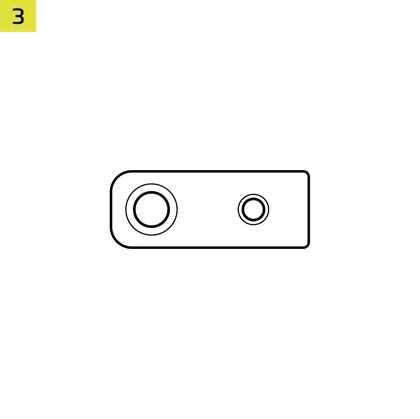
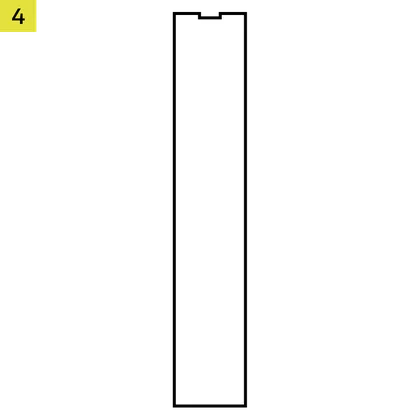
配件套件內容物
1x 側風扇安裝支架
1x 反向連接器磁條
12x InfiniRail Fan Mounts
(Pre-Installed on Select Cases)
1x Solid Side Insert
(Select Models)

1x GPU Anti-sag Stabilization Arm Mini Mount
1x GPU Anti-sag Stabilization Arm Rubber Spacer
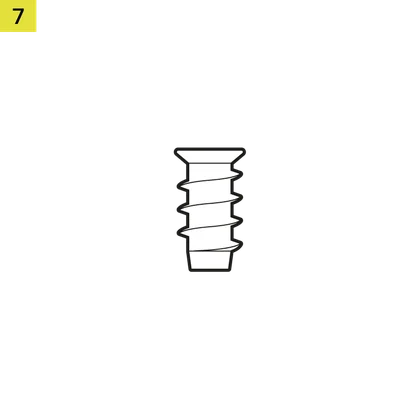
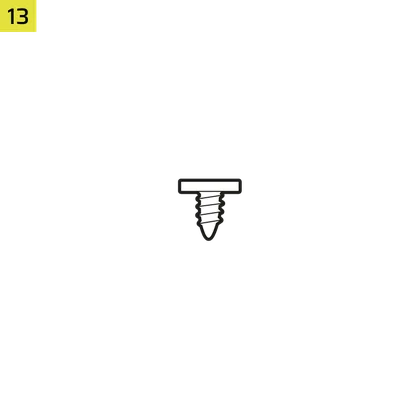
12-28x Self-Tapping Fan Screws
(Qty varies by model)
8-12x Long Fan Screws (6-32 UNC; 30mm)
(Qty varies by model)
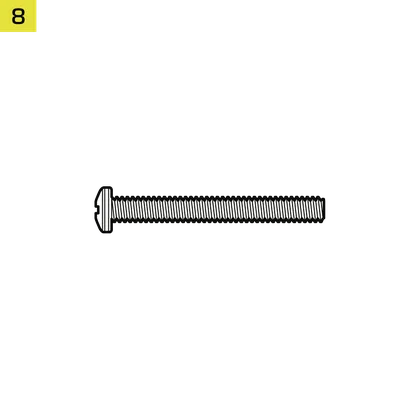
18支 主機板/硬碟螺絲 (6-32 UNC;6毫米)

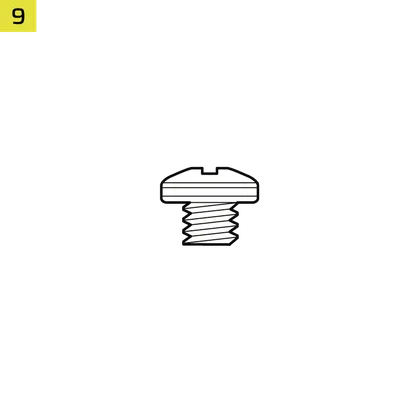
8-16x SSD Screws (M3 x 0.5; 5mm)
(Qty varies by model)
1x 備用主機板支架

2x 垂直安裝支架
InfiniRail Fan Mount Lock Screws
(Pre-Installed on Select Models)
1x 前置 I/O 轉接線
3x or 4x RS120 / RS 120 ARGB Fans
(Pre-Installed on Select Models)
12x QuikTurn® Fan Screws
(Select Models)

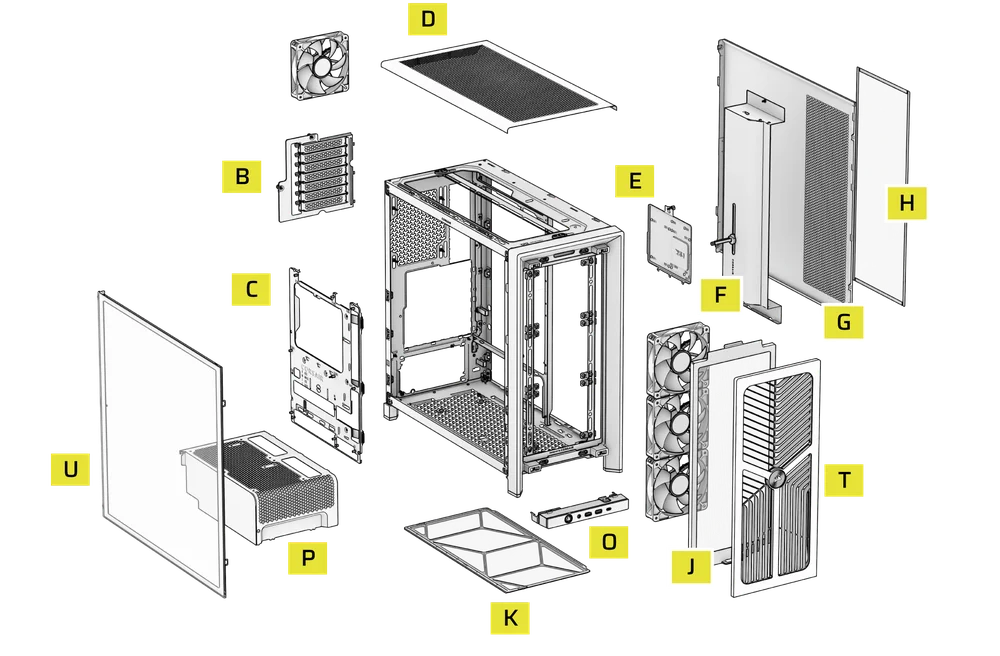
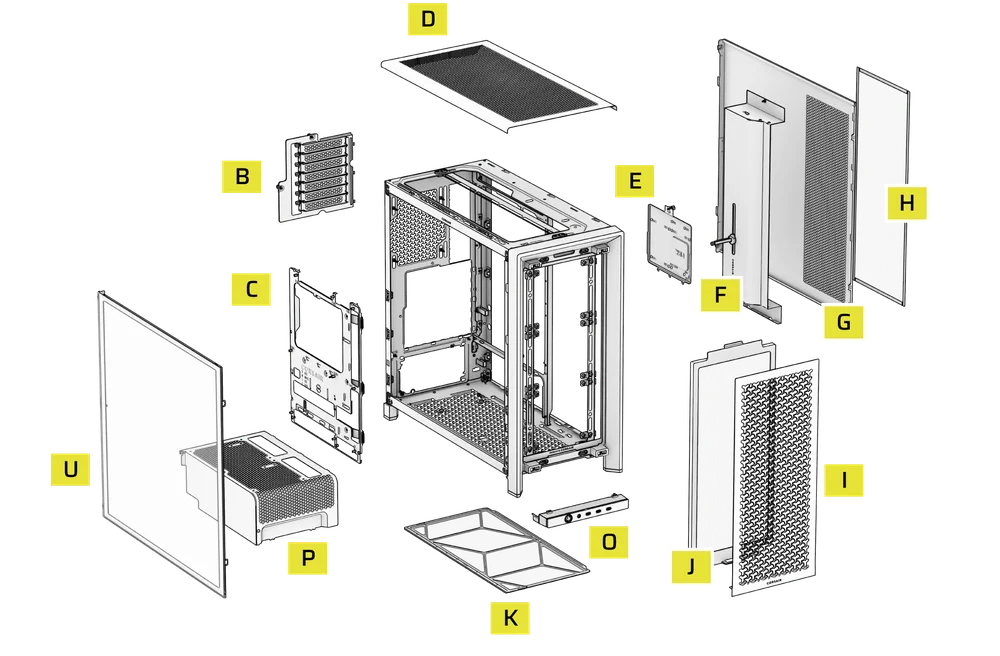
CASE EXPANDED VIEWS
FRAME 4000D RS/RS ARGB

| A. 四分之三側邊玻璃面板 | H. 側邊散熱風扇過濾網 |
| B. PCI 托盤 | I. 正面面板 |
| C. 標準鋼制主板託盤 | J. 前部散熱風扇過濾網 |
| D. 頂部面板 | K. PSU 散熱風扇過濾網 |
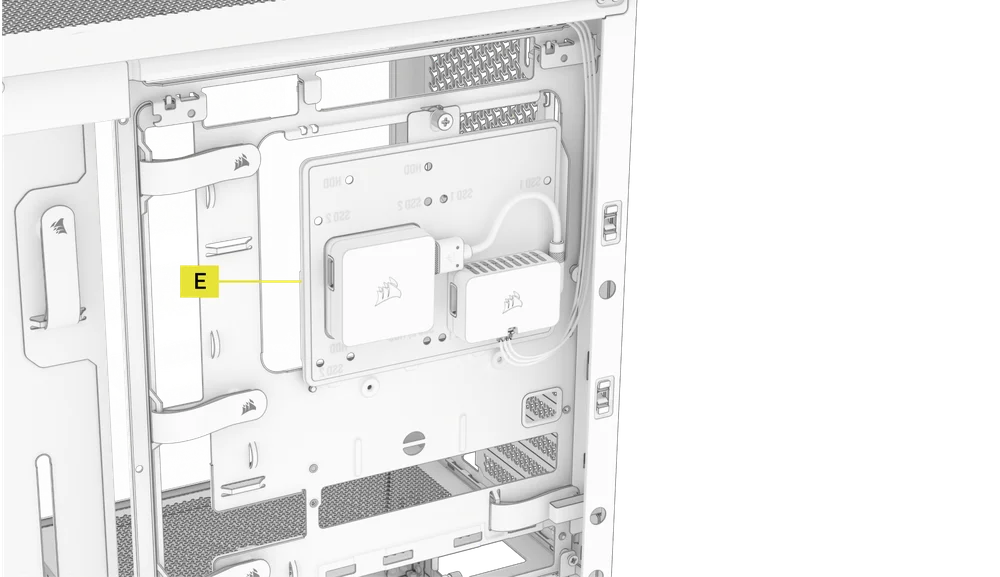
| E. 驅動器/控制器托盤 | L. PSU 護罩 |
| F. Cable Shroud with GPU Anti-sag Stabilization Arm | M. 半透明側邊插入件 |
| G. 鋼製側面面板 | N. 四分之一網眼狀側面板 |
FRAME 4000D LCD

| B. PCI Plate | J. Front Fan Filter |
| C. Standard Steel Motherboard Tray | K. PSU Fan Filter |
| D. Top Panel | O. Front Panel I/O |
| E. Drive / Controller Plate | P. Compact PSU Shroud |
| F. Cable Shroud with GPU Anti-sag Stabilization Arm | Q. Two-Thirds Side Glass Panel |
| G. Steel Side Panel | R. LCD Screen Mounting Bracket |
| H. Side Fan Filter | S. XENEON EDGE LCD Touchscreen |
| I. Front Panel |
FRAME 4000X
| B. PCI Plate | J. Front Fan Filter |
| C. Standard Steel Motherboard Tray | K. PSU Fan Filter |
| D. Top Panel | O. Front Panel I/O |
| E. Drive / Controller Plate | P. Compact PSU Shroud |
| F. Cable Shroud with GPU Anti-sag Stabilization Arm | T. RGB FLOW Front Panel |
| G. Steel Side Panel | U. Full Tempeed Side Glass Panel |
| H. Side Fan Filter |
FRAME 4000D WOOD

| B. PCI Plate | J. Front Fan Filter |
| C. Standard Steel Motherboard Tray | K. PSU Fan Filter |
| D. Top Panel | O. Front Panel I/O |
| E. Drive / Controller Plate | P. Compact PSU Shroud |
| F. Cable Shroud with GPU Anti-sag Stabilization Arm | U. Full Tempered Glass Side Panel |
| G. Steel Side Panel | V. Wood Front Panel |
| H. Side Fan Filter |
FRAME 4000D Vault Series
| B. PCI Plate | I. Front Panel |
| C. Standard Steel Motherboard Tray | J. Front Fan Filter |
| D. Top Panel | K. PSU Fan Filter |
| E. Drive / Controller Plate | O. Front Panel I/O |
| F. Cable Shroud with GPU Anti-sag Stabilization Arm | P. Compact PSU Shroud |
| G. Steel Side Panel | U. Full Tempered Side Glass Panel |
| H. Side Fan Filter |
面板安裝/拆卸
警告:本產品含有強化玻璃。請小心使用。
- 為防止損壞或受傷,請避免將本保護殼放置或存放在硬質表面上,例如陶瓷或瓷磚、石材、磚石結構或混凝土。
- 海盜船強烈建議在將機殼定位或於硬質表面開始組裝前,務必卸除所有強化玻璃側板。
- 若必須將完成組裝的裝置放置於硬質表面,請將機殼抬高或隔離,以盡量降低意外接觸、損壞或人身傷害的風險。
更換面板請至www.corsair.com 購買。如有任何需求,請聯繫help.corsair.com尋求協助。
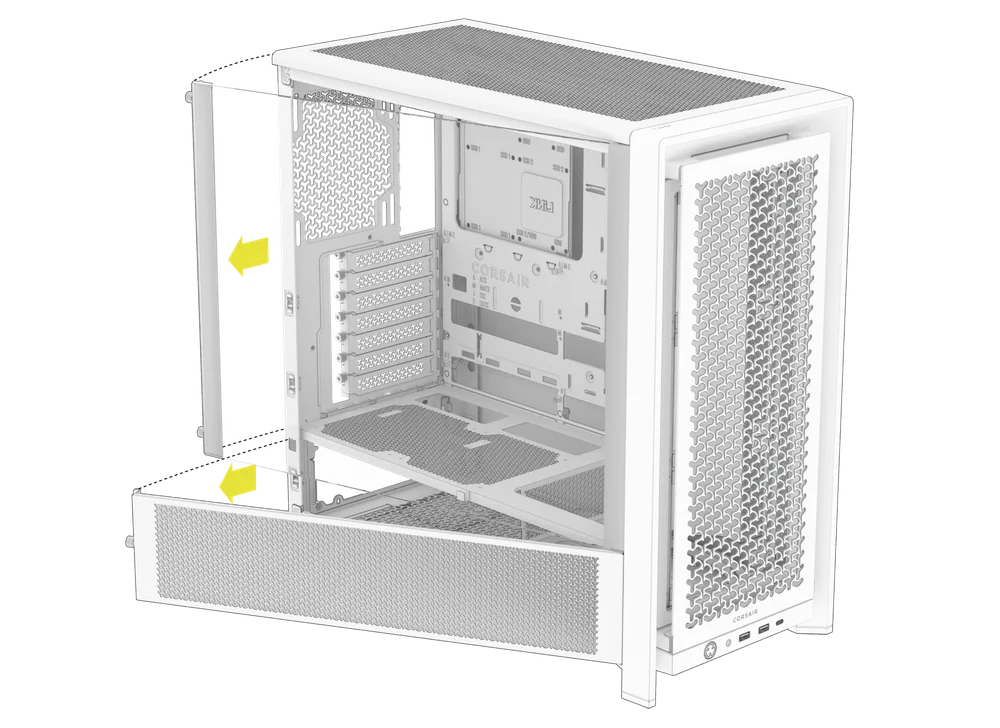
1. 側板拆卸
NOTE: This case is available with different left side panel designs (full glass or split glass/steel). Depending on your model, you may have one or multiple panels to remove. The removal method is the same for all variants.
- To remove the left side panel(s), loosen the thumbscrews at the rear of the case, then swing the panel(s) outward from the back and lift them off the front mounting tabs.
NOTE: On models equipped with the Quarter Mesh Side Panel (N), two optional inserts are included to customize the look and function of your build. A Translucent Side Insert (M) comes pre-installed, allowing RGB lighting to shine through while partially concealing cables. Alternatively, you can install the Solid Side Insert (4) for full coverage, or leave the panel open for maximum airflow. Inserts slide under the long edges of the panel for quick installation and removal.

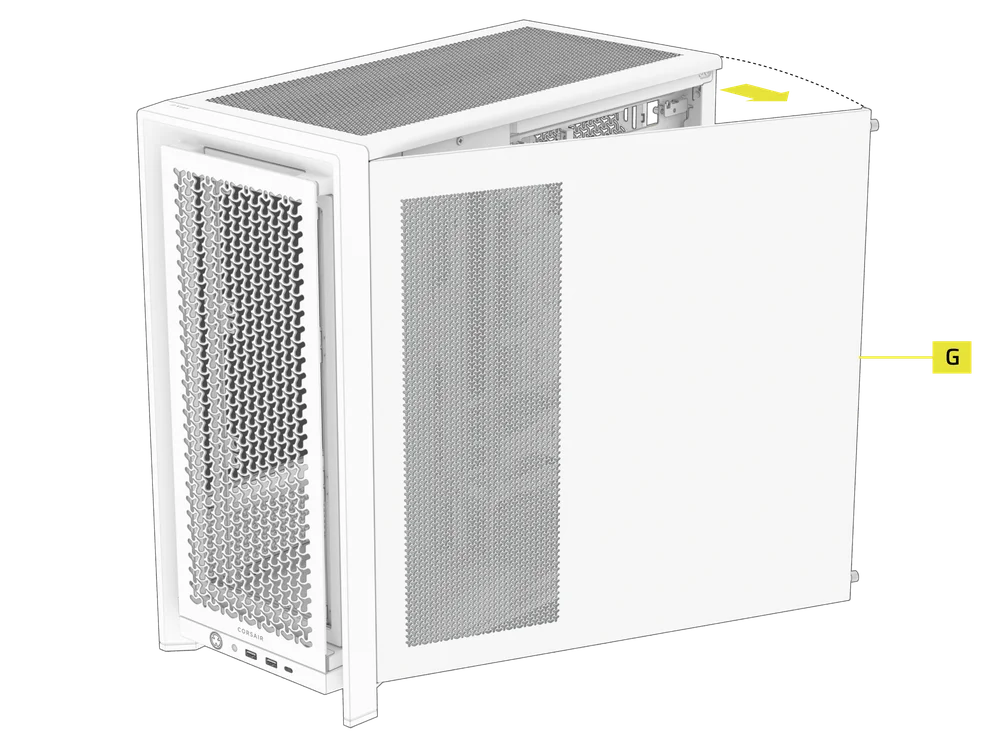
- 要拆卸鋼製側板(G),請先卸下機殼後方的固定螺絲,再將側板從卡榫處朝機殼前方方向翻開取下。
TIP: For removal or use of accessory side panels, please reference these Quick Start Guides for more in-depth information:
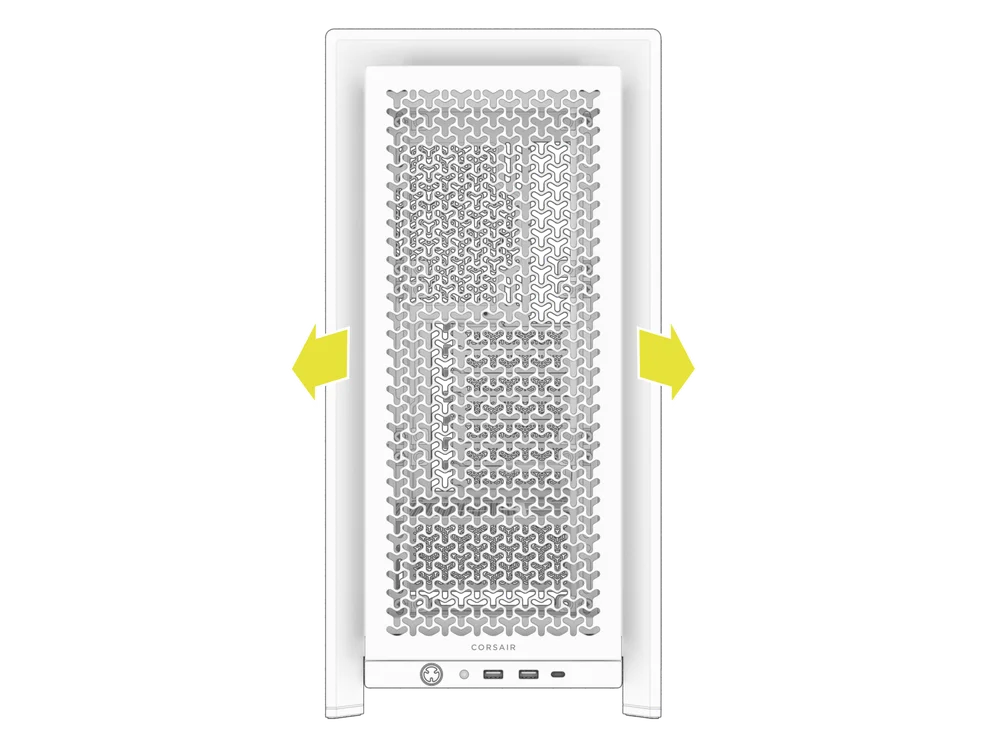
2. 前面板拆卸
- Pull the Front Panel outward. It's secured by two ball snaps at the top and bottom.
3. 頂板拆卸
- 鬆開後方兩顆固定式旋鈕螺絲,拉出橡膠化束帶以拆卸頂蓋板 (D)。
WARNING: The rubber pull-grip on the Top Panel (D) is designed to assist in removing the top panel from the case.
此處並非用於提起機殼或系統的握柄。若您以此拉環提起機殼,將可能對電腦、機殼及自身造成嚴重損壞。

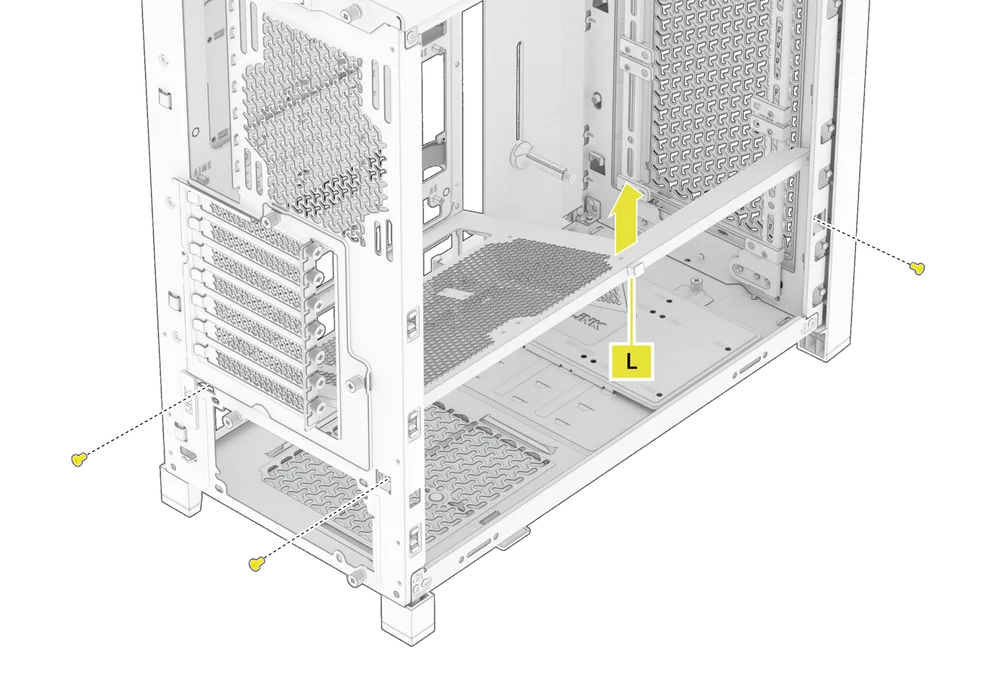
4.1 STANDARD PSU SHROUD REMOVAL (FRAME 4000D, FRAME 4000D RS / RS ARGB)
- FRAME 4000D
- FRAME 4000D RS
- FRAME 4000D RS ARGB
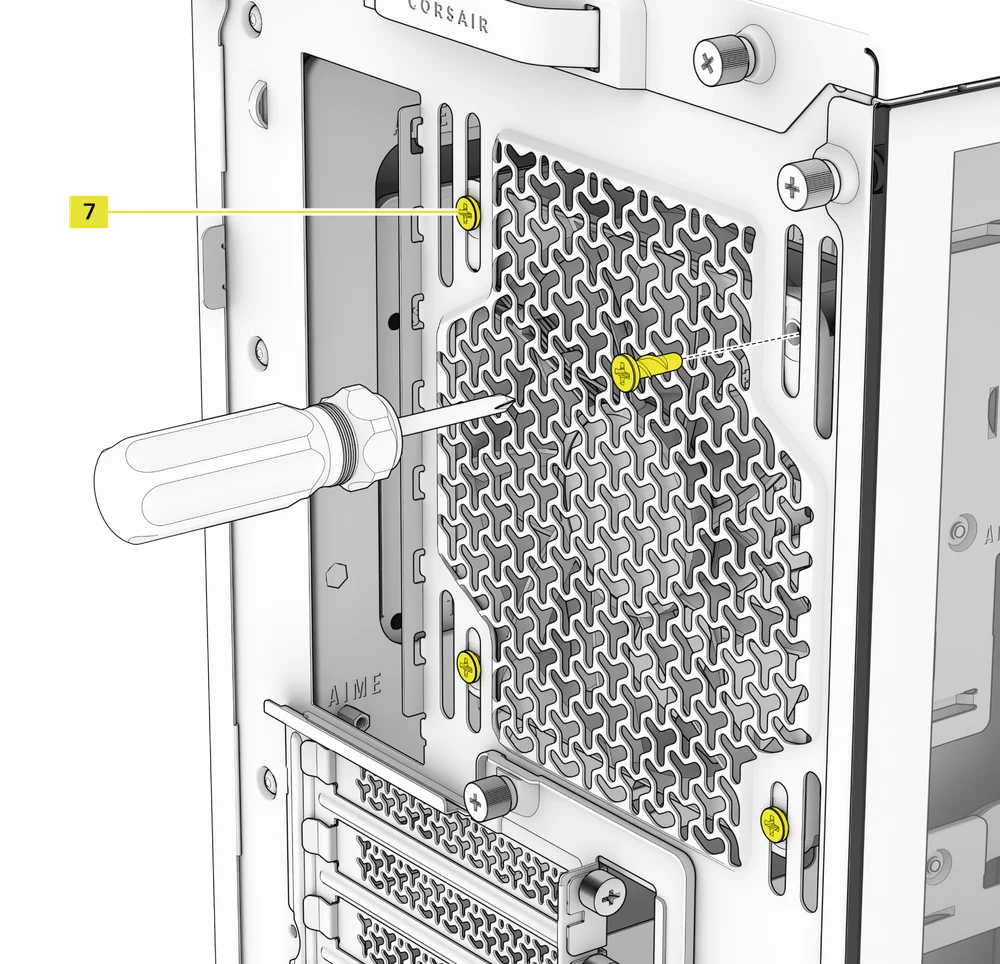
The PSU Shroud (L) is held in with a screw in the front of the case along the side and two screws in the rear panel of the case.
- Remove these three screws and the shroud will lift out.
4.2 COMPACT PSU SHROUD REMOVAL
- FRAME 4000D LCD
- FRAME 4000X
- FRAME 4000D WOOD
- FRAME 4000D Vault Series
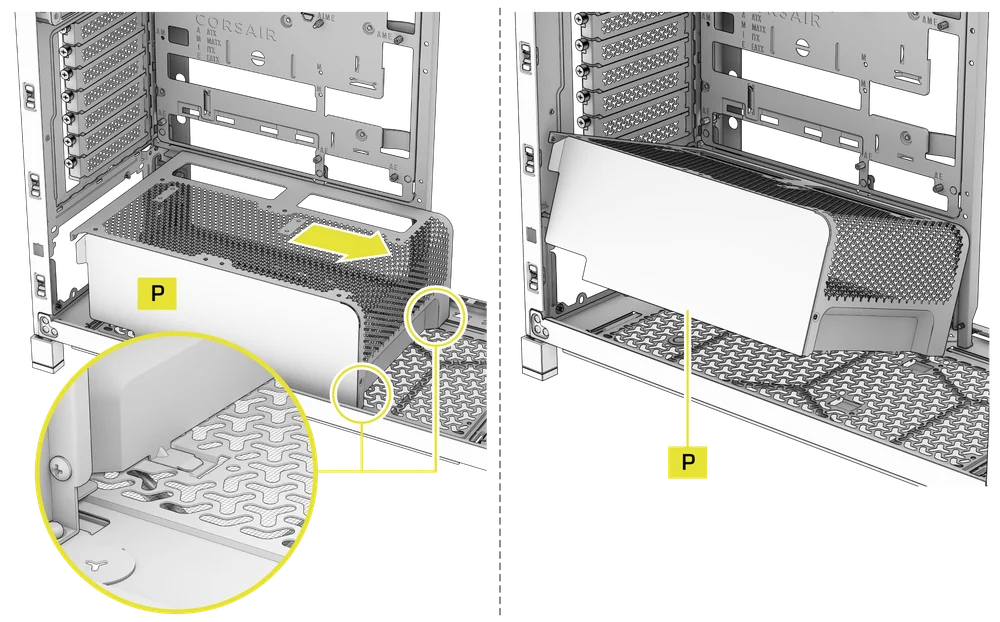
The Compact PSU Shroud (P) is held in with a screw in the front of the case along the side and two screws in the rear panel of the case.
- Remove the three screws.
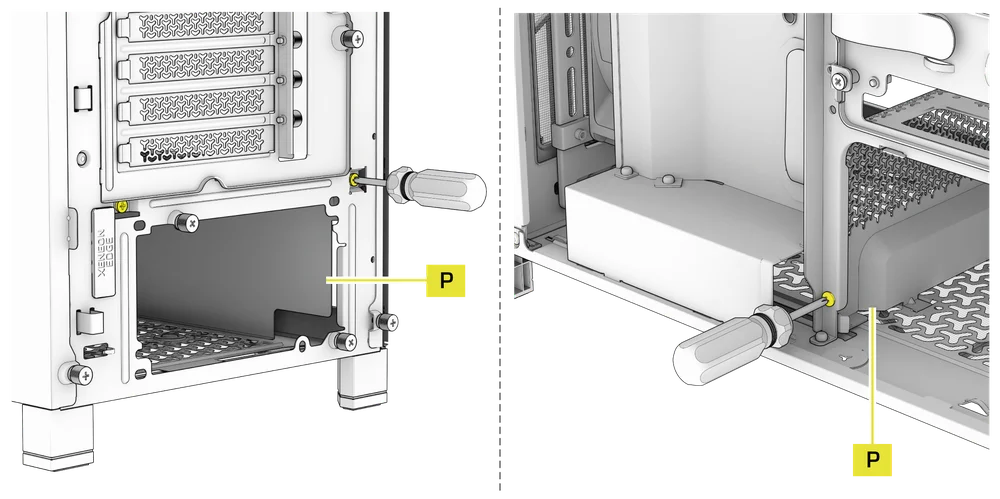
- Slide the Compact PSU Shroud (P) forward to release the clips located at its bottom front and the shroud will lift out.
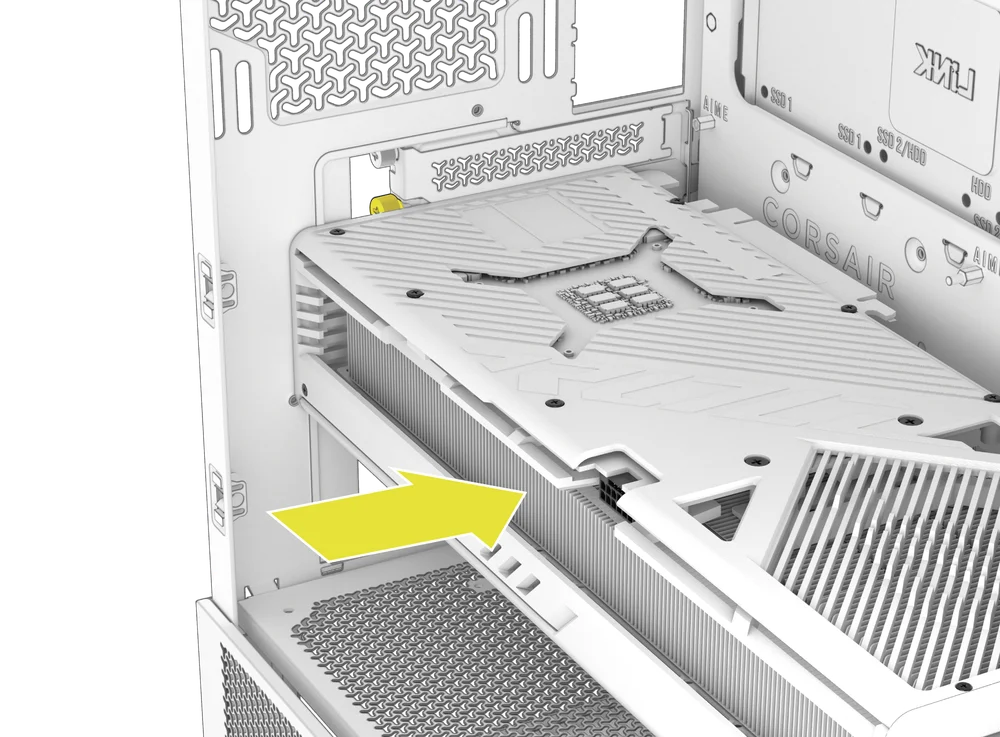
5. 纜線護罩或側風扇支架拆卸
- Unscrew the screw at the top and tip the Side Fan Mounting Bracket (1) or Cable Shroud (F) out of the side. Repeat this in reverse to reinstall the part of your choice.
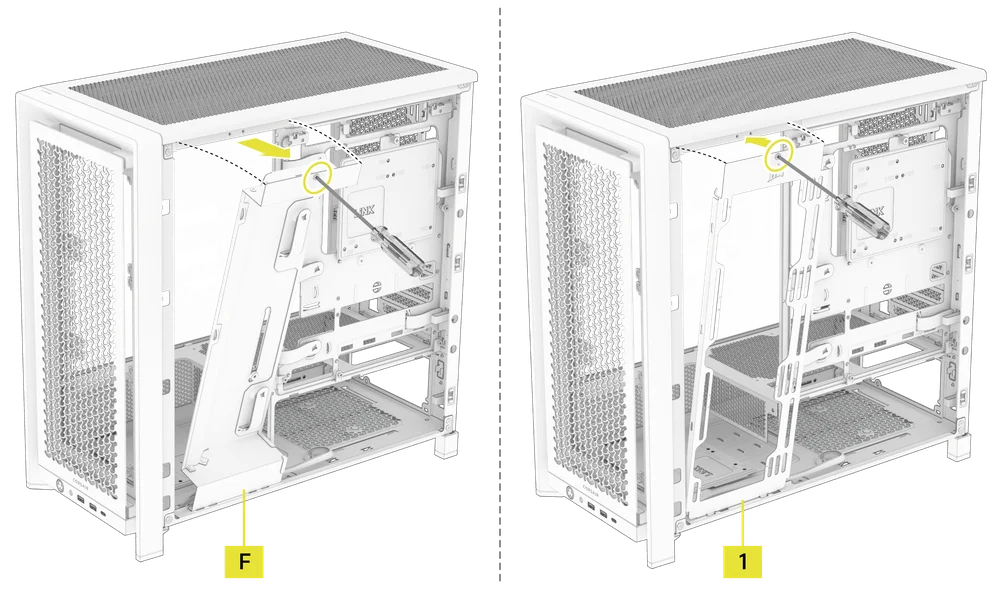
NOTE: The side mount has two positions for mounting. If using a radiator or 200mm fans, we recommend using the position closest to the motherboard.
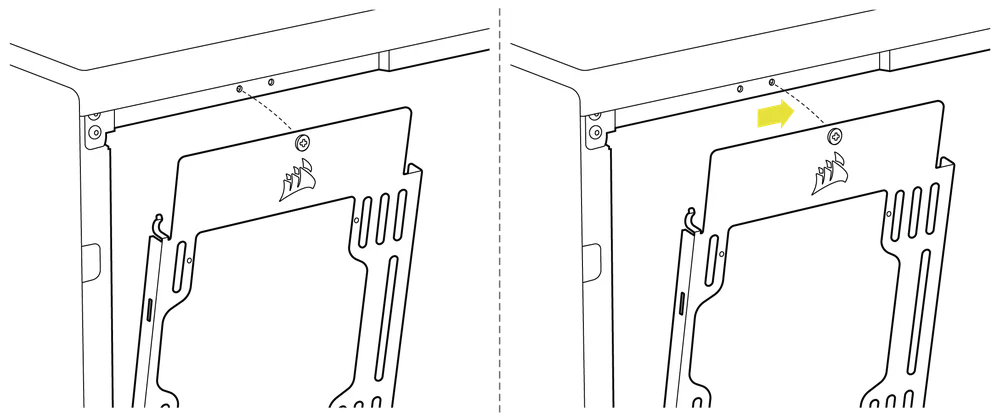
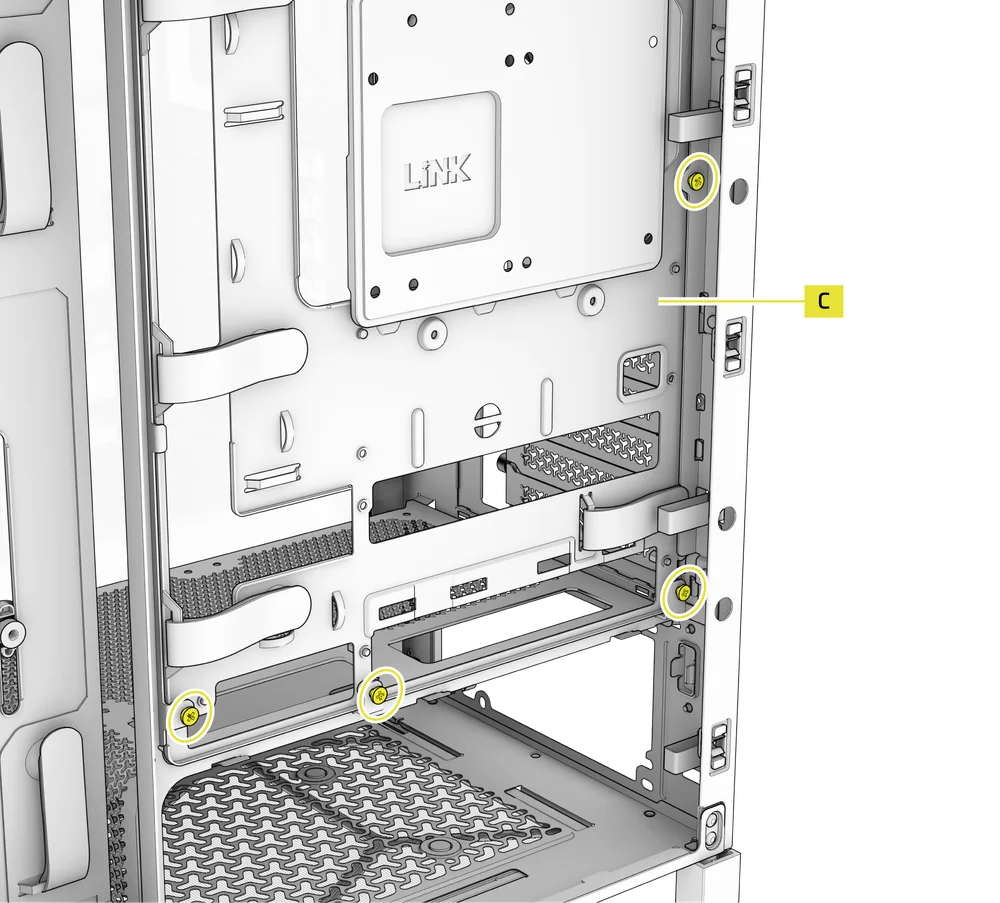
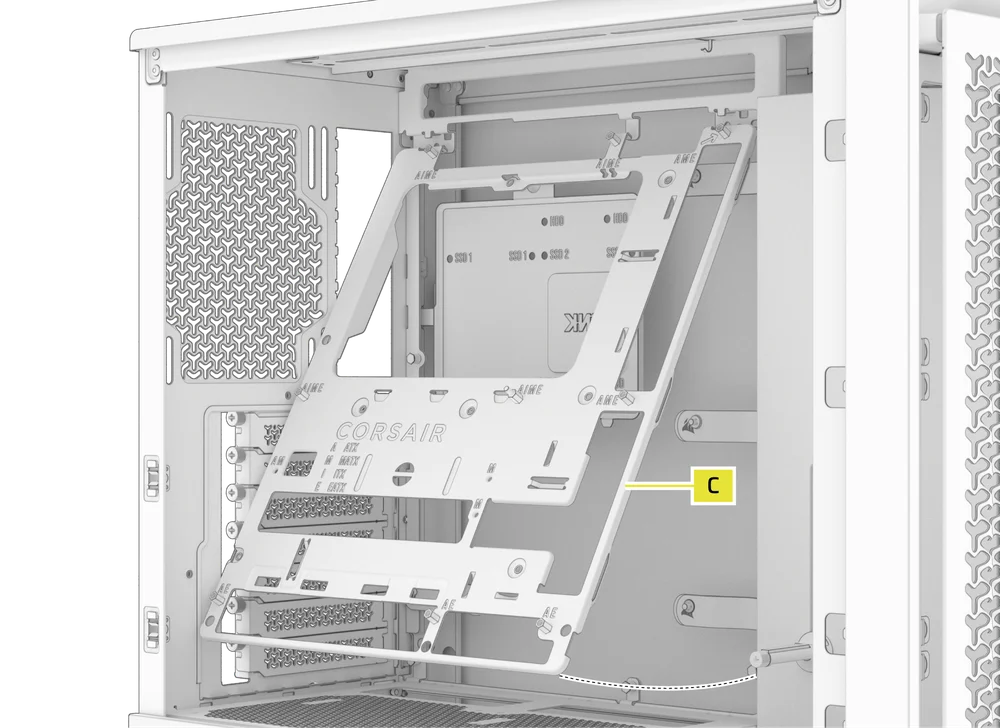
6. 主機板托盤拆卸
標準鋼製主機板托盤(C)透過托盤背面的四顆螺絲固定。
- Unscrew these four screws.
- Tilt the tray outward and lift it out.
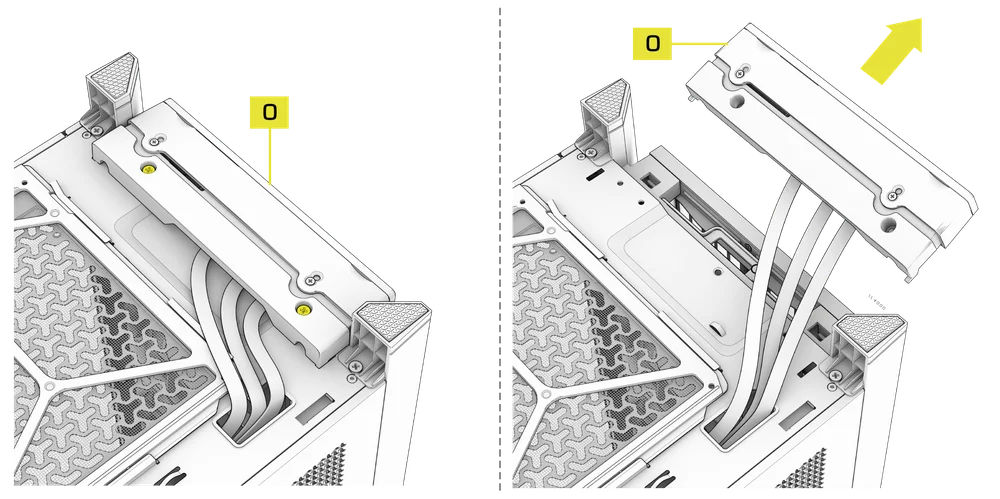
7. 前面板輸入輸出裝置移除
The Front Panel I/O (O) is held in with two screws on the bottom of the case.
- To remove it, simply unscrew these two screws, and the entire Front Panel I/O (O) assembly can be lifted out.
- To reinstall the Front Panel I/O (O) or to install a new one, place the assembly back in position and secure it with the same two screws.
主機板安裝
安裝主機板
The FRAME 4000 supports mITX, mATX, ATX, and E-ATX motherboards, including ASUS BTF, MSI Project Zero, and GIGABYTE Project Stealth with reversed connections.
- 將主板對準支架,並使用隨附的主板螺絲(9)將其固定。
注意:安裝前,請確認主機板的I/O擋板已安裝到位(如需使用)。
提示:若預裝的支架未與主機板上的孔位對齊,請移除未使用支架,並重新定位以匹配主機板上的開放安裝點。
OPTIONAL MOTHERBOARD TRAY CONFIGURATIONS
The FRAME 4000 Series includes a standard motherboard tray, with additional tray options available (sold separately) to customize your build:

| a. FRAME Standard Steel Motherboard Tray | c. FRAME ELITE Motherboard Tray |
| b. FRAME RapidRoute 2.0 Motherboard Tray |
NOTE: FRAME ELITE motherboard tray (CNC Aluminum) is designed for use with NVMe SSDs. You will lose the HDD/SSD tray that installs on the back of the steel motherboard tray that is included with FRAME 4000 Series cases. Text for SPY & GPU on the ELITE MB Tray is to assist in assembling as a standalone test bench. Ignore text during use with FRAME 4000 Series.
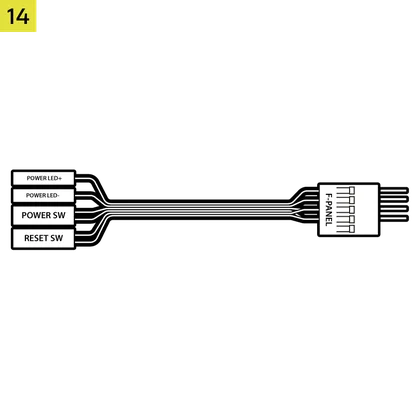
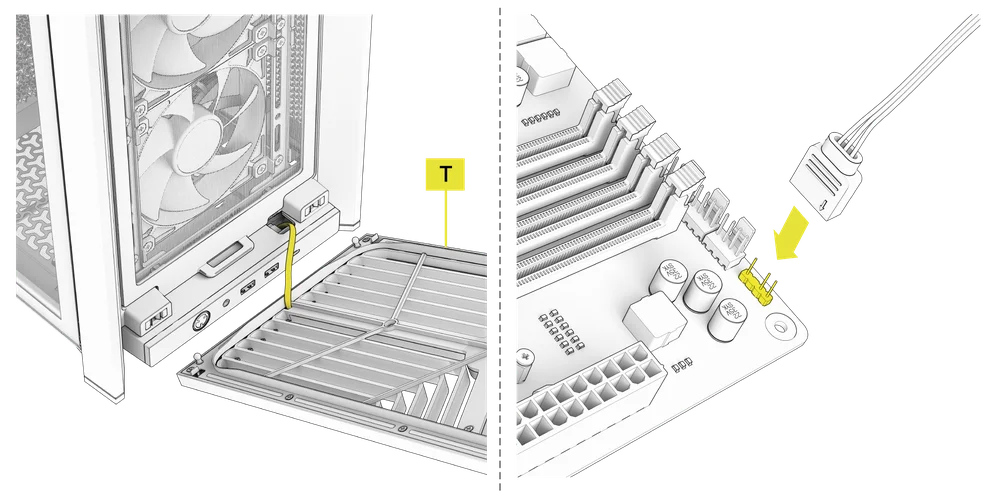
前置 I/O 纜線安裝
1. 標準英特爾主機板
- 將 FPANEL 插頭對準主機板前置面板 I/O 接頭,並確保其與帶鍵孔的佈局對齊。此接頭在某些主機板上通常標示為 JFP1。

提示:若您的電腦無法開機或使用 FPANEL 插頭時出現問題,請嘗試使用隨附的前置 I/O 轉接線纜 (14),以確保與主機板接頭正確連接。
注意:此機殼未配備硬碟指示燈或重置開關,因此儘管前置I/O轉接線(14)上存在這些連接器,但它們並無功能且已刻意保留為未安裝狀態。
2. AMD 或 非標準 Intel 主機板
- 使用隨附的頂部安裝式前置 I/O 轉接器 (14),將 FPANEL 插頭連接至個別的前面板 I/O 接頭針腳。

3. FRONT PANEL 5V ARGB CONNECTION (FRAME 4000X only)
- Run the +5V ARGB cable through the passthrough filter and into your case.
- Plug the +5V ARGB cable into your motherboard for easy ARGB control or use a COMMANDER DUO for full iCUE synchronization.
NOTE: For standard FRAME 4000D configurations without the passthrough hole in the front panel I/O, you must use the front fan filter included with the front panel and route the ARGB cable through the bottom right edge to pass it into the chassis. This wire is able to be split in half for easier routing during installation.
4. FRONT I/O EXPLANATION
- FRAME 4000D
- FRAME 4000D RS
- FRAME 4000D RS ARGB
- FRAME 4000X
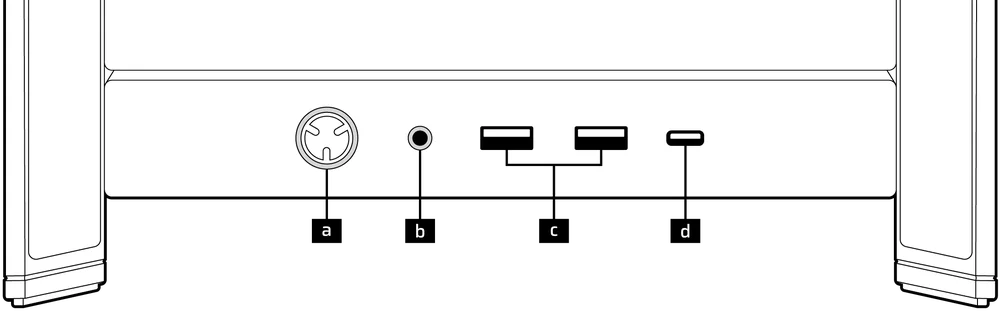
| a.電源按鈕 + LED | c.2x USB 3.2 Gen 1 Type-A 連接埠(5 Gbps) |
| b.耳機/麥克風組合插孔 | d.1x USB 3.2 Gen 2x2 Type-C 連接埠(20 Gbps) |
- FRAME 4000D 液晶顯示器 RS 軸向光柵 RGB
- FRAME 4000D 保險庫系列
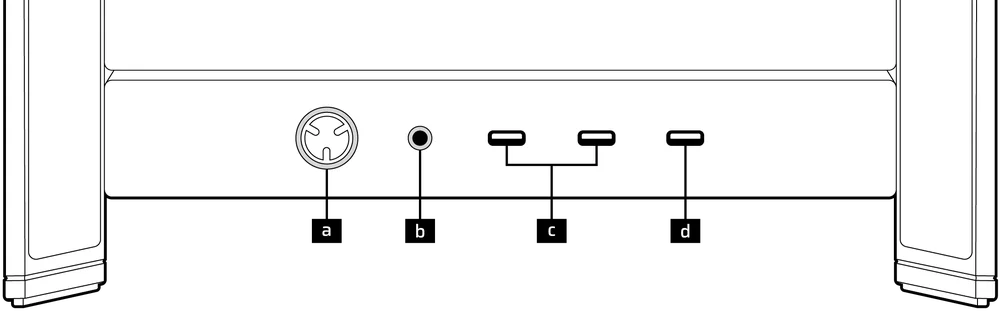
| a.電源按鈕 + LED | c.2x USB 3.2 Gen 1 Type-C 連接埠(5 Gbps) |
| b.耳機/麥克風組合插孔 | d.1x USB 3.2 Gen 2x2 Type-C 連接埠(20 Gbps) |
5. FRONT I/O CONNECTIONS
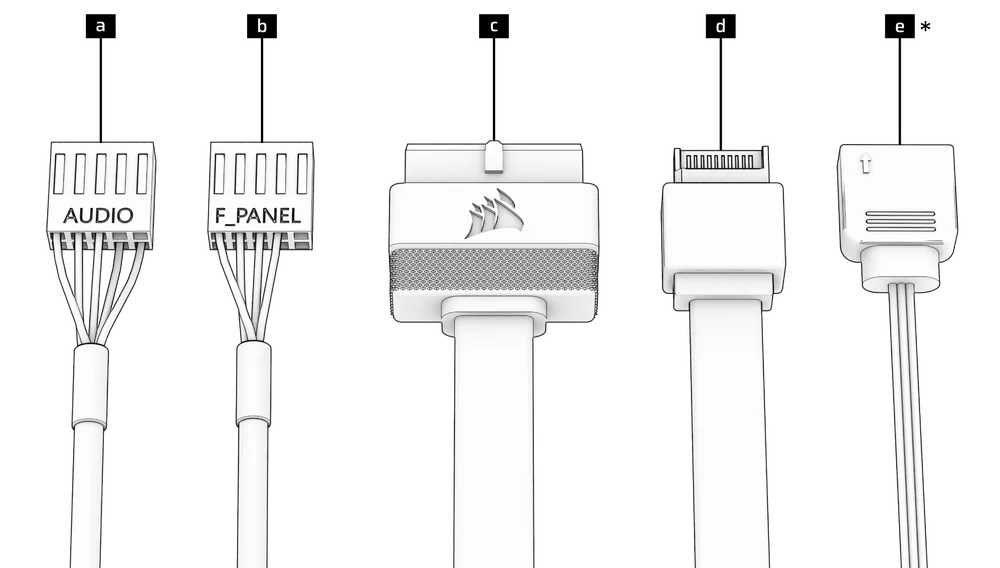
| a. HD Audio (Headphone, Microphone) | d. USB 3.2 Type-E (20 Gbps) |
| b. FPANEL (Power LED, Power Button) | e. +5V ARGB (FRAME 4000X only)* |
| c. USB 3.0 |
6. SWAPPING FRONT PANEL BUTTON POWER KEY SWITCH
The power button of the ELITE Front Panel I/O used in the FRAME 4000D LCD case utilizes a standard MX-Style key switch. This key switch is removable and replaceable to customize the look and feel of your power button.
- Simply pop off the plastic bezel on the front panel I/O and extract the key switch. Replace with a switch of your choice.
磁條安裝
FRAME 4000 包含一組反向連接器磁吸條 (2),其設計用於遮蓋主機板托盤上反向連接器孔位的可見邊緣。
- 將反向連接器磁條(2)對準您的支架,並左右調整以消除主機板上的間隙。

1. 配備反向連接器的主機板
若您安裝的主機板配備反向連接器,可使用反向連接器磁性條(2)填補24針ATX接頭周圍的空隙,使外觀更為簡潔美觀。
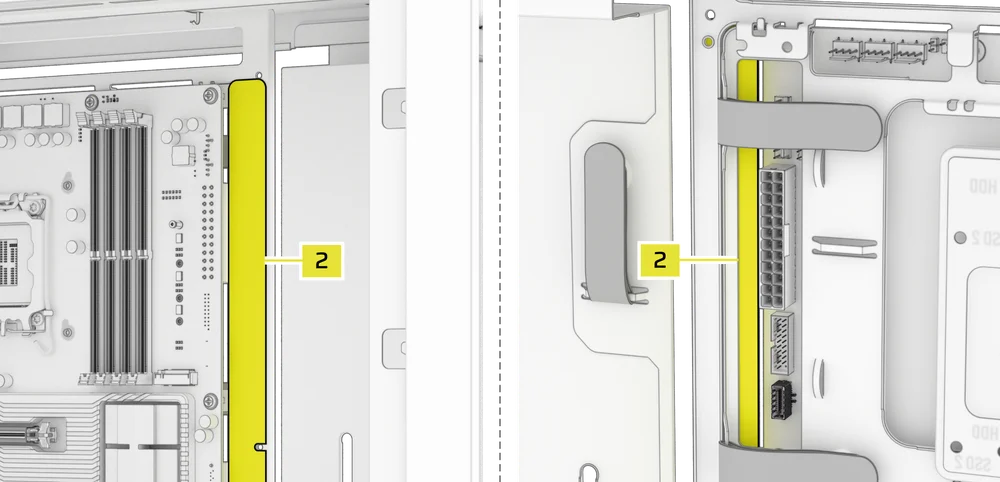
2. 配備標準連接器的主機板
安裝標準主機板時,可將反向連接器磁吸條(2)滑入主機板後方,對準主機板托盤上的螺絲孔位,藉此覆蓋反向連接器插槽,同時隱藏沿主機板托盤佈線的電線,營造更整潔的外觀。
TIP: The magnetic strip features cut-out slots, allowing you to install it simultaneously with a GPU anti-sag stabilization arm mini mount.
風扇安裝
| FRAME 4000D RS/RS ARGB | ||||||
|
Front |
Top |
Rear |
Side |
PSU Shroud | Bottom | |
|
3x 120mm 2x 140mm 2x 200mm |
3x 120mm 2x 140mm
|
1x 120mm 1x 140mm
|
3x 120mm 2x 140mm
|
2x 120mm |
None |
|
|
FRAME 4000D LCD, FRAME 4000D WOOD, FRAME 4000X |
||||||
|
Front |
Top |
Rear |
Side |
PSU Shroud | Bottom | |
|
3x 120mm 2x 140mm 2x 200mm |
3x 120mm 2x 140mm
|
1x 120mm 1x 140mm
|
3x 120mm 2x 140mm
|
2x 120mm |
1x 120mm |
|
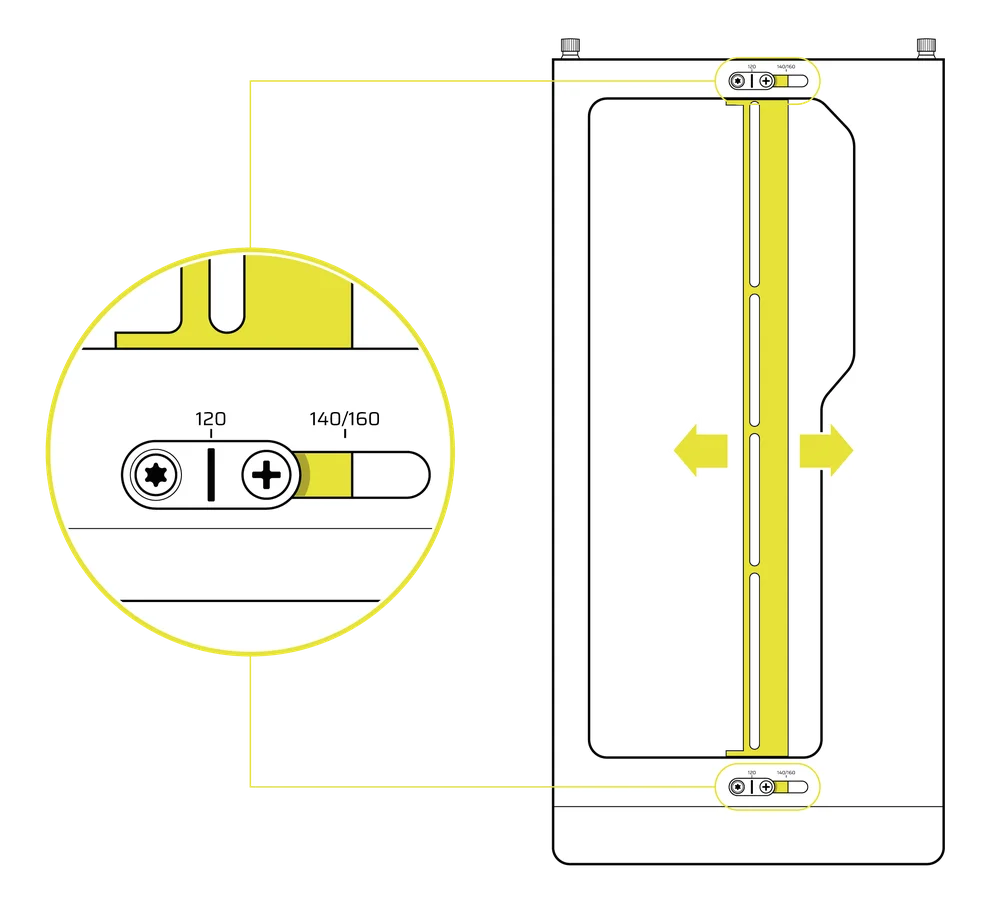
USING THE INFINIRAIL™ FAN MOUNTING SYSTEM
CORSAIR's InfiniRail™ is an innovative fan and radiator mounting system designed to offer exceptional flexibility and ease of use in PC case builds. Unlike traditional cases with fixed mounting points, InfiniRail utilizes adjustable steel rails that allow users to slide and position fans and radiators precisely where needed.
FRAME 4000 配備兩套 InfiniRail 系統:一套位於頂部,另一套位於正面。
NOTE: Determine the size and placement of your fans before configuring the rails. You do not have to fully remove the InfiniRail Phillips head screws.
調整機箱前方的導軌
- Loosen the Phillips head screw on both ends of the InfiniRails.
- 請根據機殼上的標記調整兩組風扇的前導軌。
NOTE: If using 200mm fans in front, you may need to remove the PSU shroud depending on your version of FRAME 4000 Series.
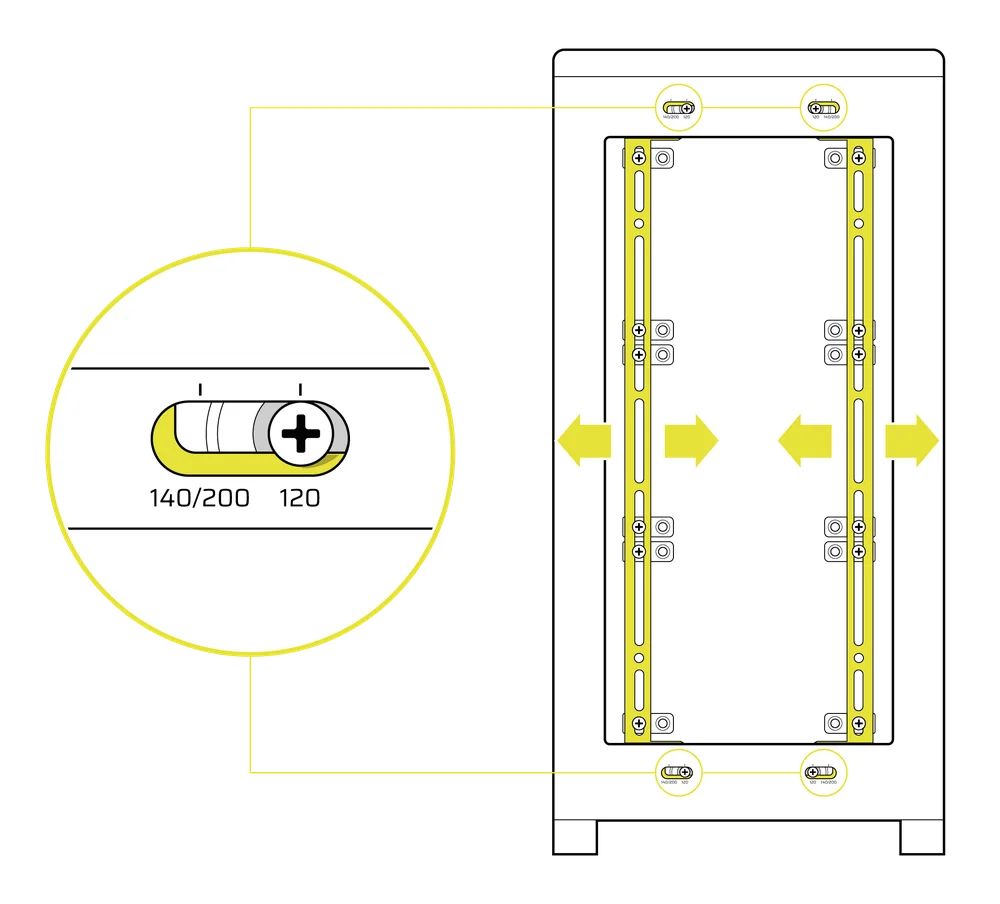
調整機箱頂部的導軌
- Loosen the Phillips head screw on both ends of the InfiniRail.
- 請根據機殼上的標記調整風扇的頂部導軌。
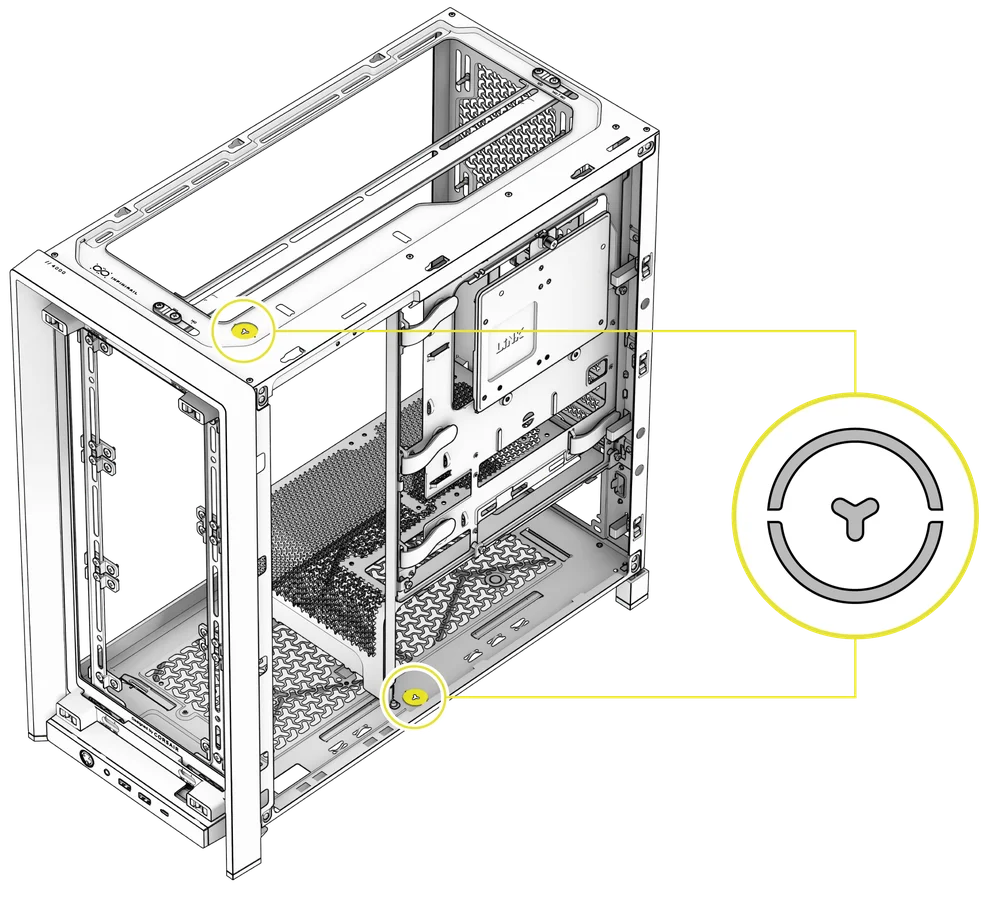
重要提示:採用非標準螺絲頭型狀的螺絲,請勿自行拆卸。
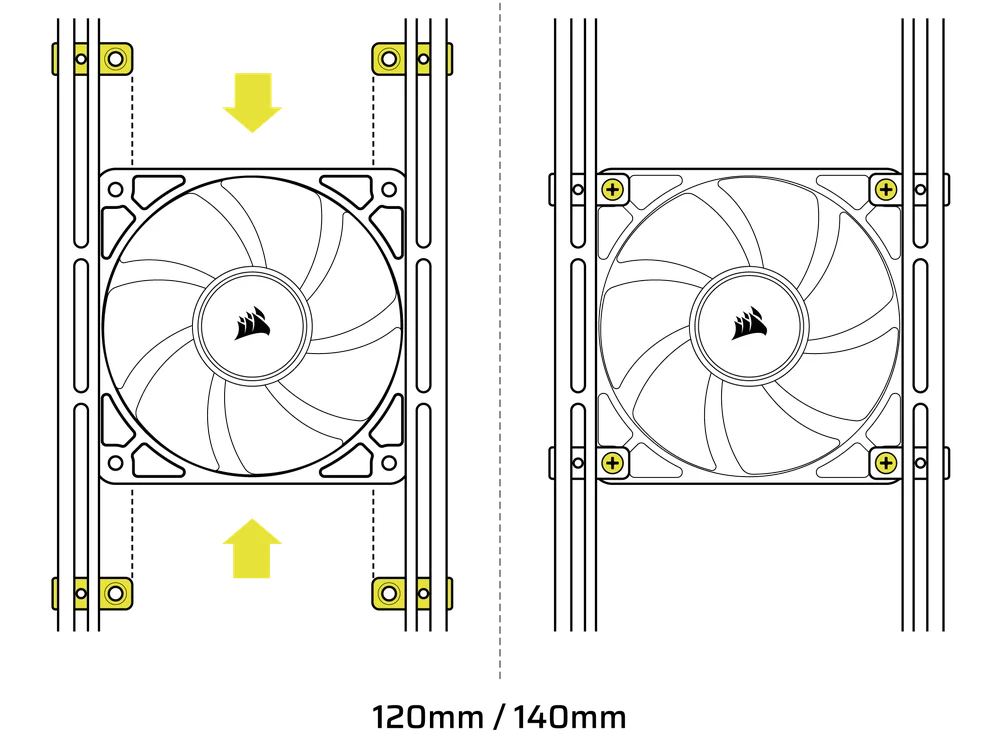
2. 在前端安裝風扇
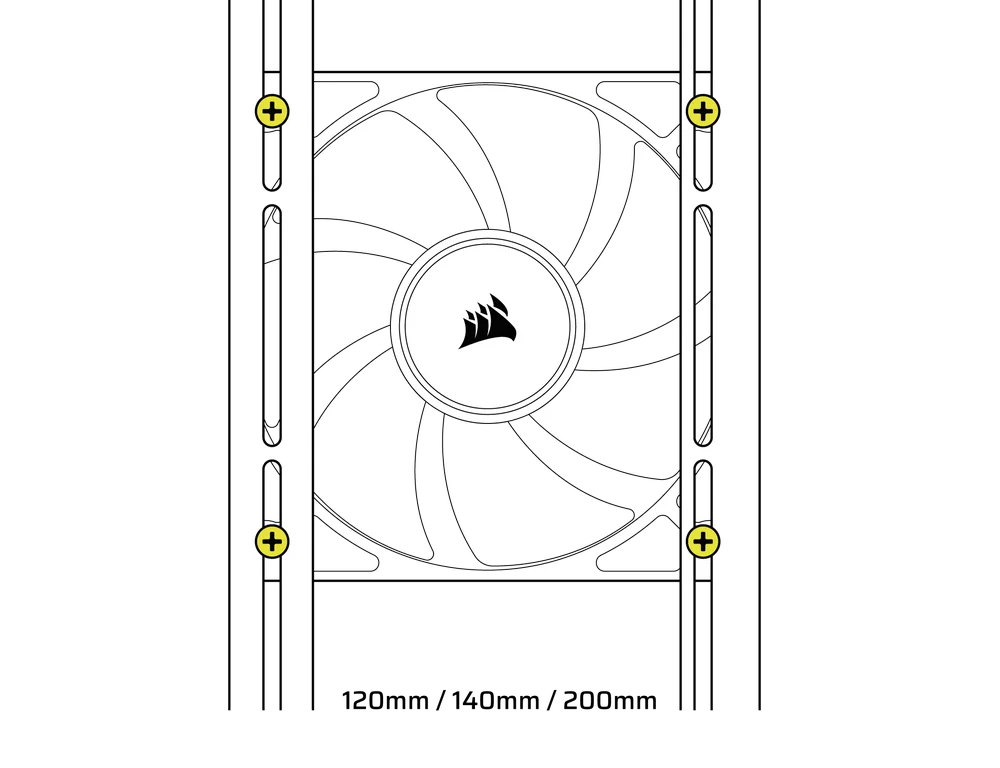
安裝 120 毫米或 140 毫米風扇
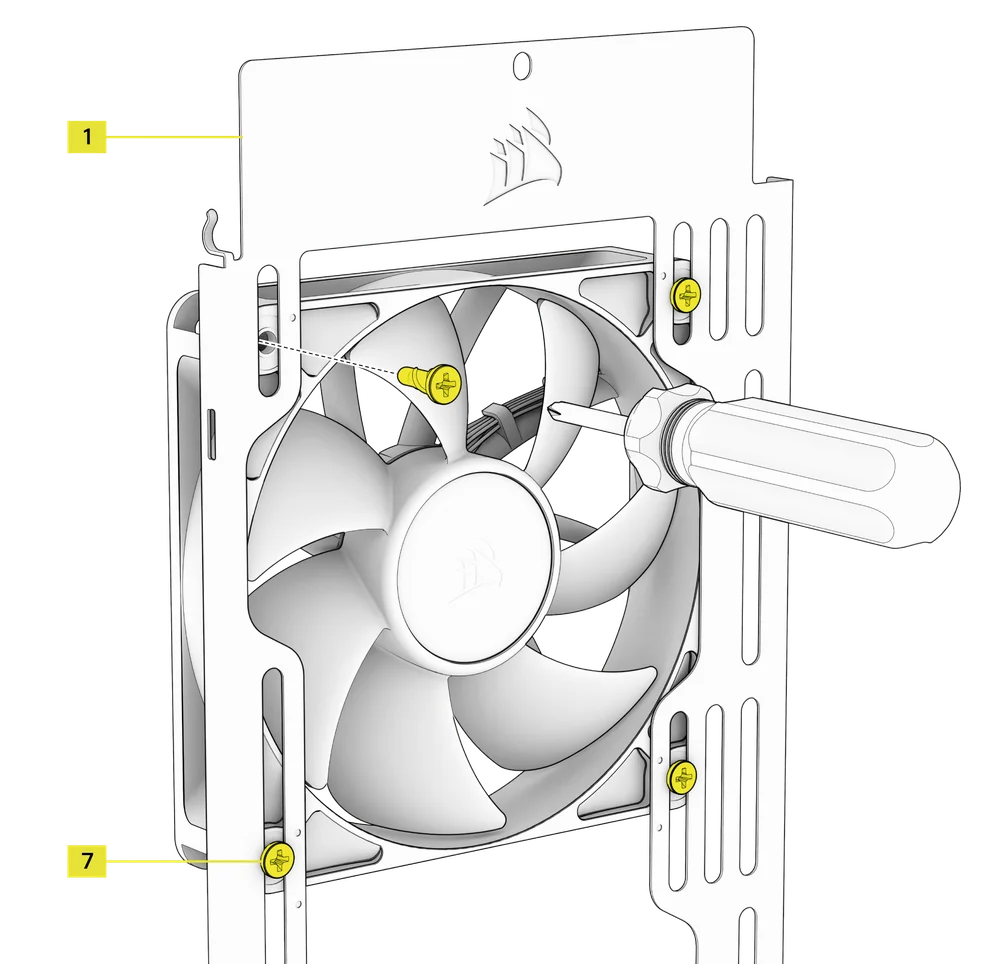
若要使用前置InfiniRail風扇安裝系統安裝120mm或140mm風扇,需安裝InfiniRail風扇支架(3)。每組風扇需使用四個支架,分別安裝於導軌兩側各兩個。
注意:部分機殼可能已預先安裝 InfiniRail 風扇支架。
- 將三組InfiniRail風扇支架固定於導軌上:先將每個支架的內緣錨定,再將外緣卡入定位。
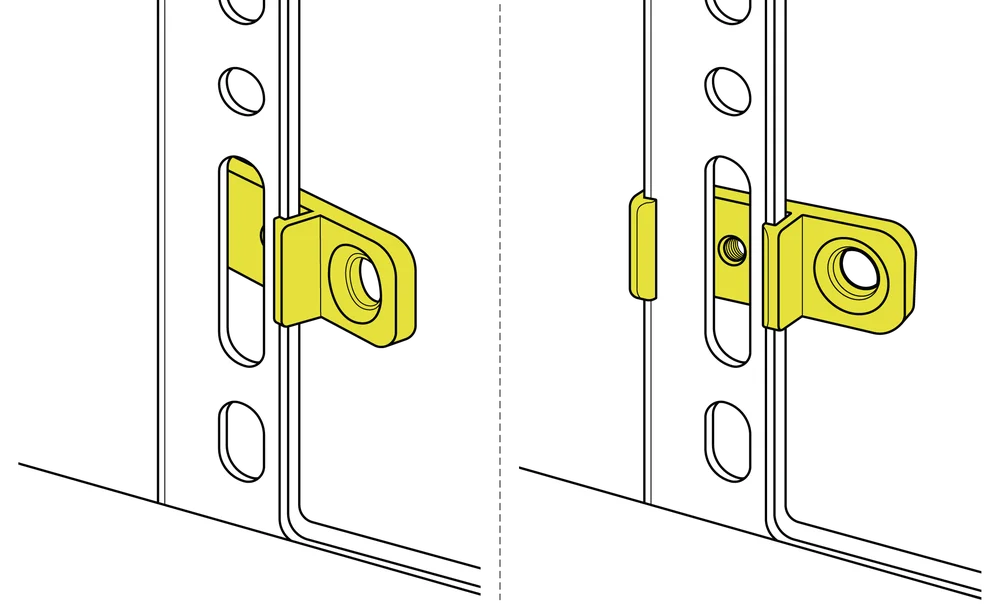
- 沿著導軌滑動支架,使其與風扇的安裝點對齊。
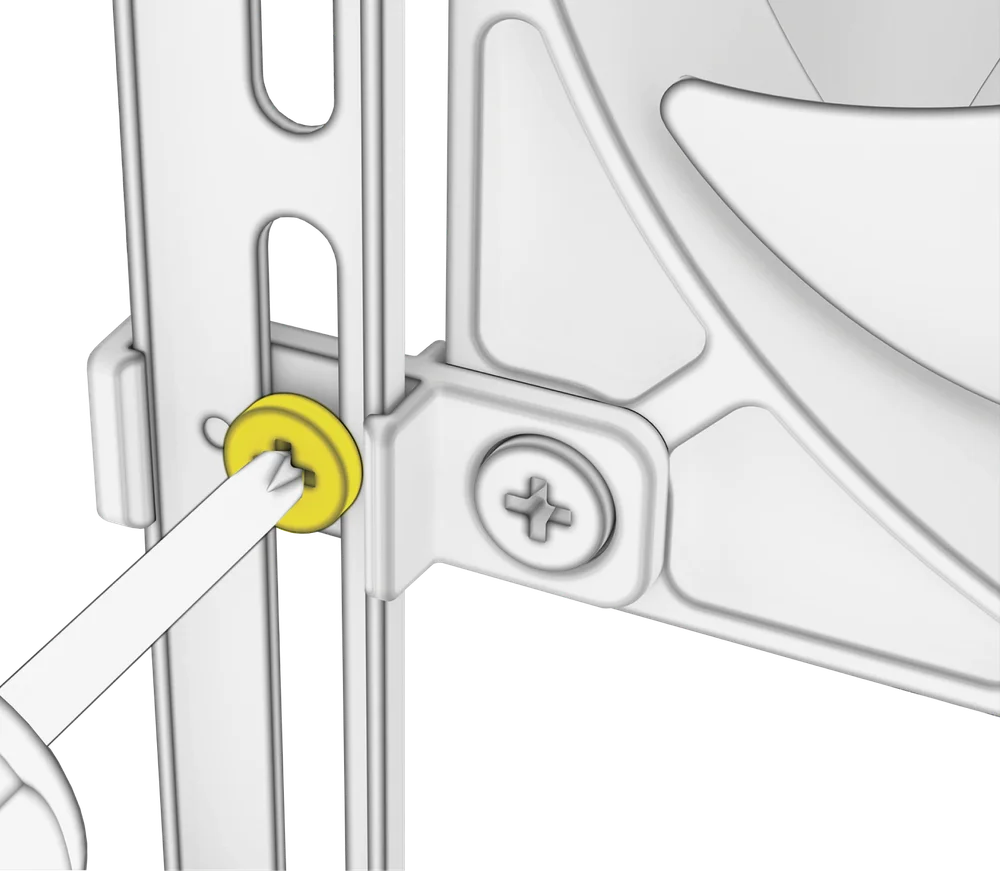
- 將風扇對準支架上的安裝卡榫,並使用自攻風扇螺絲(7)旋緊固定。
- 對齊後,可使用InfiniRail風扇支架鎖固螺絲(13)將裝置固定到位。
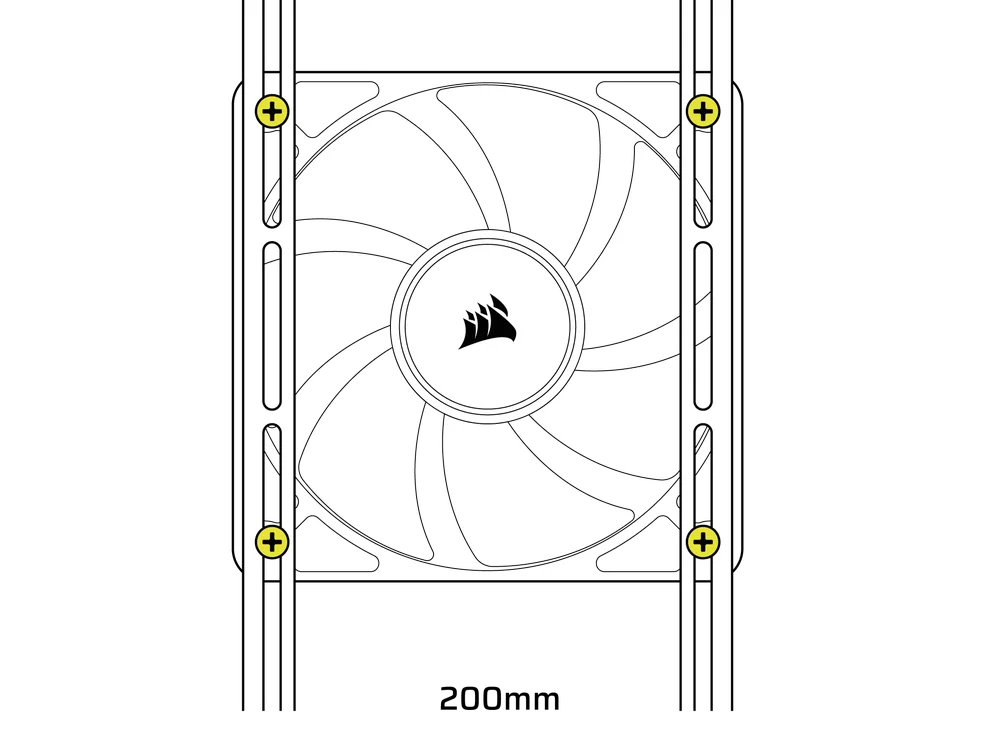
安裝200毫米風扇
200mm風扇可直接旋入InfiniRail支架,無需使用塑膠風扇支架。若機殼已預裝支架,請將其卸除。
- 將風扇對準InfiniRails的安裝槽,並使用自攻風扇螺絲(7)旋入風扇框架以固定。
注意:部分 200 毫米風扇可能需要您拆卸電源供應器外殼才能安裝。
NOTE: When installing 200 mm front fans, the side fan bracket or cable cover must be mounted in the secondary position (towards the motherboard tray) to provide sufficient clearance.
3. 在頂部安裝風扇
- 將風扇對準InfiniRail風扇安裝槽,並使用自攻風扇螺絲(7)旋入風扇框架以固定。
4. 於側面安裝風扇
若要在側面安裝風扇,請確保已安裝側面風扇安裝支架 (1)。
- 將風扇對準風扇安裝槽,並使用自攻風扇螺絲(7)旋入風扇框架以固定風扇。
提示:請使用側風扇安裝支架(1)上標記的點作為定位中心導引。
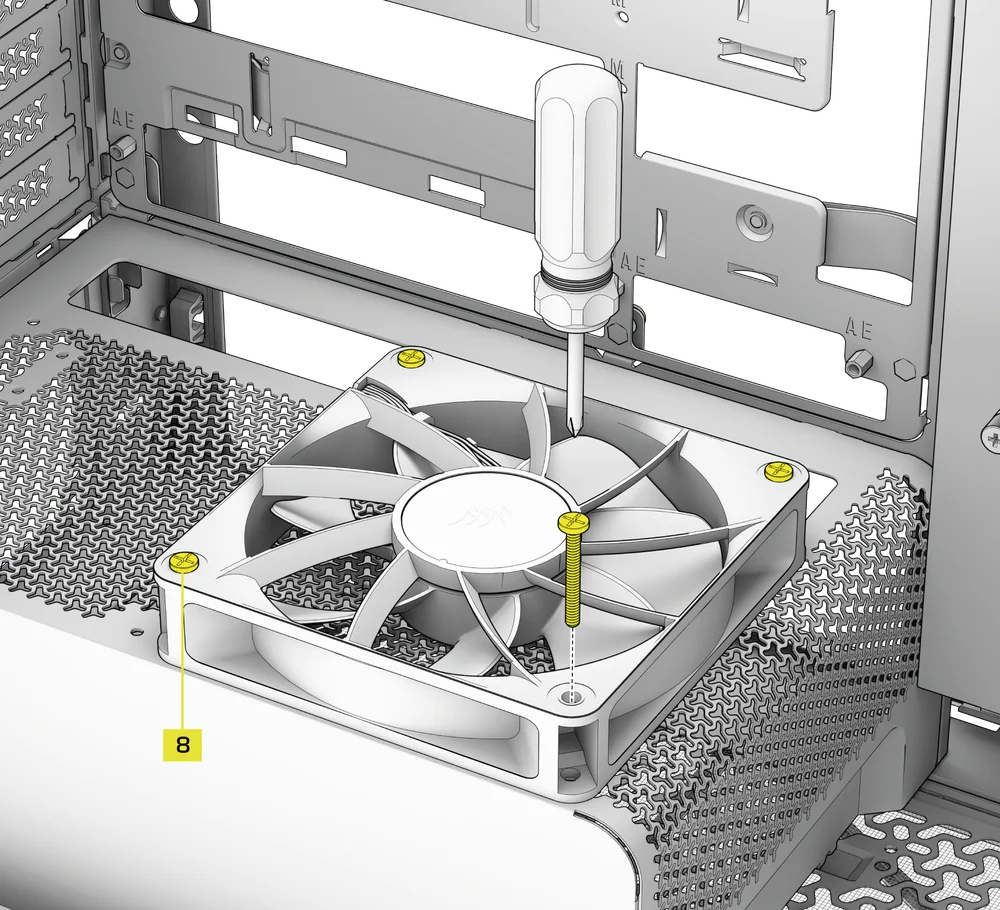
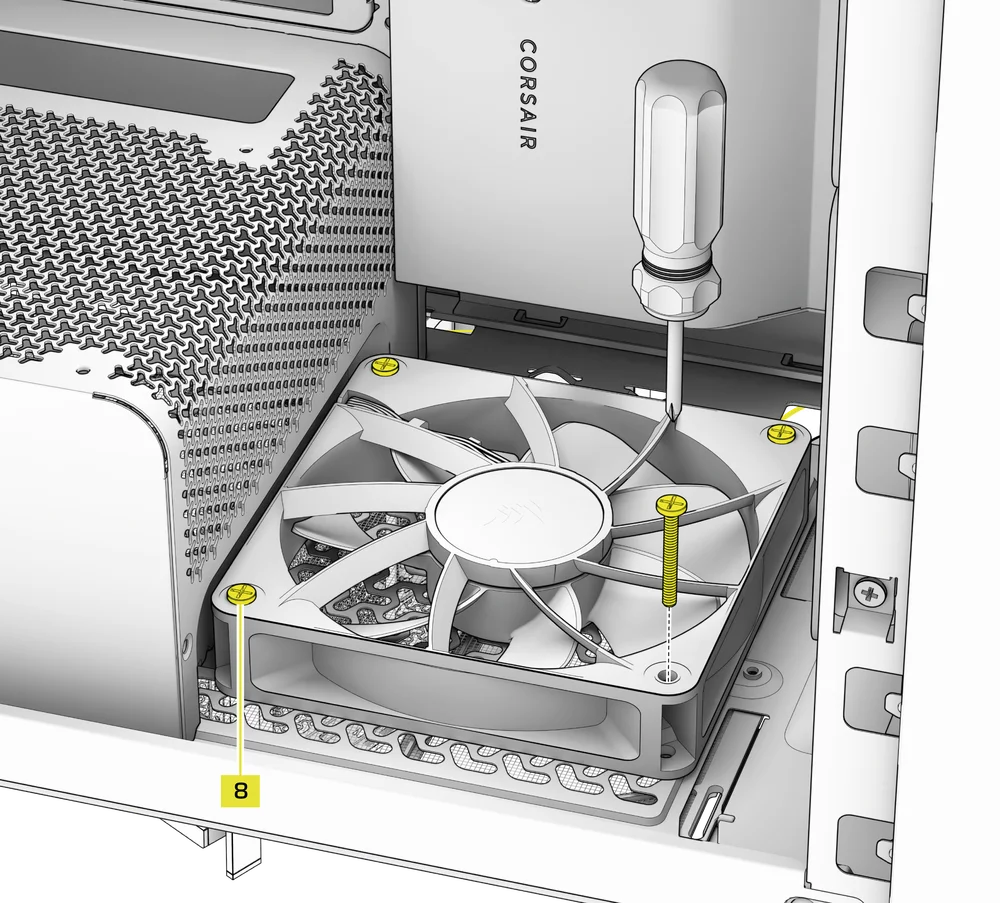
5. 在電源供應器外殼上安裝風扇
- Align your fans to the fan mounting holes on the PSU Shroud.
- 使用長風扇螺絲(8)固定風扇。
6. 在後方安裝風扇
- 將風扇對準風扇安裝孔。
- 使用自攻風扇螺絲(7)將風扇鎖緊。
7. INSTALLING FANS IN THE BOTTOM
- Align your fans to the fan mounting holes.
- Secure the fans with Long Fan Screws (8).
NOTE: Not all FRAME 4000 Series variants can install a bottom fan. Refer to the fan location table for your particular case.
HYDRO X 定製冷卻支援
The FRAME 4000 has fill / drain ports pre-punched in the top and bottom panels for a Hydro X open loop liquid cooling setup.
- 使用平頭螺絲起子輕輕撬開端口蓋,將其取下。
散熱器安裝
FRAME 4000 提供多個液冷散熱器安裝位置,其中前側與頂部位置配備可調式 InfiniRail 風扇支架。有關 InfiniRail 風扇安裝系統的使用細節,請參閱「風扇安裝」章節說明。
提示:為獲得最佳的噪音、散熱效能與可靠性,使用一體式水冷系統時,請確保散熱器安裝位置高於水泵。
|
正面 |
頂部 |
後方 |
側邊 |
PSU 護罩 |
|
240毫米 280毫米 360毫米 |
240毫米 280毫米 360毫米 |
120毫米 140毫米 |
240毫米 280毫米 360毫米 |
無 |
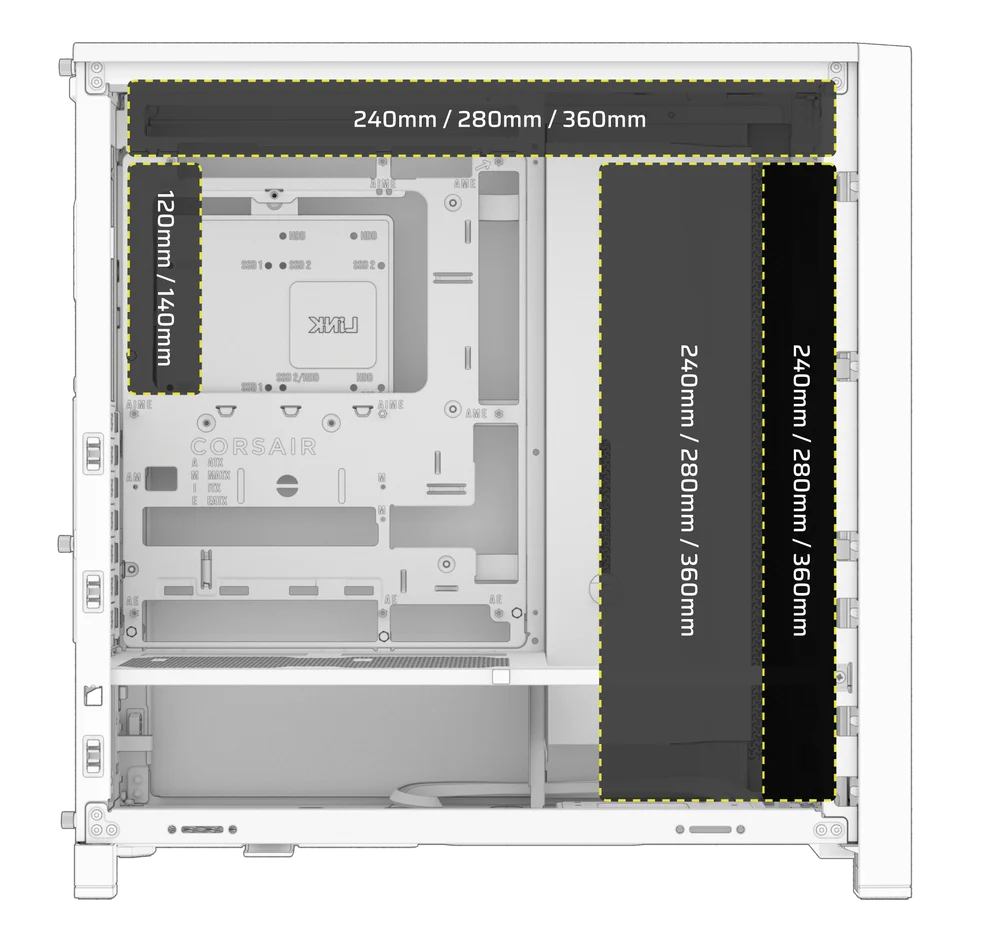
頂部安裝能提供最佳的降噪表現,但您亦可根據組裝偏好選擇其他安裝方式。更多使用技巧與最佳實踐建議,請參閱散熱器的產品手冊。
1. OPTIMAL RADIATOR MOUNTING CONFIGURATION

注意:為使散熱器居中,您可能需要卸除其中一顆散熱器固定螺絲。使用十一顆螺絲仍能提供足夠的固定點,確保散熱器與風扇穩固安裝。
儲存裝置與控制器的安裝
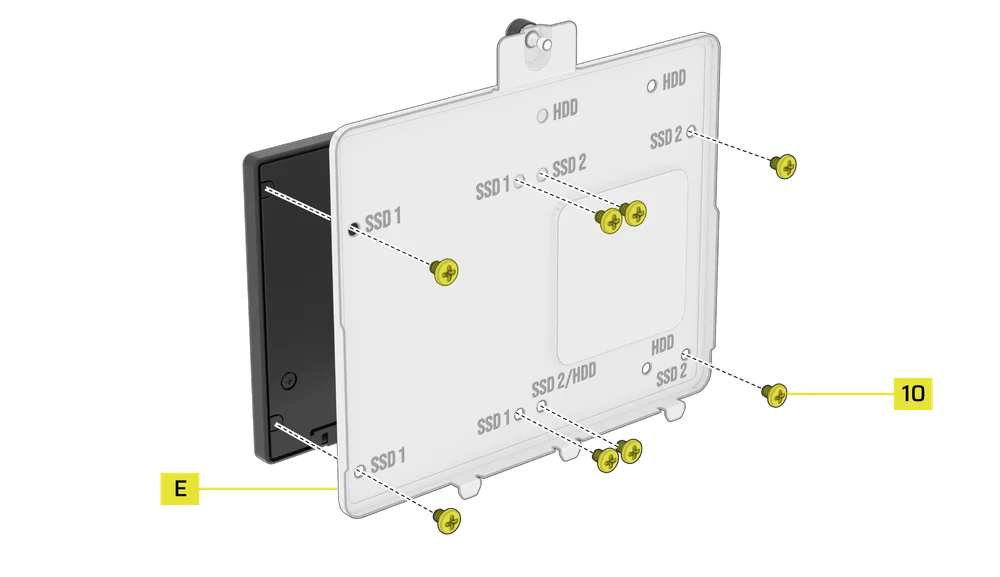
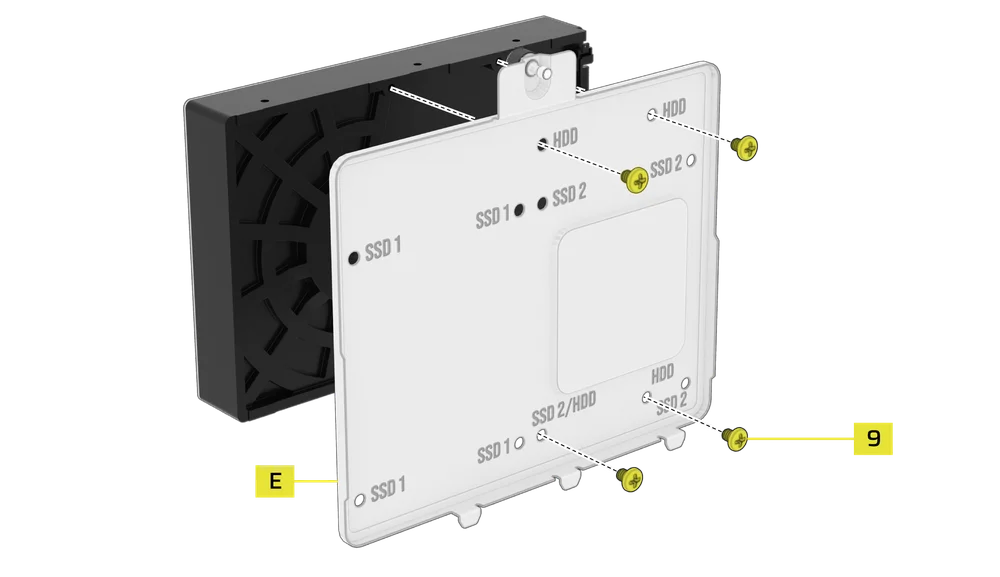
FRAME 4000 Series cases include up to two Combination Drive Plates - with each capable of mounting one HDD or two SSDs.

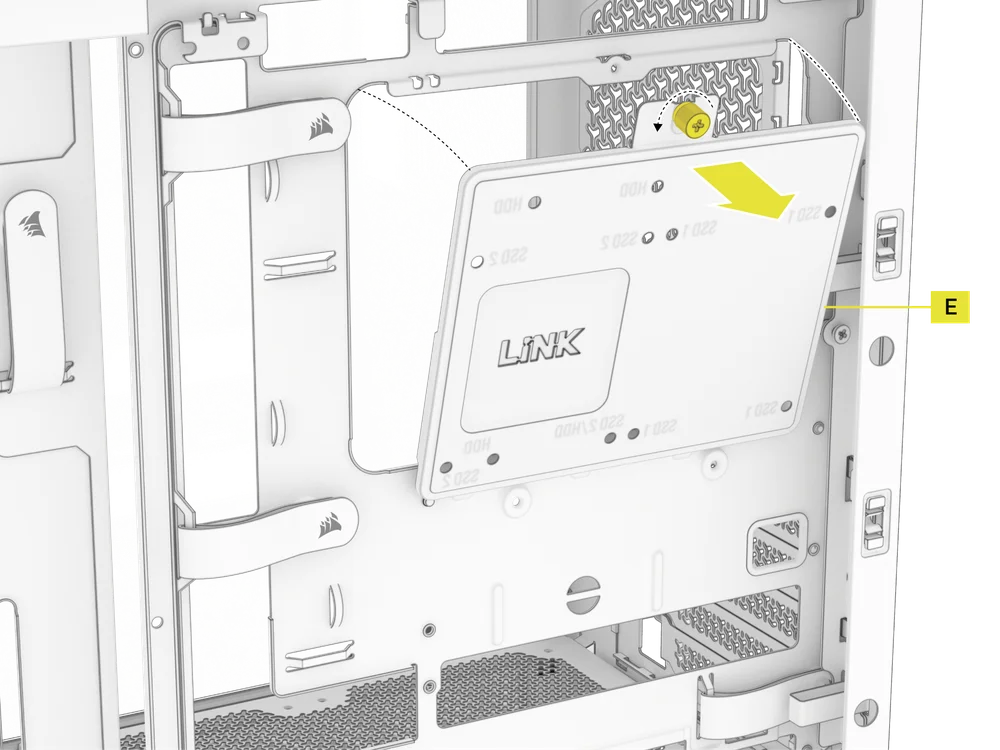
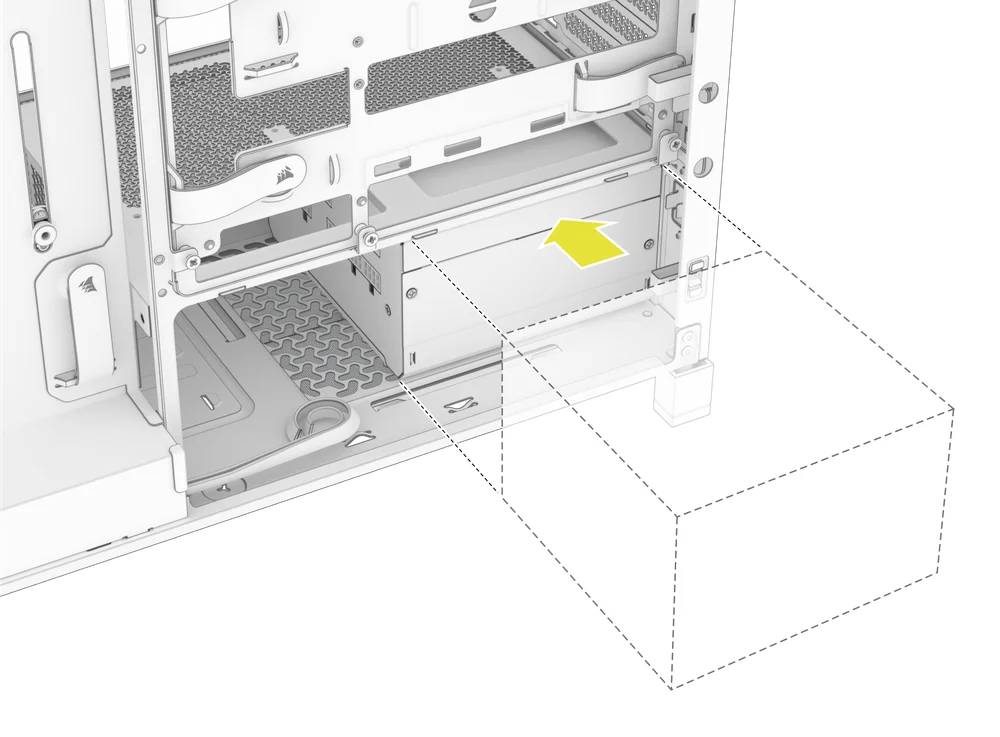
1. 組合驅動板拆卸
- 鬆開固定組合驅動板(E)的旋入式螺釘,然後取下該板。
2. 於組合式驅動器板上安裝固態硬碟
- 將固態硬碟安裝至組合式硬碟板(E)上,使用隨附的固態硬碟專用螺絲(10)將其固定於板底。
3. 硬碟安裝於組合式驅動器板上
- 將硬碟安裝至組合式驅動器板(E)上,使用隨附的硬碟專用螺絲(9)將其固定於板底。
組合驅動板(E)亦可作為 iCUE LINK 系統集線器控制器的安裝位置(若使用此控制器時)。
4. 固定組合驅動板
將組合驅動板(E)重新插入機殼的指定插槽,然後順時針旋緊拇指螺絲以固定。
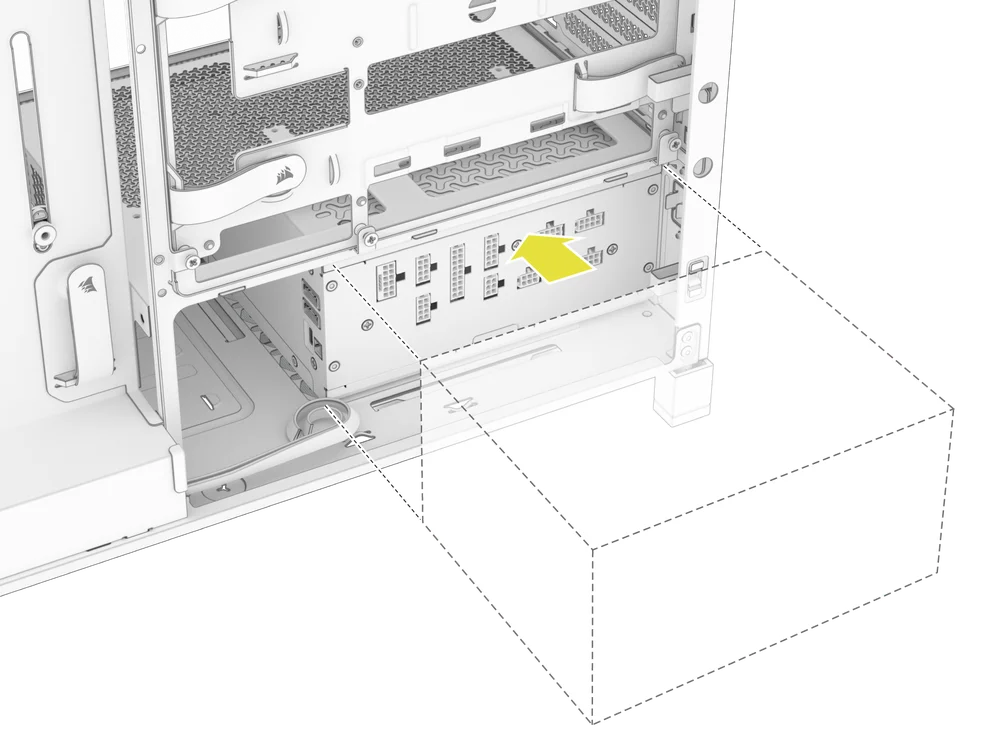
電源裝置安裝
1. 標準電源供應器安裝
- 將電源供應器安裝時,風扇朝下。
- 請使用機殼背面的兩顆固定螺絲,將電源供應器固定於機箱上。
- 為加強安全性,請使用兩顆主機板螺絲(9)將電源供應器固定於後板兩側角落。
2. 海盜船 SHIFT 電源供應器安裝
FRAME 4000 完全相容於所有 SHIFT 電源供應器,安裝方式與標準 ATX 電源供應器完全相同。
顯示卡安裝
隨附的PCI支架使FRAME 4000能支援水平與垂直兩種GPU安裝配置。
提示:為使組裝更輕鬆,請將顯示卡作為最後一步安裝。
1. 以標準方向安裝顯示卡
- 卸下 PCIe 插槽蓋板並取下。
- 將卡插入 PCIe 插槽,直至卡體與 PCIe 插槽的固定機構卡入到位。
- 將支架對準PCIe插槽,並將卡固定於機殼上。
2. 使用GPU防下垂穩定臂
GPU防下垂穩定支架能支撐您的顯示卡,防止其在散熱器重量作用下彎曲或下垂。此設計不僅有助於保護顯示卡與PCIe插槽,更能為您的系統組裝增添整潔專業的外觀。
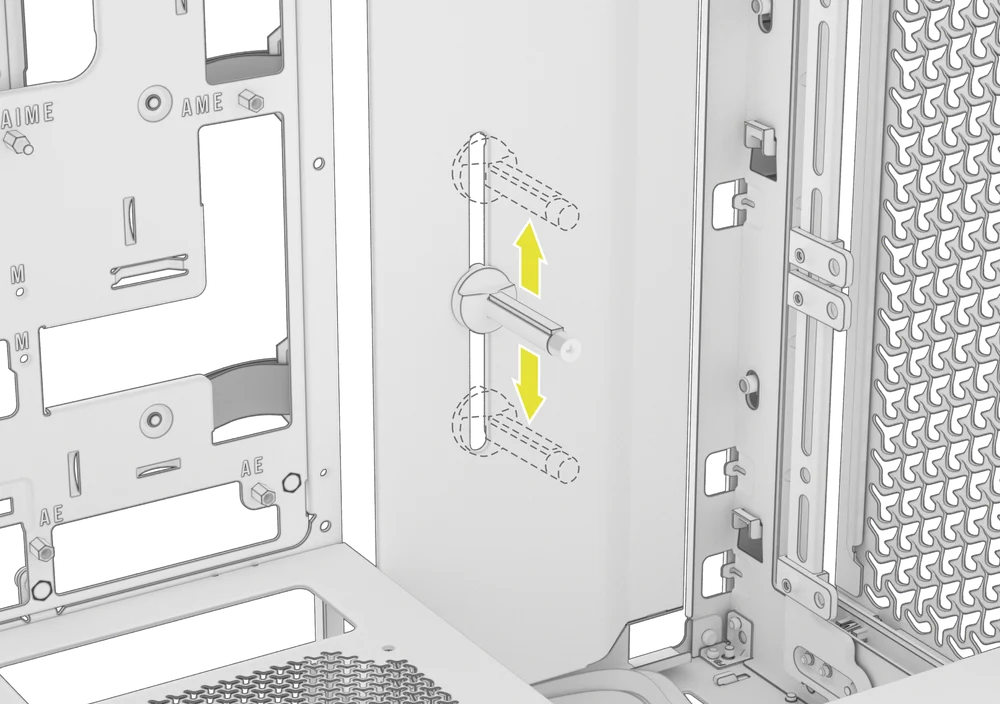
- 鬆開朝前的旋鈕螺絲,將GPU防下垂支臂向上或向下滑動進行調整。
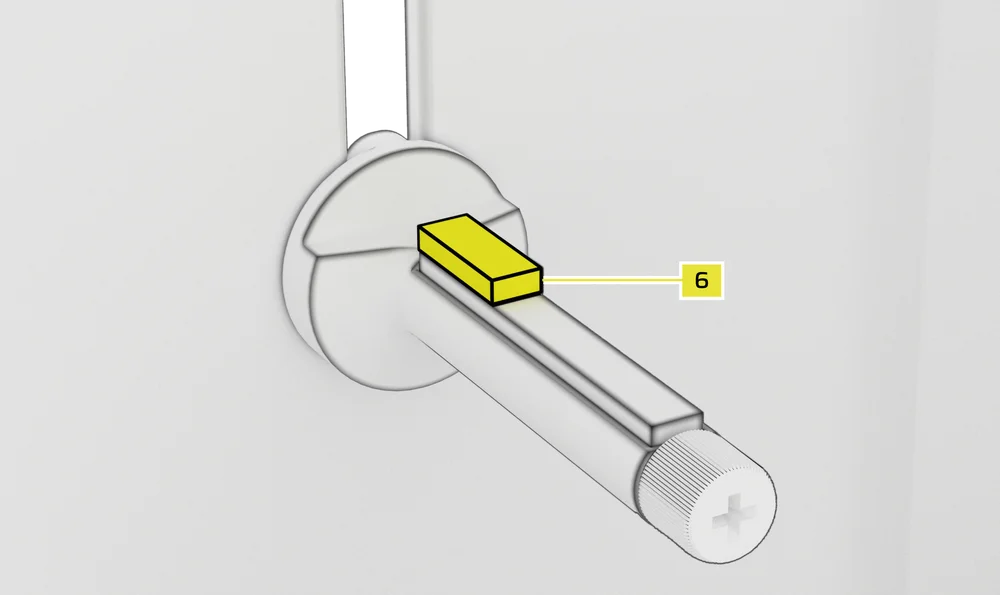
注意:若您的顯示卡風扇或其他零件可能接觸到橡膠支臂,請使用配件盒內附的防下垂穩定臂橡膠墊片(6),以確保與任何活動部件保持間隙。
- 將自黏式防下垂穩定臂橡膠墊片(6)安裝至GPU防下垂臂上。
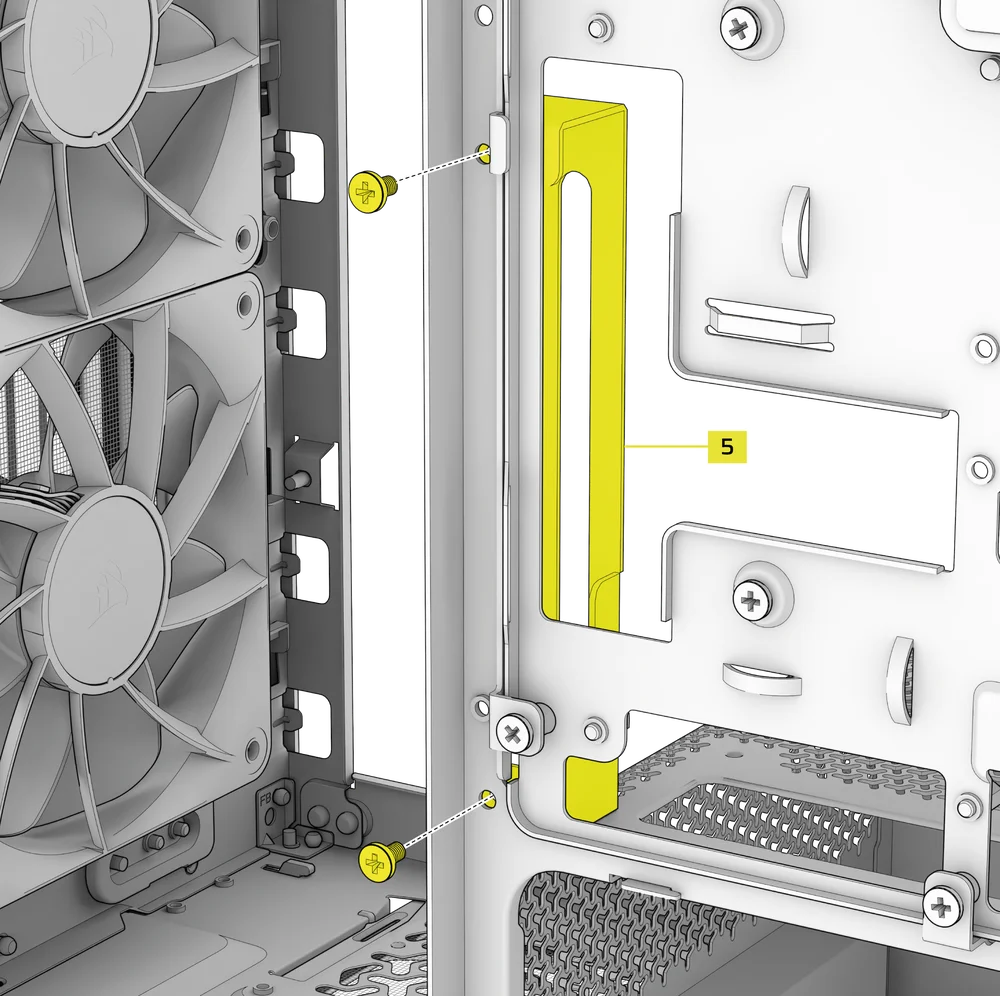
提示:若您決定將線材護罩(F)替換為側風扇安裝支架(1),可將顯示卡防下垂穩定臂移至防下垂穩定臂迷你支架(5),同時維持防下垂功能。
3. 以垂直方向安裝顯示卡
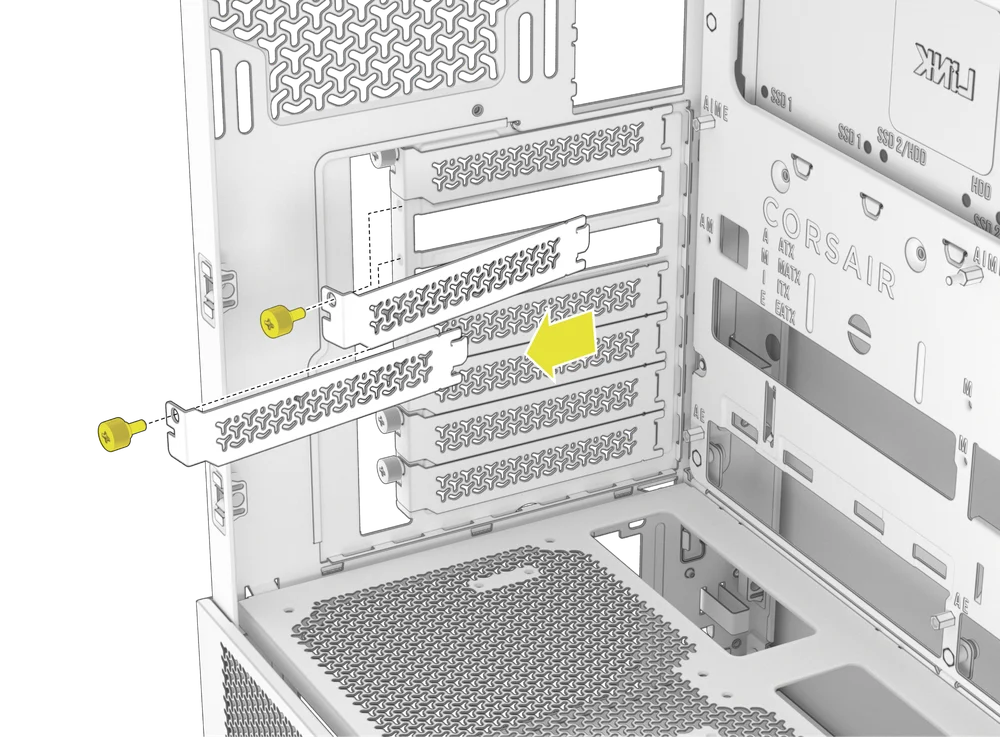
FRAME 4000 支援垂直安裝顯示卡,需搭配隨附的 PCI 背板 (B) 及 PCIe 轉接卡(需另行購買)。
- 卸除機殼後方的三顆螺絲,即可拆卸PCI板(B)。
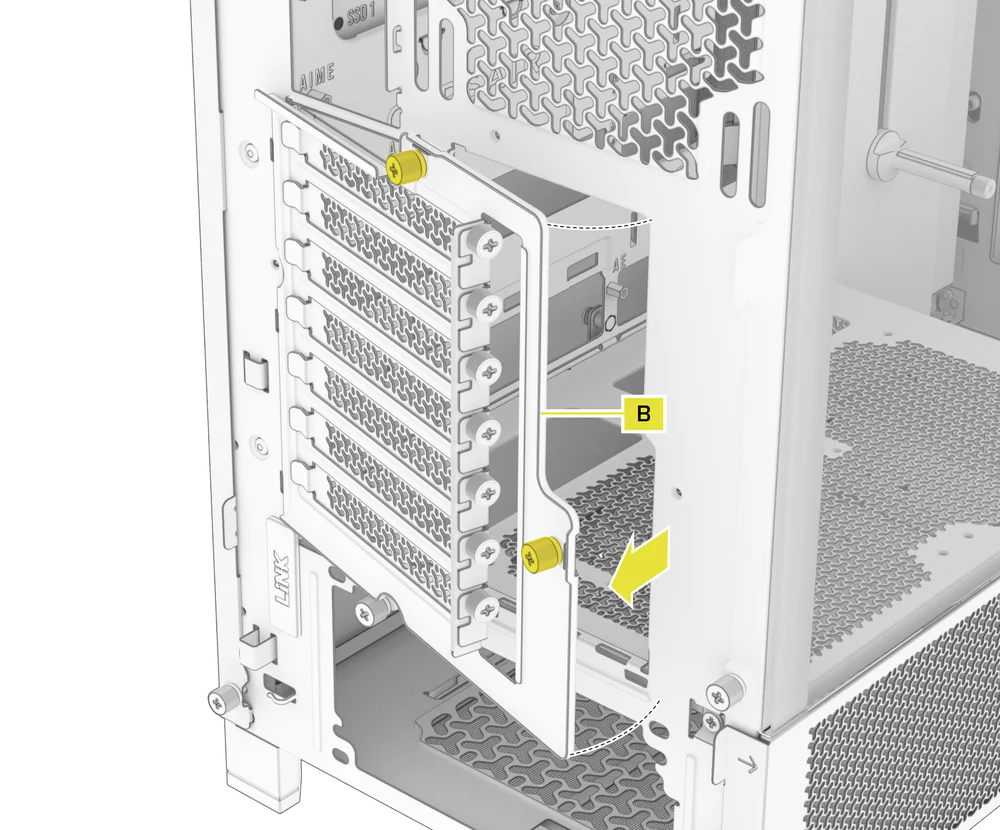
注意:PCI 板的旋鈕螺絲為固定式,無需完全卸除。
- 將PCI板(B)逆時針旋轉90度,使PCIe插槽蓋的拇指螺絲朝上。
- 重新安裝 PCI 板 (B),並鎖緊拇指螺絲。

- Install the Vertical Mount Standoffs (12) from the accessory box to the top of the PSU shroud. There are two locations for standoffs, so choose the location that best suits the size of your GPU in relation to how far it is from the side panel.
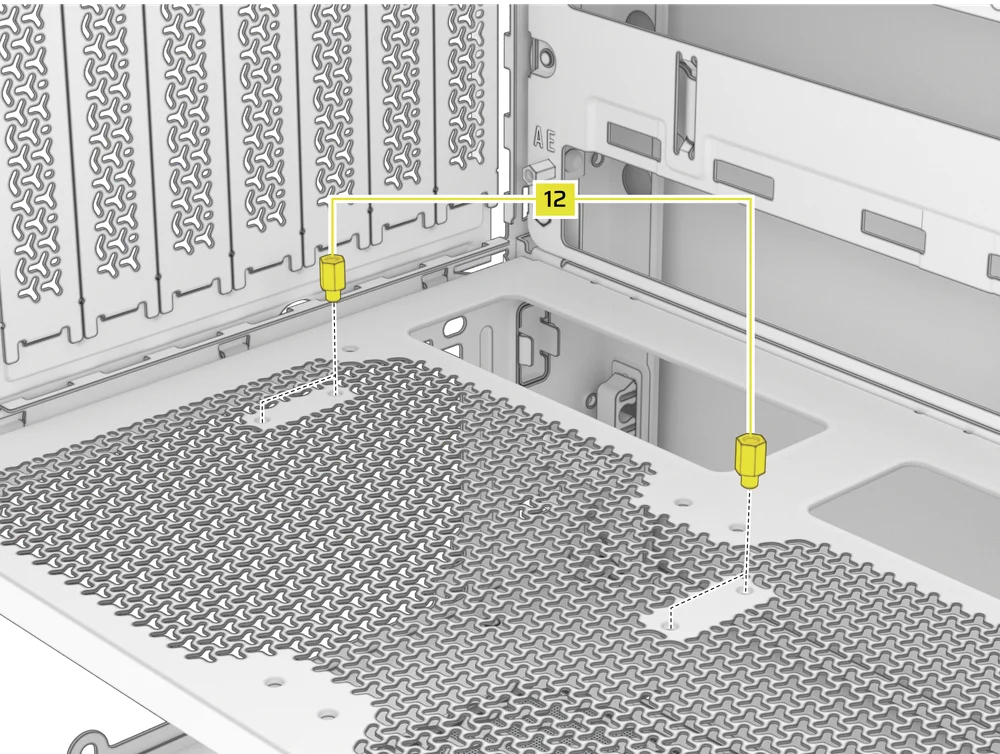
- Mount the PCIe Riser Card (sold separately) to the Vertical Mount Standoffs (12) using two of the included Motherboard Screws (9).
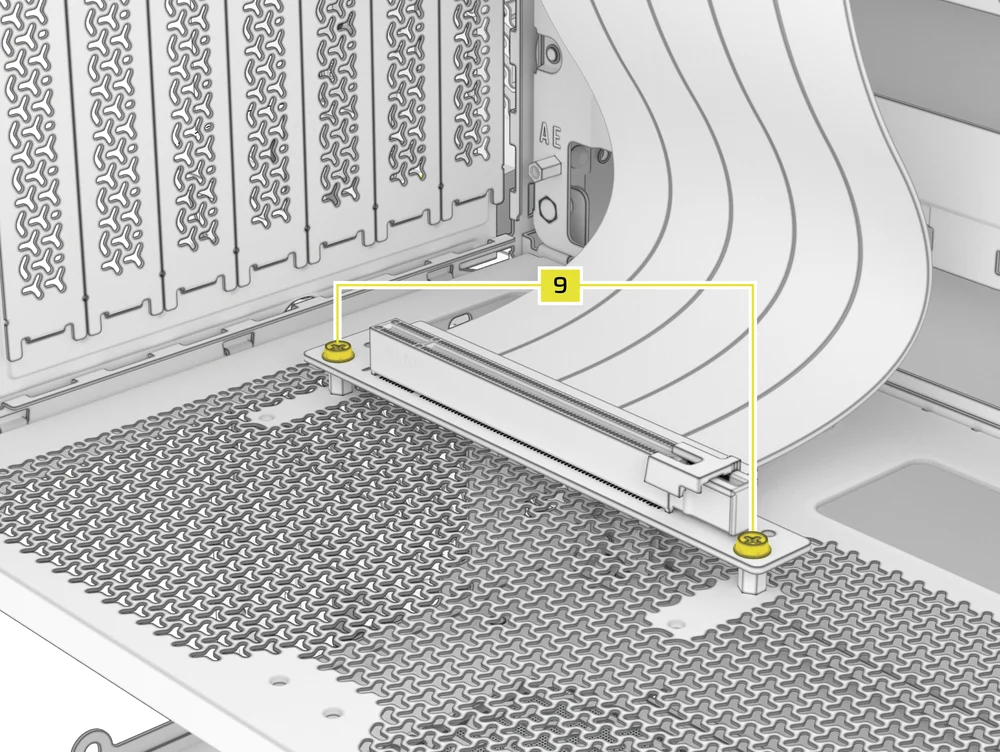
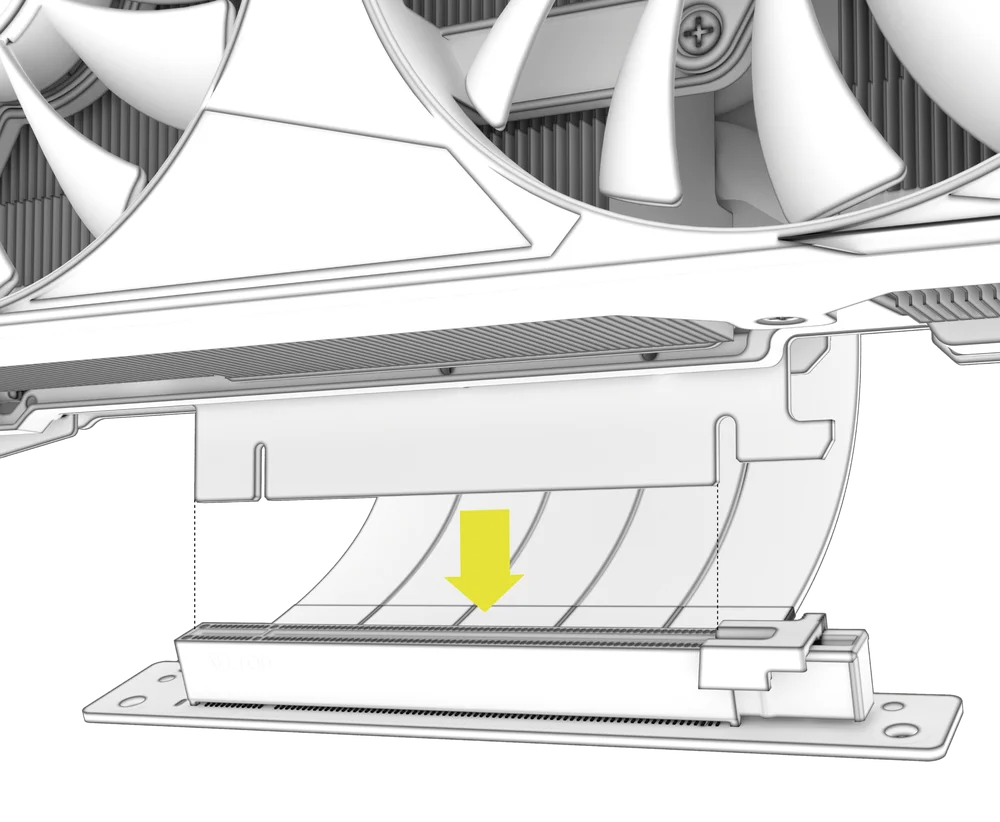
- 將顯示卡裝入PCI卡槽時,請將其穩固地插入轉接卡直至聽到卡入聲響,再以手轉螺絲固定。
連結您的粉絲
1. CONNECTING AND CONTROLLING RS FANS
- FRAME 4000D RS
- FRAME 4000D WOOD RS
- FRAME 4000X
請參閱海盜船 RS 系列快速入門指南,以獲取風扇安裝說明。
2. CONNECTING AND CONTROLLING RS ARGB FANS
- FRAME 4000D RS ARGB
- FRAME 4000D LCD RS ARGB
請參閱海盜船RS ARGB系列快速入門指南,以獲取風扇安裝說明。
維護
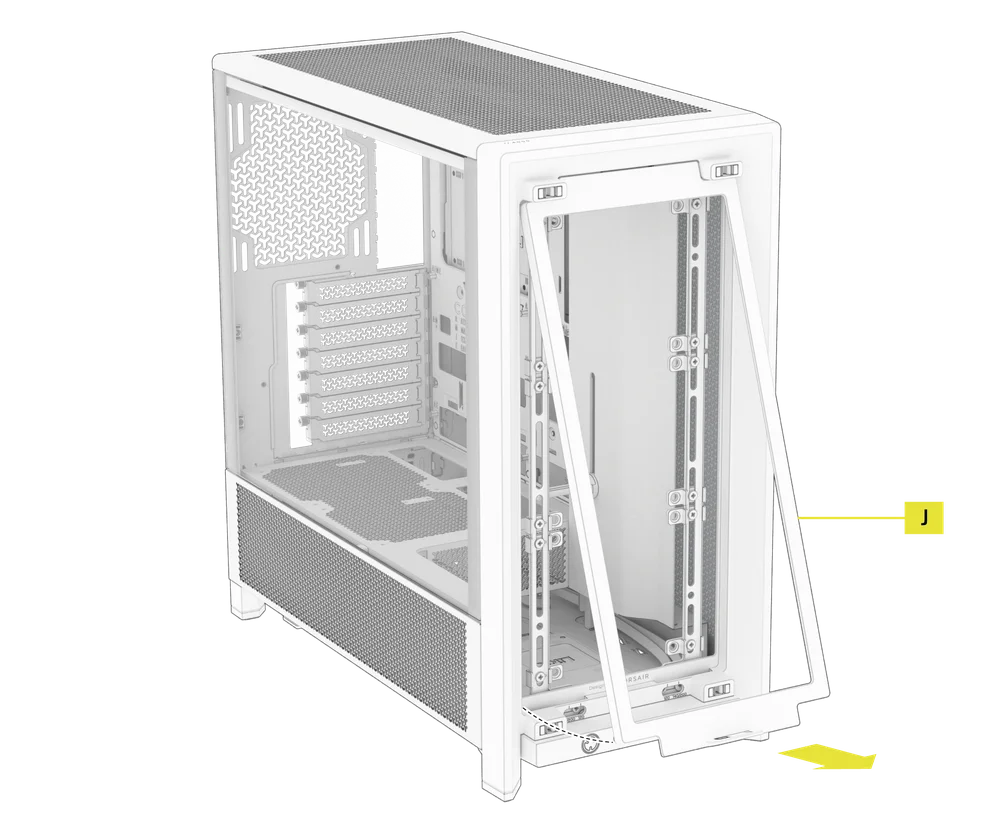
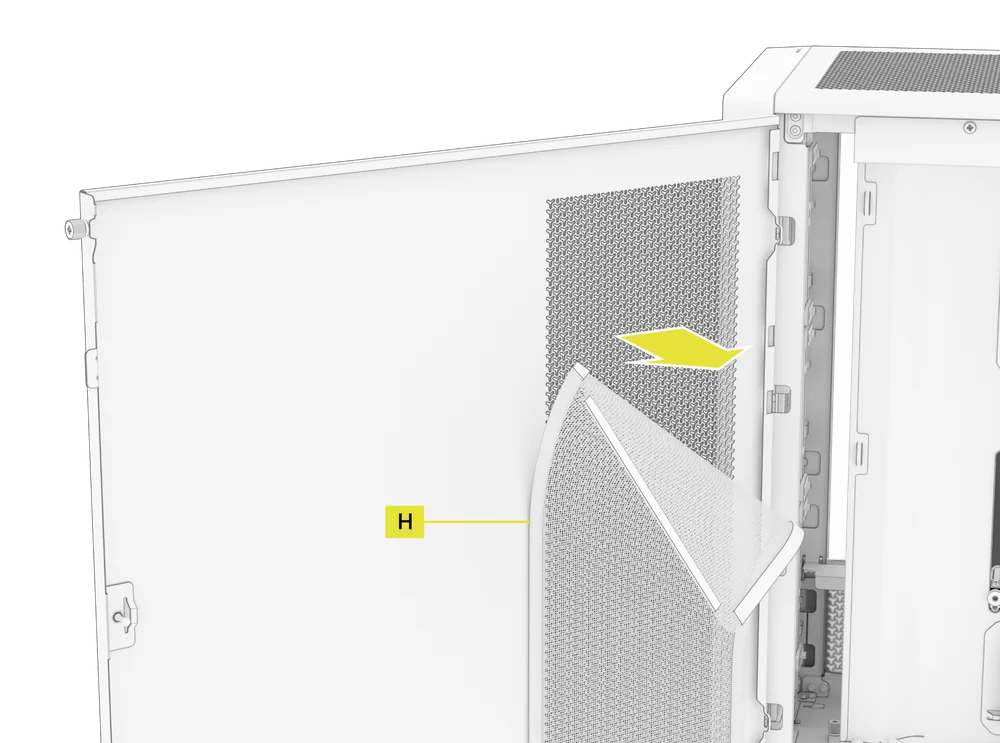
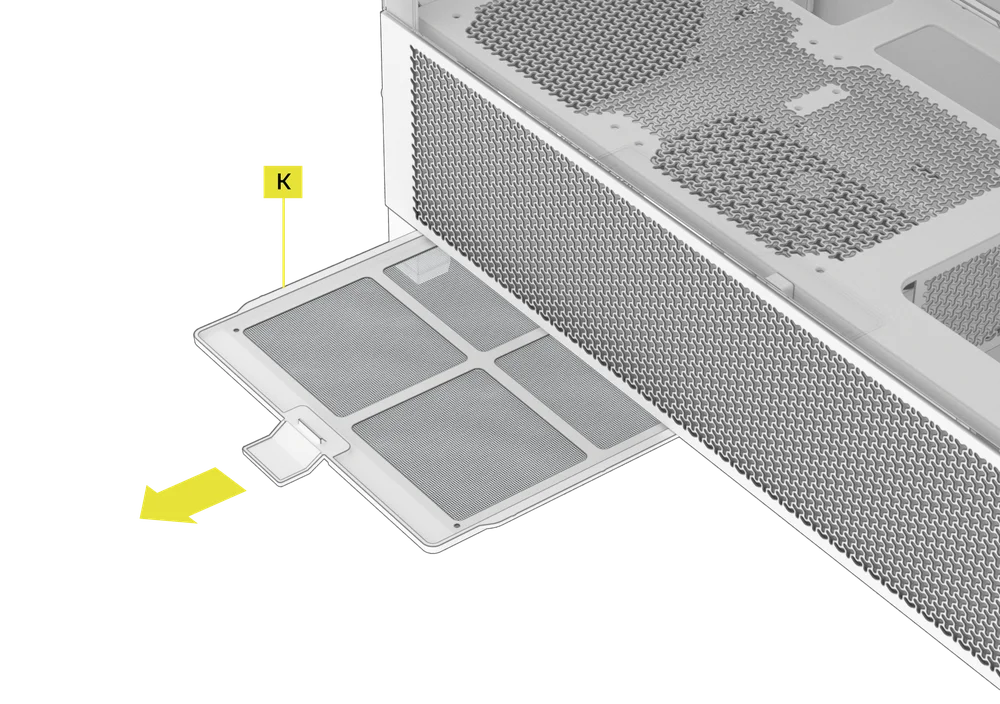
1. 清潔您的機箱濾網
FRAME 4000 配備三個可拆卸式防塵濾網:底部設有電源供應濾網,側面配置磁性濾網,正面則裝有塑膠/尼龍濾網。
- 要拆卸前風扇濾網(J),請將塑膠濾網框朝機箱頂部傾斜,從底部向上拉出。
- 要拆卸磁吸式側風扇濾網(H),請從中心處拉動使框架彎曲,接著將兩端從鎖定點脫離,最後將濾網向上提起取下。
- 要拆卸電源供應器風扇濾網(K),請將其從機殼上往外拉出。
注意:濾網可用加壓空氣或清水清潔。若以清水沖洗濾網,請確保濾網完全乾燥後再重新安裝。
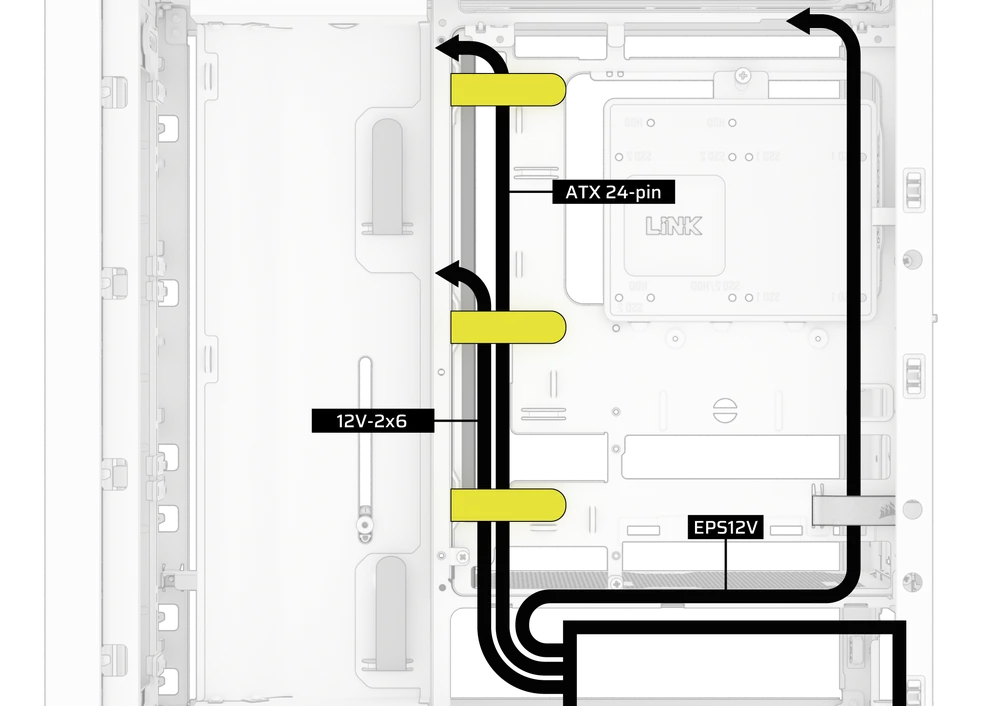
2. 線材管理技巧
FRAME 4000 還包含其他多種線材管理功能,例如:
- 可調節內/外魔鬼氈束帶,適用於箱體後部。
- 多種魔鬼氈帶位置設計,適用於標準或反向連接器主機板。
- 束線帶固定點經過策略性佈置,用於將電源線路引導至特定裝置。
- iCUE LINK 線材掛鉤可固定於頂板,牢固扣住 LINK 線材,無需永久固定。
- Supports most reverse connector motherboards (MSI, ASUS, GIGABYTE) that feature connectors on the rear of the board for a build with no visible motherboard cables.
- 專為您的iCUE LINK系統中樞設計的專屬位置。
- 若您不想花太多時間整理線材,且不希望線路從底部網狀四分之一側板外露,請將半透明嵌板替換為配件盒內附的同色系遮蔽嵌板。
質保聲明

CORSAIR FRAME 4000 系列機箱的質保期為 2 年。
PRODUCT CHANGES
|
January 2025 |
Initial Release |
|
March 2026 |
Thicker steel side panels 200mm fan compatibility PSU shroud cut Various case rigidity improvements |
AVAILABLE ACCESORIES
CC-8900917 FRAME 4000 3D-Y Airflow Front Panel - Black
CC-8900918 FRAME 4000 3D-Y Airflow Front Panel - White
CC-8901149 FRAME 4000 RGB FLOW Front Panel - Black
CC-8901150 FRAME 4000 RGB FLOW Front Panel - White
CC-8901151 FRAME 4000 Series WOOD Front Panel - Black/Walnut
CC-8901152 FRAME 4000 Series WOOD Front Panel - White/Oak
CC-8901153-WW FRAME 4000 Series ELITE WOOD Front Panel - Black/Walnut
CC-8901154-WW FRAME 4000 Series ELITE WOOD Front Panel - White/Oak
CC-8901155 FRAME 4000 Series Flat Glass Front Panel - Black
CC-8901156 FRAME 4000 Series Flat Glass Front Panel - White
CC-8901157 FRAME 4000 Series Pixel Glass Front Panel - Black
CC-8901158 FRAME 4000 Series Pixel Glass Front Panel - White
CC-8901208 FRAME 4000 Glass + Mesh Side Panels - Black
CC-8901209 FRAME 4000 Glass + Mesh Side Panels - White
CC-8901147 FRAME 4000 Full Tempered Glass Side Panel - Black
CC-8901148 FRAME 4000 Full Tempered Glass Side Panel - White
CC-8901048-WW FRAME 4000 Series LCD Mounting Kit - Black
CC-8901049-WW FRAME 4000 Series LCD Mounting Kit - White
CC-8901142-WW FRAME 4000 Series Cold Air Intake Kit - Black
CC-8901143-WW FRAME 4000 Series Cold Air Intake Kit - White
CC-8901171 FRAME 4000 Series - Flat Steel Panel - Black
CC-8901172 FRAME 4000 Series - Flat Steel Panel - White
CC-8900966 FRAME Standard Steel Motherboard Tray - Black
CC-8900967 FRAME Standard Steel Motherboard Tray - White
CC-8901022 FRAME RapidRoute 2.0 Motherboard Tray - Black
CC-8901023 FRAME RapidRoute 2.0 Motherboard Tray - White
CC-8901146-WW FRAME ELITE Motherboard Tray - Meteorite Aluminum
CC-8900937 FRAME 4000 Full Length PSU Shroud - Black
CC-8900938 FRAME 4000 Full Length PSU Shroud - White
CC-8901161 FRAME 4000/4500 Compact PSU Shroud - Black
CC-8901162 FRAME 4000/4500 Compact PSU Shroud - White
CC-8900919 FRAME 4000 Standard FPIO - Black (2xA; 1xC)
CC-8900920 FRAME 4000 Standard FPIO - White (2xA; 1xC)
CC-8901159-WW FRAME 4000 Series ELITE Front Panel I/O - Black (3xC + ARGB Cherry MX Style PWR Button)
CC-8901160-WW FRAME 4000 Series ELITE Front Panel I/O - White (3xC + ARGB Cherry MX Style PWR Button)
SPARE PARTS LISTING
|
CC-8900917 |
FRAME 4000D 3D-Y Airflow Front Panel, Black |
|
CC-8900918 |
FRAME 4000D 3D-Y Airflow Front Panel, White |
|
CC-8900919 |
FRAME 4000D Replacement Front I/O, Black |
|
CC-8900920 |
FRAME 4000D Replacement Front I/O, White |
|
CC-8900921 |
FRAME 4000D Replacement Front Bezel Assembly, Black |
|
CC-8900922 |
FRAME 4000D Replacement Front Bezel Assembly, White |
|
CC-8900923 |
FRAME 4000D Replacement Top Panel, Black |
|
CC-8900924 |
FRAME 4000D Replacement Top Panel, White |
|
CC-8900925 |
FRAME 4000D Replacement Three-Quarter Side Glass, Black |
|
CC-8900926 |
FRAME 4000D Replacement Three-Quarter Side Glass, Black |
|
CC-8900927 |
FRAME 4000D Replacement Y-Mesh Quarter Panel, Black |
|
CC-8900928 |
FRAME 4000D Replacement Y-Mesh Quarter Panel, White |
|
CC-8900929 |
FRAME 4000D Accessory Box, Black |
|
CC-8900930 |
FRAME 4000D Accessory Box, White |
|
CC-8900931 |
FRAME 4000D Replacement PCI Bracket, Black |
|
CC-8900932 |
FRAME 4000D Replacement PCI Bracket, White |
|
CC-8900933 |
FRAME 4000D Replacement Top InfiniRail, Black |
|
CC-8900934 |
FRAME 4000D Replacement Top InfiniRail, White |
|
CC-8900935 |
FRAME 4000D Replacement Front InfiniRail (Single), Black |
|
CC-8900936 |
FRAME 4000D Replacement Front InfiniRail (Single), White |
|
CC-8900937 |
FRAME 4000D Replacement PSU Shroud, Black |
|
CC-8900938 |
FRAME 4000D Replacement PSU Shroud, White |
|
CC-8900939 |
FRAME 4000D Replacement Drive/Controller Plate, Black |
|
CC-8900940 |
FRAME 4000D Replacement Drive/Controller Plate, White |
|
CC-8900941 |
FRAME 4000D Replacement Cable Cover, Black |
|
CC-8900942 |
FRAME 4000D Replacement Cable Cover, White |
|
CC-8900943 |
FRAME 4000D Replacement InfiniRail Fan Mounts (12pcs), Black |
|
CC-8900944 |
FRAME 4000D Replacement InfiniRail Fan Mounts (12pcs), White |
|
CC-8900945 |
FRAME 4000D Replacement Strap Kit, Black |
|
CC-8900946 |
FRAME 4000D Replacement Strap Kit, White |
|
CC-8900947 |
FRAME 4000D Replacement PSU Filter, Black |
|
CC-8900948 |
FRAME 4000D Replacement PSU Filter, White |
|
CC-8900949 |
FRAME 4000D Replacement Front Filter, Black |
|
CC-8900950 |
FRAME 4000D Replacement Front Filter, White |
|
CC-8900951 |
FRAME 4000D Replacement Side Filter, Black |
|
CC-8900952 |
FRAME 4000D Replacement Side Filter, White |
|
CC-8900953 |
FRAME Series GPU Anti-Sag Assembly, Black |
|
CC-8900954 |
FRAME Series GPU Anti-Sag Assembly, White |
LEGAL
©2026 CORSAIR MEMORY, Inc. All rights reserved. CORSAIR and the sails logo are registered trademarks of CORSAIR in the United States and/or other countries. All other trademarks are the property of their respective owners. Product may vary slightly from those pictured.
相關內容


