MANUAL | QUICK START GUIDE
CORSAIR TC80
GAMING CHAIR
In this Guide
INTRODUCTION
Congratulations on your new CORSAIR TC80 gaming chair. This guide will help you assemble and operate the chair.
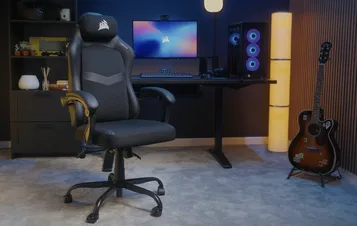
The images shown below are meant to be representative. Actual details of textures, materials, and logos may appear different, but the assembly and operation will remain the same as in this guide.
We also have a video guide for most of our chairs and products on the CORSAIR LAB YouTube Channel, found here:
PACKAGE CONTENTS
NOTE: Some hardware is prepacked in step labeled bags. Each bag may include extra fasteners such as screws or screw and washer sets as spares.
1x Backrest
1x Seat
1x Gas Piston
1x Gas Piston Cover
1x Seat Mechanism
2x Armrests
1x Detachable Head Pillow
1x Mounting Bracket
5x Casters
5x Chair Base Legs
1x 5-star Chair Base
4x Plastic Plugs
(hardware bag labeled STEP 6)
10x M8 35mm Screws
(hardware bags labeled STEP 2 and STEP 6)
8x M8 20mm Screws
(hardware bag labeled STEP 3 & STEP 4)
6x M6 16mm Screws
(hardware bag labeled STEP 1)
18x M8 Washers
(hardware bags labeled STEP 2, STEP 3 & STEP 4, STEP 6)
18x M8 Spring Washers
(hardware bags labeled STEP 2, STEP 3 & STEP 4, STEP 6)
1x Hex Key
(hardware bag labeled STEP 1)
INSTALLATION
IMPORTANT: Do not fully tighten any screw until all are in place.
1. ASSEMBLING THE 5-STAR BASE
- Open the hardware bag labeled STEP 1.
- Insert each of the Chair Base Legs (10) into the corresponding slots on the 5-Star Chair Base (11).
- Secure each of the legs with one M6 16mm Screw (15).
NOTE: The chair base includes a plastic decorative center cover that may come loose when the chair base is turned upside down. If it falls out, simply snap it back into place before proceeding.
- Insert the Casters (9) into each of the Chair Base Legs (10).
- Slide the Gas Piston Cover (4) over the Gas Piston (3).
- Insert the gas piston assembly (3, 4) into the 5-star Chair Base (11).
NOTE: If there is a protective cover on the top of the gas piston, please remove it.
2. ASSEMBLING THE BACKREST
- Open the hardware bag labeled STEP 2.
- Lay the Backrest (1) face down on a flat surface.
- Lift the bottom flap to reveal the four threaded holes.
- Secure the Mounting Bracket (8) to the Backrest (1) using four sets of M8 35mm Screws (13), M8 Washers (16) and Spring Washers (17).
3. ATTACHING THE SEAT MECHANISM TO THE BACKREST
- Open the hardware bag labeled STEP 3 & STEP 4.
- Align the three slotted holes on the Seat Mechanism (5) with the three mounting holes on the Mounting Bracket (8).
- Secure the Seat Mechanism (5) to the Mounting Bracket (8) using three sets of M8 20mm Screws (14), M8 Washers (16), and Spring Washers (17).
4. ATTACHING THE SEAT TO THE SEAT MECHANISM
- Align the mounting holes on the bottom of the Seat (2) with the four holes on the Seat Mechanism (5).
- Secure the assembly using four sets of M8 20mm Screws (14), M8 Washers (16), and Spring Washers (17).
5. SECURING THE SEAT TO THE CHAIR BASE
- Place the seat assembly onto the chair base assembly.
6. ATTACHING THE ARMRESTS
- Open the hardware bag labeled STEP 6.
- Secure each Armrest (6) using two sets of M8 35mm Screws (13), M8 Washers (16), and Spring Washers (17).
- Cover the Armrest (6) mounting holes with four Plastic Plugs (12).
HINT: The right armrest is marked with an “R” on the inside. For easier assembly, attach each armrest to the seat first, then secure it to the backrest.
7. ATTACHING THE HEAD PILLOW (OPTIONAL)
USER MANUAL
WARNING: Improper use of this chair may cause damage to the chair or result in personal injury. Please use this chair as intended.
1. TILT LOCK
The left-side lever will lock and unlock the chair tilt function.
- Pull the left-side lever handle up to unlock the tilt function.
- Push the left-side lever handle down to lock the tilt function.
WARNING: Do not apply pressure to the seat back prior to pulling the lever. The sudden shift of weight may cause the chair to become unstable which may cause damage to the chair and/or result in personal injury.
2. TILT TENSION ADJUSTMENT
- Tighten the knob (+) to increase tilt resistance.
- Loosen the knob (-) to decrease tilt resistance.
TIP: If the chair tilts easily, you may want to increase the tension. Alternatively, decrease the tension if you find it too hard to lean back while sitting in the chair.
3. HEIGHT ADJUSTMENT
The right-side lever allows you to raise or lower the height of your chair.
- To lower the height of the chair, pull the right-side lever up while weight is applied to the chair.
- To increase the height, pull the right-side lever up while the chair is empty.
SAFETY AND MAINTENANCE - TYPE C
- Use a dry cloth to wipe surface stains. Stubborn stains can be gently wiped with a warm, damp cloth or with a mild cleaner. Caution: Do no use alcohol, solvents, or corrosive liquids when cleaning.
- Your chair’s casters are designed for use on carpet and hard flooring only. Avoid using the chair on sloped or uneven surfaces to prevent sliding or damage.
- This chair is designed for office or home-office use. It is not intended for medical or rehabilitation purposes or for use in humid, corrosive, or high-temperature environments, or as a ladder or climbing aid.
- Every six months, inspect the gas cylinder and casters for looseness or unusual noises. For replacement of your chair's adjustable gas lift, only qualified personnel should service the product. Please contact CORSAIR customer service for more details.
WARRANTY

All CORSAIR Gaming chairs have a 2-year warranty.
SPARE PARTS LISTING
|
CF-8910103 |
TC80 Seat Mechanism |
|
CF-8910104 |
TC80 5-star Chair Base |
|
CF-8910105 |
TC80 Left and Right Armrests |
|
CF-8910106 |
TC80 Head Pillow |
|
CF-8910107 |
TC80 5x Casters |
|
CF-8910108 |
TC80 Gas Piston |
|
CF-8910109 |
TC80 Mounting Bracket |
|
CF-8910110 |
TC80 Hardware Kit |
LEGAL
© 2026 CORSAIR MEMORY, Inc. All rights reserved. CORSAIR and the sails logo are registered trademarks of CORSAIR in the United States and/or other countries. All other trademarks are the property of their respective owners. Product may vary slightly from those pictured.
RELATED CONTENT