MANUAL | QUICK START GUIDE
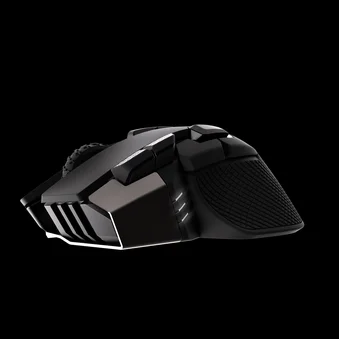
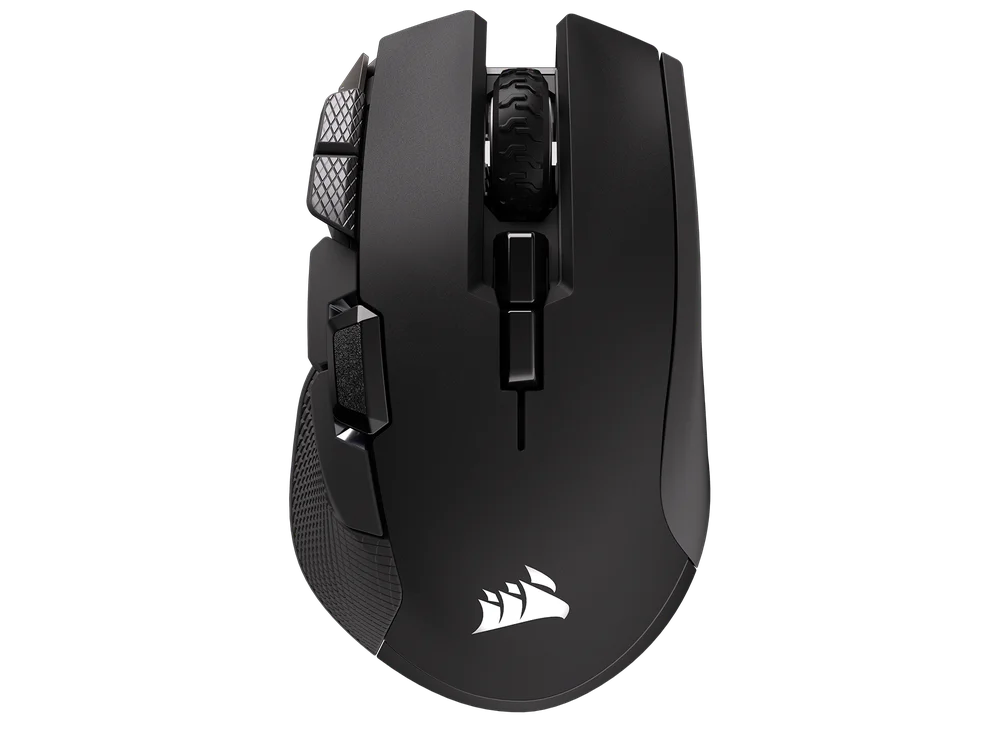
IRONCLAW WIRELESS SE
GAMING MOUSE
CHARGING THE MOUSE
IMPORTANT: The IRONCLAW WIRELESS SE gaming mouse must be fully charged before its first use.
Connect the mouse to an available USB 2.0 or 3.x port on your PC with the USB CHARGING / DATA CABLE (P).
The MULTI-PURPOSE LED INDICATOR (K) on the mouse will begin pulsing green to denote battery charging and will turn solid when charging is complete.
GETTING TO KNOW YOUR MOUSE
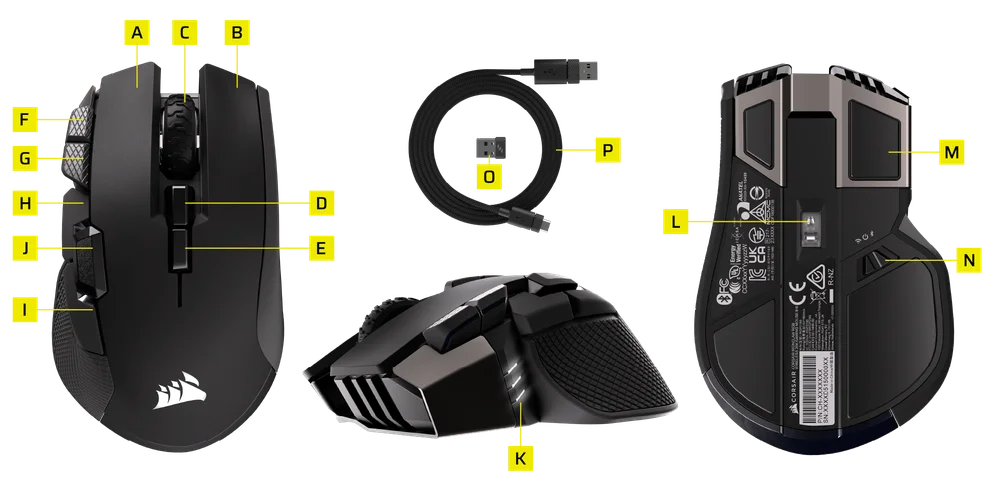
- LEFT MOUSE BUTTON
- RIGHT MOUSE BUTTON
- MIDDLE CLICK / SCROLL WHEEL
- PROFILE UP BUTTON
- PROFILE DOWN BUTTON
- DPI UP BUTTON
- DPI DOWN BUTTON
- FORWARD BUTTON
- BACKWARD BUTTON
- OPTION BUTTON
- MULTI-PURPOSE LED INDICATOR
- OPTICAL GAMING SENSOR
- MOUSE FEET
- POWER / WIRELESS MODE SWITCH
- USB WIRELESS RECEIVER
- USB CHARGING / DATA CABLE
SETTING UP 2.4GHz SLIPSTREAM WIRELESS
- Connect the USB WIRELESS RECEIVER (O) to an available USB 2.0 or 3.x port located on the front panel of your PC or nearby USB port.
- Toggle POWER / WIRELESS MODE SWITCH (N) to "2.4GHz" position to turn on your mouse.
- The MULTI-PURPOSE LED INDICATOR (K) will blink white and turn solid white when connected.
- Download the iCUE software from www.corsair.com/downloads.
- Run the installer program and follow instructions for installation.
If reconnection is required, initiate USB receiver pairing via iCUE software settings menu.
SETTING UP BLUETOOTH
Bluetooth® wireless is best for everyday computing tasks, productivity, and office applications.
- Initiate Bluetooth pairing on your Bluetooth 4.0 or higher enabled device.
- Toggle POWER / WIRELESS MODE SWITCH (N) to “Bluetooth” position to turn on your mouse.
- The MULTI-PURPOSE LED INDICATOR (K) will blink blue and turn solid blue when connected.
If reconnection is required, initiate Bluetooth re-pairing via steps below:
- Toggle POWER / WIRELESS MODE SWITCH (N) to “OFF” position on your mouse.
- Press and hold PROFILE UP BUTTON (D) and then toggle POWER / WIRELESS MODE SWITCH (N) to “BLUETOOTH” position.
- Release PROFILE UP BUTTON (D).

OPERATING MODES
The keyboard features two operating modes:
- Hardware (HW) Mode – When iCUE is not running or the mouse is connected to a device that does not support iCUE, the mouse operates in hardware mode which uses profiles and settings saved to the onboard storage.
- Software (SW) Mode, available via wired mode or 2.4 GHz – When iCUE is running on a PC or Mac, the mouse operates in software mode and is controlled by iCUE.
- Download iCUE from corsair.com/downloads and install on a Windows PC or Apple Mac to connect all your CORSAIR iCUE compatible products together in a single interface, giving you complete control of everything from lighting to powerful macros.
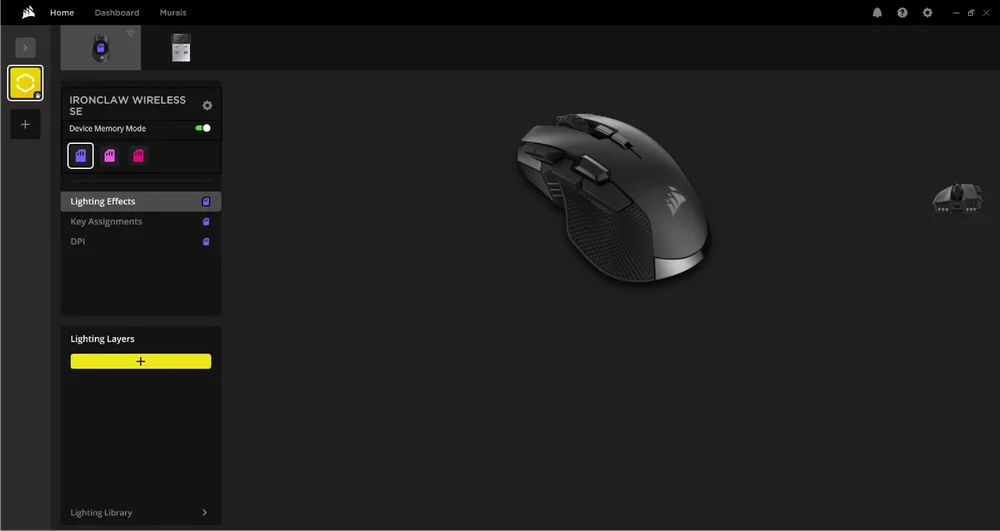
iCUE HOME AND DEVICE SCREEN
When you first open iCUE, you will see a new device tile for IRONCLAW WIRELESS SE. Hovering over or clicking the device tile will provide you with some options to start programming including:
- Lighting Effects
- Key Assignments
- DPI
- Surface Calibration
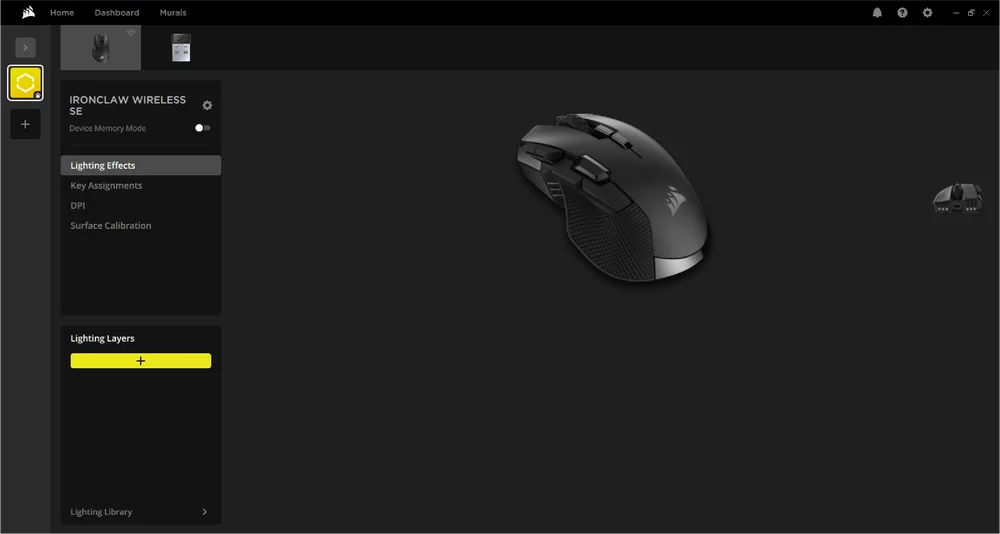
If you see an update notification in the iCUE window, please click to update firmware to the latest version.
DEVICE MEMORY MODE
Before you start programming, note that every iCUE system profile has two sets of settings for software and Device Memory Mode.
The Device Memory mode menu allows you to assign functions to keys which can be saved to the mouse’s onboard memory and plays when in hardware mode.
| FUNCTION |
SOFTWARE PROFILE |
DEVICE MEMORY MODE |
| Features |
Lighting Effects Key Assignments DPI Surface Calibration |
Lighting Effects Key Assignments DPI |
| How to Save | Automatically |
Manual Save
|


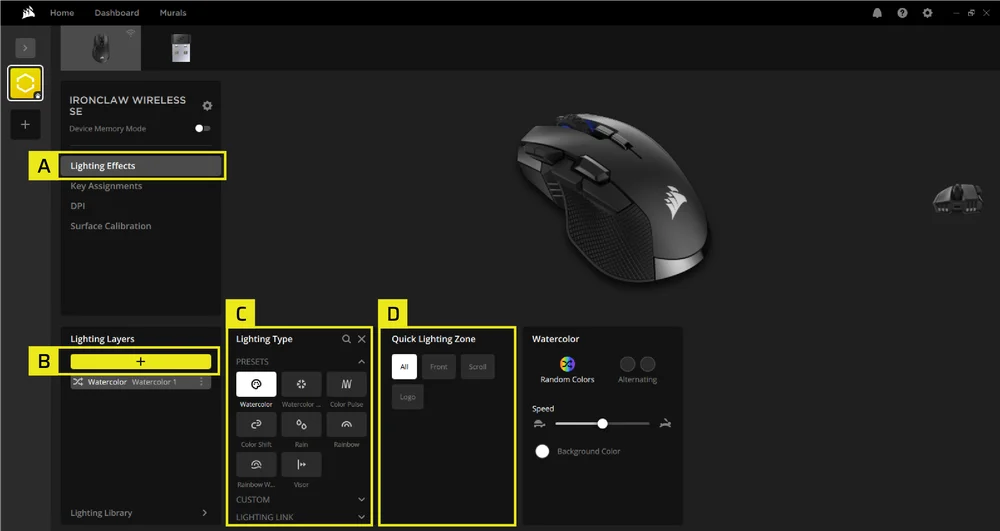
LIGHTING EFFECTS
The Lighting Effects tab allows you to program lighting effects.
- Click [Lighting Effects] in the left sidebar.
- Click the [ + ] button to create a new lighting layer.
- Choose Lighting types such as Static Color, Color Shift, Color Pulse, or Rainbow.
- Select a lighting zone (logo, scroll wheel, front).
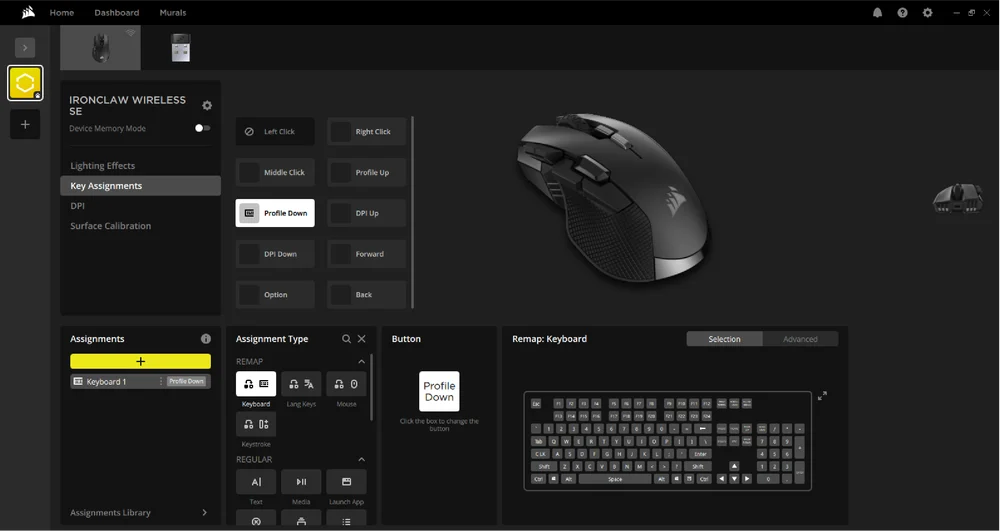
KEY ASSIGNMENTS
The Key Assignments menu allows you to assign functions to keys.
- Click [Key assignment] in the left sidebar.
- Under Assignments, click [ + ].
- Select your Assignment Type from remaps, text output, media control, app launching, macros, and more.
- Select your Key, either click the [ ? ] and press a key or click on a key on the mouse above.
- Modify your assignment parameters.
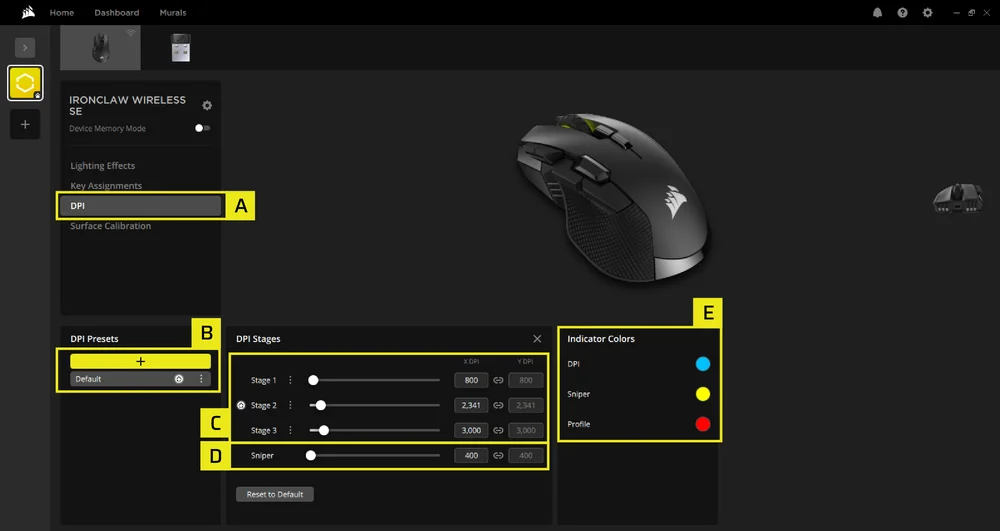
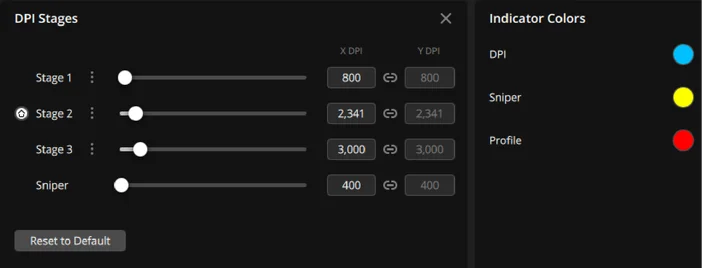
DPI
The DPI menu allows you to program the DPI.
- Click [DPI] in the left sidebar.
- Under DPI Presets, click [Default] to edit current presets or [ + ] to add a new DPI preset.
- Adjust each DPI stage independently.
- Set a Sniper DPI to a low value like 400 for precise aiming. Note the Sniper mode is only available if you rebind a mouse button to Sniper mode.
- Click on a color to change DPI indication colors.
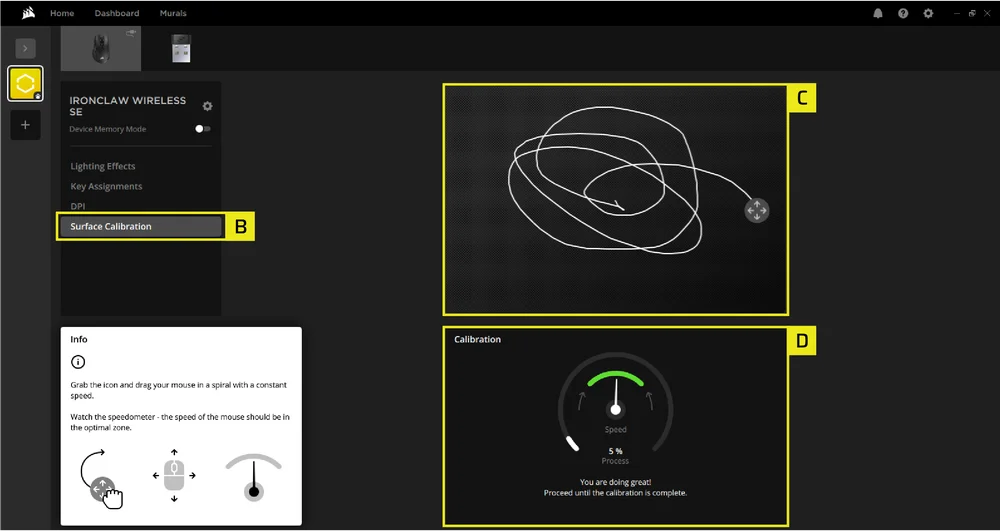
SURFACE CALIBRATION
- Connect the IRONCLAW WIRELESS SE to the computer using a USB Type-C cable.
- Click [Surface Calibration] in the left sidebar.
- Click and drag the circle/icon with your mouse, moving it in a spiral pattern.
- Keep the mouse's movement speed within the green area of the on-screen speedometer.
- Continue until the progress bar hits 100%, indicating successful calibration for your surface.
DEVICE SETTINGS
The Device Settings tab allows you to change advanced settings, adjust the polling rate, and update the firmware.

- Click [Device setting icon] in the left sidebar.
- Click Check for Updates to ensure you are running the latest device firmware.
- Device Settings.
-
- Polling Rate – Please make the adjustments in the SLIPSTREAM WIRELESS USB RECEIVER settings.

- Status / Battery – Wireless connectivity or battery status.

- Brightness – Change the brightness of the device’s RGB lighting.

- Sleep Mode – adjust time after mouse transitions to Sleep Mode

- Motion Sense Power Saving – Power saves when the sensor is not detecting any movement.
- Power Saving Mode – Enables power-saving optimizations.
- Show Battery Gauge in Notification area – Show the battery icon and status on OS notification area.

- Show Tutorial Tooltips – Turn on to go through the device tutorial again.
- Angle Snapping – Smooths out mouse movement via sensor prediction when ON.
- Lift Height – Sensor cut off height.
- Button Response Optimization – Optimizes debounce time.
- Polling Rate – Please make the adjustments in the SLIPSTREAM WIRELESS USB RECEIVER settings.
MOUSE STATUS AND INDICATIONS
Wireless connection and battery status are communicated through the MULTI-PURPOSE LED INDICATOR (K).
| BATTERY STATUS | MULTI-PURPOSE LED INDICATOR | ||
| LED #1 | LED #2 | LED #3 | |
| BATTERY CHARGING | PULSING GREEN | ||
| BATTERY CRITICAL, RECHARGE REQUIRED | PULSING RED | ||
| BATTERY LOW, RECHARGE SOON | BLINKING RED | ||
| BATTERY MEDIUM | BLINKING AMBER | ||
| BATTERY HIGH | BLINKING GREEN | ||
| BATTERY CHARGED | GREEN | ||
| WIRELESS STATUS | LED #1 | LED #2 | LED #3 |
| 2.4GHz WIRELESS MODE - PAIRING | BLINKING WHITE | ||
| 2.4GHz WIRELESS MODE - PAIRED | WHITE | ||
| 2.4GHz WIRELESS MODE- PAIRING FAILED | PULSING WHITE | ||
| BT WIRELESS MODE- PAIRING | BLINKING BLUE | ||
| BT WIRELESS MODE- PAIRED | BLUE | ||
| BT WIRELESS MODE - PAIRING FAILED | PULSING BLUE | ||
| DPI STAGE STATUS | LED #1 | LED #2 | LED #3 |
| STAGE #1 | CYAN | OFF | OFF |
| STAGE #2 | CYAN | CYAN | OFF |
| STAGE #3 | CYAN | CYAN | CYAN |
| ONBOARD PROFILE STATUS | LED #1 | LED #2 | LED #3 |
| PROFILE #1 | RED | OFF | OFF |
| PROFILE #2 | OFF | GREEN | OFF |
| PROFILE #3 | OFF | OFF | BLUE |
| BUTTON | DESCRIPTION | PROFILE #1 (DEFAULT) | PROFILE #2 | PROFILE #3 |
| A | LEFT MOUSE BUTTON | LEFT CLICK | LEFT CLICK | LEFT CLICK |
| B | RIGHT MOUSE BUTTON | RIGHT CLICK | RIGHT CLICK | RIGHT CLICK |
| C | SCROLL WHEEL | MIDDLE CLICK | MIDDLE CLICK | MIDDLE CLICK |
| D | PROFILE UP BUTTON | PROFILE UP | PROFILE UP | PROFILE UP |
| E | PROFILE DOWN BUTTON | PROFILE DOWN | PROFILE DOWN | PROFILE DOWN |
| F | DPI UP BUTTON | INCREASE DPI | INCREASE DPI | INCREASE DPI |
| G | DPI DOWN BUTTON | DECREASE DPI | DECREASE DPI | DECREASE DPI |
| H | FORWARD BUTTON | FORWARD | 1 | 1 |
| J | OPTION BUTTON ( G KEY) | G KEY | E | 2 |
| I | BACKWARD BUTTON | BACKWARD | 2 | 3 |
| DESCRIPTION | PROFILE #1 (DEFAULT) | PROFILE #2 | PROFILE #3 |
| DPI STAGE #1 | 800 DPI | 400 DPI | 800 DPI |
| DPI STAGE #2 | 1500 DPI (DEFAULT) | 800 DPI | 1500 DPI |
| DPI STAGE #3 | 3000 DPI | 1500 DPI | 3000 DPI |
BATTERY REMOVAL INFORMATION
This product uses a rechargeable battery and safety guidelines must be followed in the event that the product is disabled for disposal and recycling. To safely remove the battery for disposal and recycling, follow the numbered steps with the below diagrams.
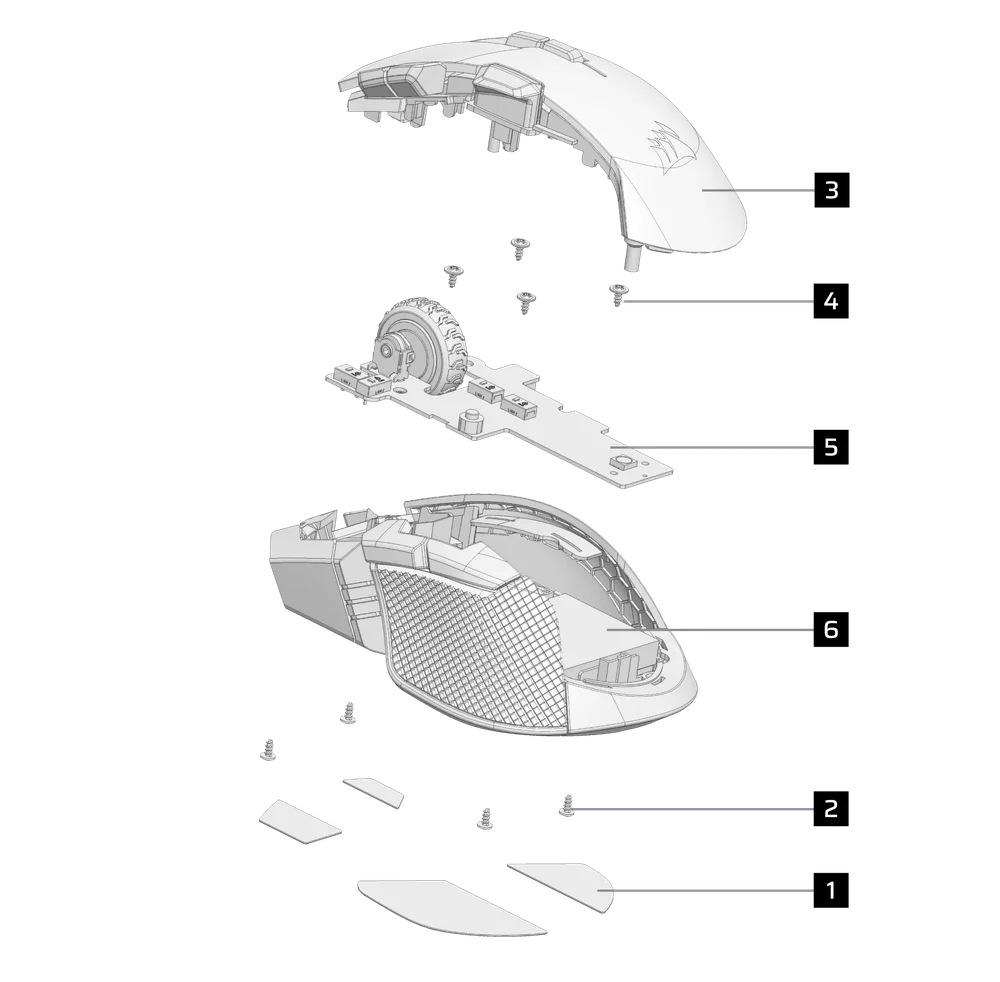
- Remove feet x4
- Disassemble PCB screw x4
- Disassemble top case sub assy
- Disassemble PCB screw x4
- Disassemble PCB
- Remove battery
CORSAIR MEMORY, Inc. encourages customers to recycle used electronic hardware and rechargeable batteries in accordance with local laws and regulations.
BATTERY INFORMATION
- M/N(型號): SH703448
- Capacity(電池容量): 3.7V, 1000mAh, 3.7Wh
- Scan QR code for battery details

Mouse
M/N(型號): RGP0188
Rating(電壓電流): 5V ![]() 0.8A
0.8A
Receiver
M/N(型號): RGP0146
Rating(電壓電流): 5V ![]() 0.1A
0.1A
FCC ID: 2AAFM-RGP0188(Mouse)
FCC ID: 2AAFM-RGP0146A(Receiver)
IC: 10954A-RGP0188 (Mouse)
IC: 10954A-RGP0146 (Receiver)

The power delivered by the charger must be between min 0.75 Watts required by the radio equipment, and max 3 Watts in order to achieve the maximum charging speed.
COPYRIGHT/LEGAL INFORMATION
©2026 CORSAIR MEMORY, Inc. All rights reserved. CORSAIR and the sails logo are registered trademarks of CORSAIR in the United States and/or other countries. All other trademarks are the property of their respective owners. Product may vary slightly from those pictured.


RELATED CONTENT