快速入門指南
MAKR PRO 75
霍爾效應 DIY 鍵盤
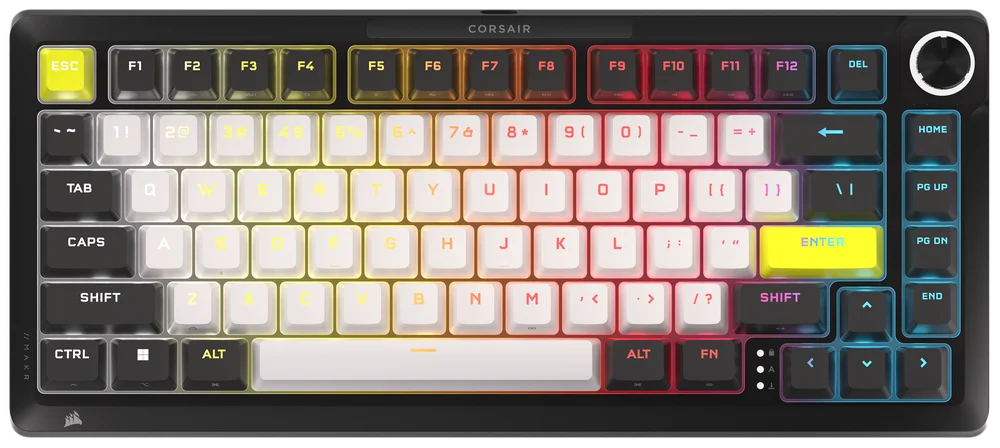
瞭解您的鍵盤
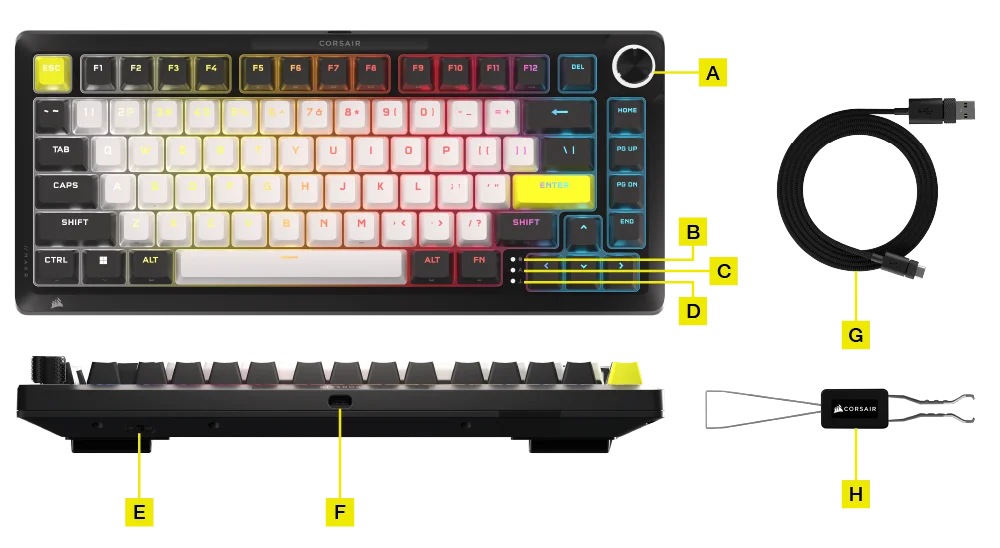
- 多功能旋鈕
- WINDOWS 鎖定指示燈
- CAPS LOCK 指示燈
- SCROLL LOCK 指示燈
- WIN/MAC 軸體
- USB TYPE-C 連接埠
- USB TYPE-C 轉 TYPE-A 纜線
- 2 合 1 按鈕軸體/鍵帽拔取器
可選附加模組:
- 無線模組
- LCD 模組
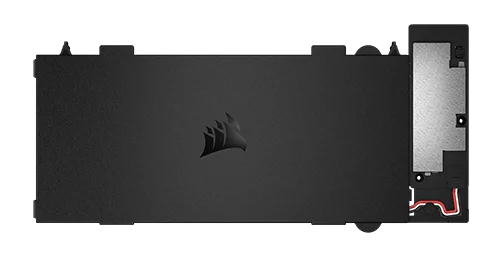
如何安裝無線模組
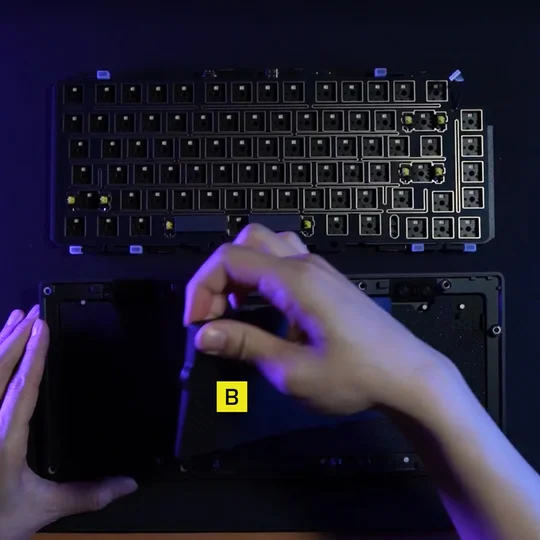
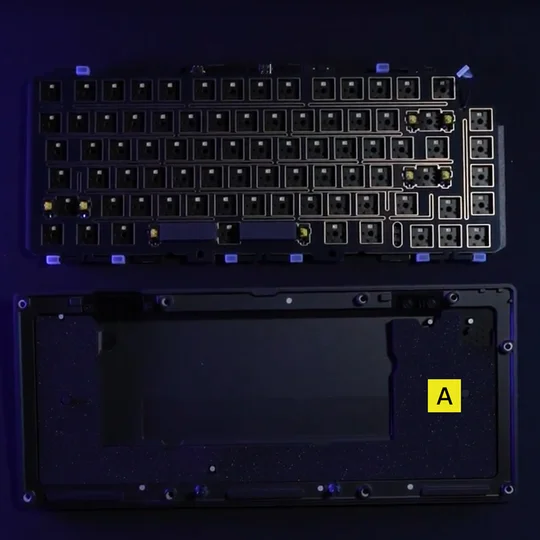
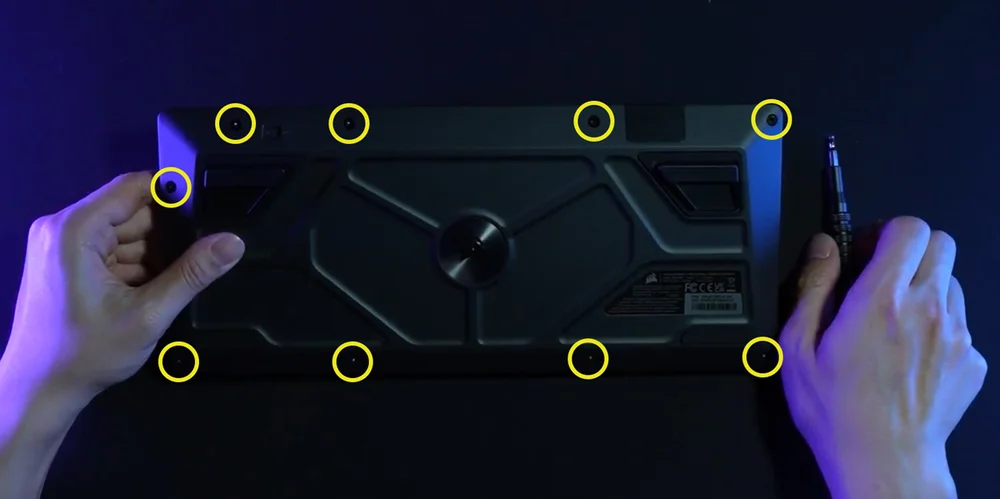
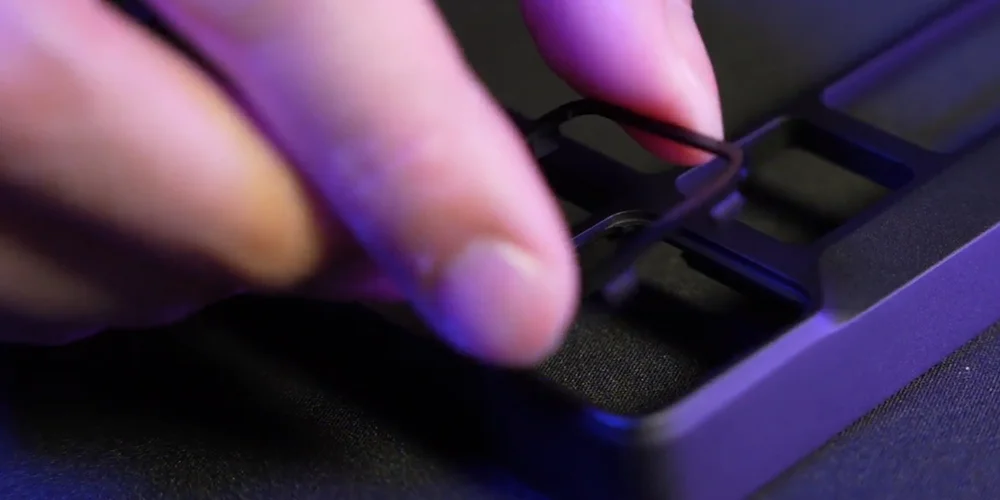
1.打開鍵盤後,取出除了帶有無線電池切口底層之外的所有內部組件。
注意:有線型號有一個橡膠墊(B),請將(B)取下,只留下電池切墊(A)。
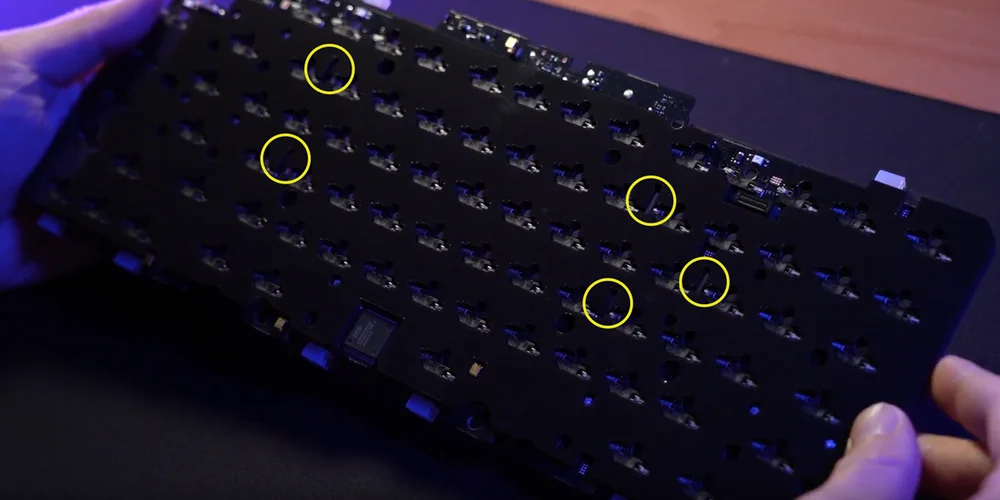
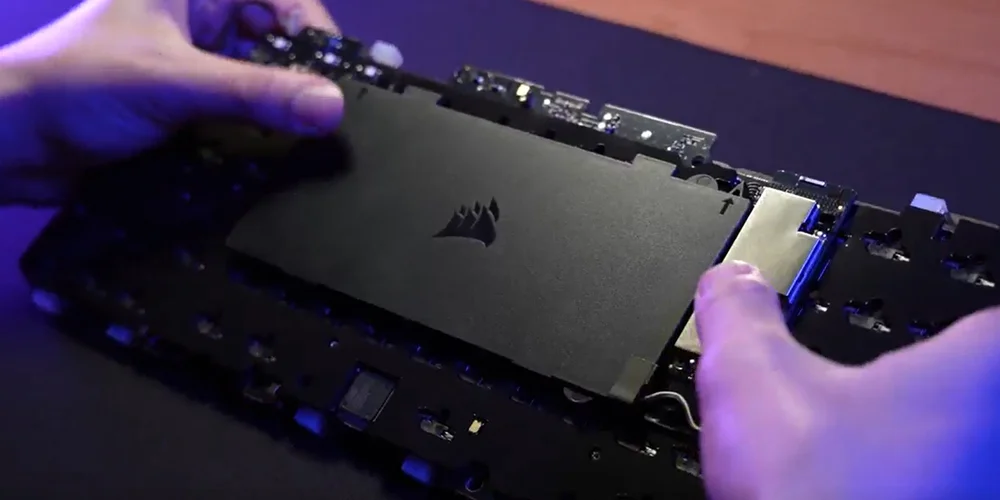
2.對齊塑膠插針與插座泡棉後側的相應插槽來安裝無線模組。有視覺指引可協助指導此過程。將塑膠插銷對齊後,對模組的四個角落施加一些壓力,直到它們卡入到位。
1
2
3
注意:
當您將無線模組連接至 PCB 時,請確保這兩個連接器已完全就位。(圖1)
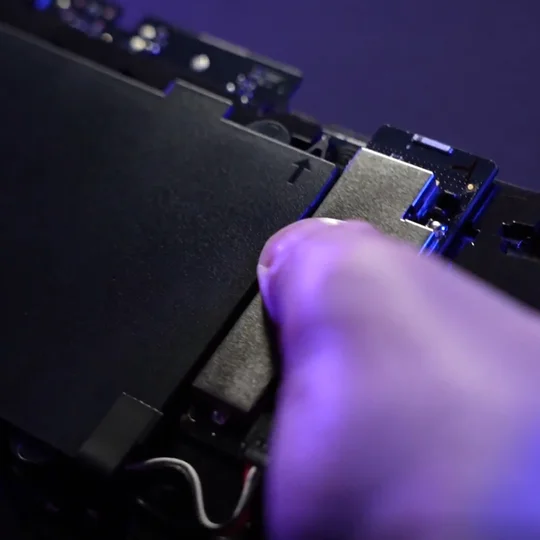
您可以輕輕按壓無線模組的銀色部分(圖 2)直到聽到喀嚓聲完成此操作。
若沒聽到喀嚓聲,請停止按壓並返回步驟 2,以確保所有塑膠銷都已對齊,然後再次按壓銀色部分。
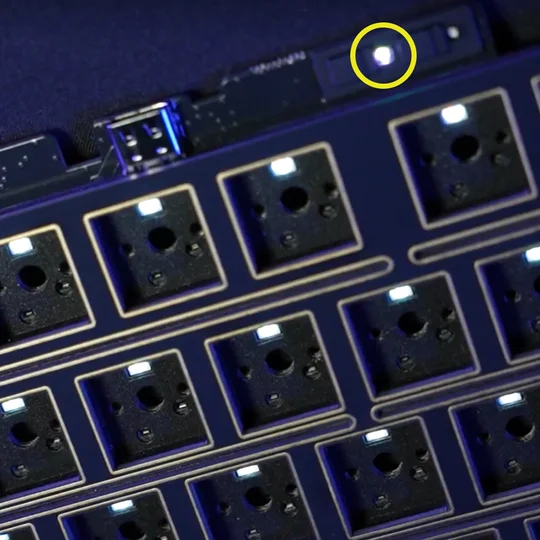
當無線模組安裝成功後,鍵盤通電時白色 LED 指示燈會亮起。(圖3)

1
2
3
3.將塑膠前額部分替換為「CORSAIR」字標  無線模組附帶新的塑膠按鈕蓋。
從左到右的正確安裝順序應為:
a.電源開啟/關閉
b.CORSAIR 字標
c.SLIPSTREAM 2.4GHz 按鈕
d.Bluetooth 按鈕
如何啟用無線連接
-
在 無線模組 安裝後,將電源開關滑動到開啟位置打開鍵盤。
-
按下無線按鈕切換到 SLIPSTREAM 無線 2.4GHz 模式。
電源開關切換至開啟/按住無線按鈕
按住即可開始進行 SLIPSTREAM 配對。
-
按下 BT 按鈕切換到藍牙模式。
按住開始藍牙配對。
電源開關滑至開啟/ 按下藍牙按鈕
如何安裝液晶顯示模組
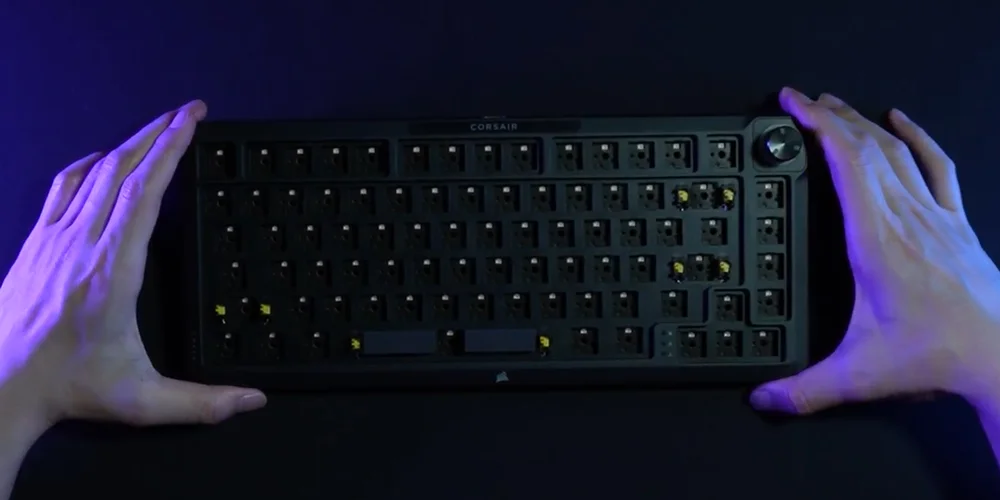
1.拆下旋鈕模組。
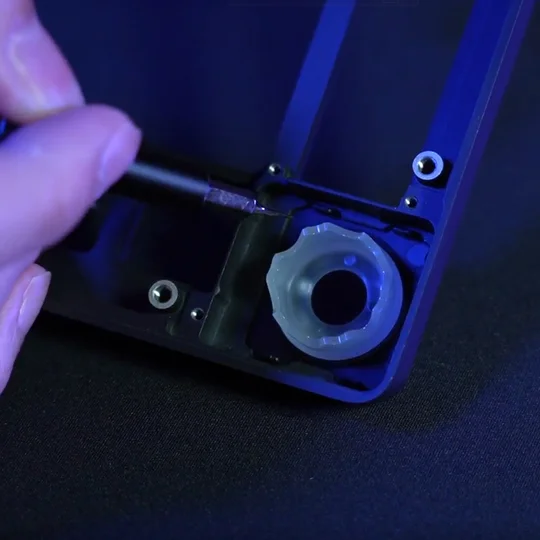
- 將套件翻轉過來,卸下外殼螺絲。
- 移除螺絲後,小心地將其翻轉過來,同時將外殼固定在一起,以防止任何部件掉落。
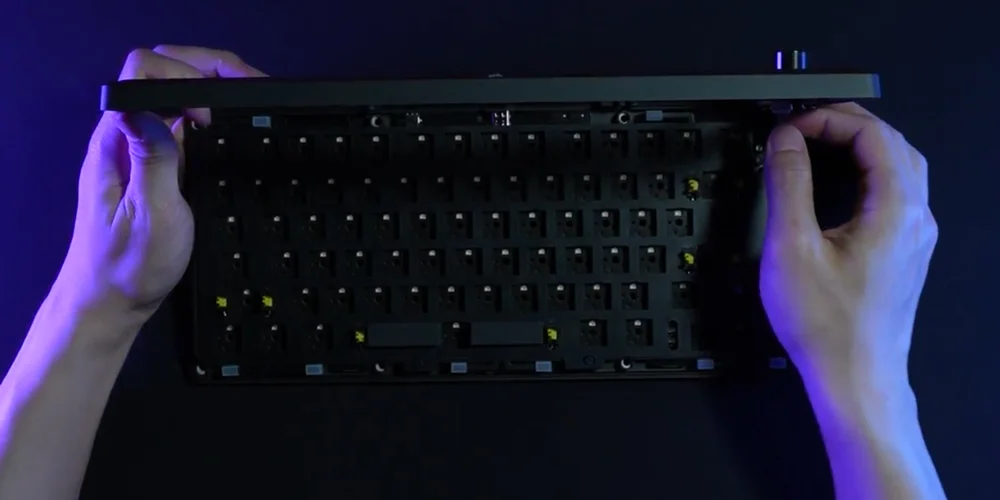
- 轉下轉盤。
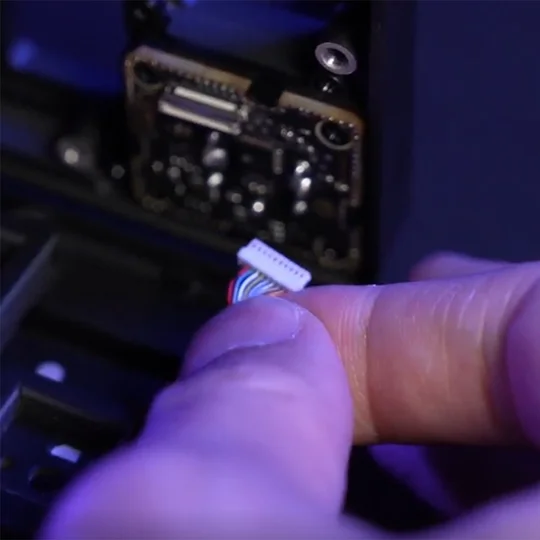
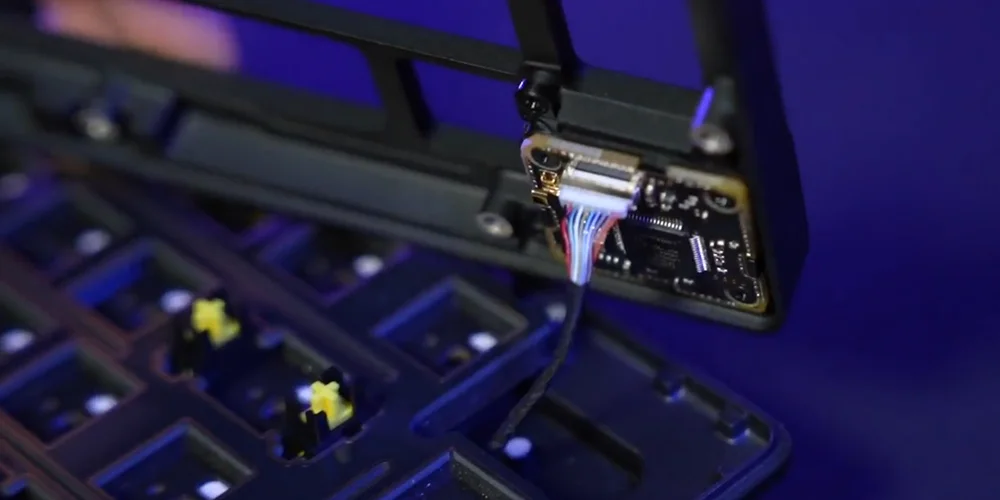
- 小心地向上抬起頂部外殼。將帶狀纜線從外殼上斷開。
1
2
3
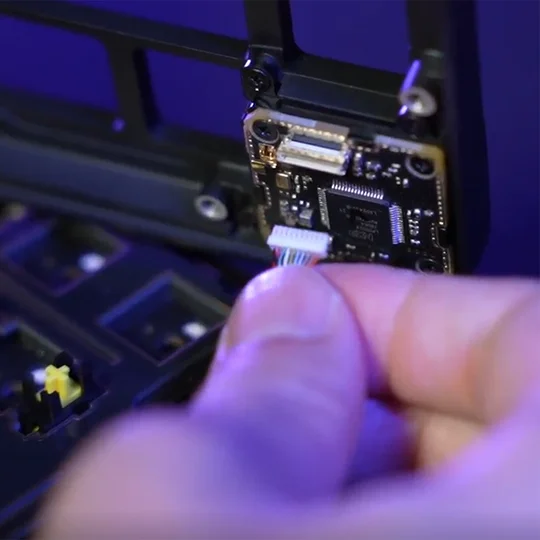
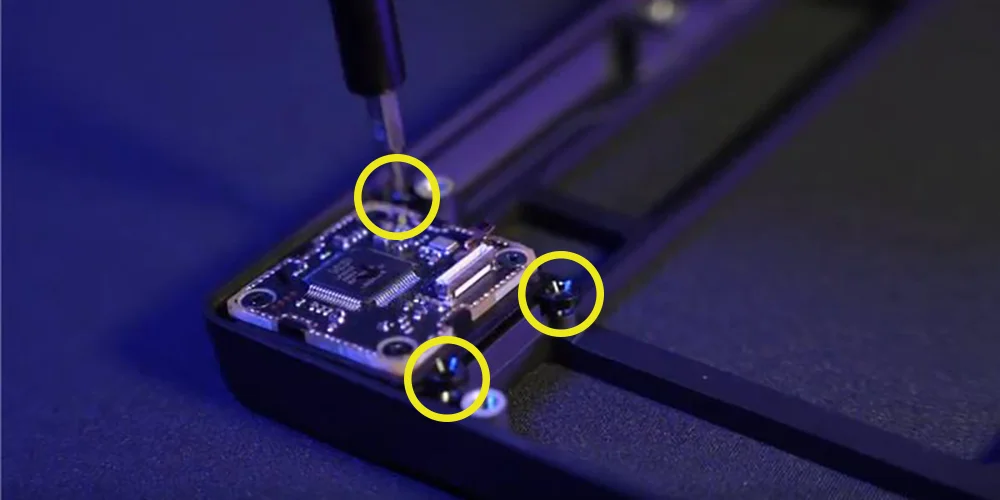
- 移除固定旋鈕模組的三顆螺絲。
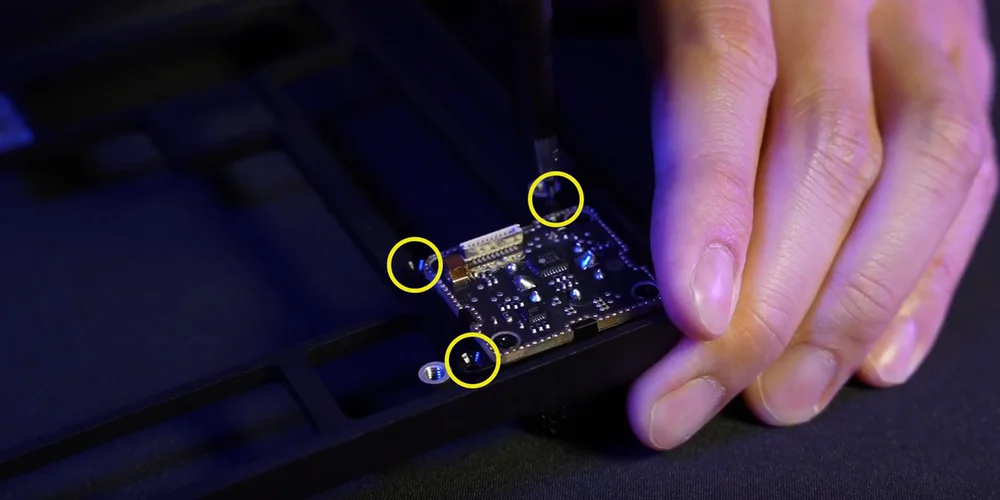
- 完全移除旋鈕模組並存放在安全處。
1
2
2.安裝LCD 模組
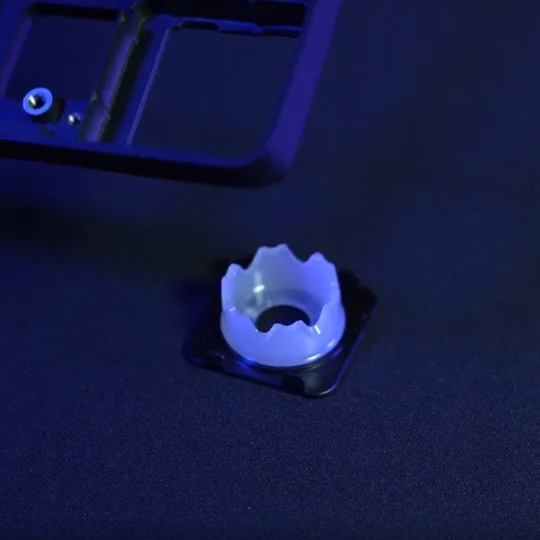
- 將環安裝到朝上的外殼上。(向後安裝將無法運作。)
- 將 LCD 翻轉到背面,並用三顆螺絲固定。
- 將帶狀纜線重新連接到頂部外殼。
技術規格
| 特點 | 說明 |
| 外型規格 | 75% |
| 頂蓋 | 全鋁 |
| 底部 | 全鋁 |
|
配色 |
蝕刻 |
|
吸音海綿 (由上至下) |
8 層
|
| 軸體板 | FR4(附矽膠墊圈) |
| 背光 | 個別 LED 亮光與全按鈕自定義設定 |
| LED 色彩 | RGB |
| 鍵帽 | PBT 雙色注塑 |
| 鍵盤軸體 |
CORSAIR MGX Hyperdrive 磁性預先潤滑鍵盤軸體,30 至 55g 觸發力道,0.1 至 4.0mm 啟動距離 (0.1mm 步進下),4.1mm 總行程,確保可進行 1 億 5000 萬次的按鍵敲擊 *為了獲得最佳精確度,建議範圍為 0.3mm-3.6mm。將驅動力設定在推薦範圍之外可能會導致靈敏度過高,並影響一致性。 |
| 連接能力 | USB Type-A |
| 矩陣圖 | 全鍵無衝突 (NKRO),100% 防鬼鍵 |
| USB 讀取速度 | 最多 8,000Hz 超輪詢 |
| 板載設定檔 | 預設:1,最多可有 5 個設定檔 |
| 媒體控制 | FN 快速鍵/旋鈕 |
| FlashTap (SOCD) |
FN + 右側 Shift iCUE UI CORSAIR 網路中心 |
| 亮度控制 | FN 快速鍵/旋鈕 |
| 可調整高度 | 是 |
| 隨插即用操作 | 是 |
| 遊戲主機相容性 | Xbox One、Xbox Series X|S、PlayStation 4、5 |
| 纜線 | 1.8 米/6 英尺,USB Type-C 轉 Type-A,可拆卸,黑色,防纏繞橡膠 |
| 尺寸 | 332(長)× 145(寬)× 50(高)毫米 |
| 重量 | 1.3 公斤 |
| 保固 | 兩年:適用當地國家/地區法規 |
可選附加模組
無線模組
| 尺寸 | 188.8(長)x 90.7(寬)x 11.9(高)毫米 |
| 重量 | 111.9g |
| 保固 | 兩年:適用當地國家/地區法規 |
| 電池規格 | 類型:內建鋰離子聚合物電池,可充電 |
|
電池續航力:
|
|
| 充電中:透過 USB 充電需要約 5 小時,取決於電池耗用與使用狀況 | |
| 設定:1S1P | |
| 數量:1 | |
| 電池:1 | |
| 型號#:2670155 | |
| 容量:4170mAh | |
| 尺寸:159(L) x 70.3(W) x 3.0(H) mm | |
| 尺寸 (含纜線):199(L) x 70.3(W) x 3.0(H) mm | |
| 重量:71g | |
| 鋰含量:1.251g | |
| HAZMAT UN #:UN3481 | |
| HAZMAT 說明:PI967 - 包含在設備中 |
LCD 模組
| 尺寸 | 1.3 英寸 |
| 解析度 | 240x240 解析度 |
| 尺寸 | 33.77 (L) x 36.26 (W) x 15.8(H) mm |
| 重量 | 13.5g |
| 圖片上傳規範 |
|
| 保固 | 兩年:適用當地國家/地區法規 |
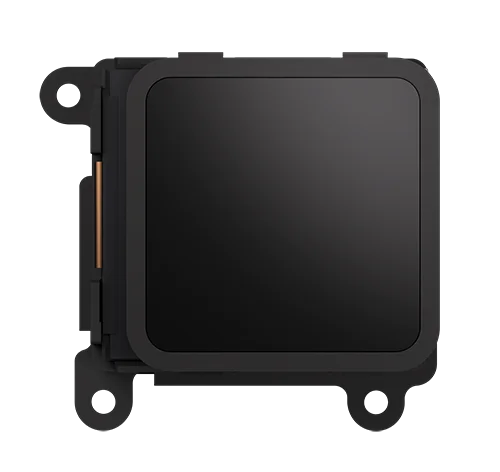
CORSAIR MGX HYPERDRIVE 磁性鍵盤軸體
CORSAIR MGX Hyperdrive 磁性機械軸體提供超級順滑、安靜且無晃動的打字手感,可編程檢測 0.1 毫米至 4.0 毫米* 範圍內的按鍵觸發距離,讓您完全控制每次按鍵的靈敏度,確保享受量身打造的遊戲與打字體驗。
*為了獲得最佳精確度,建議範圍為 0.3mm-3.6mm。將驅動力設定在推薦範圍之外可能會導致靈敏度過高,並影響一致性。

AXON 超處理技術
CORSAIR AXON 透過下列內容,提供強大且反應靈敏的鍵盤體驗:
- 超快速按鍵敲擊偵測和處理。
- 最高可達 8,000Hz 超輪詢率(可在 iCUE 和 CORSAIR 網路中心設備設定中進行調整)。
- 最多 20 層板載 RGB效果 (每個設定檔可在 iCUE 中程式化)。

設定您的鍵盤
| Windows PC | Apple Mac |
Microsoft Xbox One* Microsoft Xbox Series X | S* |
Sony PlayStation 4** Sony PlayStation 5** |
**請參閱連接到 Sony PlayStation 部分。
連接至 SONY PLAYSTATION
鍵盤也有特殊模式,用來支援可用快速鍵啟用的 Sony PlayStation 4 和 5。
| 快速鍵 | 功能 | 指示 |
| FN+ |
切換至 PlayStation 模式 | |
| FN+ |
切換回標準模式 |
注意:根據遊戲主機的支援和應用程式,可用功能可能受限。
透過無線模式連接(僅在安裝無線模組後可用)
當插入 USB 線纜時,裝置會自動切換到 USB 模式。
拔下 USB 線纜時,裝置將切換到上次使用的無線模式。
| 功能名稱 | 按鈕 | 功能 | 指示燈 | 指示燈/狀態 |
| USB 線纜 | 不適用 | 插入線纜時自動切換至 USB 模式。 | 無線按鈕 |
持續亮黃燈 |
| SLIPSTREAM Wireless | 無線按鈕 |
按下無線按鈕切換到 SLIPSTREAM 無線 2.4GHz 模式 | 無線按鈕 |
持續亮白燈:已連線 閃動白燈:未連接 |
| 按住無線按鈕開始配對* | 配對期間,白色指示燈快速閃爍 120 秒 | |||
| 藍牙 1 | 藍牙按鈕 |
|
藍牙按鈕 |
持續亮藍燈:已連線。 閃動藍燈:未連接
配對過程中快速閃爍藍光 120 秒 |
| 藍牙 2 | 藍牙按鈕 |
|||
| 藍牙 3 | 藍牙按鈕 |
*SLIPSTREAM 無線配對:您也可透過 iCUE 將加密狗與鍵盤配對。
步驟:找到加密狗頁面下黃色圓圈的配對按鈕。
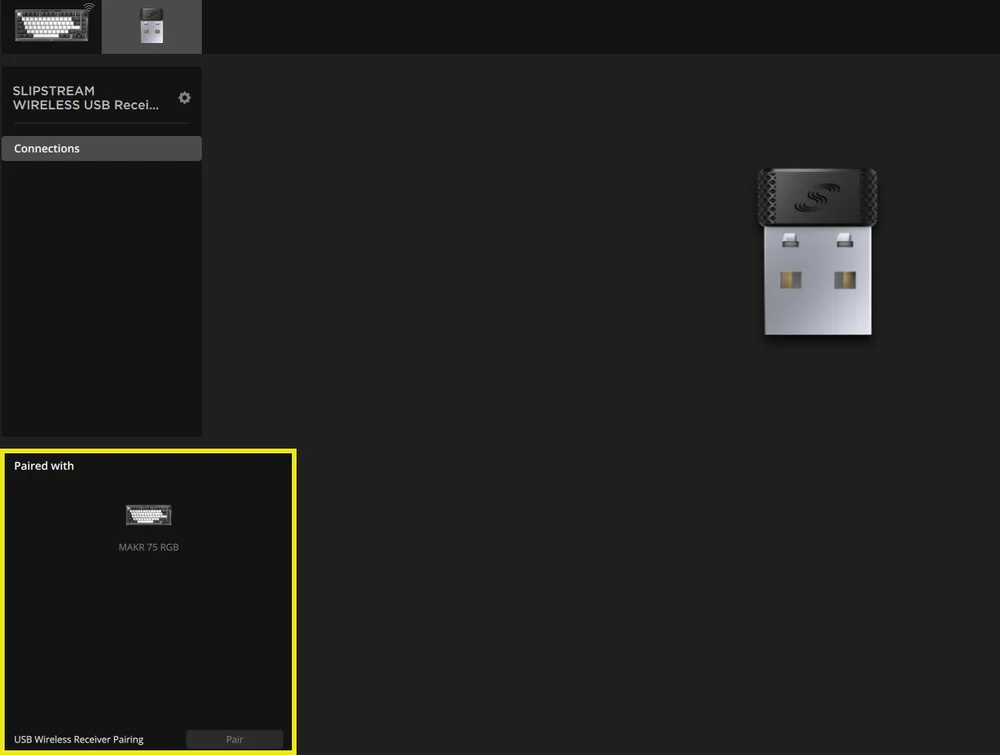
*若要完成配對至 SLIPSTREAM 無線轉接器,請在 iCUE 裝置設定中啟動轉接器配對。
充電中&電池續航力

| 功能名稱 | 按鈕 | 功能 | 指示 |
| 電池檢查 | FN + ESC |
按FN + Esc顯示電池電量顏色/效果Esc 鍵持續 3 秒。 |
電量嚴重不足:閃動紅燈(正在進行的事件) 低:閃爍紅燈 中等:閃爍琥珀燈 高:閃爍綠燈 已充飽電:持續亮綠燈 *插入 USB 線纜充電時,指示燈將持續閃爍綠色,直到充飽電。充飽電後,指示燈將轉變為穩定的綠色。 |
操作模式
此鍵盤有三種操作模式:
- 硬體 (HW) 模式 – iCUE 不執行或鍵盤連接至不支援 iCUE 的裝置時,鍵盤會以硬體模式操作,這使用儲存至板載儲存空間的設定檔和設定。
- 軟體 (SW) 模式 – 當 iCUE 在 PC 或 Mac 上運作時,鍵盤以軟體模式運作並由 iCUE 控制。
- 從以下位置下載 iCUE corsair.com/downloads並安裝在 Windows PC 或 Apple Mac 上,將所有 CORSAIR iCUE 相容產品連接到一個介面,從燈光到強大的巨集讓您完全控制。。

- 從以下位置下載 iCUE corsair.com/downloads並安裝在 Windows PC 或 Apple Mac 上,將所有 CORSAIR iCUE 相容產品連接到一個介面,從燈光到強大的巨集讓您完全控制。。
- 網頁模式 – 當 iCUE 未運行時,請前往CORSAIR 網路中心鏈接 https://corsair.com/web-hub,鍵盤以網頁模式運行,使用儲存到板載儲存的設定檔和設定。

| 功能 | 硬體 模式 | 網頁版 模式 | 軟體 模式 |
| 儲存&個人資料 | 1 個設定檔到 5 個設定檔 | 5 個設定檔 | 無限制 |
| 建立新設定檔 | 在 iCUE 中建立 | 在 CORSAIR 網路中心中創建 | 在 iCUE 中建立 |
| 建立 RGB 效果 | 在 iCUE 中建立 | 在 CORSAIR 網路中心中創建 | 在 iCUE 中建立 |
| 建立按鈕指派 | 在 iCUE 中建立 | 在 CORSAIR 網路中心中創建 | 在 iCUE 中建立 |
| 燈光層數上限 | 20 | 5 |
無限(有線模式) 20(無線模式) |
硬體概觀
FN 快速鍵燈光指示燈
按下 FN 鍵時,所有燈光將會短暫關閉,但獲指派次要功能和巨集的按鈕除外。這些按鍵的背光將會開啟。
- 預設顏色為白燈。
- 使用者可以在 iCUE 中自訂色彩指示燈。
目前使用的設定檔的色彩指示燈將優先於 FN 快捷方式照明。
硬體啟動設定 (表 A)
請確保在進行硬體啟動設定之前,iCUE 和 CORSAIR 網路中心都已關閉。
- 按住FN +右 Alt 鍵持續 2 秒鐘,直到ESC、F1-F12、4-0、-_ 和 =+ 按鈕以外的鍵盤燈光熄滅。
- 按下 ESC 和 F1-F12 中亮起的按鍵之一,即可將所有按鍵設定為該啟動距離。
- 所有類比按鍵(不包括 ESC、F1-F12、4-0、-_ 和 =+ 按鈕,但包括選取的按鍵)都會亮起呼吸燈(選定的顏色)。
- 按下同個敏感度按鈕,即可回復為目前的硬體模式設定。
| 按鈕 | ESC | F1 | F2 | F3 | F4 | F5 | F6 |
| 啟動距離 (mm) | 0.8 | 1.0 | 1.2 | 1.4 | 1.6 | 1.8 | 2.0 (預設) |
| 顏色 | 白色 | 橘 | 琥珀色 | 黃色 | 綠色 | 藍綠 | 卡普里藍 |
| 按鈕 | F7 | F8 | F9 | F10 | F11 | F12 |
| 啟動距離 (mm) | 2.2 | 2.4 | 2.6 | 2.8 | 3.0 | 3.2 |
| 顏色 | 藍 | 靛 | 紫 | 紫 | 洋紅燈 | 紅 |
- 按FN + 右 Alt 鍵退出並測試您的新設定。
| 遊戲 (增進回應) | 多用途 (平衡) | 打字 (增進精確性) |
| 1.0mm | 2.0mm (預設) | 3.0mm |
在 iCUE 的軟體模式下,您可以獲得更強大的控制功能,以 0.1 毫米增量進一步微調啟動設置,範圍從 0.1 毫米到 4.0 毫米*,可以按配置文件保存,或可指派動作至連發組合或進階步行移動的輔助啟動。
*為獲得最佳精確度,建議範圍為 0.3 毫米-3.6 毫米。將驅動力設定在推薦範圍之外可能會導致靈敏度過高,並影響一致性。
硬體快速觸發動作設定(表 B)
請確保在進行硬體啟動設定之前,iCUE 和 CORSAIR 網路中心都已關閉。
- 按住FN +右 Alt 鍵持續 2 秒鐘,直到 ESC、F1-F12、4-0、-_ 和 =+ 按鈕以外的鍵鍵盤燈光熄滅。
- 按下 4 -0、-_ 和 =+ 鍵中亮起的鍵之一,即可將快速觸發作用點設定套用至所有鍵。
- 按下同個敏感度按鈕,即可回復為目前的硬體模式設定。
| 按鈕 | 4 | 5 | 6 | 7 | 8 | 9 | 0 | -_ | =+ |
| 啟動距離 (mm) | 0.4 | 0.5 | 0.6 |
0.7 |
0.8 | 0.9 | 1.0 (預設) | 1.1 | 1.2 |
| 顏色 | 琥珀色 | 黃色 | 綠色 | 藍綠 | 卡普里藍 | 藍 | 紫 | 洋紅燈 | 紅 |
- 按FN +右 Alt 鍵退出並測試您的新設定。
硬體校準
對於驅動點不再存在的特殊情況,您可以使用這款獨特的硬體校準工具。
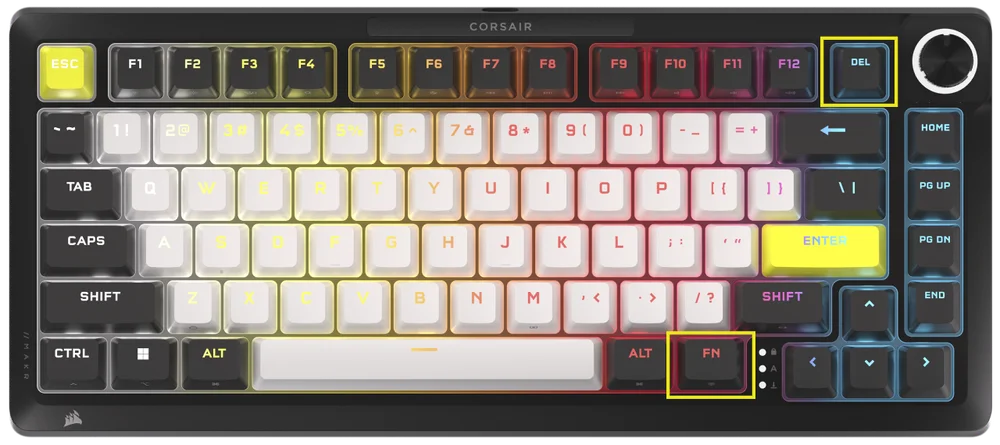
請確保在進行硬體啟動設定之前,iCUE 和 Corsair 網路中心都已關閉。
-
按住FN + Delete 持續 2 秒鐘進入校準模式
-
所有按鍵均亮起持續亮白燈, FN 鍵亮起持續亮綠燈
-
按住您想要校準的任何鍵
a.FN 鍵和按住播放鍵 持續亮紅燈 校準時
b.FN 鍵和按住播放鍵 持續亮藍燈 校準完成後
-
放開要校準的鍵
a.FN 鍵和按住播放鍵 持續亮綠燈 校準完成後
- 按住FN 2 秒即可退出校準模式並重設設備
旋鈕功能
按住旋鈕 2 秒鐘即可循環切換撥號模式。
旋鈕環將顯示與目前撥號模式相對應的顏色。當前旋鈕模式模式不會因電源循環而改變。
| 模式 | LED 色彩 | LED 指示燈 | 轉動 | 按下 |
| 音量 | 白色 | 持續亮燈 |
|
靜音/取消靜音 |
| 媒體控制 | 藍 | 持續亮燈 |
|
播放/暫停 |
| 燈光 | 藍綠 | LED 燈根據亮度 % 亮起 |
|
開啟 (100%)/關閉 (0%) |
| 巨集錄製 | 紅 |
空閒狀態:脈衝紅光 錄音狀態:閃爍紅光 錄製結束:快速閃爍紅燈 清除狀態:快速閃爍紅燈 |
不適用 | 開始巨集錄製 |
| 曲目快轉 | 綠色 | 持續亮燈 |
Windows
Mac OS 蘋果音樂:
Mac OS Spotify:
|
不適用 |
| 切換應用程式 | 萊姆 | 持續亮燈 |
|
|
| 垂直滾動 | 橘 | 持續亮燈 |
|
Ctrl+ END |
| 水平捲動 | 黃色 | 持續亮燈 |
|
Ctrl+ END |
| 縮放 | 紫 | 持續亮燈 |
|
還原 為 預設 縮放 動作 |
| iCUE 自訂操作 | 使用者定義 | 持續亮燈 |
|
動作 1 |
標準快速鍵
以下所有功能均假定按住 FN 鍵,按下後即啟動操作,除非另行說明。
| 按鈕 | 功能 |
螢幕指示器 (倘若安裝了 LCD) |
備註 |
| FN + ESC | 電池檢查 | 否 | 若無線模組則無法運作。 |
| FN + F1 | 降低螢幕亮度 | 是 | |
| FN + F2 | 增加螢幕亮度 | 是 | |
| FN + F3 | 切換 Windows 的任務檢視 | 否 | macOS:任務控制 |
| FN + F4 | 啟動檔案總管 | 否 | macOS:聚焦搜尋 |
| FN + F5 | 以 10% 的增量降低鍵盤 LED 亮度 | 是 | macOS:聽寫/Siri |
| FN + F6 |
以 10% 的增量增加鍵盤 LED 亮度 |
是 | macOS:勿擾 |
| FN + F7 | 上一個媒體曲目 | 是 | |
| FN + F8 | 播放/暫停媒體曲目 | 是 | |
| FN + F9 | 下一個媒體曲目 | 是 | |
| FN + F10 | 靜音/取消靜音 | 是 | |
| FN + F11 | 以 2% 的增量降低音量 | 是 | |
| FN + F12 | 以 2% 的增量增加音量 | 是 | |
| FN + S | 切換 Scroll Lock 開關 | 是 | macOS:無功能 |
| FN + Z | 循環設定檔 | 是 | 除非被覆蓋,否則自我指示設定檔的關鍵顏色為純色 5 秒 |
| FN + C | 循環切換板載燈光效果 | 是 | 按住 2 秒可重設為板載效果 |
| FN + V | 循環燈光效果方向設置 | 是 | |
| FN + B | 循環切換燈光效果速度設定 | 是 | |
| FN + M | 進入巨集錄製模式 | 是 | 需要按住2秒 |
| FN + Win | 將 Win 鎖定切換為開啟和關閉 | 是 | |
| FN + 右側 Shift | 切換 FlashTap 開關 | 否 | |
| FN + 左 | 在螢幕使用者介面中向左移動 | 否 | 若無螢幕模組則無法運作。 |
| FN + 右 | 在螢幕使用者介面中向右移動 | 否 | |
| FN + ENTER | 啟動螢幕元素 | 否 |
巨集錄製
- 進入巨集錄製模式
- 按住 FN + M 鍵 2 秒,或在巨集錄製模式下按住旋鈕(LED 顏色顯示紅色)
- 指示燈 M 鍵閃爍紅光
- 若有旋鈕或螢幕,也應該播放其巨集錄製指示
- 按下任何一系列標準按鈕開始錄音
- 這也包括 FN + 按鍵命令(基於韌體/軟體限制)等快速鍵,如 FN + S 被記錄為滾動鎖定
- 只能錄製標準鍵盤功能,無法鍵製特殊或板載功能等如
- 滑鼠游標
- 設定檔
- 背光效果
- 亮度
- 媒體
- 音量
- Win 鎖定
- 只能錄製標準鍵盤功能,無法鍵製特殊或板載功能等如
- 延誤也會被記錄
- 指示燈:指示燈 M 鍵(和旋鈕,如果有的話)閃爍紅色
- 這也包括 FN + 按鍵命令(基於韌體/軟體限制)等快速鍵,如 FN + S 被記錄為滾動鎖定
- 按下 FN + M 鍵 2 秒鐘或按下旋鈕停止錄製,並準備儲存或清除巨集。
- 多次按下此按鈕不會產生附加功能
- 指示燈:指示燈 M 鍵(和旋鈕,如果有的話)快速閃爍紅色
- 按任意鍵,FN + 鍵
- 若錄製按鈕: 按下該按鈕或組合可儲存巨集
- 如果沒有記錄按鍵:按下該鍵或組合鍵將清除已儲存的任何巨集或功能
- 如果有通常綁定到該組合的韌體快捷方式,則會恢復
- 除非無法透過這些按鈕或按鈕組合錄製:
- FN
- FN + M
- FN + ESC
- FN + Windows
- 指示:已指派巨集的組合鍵迅速閃爍紅燈
- 注意:指示顏色預設為紅色,使用者可變更。
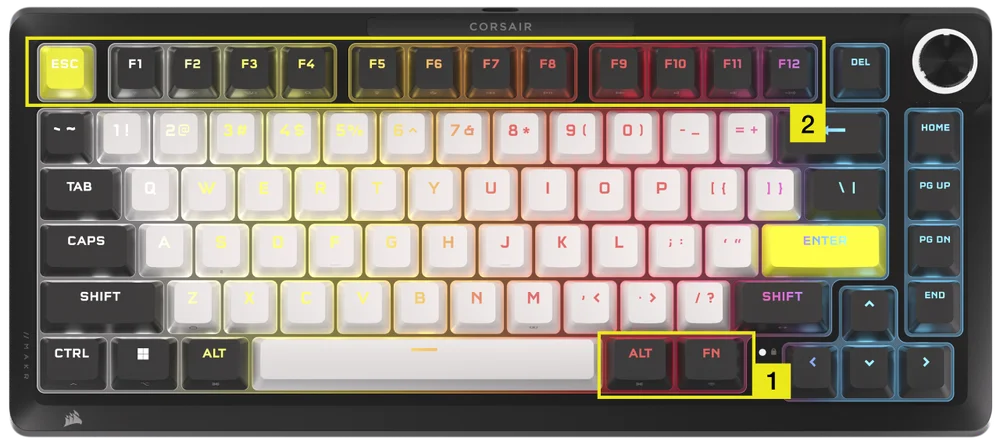
FLASHTAP (SOCD)
FlashTap 是革命性的技術,讓玩家完全掌控移動按鍵,尤其是向左和向右鍵,對每一種遊戲和類型最佳化 SOCD 行為。
在硬體模式、iCUE 和 CORSAIR 網路中心中,FlashTap 預設將會被停用。
硬體模式行為
- 不依賴配置文件,透過快速鍵啟用:FN + 右側 SHIFT
- 支援 A + D 鍵,僅最後優先
- 指示燈當 FlashTap 開啟時,A&D 保持琥珀色持續亮燈(覆蓋現有燈光)
iCUE & Corsair 網路中心行為(請參閱 iCUE& CORSAIR 網路中心部分以了解更多詳細資訊)
- 支援進階功能如模式選擇和按鍵重新映射等
- 可透過設定檔設定
- 模式選擇相關細節
|
最後優先 (開啟時的預設) |
永遠輸出最後指示並繞過其他指示 |
| 中性 | 若同時觸發兩個指示,則沒有輸出 |
| 第一優先 | 永遠輸出第一個指示並繞過其他指示 |
軟體概觀
CORSAIR 網路中心
CORSAIR 網路中心是一款輕量級的網路實用程序,用於自訂您的 MAKR PRO 75 鍵盤。功能強大、易於使用,且不需要安裝任何額外的軟體。在這裡試試看: https://corsair.com/web-hub

首次開啟 CORSAIR 網路中心時,您會看到 MAKR PRO 75 的裝置名稱。點擊它將顯示開始程式化的選項:
- RGB 效果
- 按鈕指派
- 多功能按鈕
- 按鈕啟動
- 旋鈕
- FlashTap
- Key Calibration
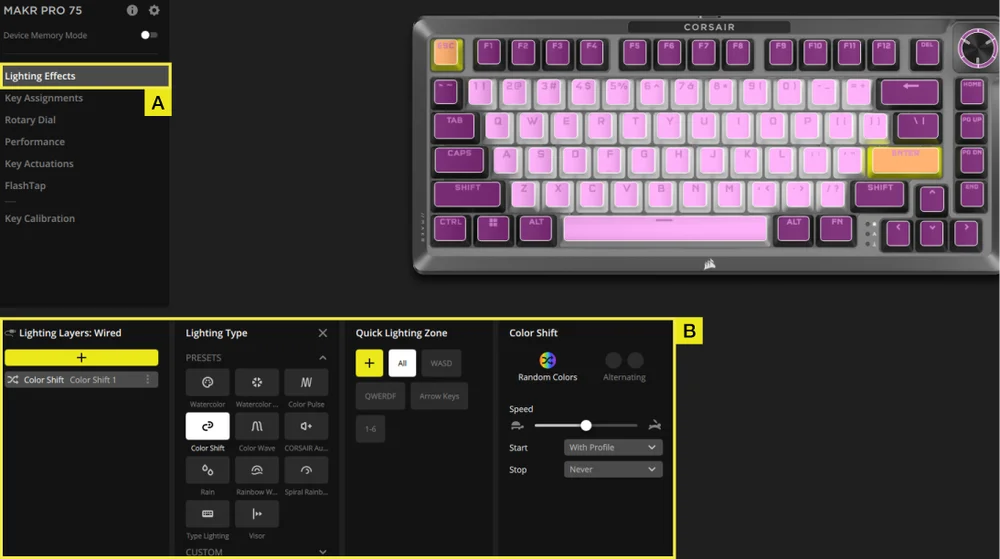
RGB 效果
「RGB 效果」索引標籤可讓您程式化 RGB 效果。
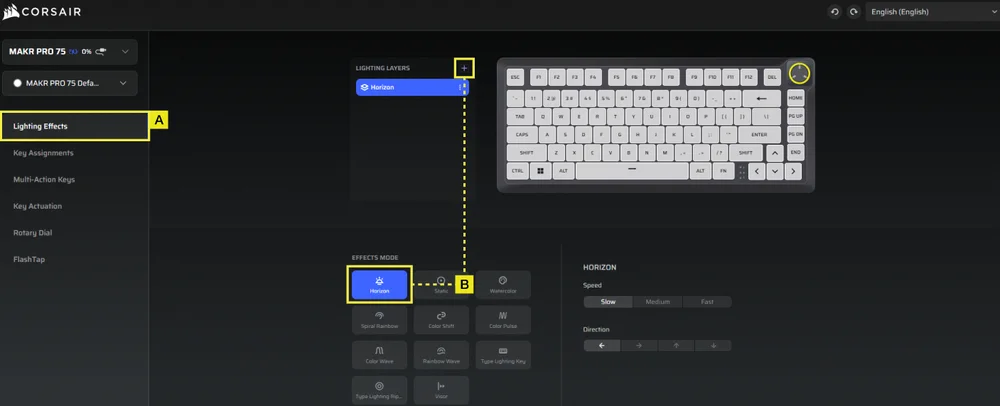
A.選擇「燈光效果」標籤。
B.點選 + 即可依喜好設定燈光層數。
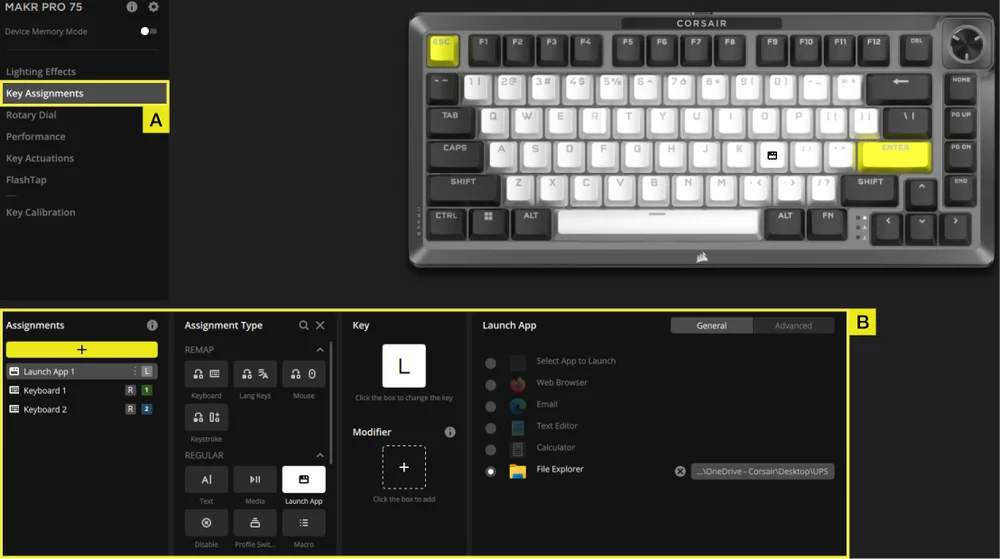
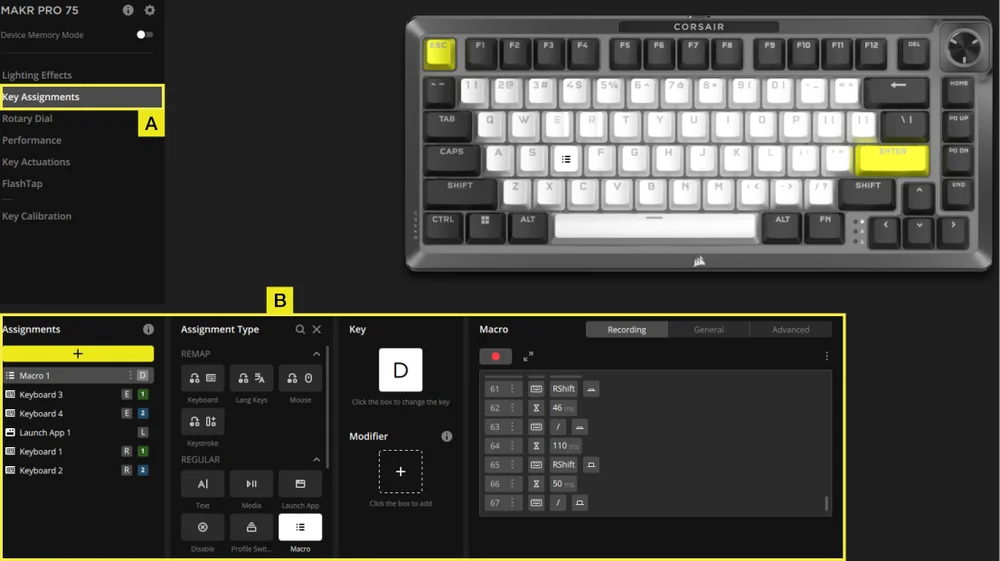
按鍵指派
「按鈕指派」索引標籤可讓您輕鬆重新對應按鈕,或為按鈕指派新功能。
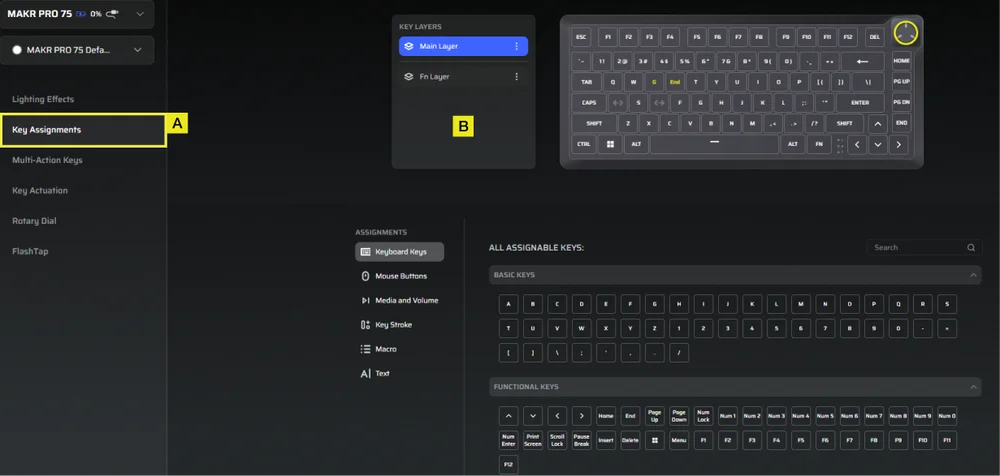
A.選擇「按鈕指派」標籤。
B.選擇主層或 FN 層中的按鈕,並將其指派給選單中列出的任何功能。
多功能按鈕
「多功能按鈕」標籤可讓您啟用輔助觸發點,從而實現進階的二合一按鍵組合。
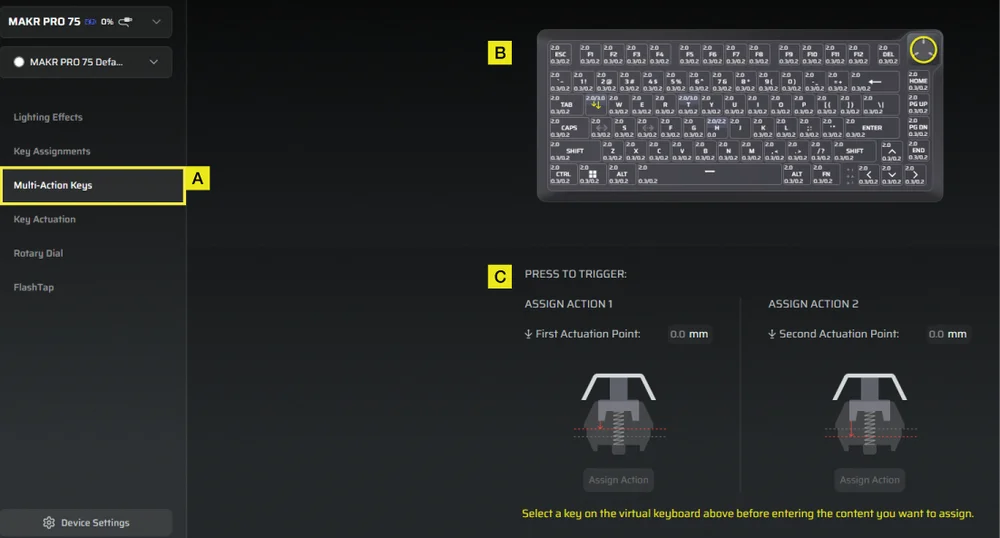
A.選擇「多功能按鈕」標籤。
B.選擇要套用此設定的按鈕。
C.調整動作 1 和動作 2 的觸發點。接下來,開啟每個面板的「分配操作」面板,選擇您喜歡的功能。
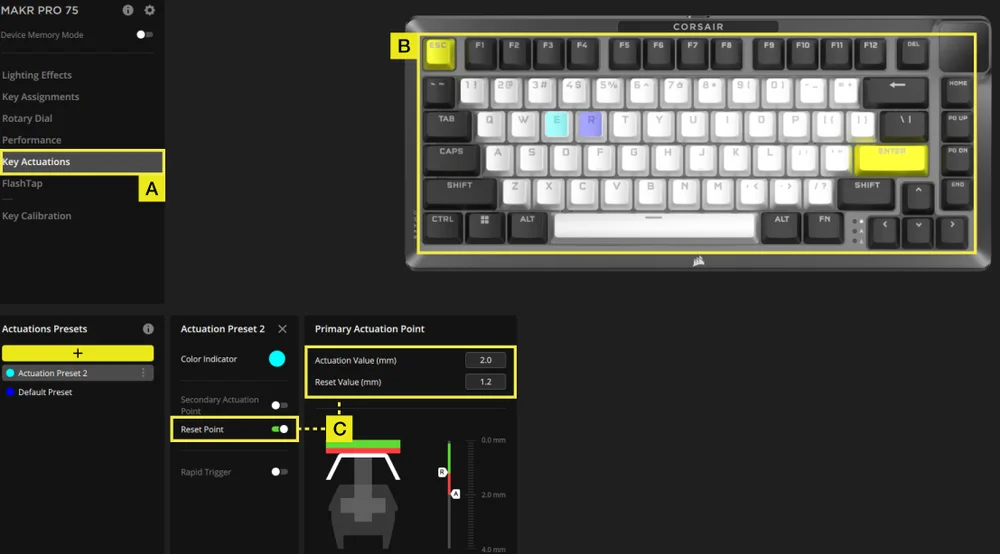
按鈕啟動
在「按鈕啟動」標籤中,您可以調整啟動點。預設為 2.0 毫米,您可以調整的範圍為 0.1 毫米至 4.0 毫米。這裡您還可以找到快速觸發設置,該設置允許動態更改啟動點和重置點。
*為獲得最佳精確度,建議範圍為 0.3 毫米-3.6 毫米。將驅動力設定在推薦範圍之外可能會導致靈敏度過高,並影響一致性。
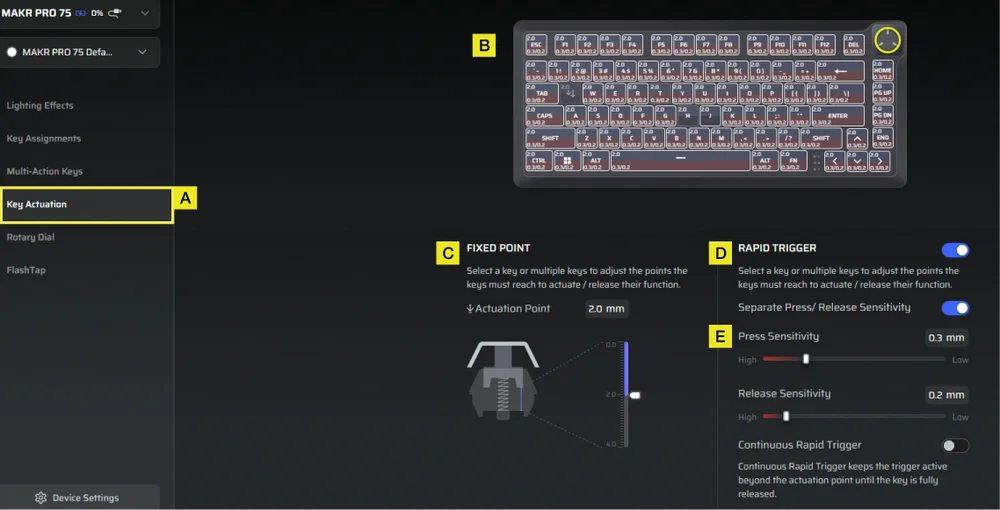
A.選擇「按鈕啟動」標籤。
B.選擇按鈕以調整其啟動行為。
C.在固定點下,設定啟動點。
D.開啟快速觸發(預設為關閉)功能,可獨立調整按下和釋放點的靈敏度。
E.使用滑桿微調按下靈敏度和釋放靈敏度,或啟用連續快速觸發以實現更快的重複輸入。
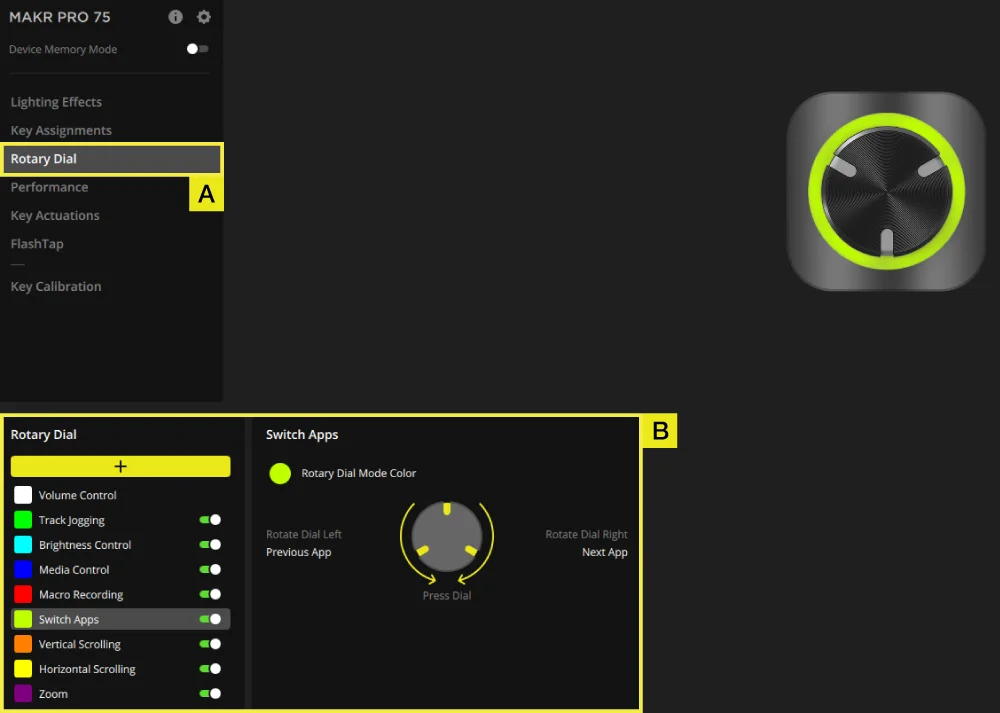
旋鈕
「旋鈕」標籤可讓您選擇所需的模式。
預設為所有模式開啟。

A.選擇「旋鈕」標籤。
B.選擇旋鈕模式。
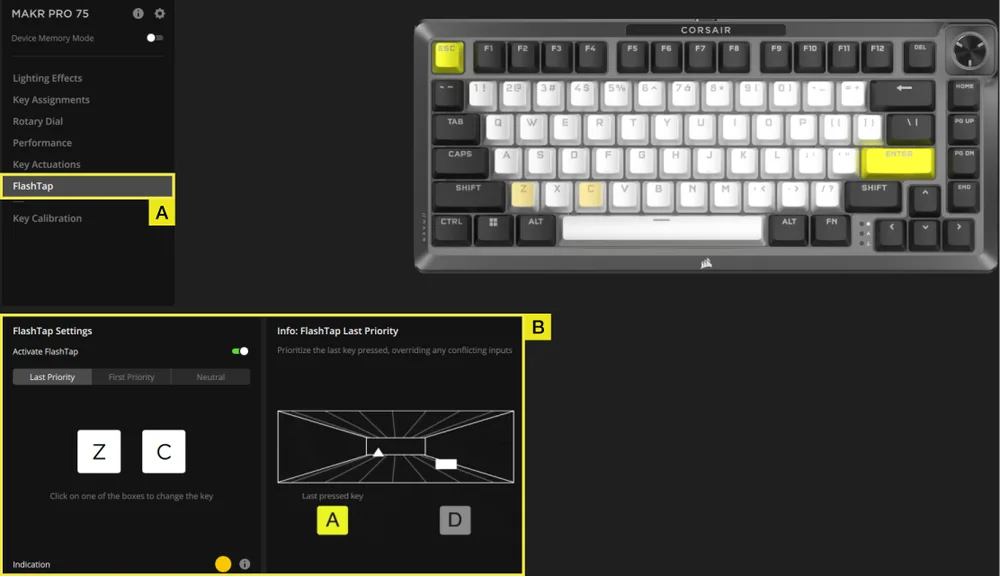
FLASHTAP (SOCD)
FlashTap (SOCD) 標籤可讓您在三種不同的設定之間進行選擇,並指派特定的鍵對以支援 FlashTap。
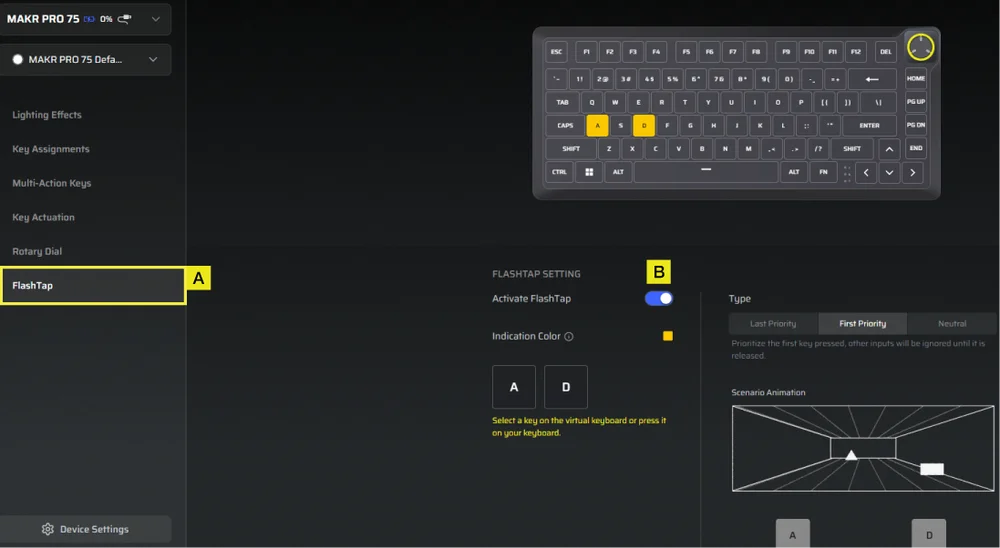
A.選擇「 FlashTap 」標籤。
B.開啟 FlashTap(預設為關閉),然後選擇您喜歡的設定並根據需要指派兩個按鈕。
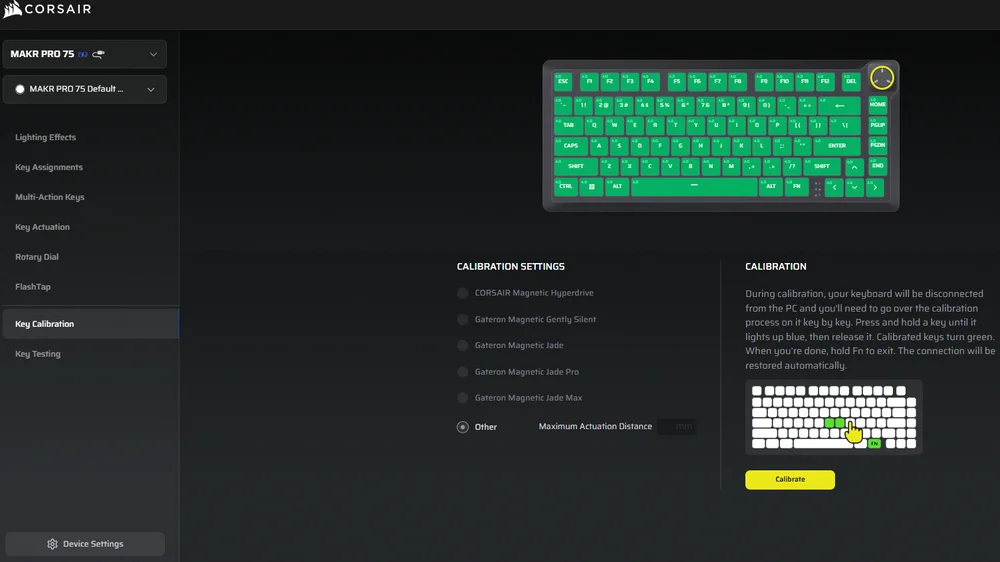
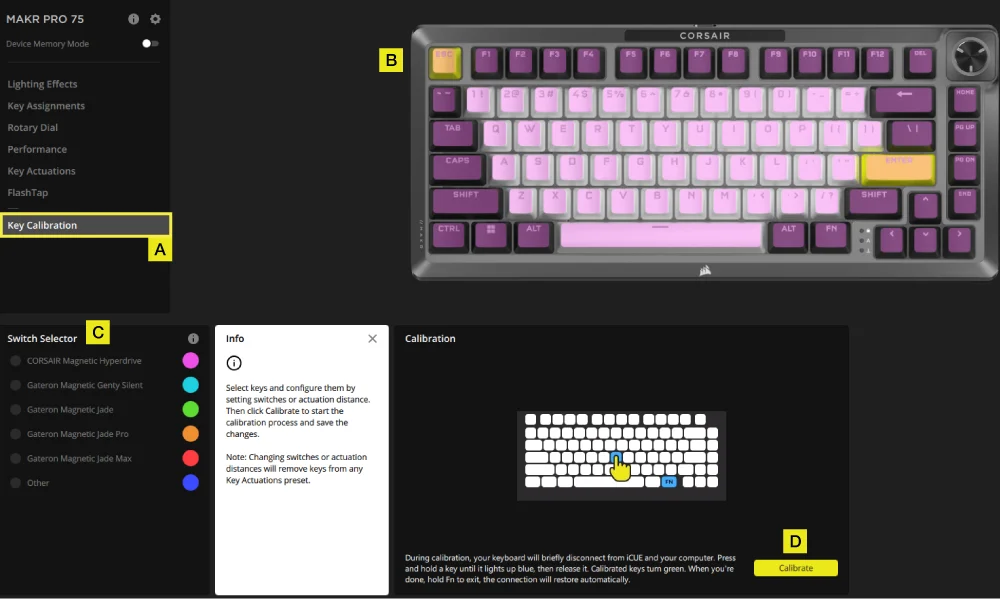
KEY CALIBRATION
The Key Calibration tab allows you to calibrate the magnetic switches listed in the Calibration Settings panel.
(See instruction video: https://youtu.be/pVrzB89FWBw)
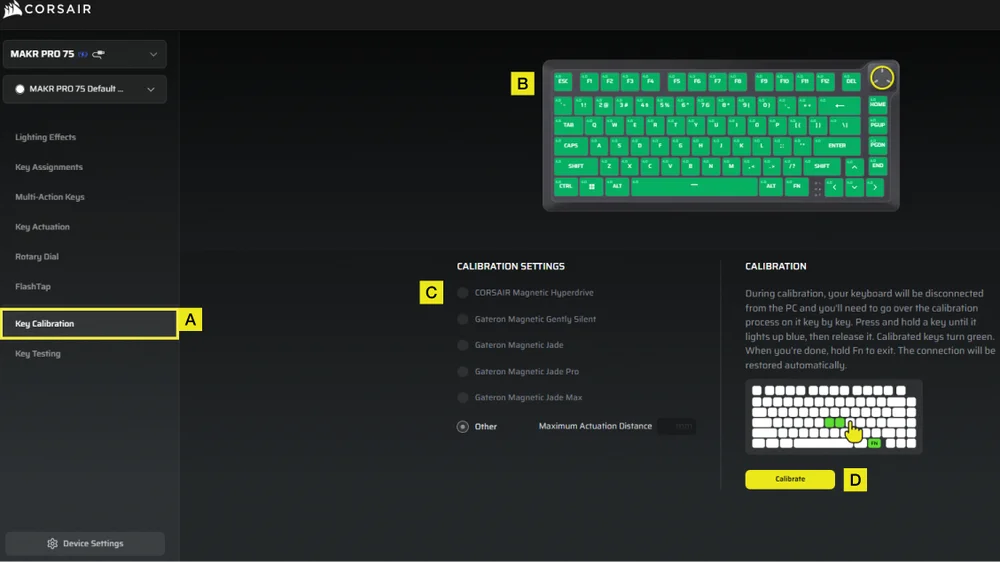
A. Choose Key Calibration tab.
B. Select the keys you want to calibrate.
C. The switch types in the “Calibration Settings” will highlight for selection. Choose the switch type installed on those keys.
D. Click the Calibrate button.
E. The keyboard will temporarily disconnect from the PC, which will bring you to the portal page. During this process, follow the steps below to complete calibration
- Hold a key until that key and the FN key turn solid blue, then release the key.
- The FN key and the hold key will turn solid green once calibration is complete.
- Hold the FN key for 2 seconds to exit calibration mode and reset device- you will see the boot-up animation.
- After the calibration process completes, you will be returned to the calibration page.
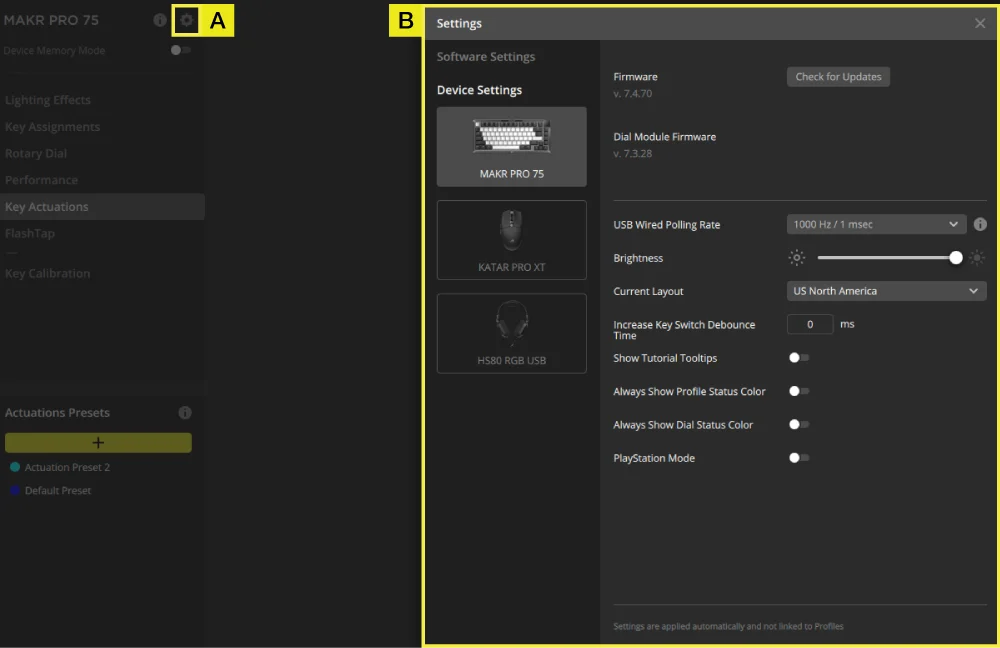
裝置設定
「裝置設定」索引標籤可讓您變更進階設定、調整輪詢速率和更新韌體。
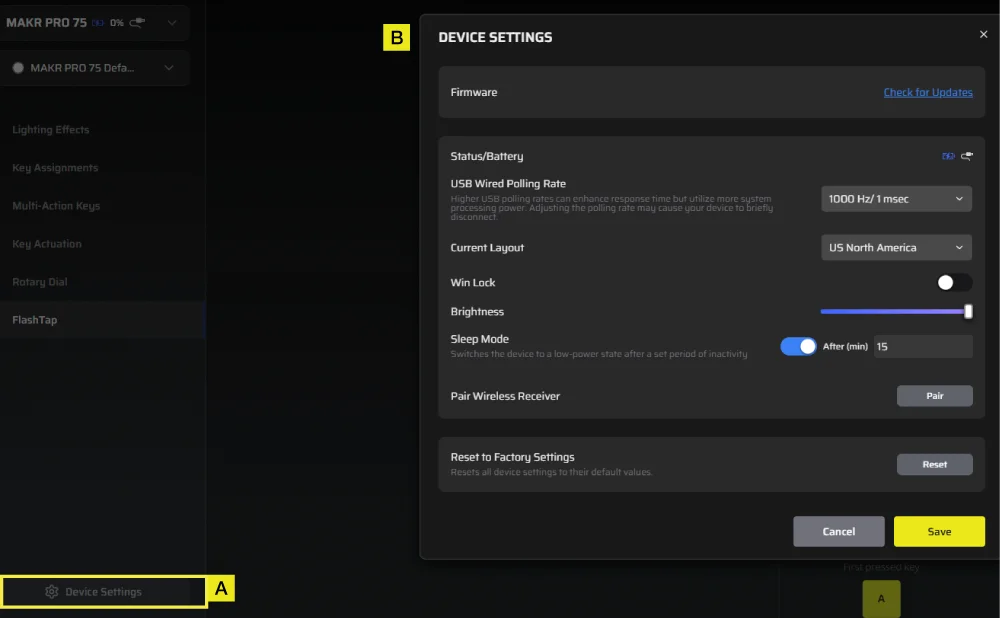
A.點選「裝置設定」標籤。
B.更改進階設定(輪詢率、亮度等)。
iCUE 首頁與裝置畫面

首次開啟 iCUE 時,您會看到 MAKR PRO 75 的新裝置圖塊。點擊設備圖塊將顯示開始程式化的選項:
- RGB 效果
- 按鈕指派
- 旋鈕
- 效能
- 按鈕啟動
- FlashTap
- Key Calibration
若您在 iCUE 視窗中看見更新通知,請按一下以將韌體更新為最新版本。
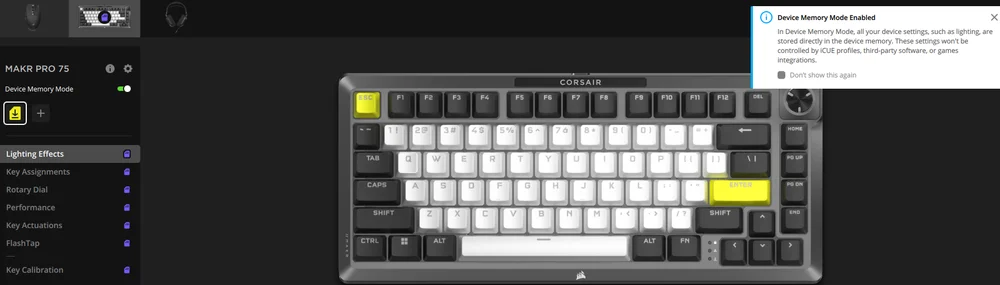
裝置記憶體模式
在開始程式設計之前,請注意每個 iCUE 系統設定檔都有兩組設定:軟體模式和裝置記憶體模式。
裝置記憶體模式選單可讓您指派功能,將其儲存至鍵盤板載記憶體,並在硬體模式下播放。
| 功能 |
裝置記憶體模式
|
軟體模式
|
| 儲存&個人資料 | 1MB 可儲存最多 5 個設定檔 | 無限制 |
| 特點 |
|
|
| 儲存方式 |
手動儲存
|
自動 |
| 燈光層數上限 | 20 |
無限制 |


RGB 效果
「RGB 效果」索引標籤可讓您程式化 RGB 效果。
A.選擇「燈光效果」標籤。
B.在燈光圖層下,點選 [ + ] 即可依喜好設定燈光。
按鍵指派
「按鈕指派」索引標籤可讓您輕鬆重新對應按鈕,或為按鈕指派新功能。
A.選擇「按鈕指派」標籤。
B.在「按鍵分配」下,點選 [ + ] 重新對應按鍵或指派新功能。
旋鈕
「旋鈕」標籤可讓您選擇所需的模式。
預設為所有模式開啟。
A.選擇「旋鈕」標籤。
B.切換所需模式的開啟和關閉。
效能
「效能」索引標籤可讓您啟用/停用快速鍵,以及自訂指示燈顏色。
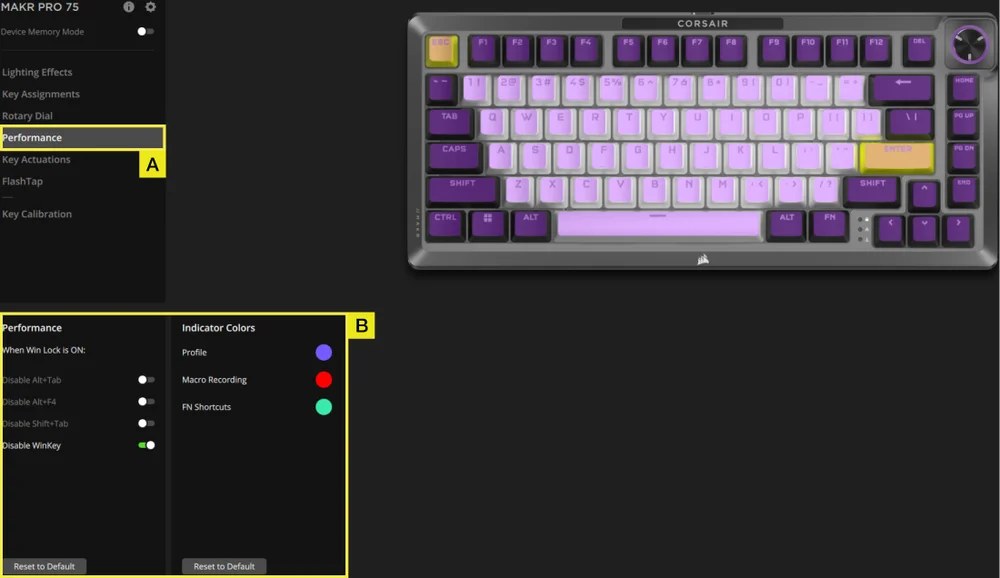
A.選擇「旋鈕」標籤。
B.啟用/停用快速鍵或根據喜好自訂指示器顏色。
按鈕啟動
在「按鈕啟動」標籤中,您可以調整啟動點。預設為 2.0 毫米,您可以調整的範圍為 0.1 毫米至 4.0 毫米。在這裡,您還可以找到啟用輔助啟動點的設置,從而實現高級的二合一按鍵組合;以及快速觸發設置,該設置允許動態更改觸發點和重置點。
*為獲得最佳精確度,建議範圍為 0.3 毫米-3.6 毫米。將驅動力設定在推薦範圍之外可能會導致靈敏度過高,並影響一致性。
A.選擇「按鈕啟動」標籤。
B.選擇要套用此設定的按鈕。
C.在「啟動預設」下,按一下 [ + ] 以 0.1 毫米為步進調整啟動值(預設值:2 毫米),切換重設點(預設值為關閉)以 0.1 毫米為步進調整重設值(預設值:1.9 毫米)。
兩項操作設定
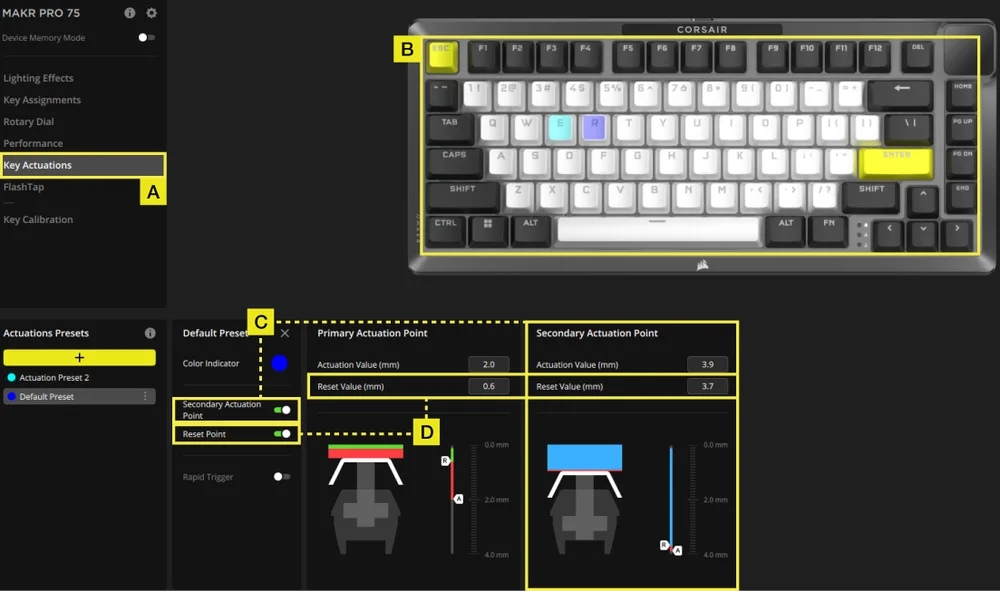
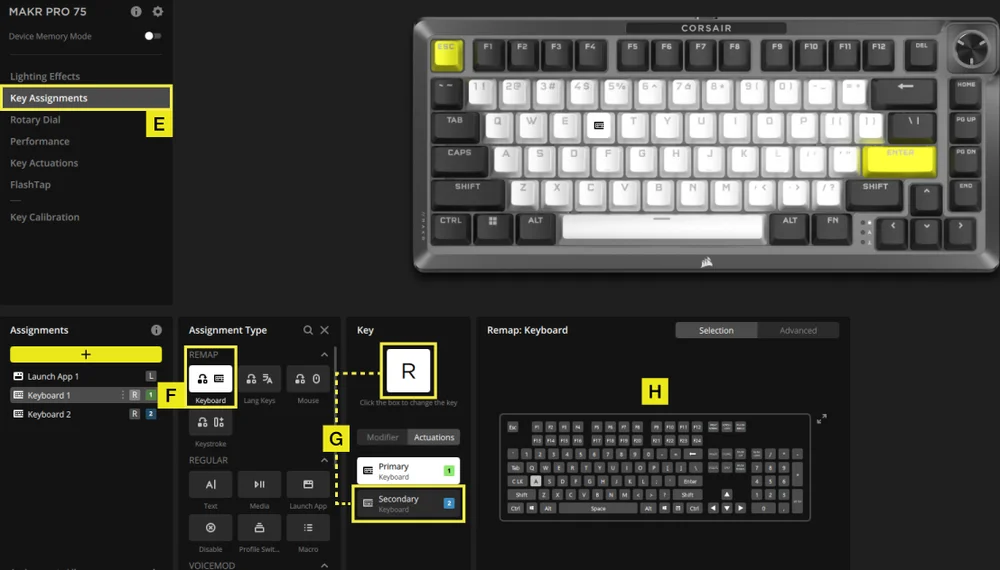
A.選擇「按鈕啟動」標籤。
B.選擇要套用此設定的按鈕。
C.切換第二個啟動點(預設為關閉)以 0.1 毫米為步長調整第二個啟動值(預設值:3.5 毫米)。
D.切換重設點(預設為關閉)以 0.1mm 的步長調整重設值(主驅動預設值:1.9mm;輔助驅動預設值:3.4mm)。
E.前往「按鈕指派」標籤。
F.在任務類型選單中,選擇重新映射。
G.選擇具有兩個已指派啟動的按鈕,然後在「啟動」標籤下選擇輔助啟動。
H.選擇包含您要指派的啟動按鈕。
RAPID TRIGGER 設定
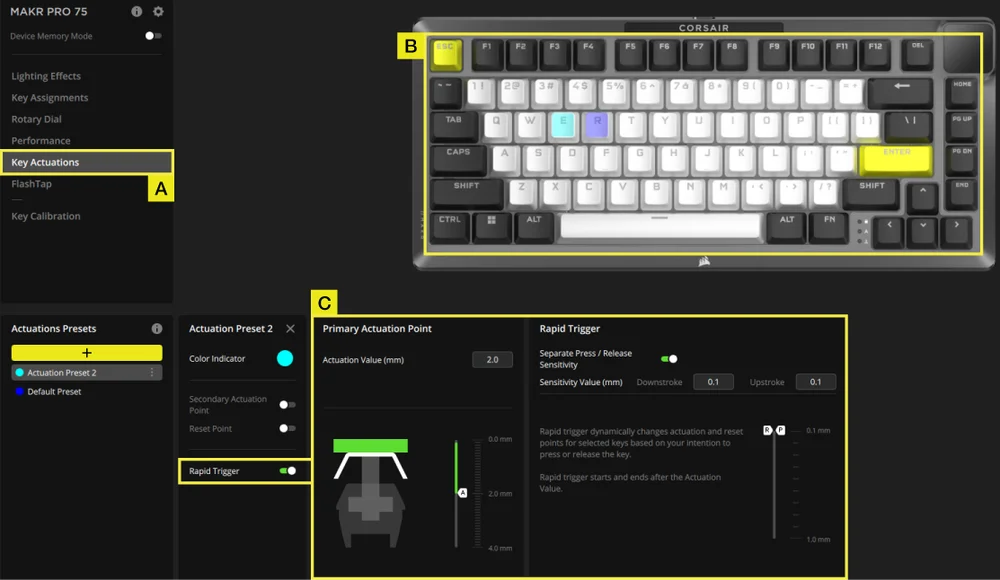
A.選擇「按鈕啟動」標籤。
B.選擇要套用此設定的按鈕。
C.開啟快速觸發功能(預設為關閉)。開啟/關閉單獨的按壓/釋放靈敏度調整功能(預設為關閉),以調整下行程&上行程值(預設值:0.1毫米)
以下是如何配置啟動點以最佳方式處理各種場景的範例。我們強烈建議使用者進行調整和實驗,以找到最適合自己喜好的設定。
| 用途 | 啟動值 | 優點 |
| 電競遊戲 | 1.0mm | 支援更快且更為靈敏的輸入。 |
| 一般用途 | 2.0mm (預設) | 在速度和精準度之間取得完美平衡。此為預設值。 |
| 打字 | 3.0mm | 降低意外按下按鍵的機率。 |
FLASHTAP (SOCD)
FlashTap (SOCD) 標籤可讓您在三種不同的設定之間進行選擇,並指派特定的鍵對以支援 FlashTap。
A.選擇「 FlashTap 」標籤。
B.開啟 FlashTap(預設為關閉),然後選擇您喜歡的設定並根據需要指派兩個按鈕。
KEY CALIBRATION
The Key Calibration tab allows you to calibrate the magnetic switches listed in the Calibration Settings panel.
(See instruction video: https://youtu.be/wbyFtZx3KEE)
A. Choose Key Calibration tab.
B. Select the keys you want to calibrate.
C. The switch types in the Switch Selector will highlight for selection. Choose the switch type installed on those keys.
D. Click the Calibrate button.
E. The keyboard will temporarily disconnect from the PC, which will bring you to the portal page where the MAKR PRO 75 device panel will not be visible. Follow the steps below to complete calibration:
- Hold a key until that key and the FN key turn solid blue, then release the key.
- The FN key and the hold key will turn solid green once calibration is complete.
- Hold the FN key for 2 seconds to exit calibration mode and reset device- you will see the boot-up animation.
- After calibration is finished, the MAKR PRO 75 will reappear in the device panel.
裝置設定
「裝置設定」索引標籤可讓您變更進階設定、調整輪詢速率和更新韌體。
A.點擊設定圖示。
B.更改進階設定(輪詢率、亮度等)。
巨集錄製
可在 iCUE 和 CORSAIR 網路中心中程式化。
iCUE

CORSAIR 網路中心
A.選擇「按鈕指派」標籤。
B.點選分配類型「巨集」,重新對應按鍵後開始巨集錄製。
原廠重設
按住 ESC 鍵,同時拔出並插入 USB Type-C 纜線,兩秒鐘後放開 ESC 鍵。鍵盤將會開啟,並恢復原廠預設值。
版權 / 法務資訊
KDB 996369 D03 OEM Manual rule sections:
2.2 List of applicable FCC rules
This module has been tested for compliance to FCC Part 15.247, 15.249
2.3 Summarize the specific operational use conditions
The module is evaluated for compliance to standalone portable RF exposure use condition. Any other usage conditions such as colocation with other transmitter(s) will need a separate reassessment through a class II permissive change application or new certification
2.4 Limited module procedures
Not applicable.
2.6 RF exposure considerations
This equipment complies with FCC portable radiation exposure limits set forth for an uncontrolled environment. Further RF exposure reduction can be achieved if the product can be kept as far as possible from the user body.
2.7 Antennas
The following antennas have been certified for use with this module; antennas of the same type with equal or lower gain may also be used with this module, except as described below.
| Antenna Manufacturer | Unictron Technologies Corp. |
| Antenna Model | CW801S |
| Antenna Type | Chip Antenna |
| Antenna Gain (dBi) | -4.07 |
| Antenna Connector | N/A |
2.8 Label and compliance information
The final end product must be labeled in a visible area with the following: “Contains FCC ID: 2AAFM-RGP0175. The grantee's FCC ID can be used only when all FCC compliance requirements are met.
The OEM integrator has to be aware not to provide information to the end user regarding how to install or remove this RF module in the user’s manual of the end product which integrates this module.
The end product user manual shall include all required regulatory information/warning as shown in this manual.
2.9 Information on test modes and additional testing requirements
This transmitter is evaluated for compliance in a standalone portable RF exposure condition and any co-located or simultaneous transmission with other transmitter(s) will require a separate class II permissive change re-evaluation or new certification.
2.10 Additional testing, Part 15 Subpart B disclaimer
This transmitter module is tested as a subsystem and its certification does not cover the FCC Part 15 Subpart B (unintentional radiator) rule requirement applicable to the final host. The final host will still need to be reassessed for compliance to this portion of rule requirements if applicable.
OEM/Host manufacturers are ultimately responsible for the compliance of the Host and Module. The final product must be reassessed against all the essential requirements of the FCC rule such as FCC Part 15 Subpart B before it can be placed on the US market. This includes reassessing the transmitter module for compliance with the Radio and EMF essential requirements of the FCC rules. This module must not be incorporated into any other device or system without retesting for compliance as multi-radio and combined equipment.
As long as all conditions above are met, further transmitter test will not be required. However, the OEM integrator is still responsible for testing their end-product for any additional compliance requirements required with this module installed.
2.11 Note EMI Considerations
Please follow the guidance provided for host manufacturers in KDB publications 996369 D02 and D04.
2.12 How to make changes
Only Grantees are permitted to make permissive changes. Please contact us should the host integrator expect the module to be used differently than as granted: help.corsair.com
IMPORTANT NOTE: In the event that these conditions cannot be met (for example certain laptop configurations or co-location with another transmitter), then the FCC authorization is no longer considered valid and the FCC ID cannot be used on the final product. In these circumstances, the OEM integrator will be responsible for re-evaluating the end product (including the transmitter) and obtaining a separate FCC authorization.
This device is intended only for OEM integrators under the following conditions: (For module device use)
The transmitter module may not be co-located with any other transmitter or antenna.
As long as conditions above are met, further transmitter test will not be required. However, the OEM integrator is still responsible for testing their end-product for any additional compliance requirements required with this module installed.
Cet appareil est conçu uniquement pour les intégrateurs OEM dans les conditions suivantes: (Pour utilisation de dispositif module)
Le module émetteur peut ne pas être coïmplanté avec un autre émetteur ou antenne.
Tant que les conditions ci-dessus sont remplies, des essais supplémentaires sur l'émetteur ne seront pas nécessaires. Toutefois, l'intégrateur OEM est toujours responsable des essais sur son produit final pour toutes exigences de conformité supplémentaires requis pour ce module installé.
IMPORTANT NOTE:
In the event that these conditions can not be met (for example certain laptop configurations or co-location with another transmitter), then the Canada authorization is no longer considered valid and the IC ID can not be used on the final product. In these circumstances, the OEM integrator will be responsible for re-evaluating the end product (including the transmitter) and obtaining a separate Canada authorization.
NOTE IMPORTANTE:
Dans le cas où ces conditions ne peuvent être satisfaites (par exemple pour certaines configurations d'ordinateur portable ou de certaines co-localisation avec un autre émetteur), l'autorisation du Canada n'est plus considéré comme valide et l'ID IC ne peut pas être utilisé sur le produit final. Dans ces circonstances, l'intégrateur OEM sera chargé de réévaluer le produit final (y compris l'émetteur) et l'obtention d'une autorisation distincte au Canada.
End Product Labeling
The product can be kept as far as possible from the user body or set the device to lower output power if such function is available. The final end product must be labeled in a visible area with the following: “Contains IC:10954A-RGP0175.
Plaque signalétique du produit final
L'appareil peut être conservé aussi loin que possible du corps de l'utilisateur ou que le dispositif est réglé sur la puissance de sortie la plus faible si une telle fonction est disponible. Le produit final doit être étiqueté dans un endroit visible avec l'inscription suivante: "Contient des IC:10954A-RGP0175.
Manual Information To the End User
The OEM integrator has to be aware not to provide information to the end user regarding how to install or remove this RF module in the user’s manual of the end product which integrates this module.
The end user manual shall include all required regulatory information/warning as show in this manual.
Manuel d'information à l'utilisateur final
L'intégrateur OEM doit être conscient de ne pas fournir des informations à l'utilisateur final quant à la façon d'installer ou de supprimer ce module RF dans le manuel de l'utilisateur du produit final qui intègre ce module.
Le manuel de l'utilisateur final doit inclure toutes les informations réglementaires requises et avertissements comme indiqué dans ce manuel.
Battery Information
- M/N(型號): 2670155
- Capacity(電池容量): 3.7V, 4170mAh, 15.43Wh
- Scan QR code for battery details

FCC ID:2AAFM-RGP0175(無線模組)
FCC ID:2AAFM-RGP0146A(加密狗)
IC:10954A-RGP0175(無線模組)
IC:10954A-RGP0146 (網卡)
M/N(型號):RGP0176
額定值(電壓電流):5V
© 2025-2026 CORSAIR MEMORY, Inc. All rights reserved. CORSAIR and the sails logo are registered trademarks of CORSAIR in the United States and/or other countries. All other trademarks are the property of their respective owners. Product may vary slightly from those pictured.