It’s fairly easy to change your Wi-Fi password even if you’re not tech savvy, though the degree of difficulty for this task will depend on your setup. For this article we are using a cable modem connected to a wireless router, which is what we recommend for the best wireless experience in your home. Every router manufacturer has a slightly different process for changing the Wi-Fi password, but we will boil down the steps that should be applicable to most routers. These are the steps you should follow if you forgot your password and you need to reset it, but they could also apply to setting up a new router for the first time as well.
For this article we are using a Netgear Nighthawk router, so even though the information below is specific to that router, we will include information for other router manufacturers too. Note there will also be an app you can download to change your password, but we are not covering using an app in this article.
How to Reset Your Router
If you forgot your current password and need to change it, you need to reset your router. Every router has a recessed button the back of it that will wipe all setting and restore it to factory condition. Use a paperclip or the tip of a pen to press the button for ~10 seconds until you see its lights flashing, then wait a minute or two for the router to come back online. This process is wiping all saved settings and restoring the router to how it was when it was brand new with everything set to factory defaults.
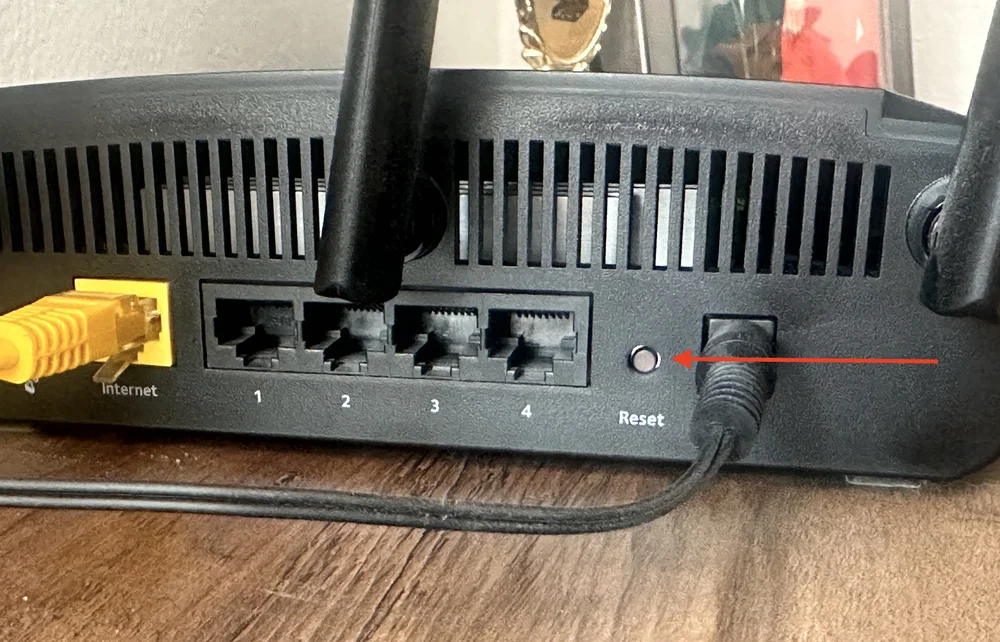
Every router has a recessed button on the back that has to be pressed for a few seconds to reset the device to factory settings.
Look at the Bottom (or Back) of Your Router
Once the router has been reset and is restored to factory condition, you will need to connect to it in order to change the password. For a Netgear router, it comes pre-configured with a single network name that combines both the 2.4GHz and 5GHz bands into one Wi-Fi network, and it has a preset password too. This is the case for most consumer routers today, so if you look on the bottom (or back) of the router it will show you the preset network name and password. Once you connect to this network using the supplied password, you will have access to both the router itself and the Internet.
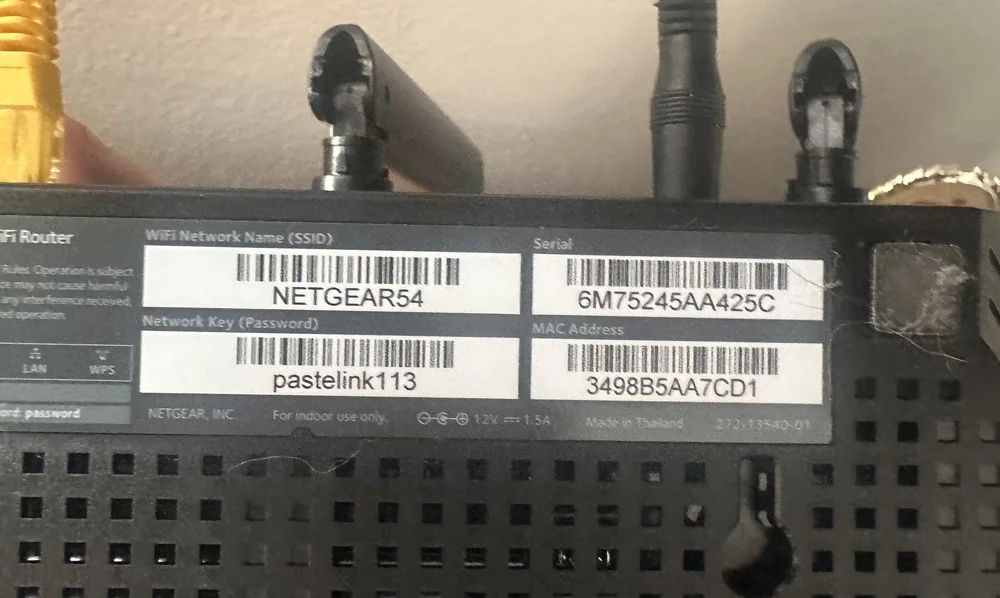
This is the default network name and password set by Netgear for this particular router, but you can change it.
If there is not a sticker on your router with a pre-configured network name, view the list of available networks and look for two networks with the name of your router manufacturer and no security on them at all and connect to one of those. It could be Asus5G, Netgear54, etc. You will know there is no security as the other network names will have a padlock icon next to them, but the two from your router will have nothing, or be listed as "unsecured."
Once you’ve connected to the router, either by using the pre-configured network name and password, or by connecting to a generic-sounding network without any security (as it was erased when you reset the router) you can go about changing the password.
Connect to the Router Interface
It goes without saying that to change your router’s settings you have to be connected to it, either via an Ethernet cable or wirelessly. One you’ve connected to one of the available Wi-Fi networks from the previous step, you now need to connect to the router's backend interface to make changes to its settings. This area sits behind a username/password for obvious reasons, and to access it you will have to type an address into a web browser. The most common addresses include:
- 192.168.1.1
- 192.168.0.1
Those are IP addresses a router will use on a home network, and those two addresses will work for most routers on the market today. However, some manufacturers have made it more user friendly by translating those IP addresses into more traditional site names. For Netgear it is:
- Routerlogin.net
- Routerlogin.com
- For an Asus router it is: router.asus.com
- For a TP-Link router it is: tplinkwifi.net
If you have a router that is from a different company, use Google to find the router address and type it into your web browser.
Once you connect to one of those addresses you will see a wizard appear that will guide you through the process of configuring the router and changing the Wi-Fi password.
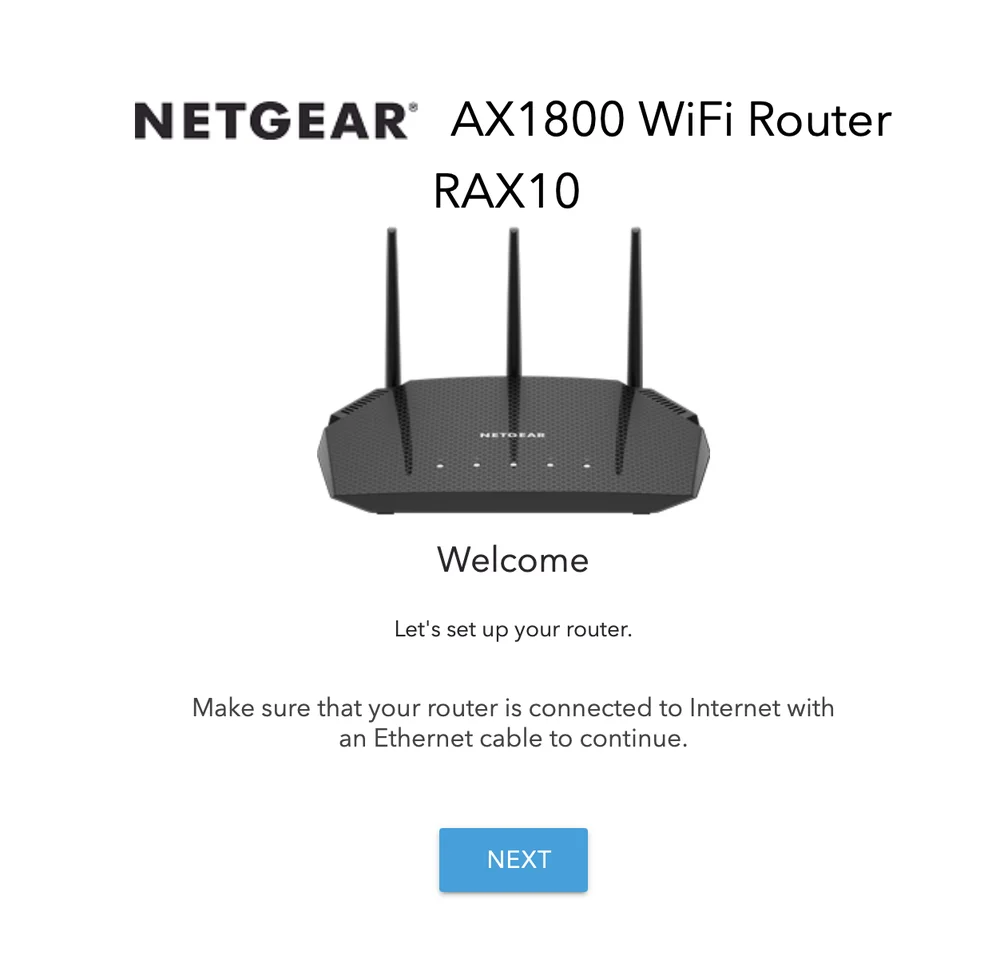
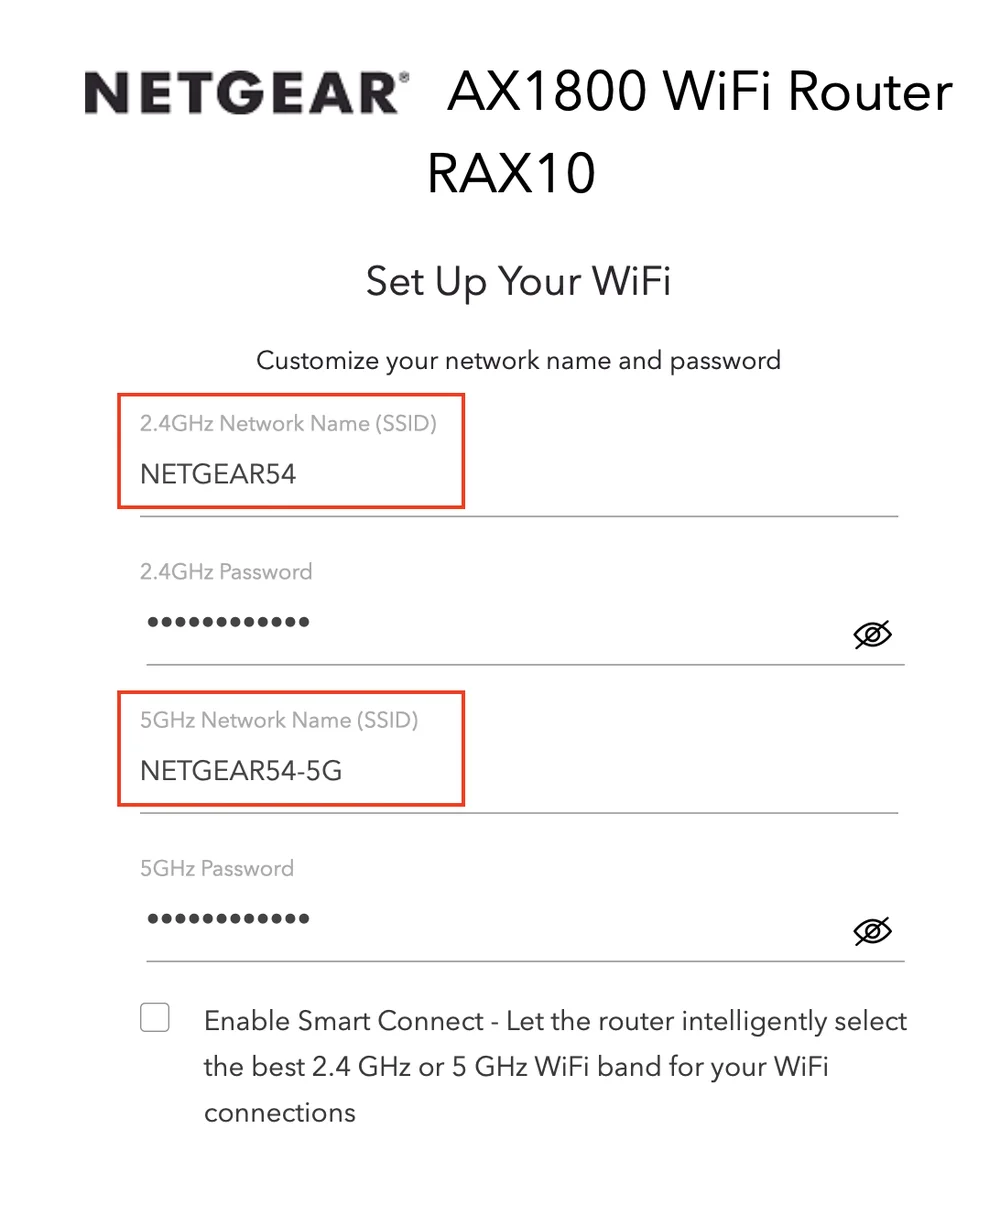
Once you've connected to the backend of your router to change its settings you will see a variation of this wizard appear.
Let’s Change Your Password
Once you have connected to your router through a web browser it will guide you through the process of configuring the router and changing your password. The steps usually include:
- Setting a password for access to the router itself, with the username typically being “admin.” This prevents neighbors or people close enough to connect to your Wi-Fi from accessing the settings area of your router. The default username/password is almost aways admin/admin for this.
- Changing the names of the available networks, also known as SSID. These are the names you see on your device when connecting to Wi-Fi.
- Changing the passwords for your networks.
- Choosing if you want the router to combine your networks into one name or SSID (see more on this below under SmartConnect).

Et voila - the wizard will show you available Wi-Fi networks and let you change their names and passwords.
Things to Consider when Setting Up Your Router
Naming Your Network(s)
The name you give to your networks can be anything you want it to be, and if you live in an apartment or condo your neighbors will see it on their devices, so go crazy but be respectful. You can also choose to hide a network name, which allows you to connect to it by typing in the name of it when connecting for the first time, which is a good security measure if you’re the cautious type. It’s usually labeled SSID Broadcast or something similar, with SSID being the name of your network. You will have to manually connect to it as the name will not appear in the list of accessible networks.
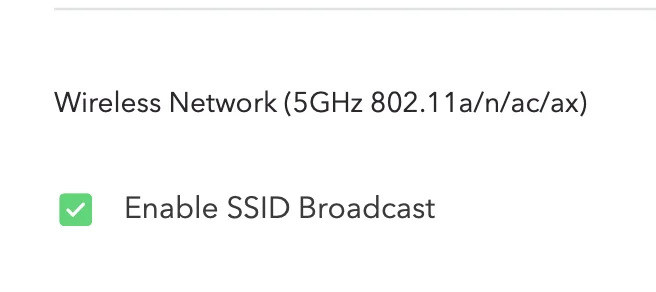
You can choose the broadcast the name of your Wi-Fi network to nearby devices, which makes connecting to it easier versus having the name hidden and having to do it manually.
Creating a Guest Network
Some routers give you the option of creating a 2.4GHz “Guest network” which can be used if you’re an Airbnb host or a similar situation where you want people to have access to your Wi-Fi but not be able to connect to the network you are using.
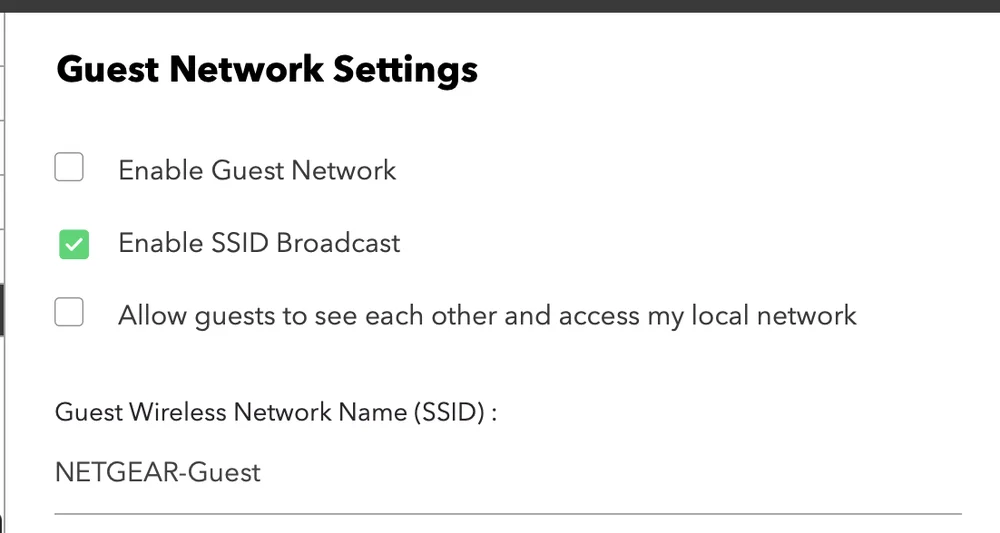
Most routers let you enable a Guest Network, which usually resides on the slower 2.4GHz band.
A Quick Note About Dual-Band Routers
In the olden days consumer Wi-Fi routers offered just one band of wireless access, which was 2.4GHz. This is essentially a block of the wireless spectrum that was opened up for consumer access. This band of Wi-Fi has evolved over the years to offer more bandwidth, going from 11Mb/s to 600Mb/s eventually. The benefit of 2.4GHz is that it has great range and can penetrate walls, but it is not very fast. This is the band used by a lot of low-level consumer devices that need wireless internet, such as security cams, baby monitors, household appliances, etc.
Given the limitations of 2.4GHz, eventually the 5GHz band was opened up for consumers with twice the bandwidth at 1200Mb/s for higher transfer rates and support for more devices. Most routers these days are dual-band in that they offer both 2.4GHz for older devices and 5GHz for newer devices. The 5GHz band offers much higher transfer rates but over a shorter distance, and it can’t penetrate walls very well. However, it offers more channels than 2.4GHz, so there’s less of a chance of interference from other devices, so in general if you want fast Internet, use 5GHz.
There are also tri-band routers these days, which are still 2.4GHz and 5GHz, but there are more channels on the 5GHz band, so they support more devices than traditional 5GHz. These routers offer three separate networks: 2.4GHz, and two 5GHz bands/networks.
A dual-band router offers both 2.4GHz and 5GHz networks.
A Note About SmartConnect
A lot of routers offer a feature called SmartConnect that combines the 2.4GHz and 5GHz bands into one network, and then decides on its own how to handle traffic and connected devices between them. This means you have two bands available, but only one network is listed. This makes getting connected extremely simple no matter which devices you have, and if you have a mix of older 2.4Ghz devices and newer 5GHz devices, you might appreciate it, especially if you prioritize a simple setup process for devices over outright performance.
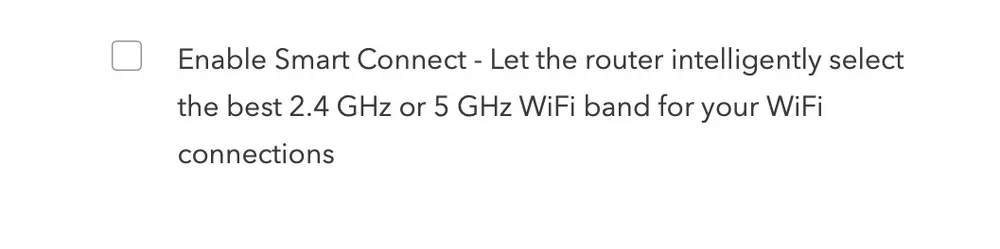
That said, if you’re concerned at all about performance, it’s best to keep your 2.4GHz and 5GHz networks separate and connect each appropriate device to the right network. The SmartConnect service might connect your modern phone to the 2.4GHz network without you knowing about it, which would result in slower performance.
Final thoughts
Changing your Wi-Fi password isn’t too difficult if you follow the steps above, and we’ll repeat them here for people who scrolled down for the conclusion.
- Reset your router by pressing the button on the back with a paperclip.
- Access the pre-configured network printed on the router itself.
- Log in to the router interface.
- Use the wizard to navigate the setup menu and change your Wi-Fi password(s).
If you ever need to reset your password in the future, just login to your router and either use the wizard provided or do it manually.
JOIN OUR OFFICIAL CORSAIR COMMUNITIES
Join our official CORSAIR Communities! Whether you're new or old to PC Building, have questions about our products, or want to chat about the latest PC, tech, and gaming trends, our community is the place for you.