INSTRUKCJA | SZYBKI PRZEWODNIK
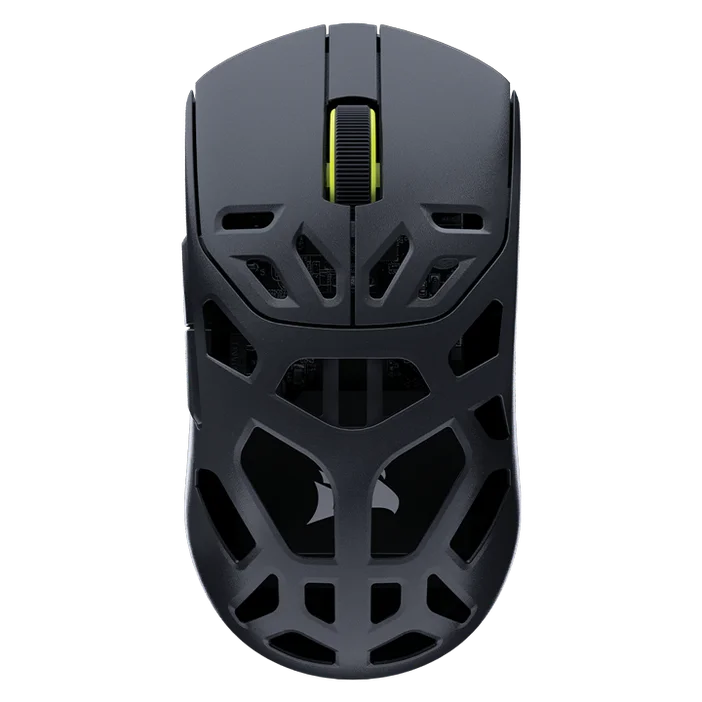
SABRE v2 PRO WIRELESS MG
MYSZ GAMINGOWA ZE STOPU MAGNEZU
ŁADOWANIE MYSZY
WAŻNE: Przed pierwszym użyciem myszy SABRE v2 PRO należy ją całkowicie naładować. Aby uzyskać najlepsze wrażenia, należy zaktualizować oprogramowanie sprzętowe za pośrednictwem CORSAIR WEB HUB.
Podłącz mysz do wolnego portu USB 2.0 lub 3.X w komputerze za pomocą KABLA USB DO ŁADOWANIA/PRZESYŁANIA DANYCH (L).
Kontrolki pod ŚRODKOWYM POKRĘTŁEM DO KLIKANIA / PRZEWIJANIA (C) myszy zaświecą się zgodnie ze stanem akumulatora i zaczną świecić ciągłym zielonym światłem po zakończeniu ładowania.
WYGLĄD MYSZY
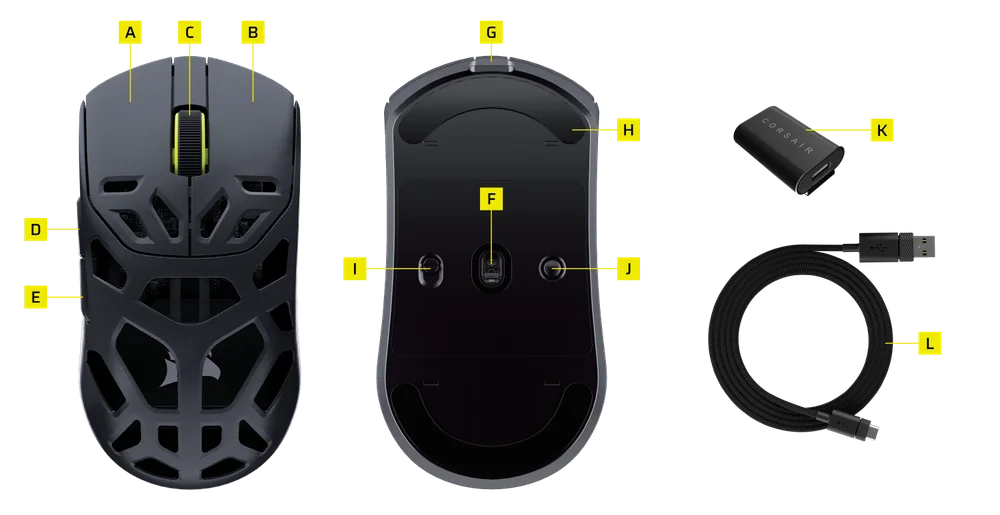
- LEWY PRZYCISK MYSZY
- PRAWY PRZYCISK MYSZY
- KLIKNIĘCIE ŚRODKOWYM PRZYCISKIEM / KÓŁKO PRZEWIJANIA
- PRZYCISK DO PRZODU
- PRZYCISK DO TYŁU
- CZUJNIK OPTYCZNY MARKSMAN S
- PORT USB DO ŁADOWANIA I TRANSMISJI DANYCH
- ŚLIZGACZE W 100% Z PIERWOTNEGO UPE
- PRZEŁĄCZNIK ZASILANIA I TRYBU BEZPRZEWODOWEGO
- PRZYCISK DPI & PRZYCISK PAROWANIA BLUETOOTH (3 S)
- ODBIORNIK BEZPRZEWODOWY USB
- PRZEWÓD USB DO ŁADOWANIA I TRANSMISJI DANYCH
KONFIGURACJA ŁĄCZNOŚCI BEZPRZEWODOWEJ 2,4 GHz
- Podłącz BEZPRZEWODOWY ODBIORNIK USB (K) do PRZEWODU USB DO ŁADOWANIA I TRANSMISJI DANYCH (L), drugą wtyczkę przewodu włóż do dostępnego portu USB 2.0 lub 3.x na panelu przednim komputera lub do pobliskiego portu USB.
- Włącz mysz, przełączając PRZEŁĄCZNIK TRYBU ZASILANIA/TRYBU BEZPRZEWODOWEGO (I) na łączność bezprzewodową 2,4 GHz.
- Wskaźnik LED pod ŚRODKOWYM POKRĘTŁEM DO KLIKANIA/PRZEWIJANIA (C) zaświeci się na zielono po pomyślnym nawiązaniu połączenia z odbiornikiem.
KONFIGURACJA BLUETOOTH
Łączność bezprzewodowa Bluetooth jest najlepsza do codziennej pracy na komputerze i sprawnej obsługi aplikacji biurowych.
- Zainicjuj parowanie Bluetooth w produkcie zgodnym ze standardem Bluetooth 4.0 lub nowszym.
- Włącz mysz, przełączając PRZEŁĄCZNIK TRYBU ZASILANIA/TRYBU BEZPRZEWODOWEGO (I) na łączność bezprzewodową Bluetooth.
- Dioda LED pod ŚRODKOWYM POKRĘTŁEM DO KLIKANIA/PRZEWIJANIA (C) będzie migać na niebiesko, a po podłączeniu zacznie świecić ciągłym niebieskim światłem.
- Jeśli urządzenie połączone przez Bluetooth wymaga ponownego połączenia lub wymiany, najpierw przełącz tryb Bluetooth. Przytrzymaj przycisk DPI & Przycisk parowania Bluetooth (J) przez 3 sekundy lub do momentu, gdy wskaźnik LED zacznie migać na niebiesko, aby przejść do trybu parowania BT.
* SABRE v2 PRO WIRELESS MG można sparować tylko z jednym urządzeniem. Jeśli chcesz dokonać parowania z innym urządzeniem, wejdź w tryb ponownego parowania, aby zainicjować proces parowania.
WYBIERANIE PROFILI DPI
Możliwość szybkiej konfiguracji poprzez cykliczne przełączanie DPI.
- Naciśnij raz PRZYCISK DPI (J), aby przejść do następnego etapu DPI.
- Po przełączeniu na odpowiedni poziom DPI kontrolka na kółku myszy zamiga 3 razy, zmieniając kolor DPI na odpowiedni, a następnie zgaśnie.
- Aby przejść do następnego poziomiu DPI, powtórz powyższe kroki. Po przejściu przez 5 poziomów DPI nastąpi powrót do poziomu 1.
W CORSAIR WEB HUB dostępne są zaawansowane opcje konfiguracji.
STAN MYSZY I WSKAZANIA
Informacje o połączeniu bezprzewodowym i stanie akumulatora są przekazywane za pomocą kontrolek znajdujących się pod ŚRODKOWYM POKRĘTŁEM DO KLIKANIA/PRZEWIJANIA (C).
| STATUS DPI – GOTOWY | WSKAŹNIK LED |
| POZIOM 1 — 400 DPI | CZERWONY |
| POZIOM 2 — 800 DPI | NIEBIESKI |
| POZIOM 3 — 1200 DPI | ZIELONY |
| POZIOM 4 — 1600 DPI | ŻÓŁTY |
| POZIOM 5 — 2000 DPI | FIOLETOWY |
| STAN AKUMULATORA | WSKAŹNIK LED |
| Ładowanie baterii przy niskim poziomie naładowania | Pulsowanie na czerwono |
| Ładowanie baterii przy średnim poziomie naładowania | Pulsowanie na zielono |
| Akumulator w pełni naładowany | Zielone światło ciągłe |
| Poziom krytyczny, wymagane ładowanie | Pulsowanie na czerwono |
STEP-BY-STEP MOUSE SETUP GUIDE
Step 1 – Connect Your SABRE v2
A. Plug in the SABRE v2 PRO WIRELESS MG’s receiver via Type-C.
B. Make sure the power switch on the mouse is set to "2.4 GHz".
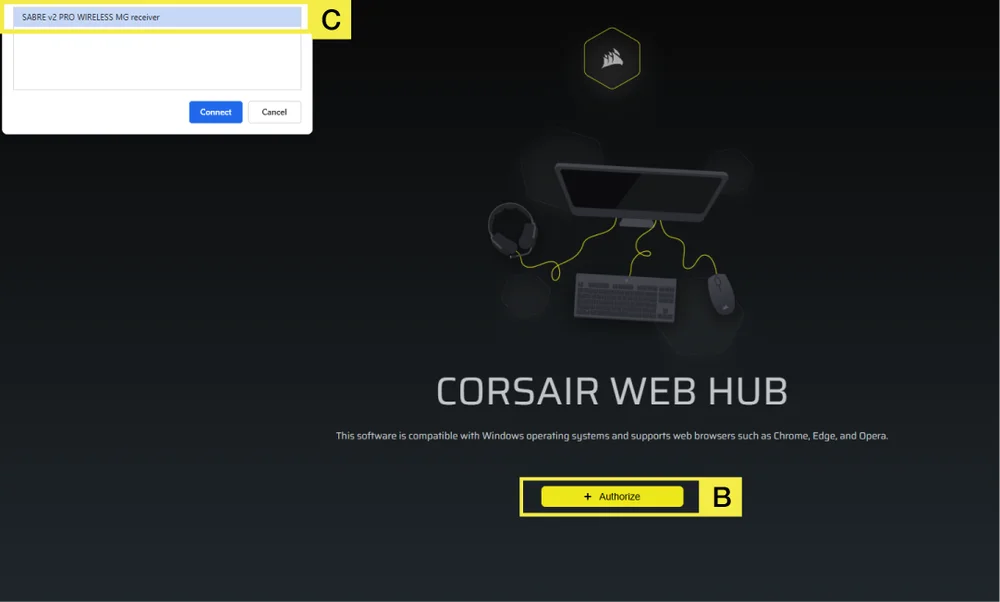
Step 2 – Open CORSAIR WEB HUB and Select the Mouse
A. Go to https://www.corsair.com/web-hub/index.html.
B. Click [Authorize].
C. Choose SABRE v2 PRO WIRELESS MG receiver.
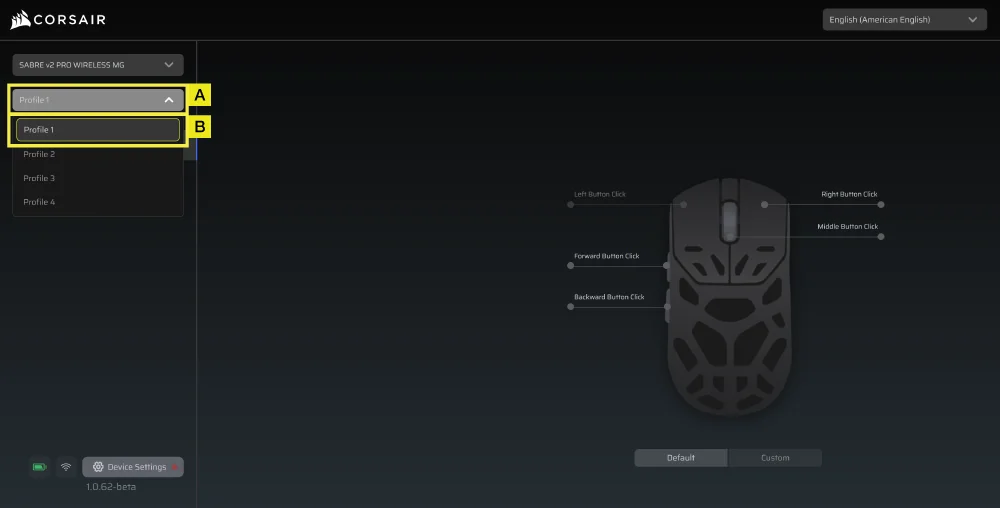
Step 3 – Create or Select a Profile
A. At the top-left, open the profile dropdown Menu.
B. Click the profile you want to edit (for example: “Profile 1”).
C. This profile will store your DPI, and button assignments.
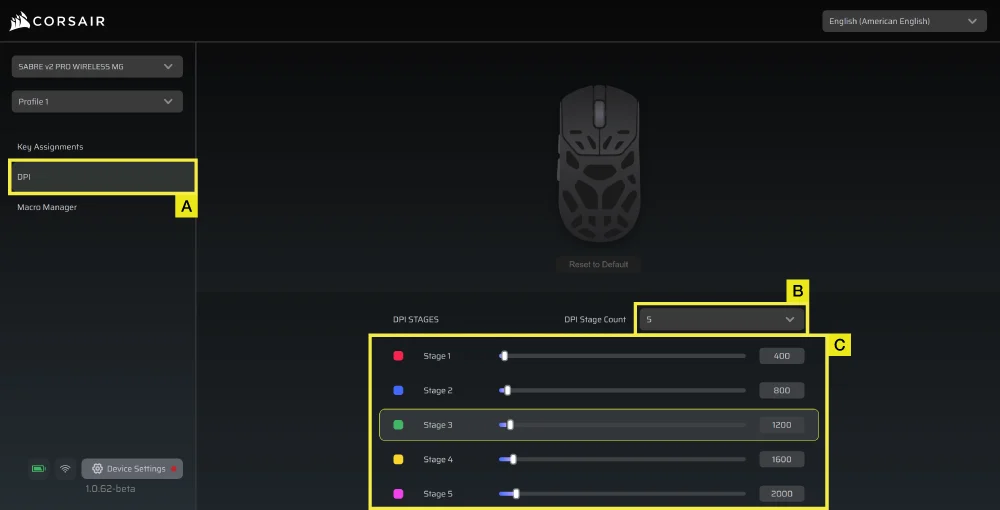
Step 4 – Set DPI Levels
A. Click [DPI] in the left sidebar.
B. Choose how many DPI stages you want (1~5).
C. Enable the DPI stages you want to use (for example, 800/1200/1600).
Recommended starting DPI:
- Desktop/general: 1200–1600 DPI
- FPS games: 800–1200 DPI
- MOBA/MMO: 1600–2400 DPI.
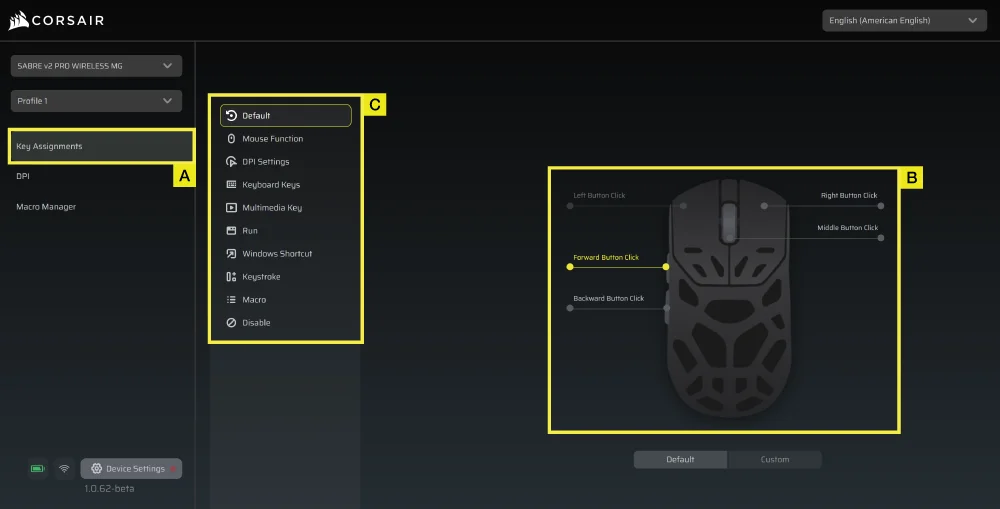
Step 5 – Remap Buttons (Actions / Key Assignments)
A. Click [Key Assignments] in the left sidebar.
B. Click the button on the mouse diagram you want to change.
C. Choose the Assignment Type:
- Keyboard (remap to a key like R, E, or P)
- Macro (record multiple keystrokes)
- etc.
D. Confirm the assignment and test it.
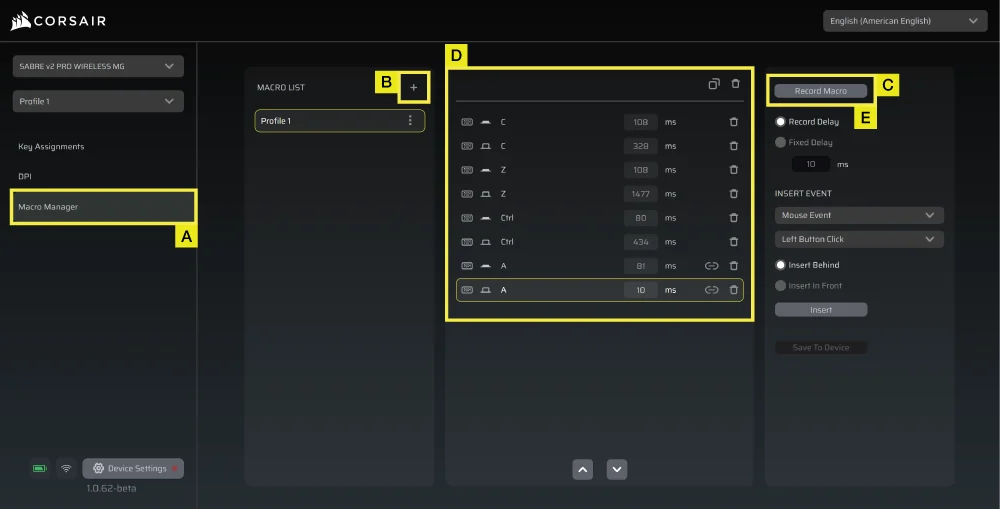
Step 6 – Set Macro Manager
A. Click [Macro Manager] in the left sidebar.
B. Click [ + ] to add a new Macro (For example: “Profile 1”).
C. Click [Record Macro] on the right.
D. Press the keyboard keys or mouse events you want to record.
E. Click [Record Macro] again to stop recording.
Step 7 – Insert Macro Events Manually
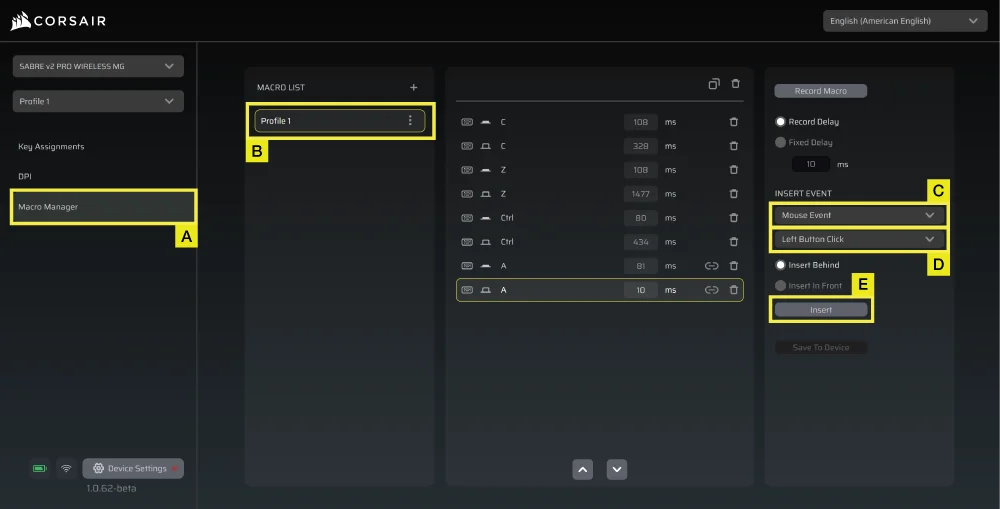
A. Click [Macro manager] in the left sidebar.
B. Choose the Macro you want to edit.
C. At the insert event bar, choose whether you want to insert keyboard or mouse events with the first dropdown menu.
D. Choose the event you want to insert with the second dropdown menu.
E. Click [Insert].
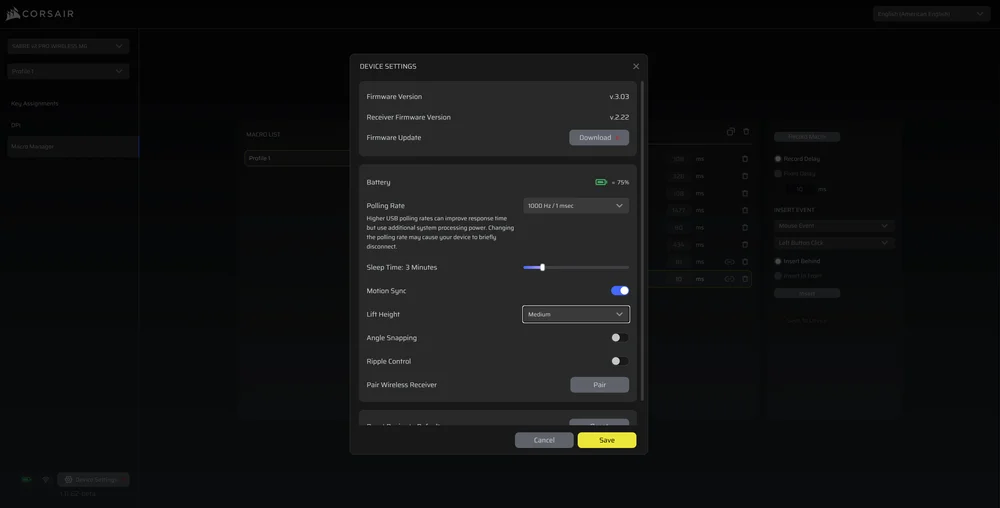
Step 8 – Device Setting
- Click Device Setting at bottom left.
- Device Settings.
- Battery – Wireless connectivity or battery status.

-
Polling Rate – Select [ 1000 Hz / 1 msec ] polling for 1000Hz polling.

- Sleep Time – Adjust time after mouse transitions to Sleep Mode.

-
Motion Sync – Aligns mouse movement data with USB polling intervals to deliver more consistent and stable cursor tracking.
- Lift Height – Sensor cut off height.

-
Angle Snapping – Smooths out mouse movement via sensor prediction when ON.
-
Ripple Control – Smooths mouse movement by filtering out small, unintended jitter at the cost of slightly reduced raw input precision.
-
Pair Wireless receiver – Pair or reset the wireless receiver.
-
Reset Device Default – Reset your Saber v2 Pro Ultralight Wireless to default setting.
Step 9 – Update Firmware
A. Click [Device Setting] at bottom left.
B. Click [Check for Updates] to ensure you are running the latest device firmware.
C. Follow the steps to update the firmware if needed.
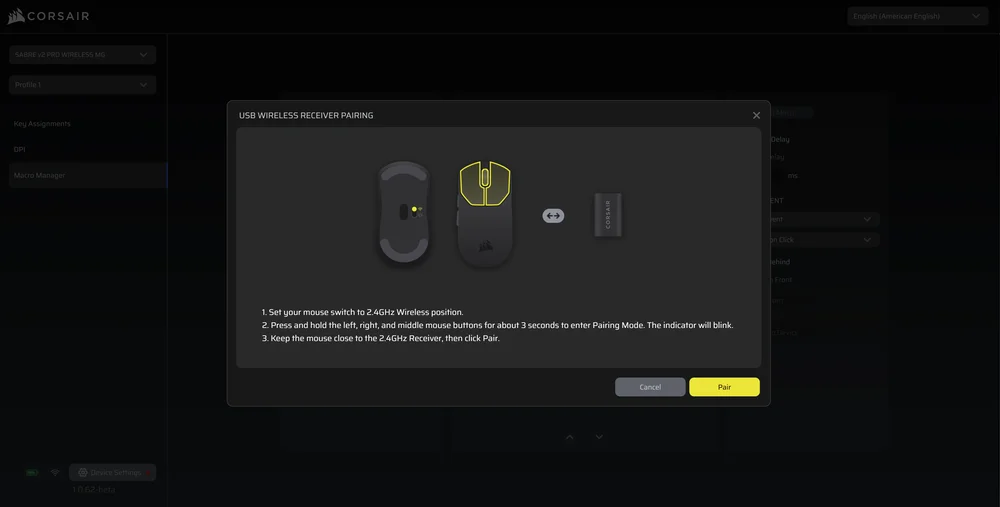
Step 10 – Pair Wireless Receiver
A. Click [Device Setting] at bottom left.
B. Click [Pair].
C. Follow the steps to pair the USB receiver.
INFORMACJE O WYJMOWANIU AKUMULATORA
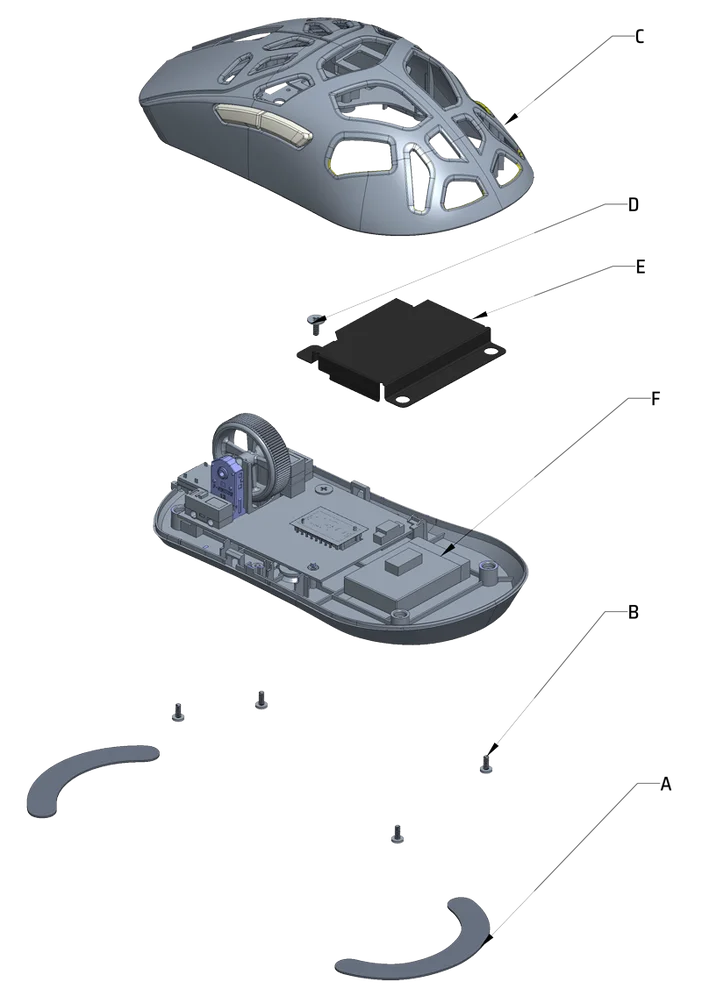
A: Remove feet x2
B: Remove screws x4
C: Disassemble top case sub assy
D: Remove screw x1
E: Remove battery cover
F: Remove battery
Ten produkt zawiera akumulator i należy przestrzegać zasad bezpieczeństwa w razie przeznaczenia produktu do usunięcia i recyklingu. Aby bezpiecznie wyjąć akumulator w celu przekazania go do recyklingu, należy wykonać ponumerowane czynności przedstawione na poniższych diagramach.
Firma CORSAIR MEMORY, Inc. zachęca klientów do przekazywania zużytych urządzeń elektronicznych oraz akumulatorów do recyklingu zgodnie z lokalnymi przepisami ustawowymi i wykonawczymi w tym zakresie.
INFORMACJE O AKUMULATORZE
- M/N (型號): TW 602030
- Pojemność (電池容量): 3,7 V, 300 mAh, 1,11 Wh
- Zeskanuj kod QR, aby uzyskać szczegółowe informacje o baterii

M/N(型號): RGP0184
Wartości znamionowe(電壓電流): 5 V
Nadajnik/odbiornik
M/N(型號): RGP0185
Parametry znamionowe(電壓電流): 5 V
FCC ID: 2AAFM-RGP0184 (mysz)
FCC ID: 2AAFM-RGP0185 (nadajnik/odbiornik)
IC: 10954A-RGP0184 (Mysz)
IC: 10954A-RGP0185 (nadajnik/odbiornik)

Moc dostarczana przez ładowarkę musi mieścić się w przedziale od min 2,5 W wymaganych przez sprzęt radiowy do maks. 10 W, aby osiągnąć maksymalną moc ładowania.
Aby uzyskać najlepszą wydajność, zaleca się ładowanie w zakresie temperatur 5°C–40°C (41°F–104°F).
INFORMACJE O PRAWACH AUTORSKICH I PRAWNE
© 2026 CORSAIR MEMORY, Inc. All rights reserved. CORSAIR and the sails logo are registered trademarks of CORSAIR in the United States and/or other countries. All other trademarks are the property of their respective owners. Product may vary slightly from those pictured.
