BLOG
How to Use XENEON EDGE as a Dashboard for Sim Racing
The CORSAIR XENEON EDGE is a versatile and dynamic device with a limitless number of potential uses. One of these uses is as a dashboard for sim racing, and there are two ways to do this: Via iCUE with our dedicated SimHub widget, or using it as a separate monitor. We’re going to detail both these methods for you here. Let’s go.
Option 1: XENEON EDGE SimHub Widget
To make life easier, we’ve made a dedicated widget that will display any dashboard in SimHub through a widget on the XENEON EDGE. The main benefit here is that like any widget, it can be resized so you can arrange it alongside other widgets.
- Make sure iCUE and SimHub are installed and fully updated.
- Open SimHub and iCUE.
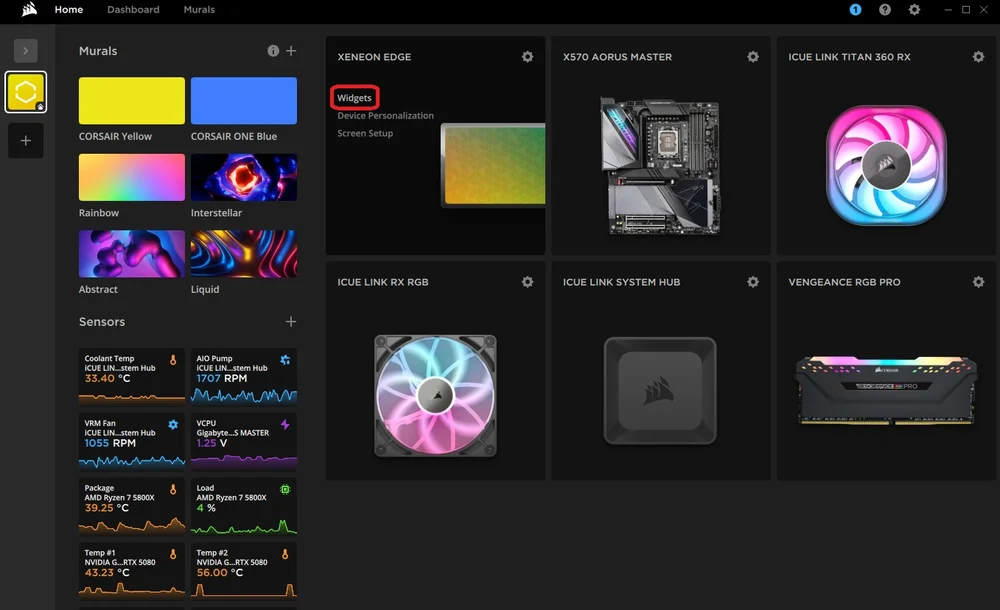
- From the iCUE home page hover over the XENEON EDGE module and click “Widgets”
- In here, toggle “Show iCUE Widgets” on and click the empty “+” box on the currently-blank preview.
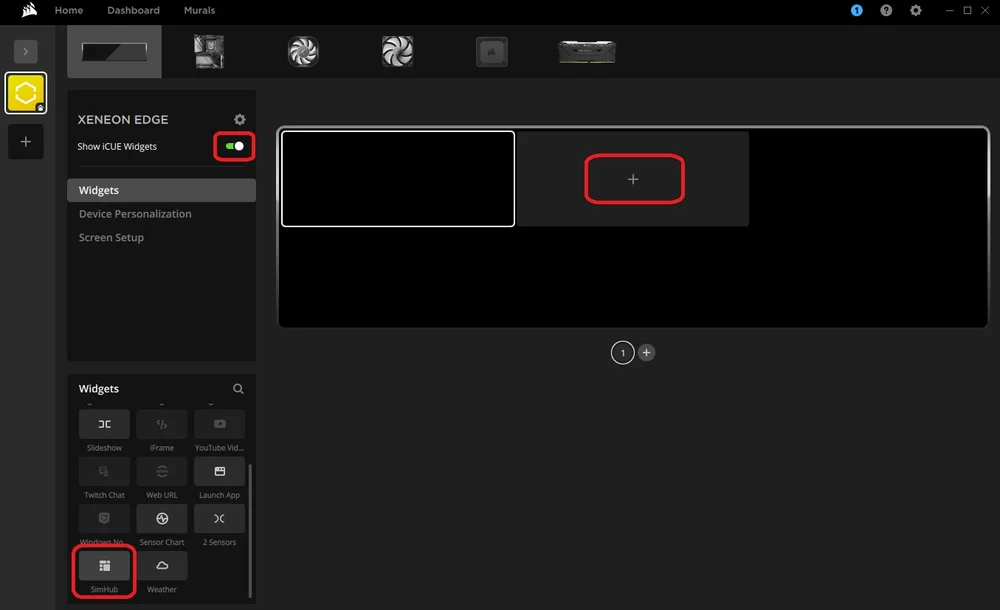
- Now scroll down in the menu on the bottom left until you find “SimHub” and click it.
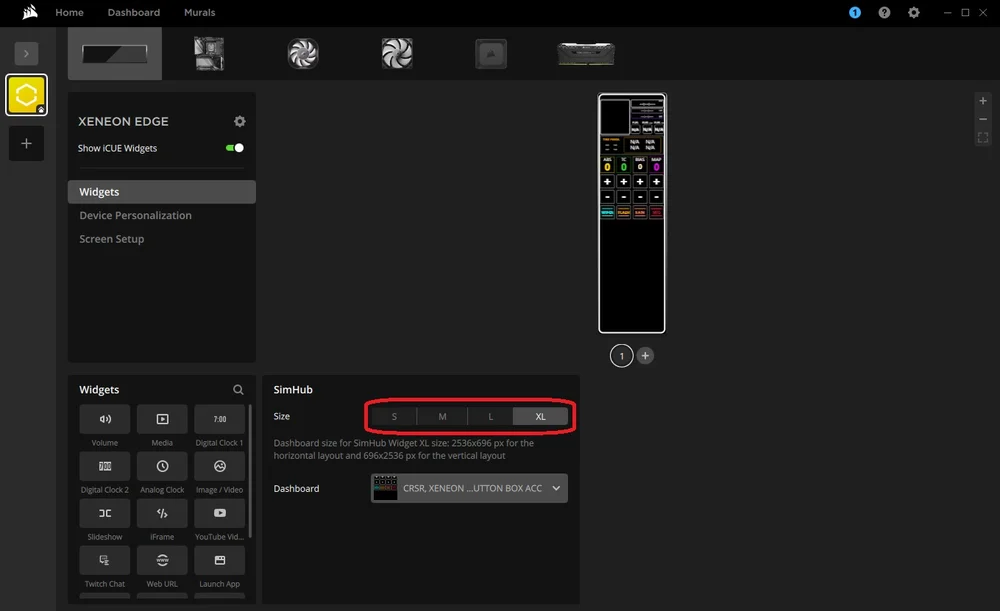
- After this, the widget will appear onscreen, and you can choose the size and which dashboard you want to use.
The size will depend entirely on which dashboard you’re using and which other widgets you’d like to display alongside it. You’ll notice that each size setting is accompanied by a specific resolution in iCUE so it fits perfectly. Take note of these if you decide to make or edit a dashboard in SimHub’s Dash Studio. (More on that later)
in order to give you guys a starting point, we've created a condensed dashboard that is sized specifically to fit the "Medium" widget size. Download it below.

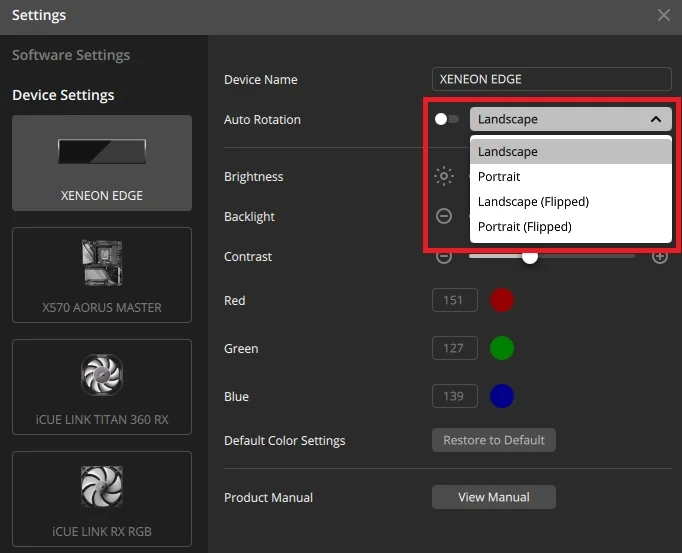
Additionally, depending on your chosen dashboard, positioning the XENEON EDGE vertically could be the superior orientation. Out of the box it will automatically change the orientation of the screen to match the orientation of the XENEON EDGE. Otherwise, you can manually change it by going into the settings, toggling “Auto Rotation” off, and select the preferred orientation from the dropdown menu.
Option 2: Using the XENEON EDGE as a Separate Monitor
Seeing as the XENEON EDGE can be used as an additional monitor, parking the dashboard for your favorite sim racing game here can a solution if you prefer not to use iCUE.
Head to the SimHub website and download the latest version of SimHub. Follow the prompts and install it on your system. After this is done, SimHub will open, and you’ll be able to setup the XENEON EDGE as the output.
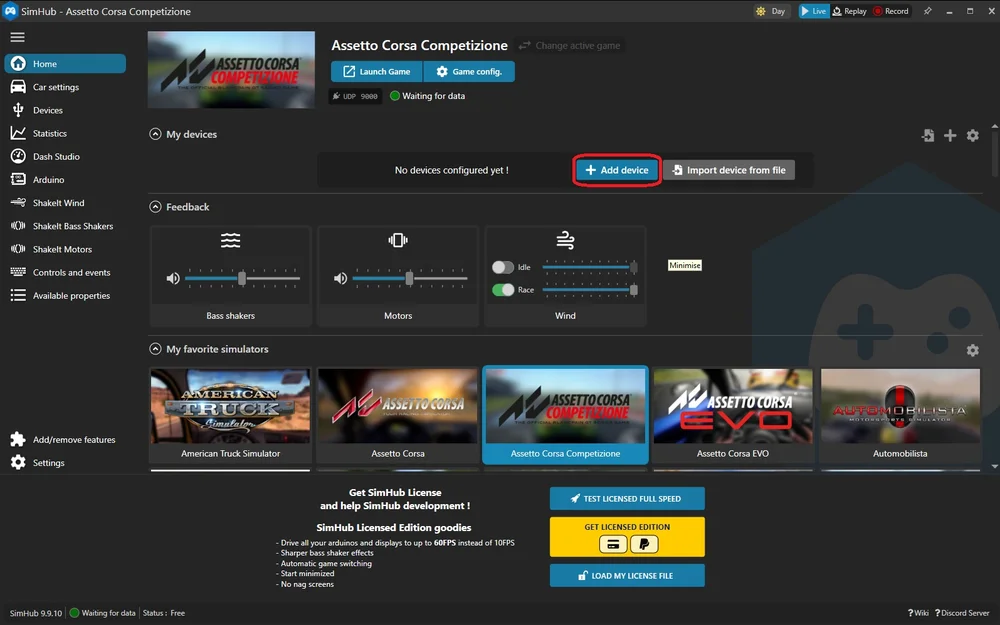
- From the SimHub home screen, you’ll see the “My devices” tab. Click the “Add device” button.
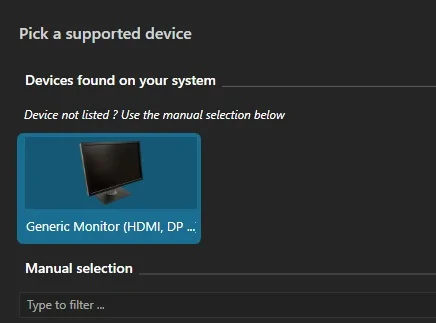
- Click “Generic Monitor”. This will open a menu that allows you to designate any of your connected monitors as the default location for the SimHub dashboard.
- Here you’ll see an approximation of your monitors and their relative positions. Select “Click to define target monitor”.

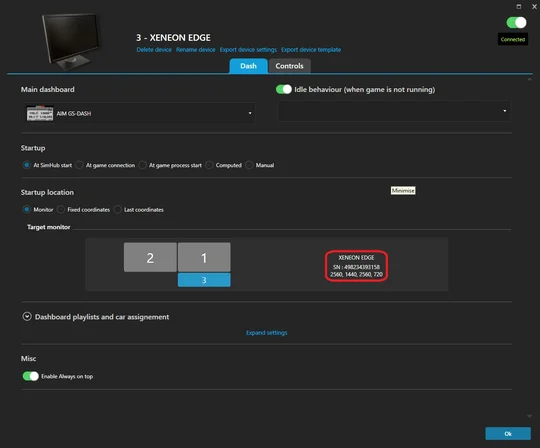
- This will open a window with that same monitor layout approximation. Click the long skinny one labelled “XENEON EDGE”.
Now SimHub knows to use the EDGE to display your dashboard. There are some additional settings here that allow you to control when and how the dashboard behaves on the XENEON EDGE. For example, to automatically run when you launch a certain game, or to use a different dash depending on which game you’re running.
How to Make a Dashboard for XENEON EDGE in SimHub
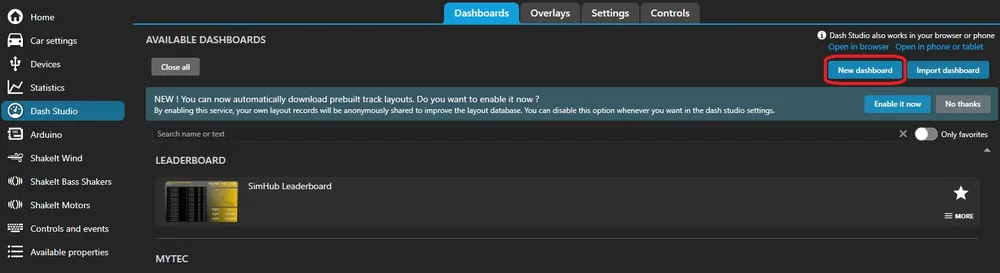
Remembering that dashboards are simply little applications that live on any screen, making a dashboard specifically for the XENEON EDGE works just like it does for any other monitor. Let’s head into the Dash Studio to start creating a new dashboard.
- In Sim Hub, click the “Dash Studio” tab from the menu on the left, then click “New dashboard” on the right. This will open the Dash Studio in a new window.
You will now be greeted with a new, blank template for creating a dashboard. However, due to the unconventional size and aspect ratio of the XENEON EDGE, we need to adjust this template.
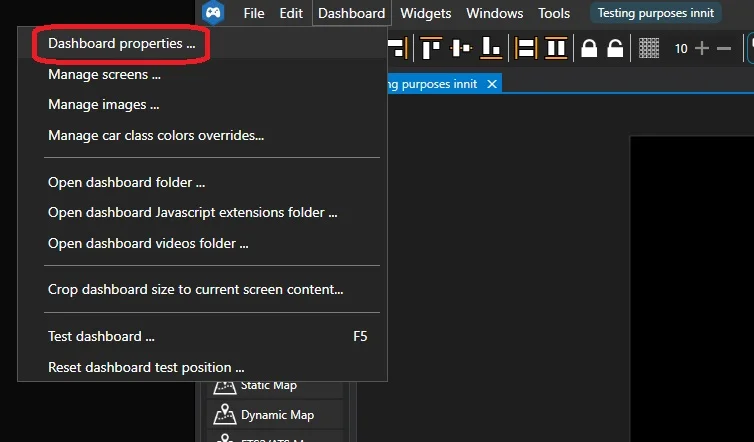
- Click “Dashboard” in the top left, then click “Dashboard properties …” from the sub menu that appears. This will open the “Dashboard Properties” window.
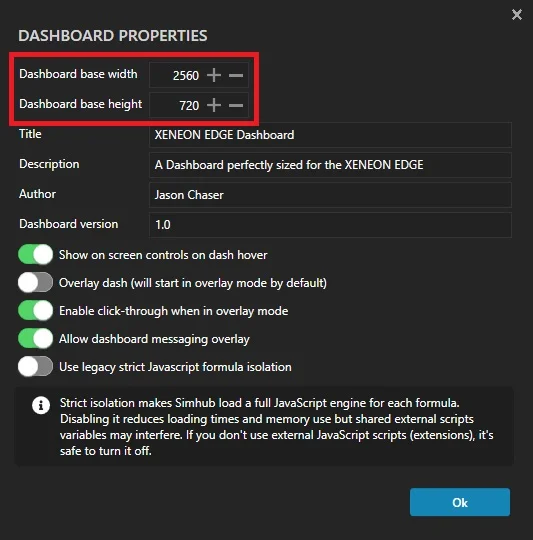
- Set the “Dashboard base width” to 2560.
- Set the “Dashboard base height" to 720.
- After this, give it a title, author, etc, and click the “Ok” button.
NOTE: If you intend to make a dashboard for use with the SimHub widget in iCUE, instead of via the XENEON EDGE as a monitor, the width and height considerations are different. They also differ depending on the size setting of the widget:
- SimHub Widget S Size: 840x344 (horizontal) or 696x416 (vertical).
- SimHub Widget M Size: 840x696 (horizontal) or 696x840 (vertical).
- SimHub Widget L Size: 1688x696 (horizontal) or 696x1688 (vertical).
- SimHub Widget XL Size: 2536x696 (horizontal) or 696x2536 (vertical).
Now your template is the perfect size for the XENEON EDGE and you can start adding things from the Toolbox on the left side of the screen to create your own custom dashboard. A great way to start is by selecting one of the pre-made dashboards from the Dash Studio Main menu.

Click the “MORE” button next to one of them, then click the “Edit Dashboard” option. This will open the dashboard in Dash Studio, and then you can change the size to match the XENEON EDGE using the steps above.
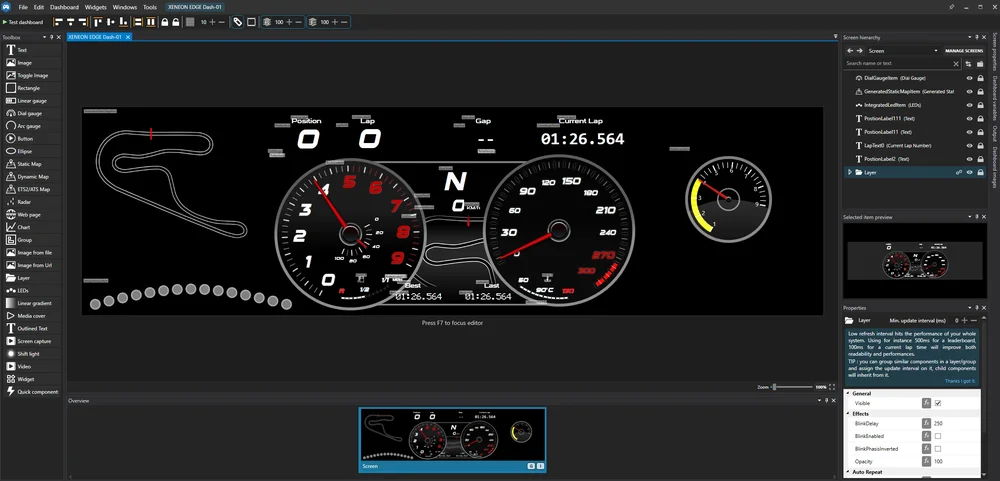
This will give you an idea of just how many options there are to creating a dashboard here, and the additional width of the XENEON EDGE allows for far more functionality and creativity than a typical 16:9 monitor.
Making a Button Box for XENEON EDGE
Owing to the 5-point capacitive touchscreen of the XENEON EDGE, it can pull double duty as a button box. A far more versatile button box than usual, too, as you can place buttons wherever you want and change it up depending on the game in question.
Creating a button box layout via Sim Hub can be a challenge, but it’s worth it. Button Boxes can be total gamechangers, giving you a handy and utilitarian interface, which is particularly useful because sim racing games have around 658493658943 different keybinds to control every exhaustive facet of the sim racing experience at the highest level. Don’t even get us started on flight sims.
We’ve made a template already for Assetto Corsa that you can use as a starting point. Due to the width of the XENEON EDGE, we found that it works best as a button box in a vertical orientation.
However, due to how Sim Hub profiles work, this template is not quite plug-and-play. If you download our profile, you’ll have to bind the inputs on the profile to the in-game keybinds. This is the case whether you make your own button box or use our template, as the binds work on a system/user level and cannot be transferred.
How to Connect Sim Hub Controls to in-game Keybinds
Using Assetto Corsa and our template button box profile as an example, here’s how to bind the button box to the in-game keybinds.
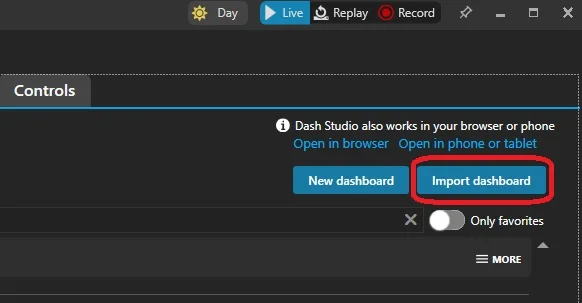
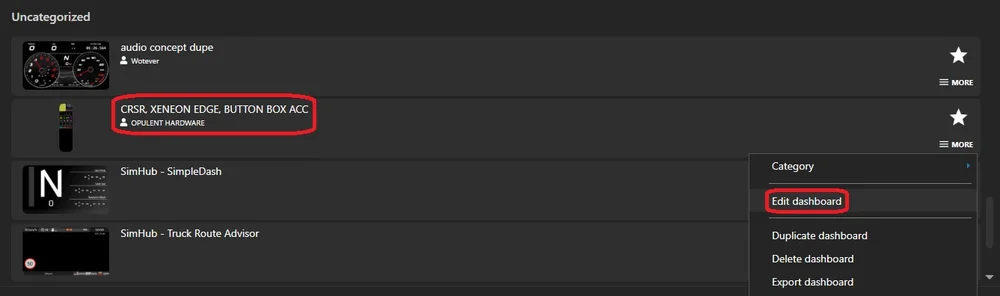
- Open Sim Hub and click the “Dash Studio” tab on the left. Then click the “Import Dashboard” button on the right and find where you downloaded our template.
- Once you’ve imported it, scroll down to find the profile. It will probably be in the “uncategorized” section. Click the “More” button, then select “Edit dashboard” from the drop-down menu. This will open the dashboard in Dash Studio.
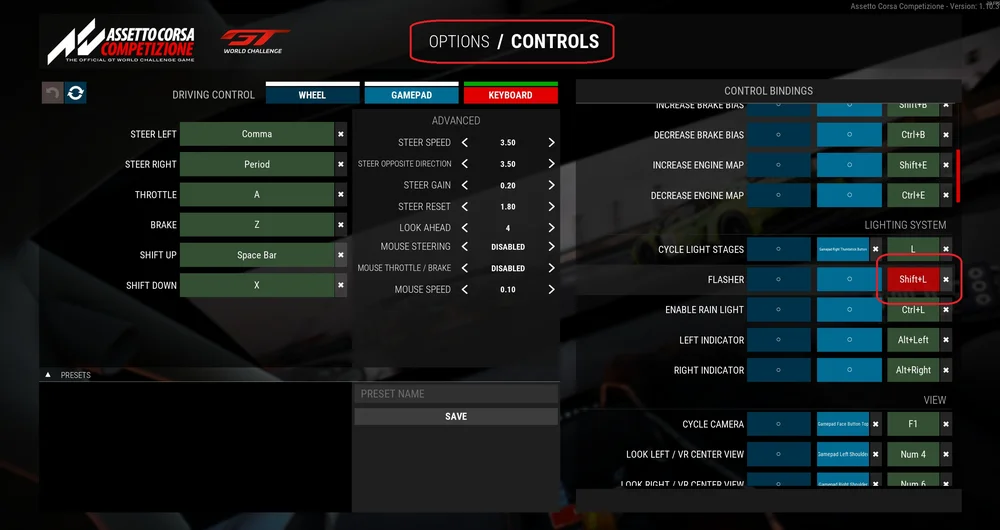
Here it might be handy to open the sim racing game in question and re-acquaint yourself with the keybinds. If you have a second monitor, put the game here so you can look back and forth between it and Sim Hub to make sure you get the binds right. Speaking of which:
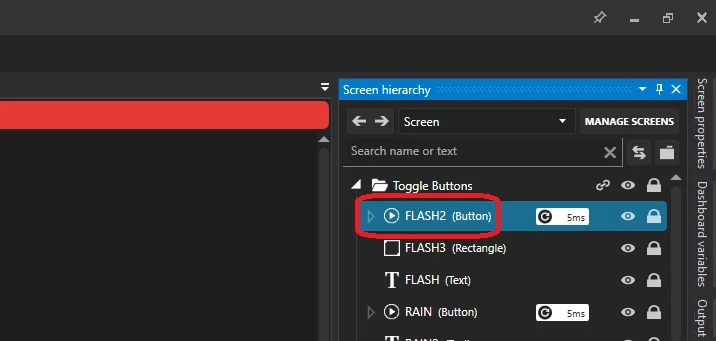
In the top right, you’ll see the “Screen Hierarchy” tab. This is akin to the “Layers” you might recognise from Photoshop. This means that there are basically limitless potential things that can live here. So, it’s a good idea to nest them all within folders so you can tidy up after yourself, like how we did in our example template.
- Click the chevron on the “Toggle Buttons” folder. This will open the folder and display all the buttons within. At this stage you can ignore anything that doesn’t have “(Button)” next to it.
- Clicking one of the Buttons will open the “Properties” tab below. In here, scroll down to the “Button” section and take heed of two options: “SimulateKey” which is a check box and “SimulatedKey” with allows you to simulate a key. It’s confusing, we know.
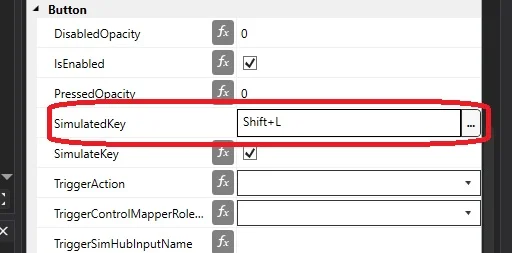
- Firstly, make sure “SimulateKey” is checked. This will make the button mimic a keystroke much like a macro.
- In “SimulatedKey” click the white space and then press the key, or combination of keys that is already bound to the setting in the game you’re setting this up for.
So, when you press the button on the button box, it will mimic the keystroke. As far as the game is concerned, that keystroke occurred as it would normally, so the action will occur. This is basically identical to a macro.
It’s worth mentioning here that if you decide to rebind one of these controls in game, the button in this Sim Hub profile won’t be addressed to the correct bind, and you’ll have to repeat these steps to assign it to the new in-game keybind.
产品注册
JOIN OUR OFFICIAL CORSAIR COMMUNITIES
Join our official CORSAIR Communities! Whether you're new or old to PC Building, have questions about our products, or want to chat about the latest PC, tech, and gaming trends, our community is the place for you.